


1.项目场景:
此代码主要用于检查自己的labelme转yolo后的txt文件是否正确,想要在训练之前验证转化格式是否正确,可以试一下这个代码。
2.代码详情
import os
import cv2
import numpy as np
import matplotlib.pyplot as plt
import glob

# Configuration settings
img_path = "keypoint1/IMG_20240418_175650.jpg"
class_list = ["Seed"]
class_color = [(255, 0, 0), (0, 255, 0), (0, 0, 255), (255, 255, 0)]
# Keypoint connection pairs (index of the keypoints to connect)
connections = [(0, 1), (0, 2), (0, 3),(0, 4),(0, 5), (0, 6), (0, 7),(0, 8), (0, 9), (0, 10),(0, 11), (0, 12), (0, 13)]  # Example indices, adjust as needed
# Colors for each connection
connection_colors = [
    (255, 0, 0),    # Red
    (0, 255, 0),    # Green
    (0, 0, 255),    # Blue
    (255, 255, 0),  # Yellow
    (255, 0, 255),  # Magenta
    (0, 255, 255),  # Cyan
    (128, 0, 0),    # Maroon
    (0, 128, 0),    # Green (Dark)
    (0, 0, 128),    # Navy
    (128, 128, 0),  # Olive
    (128, 0, 128),  # Purple
    (0, 128, 128),  # Teal
    (255, 128, 0),  # Orange
    (128, 255, 0),  # Lime
    (0, 128, 255),  # Sky Blue
    (255, 0, 128),  # Pink
    (128, 0, 255),  # Violet
    (255, 128, 128),# Light Salmon
    (128, 255, 128),# Light Green
    (128, 128, 255) # Light Blue
]

def read_image(img_path):
    return cv2.imread(img_path)

def get_label_data(img_path):
    yolo_txt_path = img_path.replace('jpg', 'txt')
    with open(yolo_txt_path, 'r') as f:
        lines = [x.strip() for x in f.readlines()]
    return np.array([x.split() for x in lines], dtype=np.float32)


def draw_bounding_boxes_and_keypoints(img, labels):
    img_copy = img.copy()
    h, w = img_copy.shape[:2]
    keypoints = []  # Store keypoints for drawing connections

    for id, l in enumerate(labels):
        # Existing code for bounding box and text
        label_id, cx, cy, bw, bh = l[0:5]
        cx, cy, bw, bh = cx * w, cy * h, bw * w, bh * h
        xmin, ymin, xmax, ymax = int(cx - bw / 2), int(cy - bh / 2), int(cx + bw / 2), int(cy + bh / 2)
        cv2.rectangle(img_copy, (xmin, ymin), (xmax, ymax), class_color[int(label_id)], 2)
        cv2.putText(img_copy, class_list[int(label_id)], (xmin, ymin - 10), cv2.FONT_HERSHEY_SIMPLEX, 2,
                    class_color[int(label_id)], 2)

        # Draw keypoints and collect their coordinates
        local_keypoints = []
        for i in range(5, len(l), 3):
            px, py = int(l[i] * w), int(l[i + 1] * h)
            if l[i + 2] > 0:  # visibility check, if needed
                cv2.circle(img_copy, (px, py), 10, (0, 0, 255), -1)
                local_keypoints.append((px, py))
        keypoints.append(local_keypoints)

    # Draw connections based on predefined connections and colors
    for i, points in enumerate(keypoints):
        for j, (start, end) in enumerate(connections):
            if start < len(points) and end < len(points):
                cv2.line(img_copy, points[start], points[end], connection_colors[j], 2)

    return img_copy

def display_image(img):
    plt.figure(figsize=(15, 10))
    plt.imshow(img[:, :, ::-1])
    plt.axis('off')
    plt.show()

def save_image(img, filename):
    cv2.imwrite(filename, img)

def main():
    img = read_image(img_path)
    labels = get_label_data(img_path)
    img_with_annotations = draw_bounding_boxes_and_keypoints(img, labels)
    display_image(img_with_annotations)
    save_image(img_with_annotations, './annotated_image.png')

if __name__ == "__main__":
    main()
3.需要修改部分
img_path = "keypoint1/IMG_20240418_175650.jpg"
class_list = ["Seed"]
class_color = [(255, 0, 0), (0, 255, 0), (0, 0, 255), (255, 255, 0)]
1.图片地址,确保对应的txt文件也在同一个文件夹下
2.框的种类
3.框的颜色
            if px > 0:  # Adjust condition based on actual needs
                cv2.circle(img_copy, (px, py), 10, (0, 0, 255), -1)
4.(0, 0, 255)是你想要的点的颜色
connections = [(0, 1), (0, 2), (0, 3),(0, 4),(0, 5), (0, 6), (0, 7),(0, 8), (0, 9), (0, 10),(0, 11), (0, 12), (0, 13)] # Example indices, adjust as needed
5.上面是你想要的连接 我是将所有点都连接在0点上了
4.代码运行效果
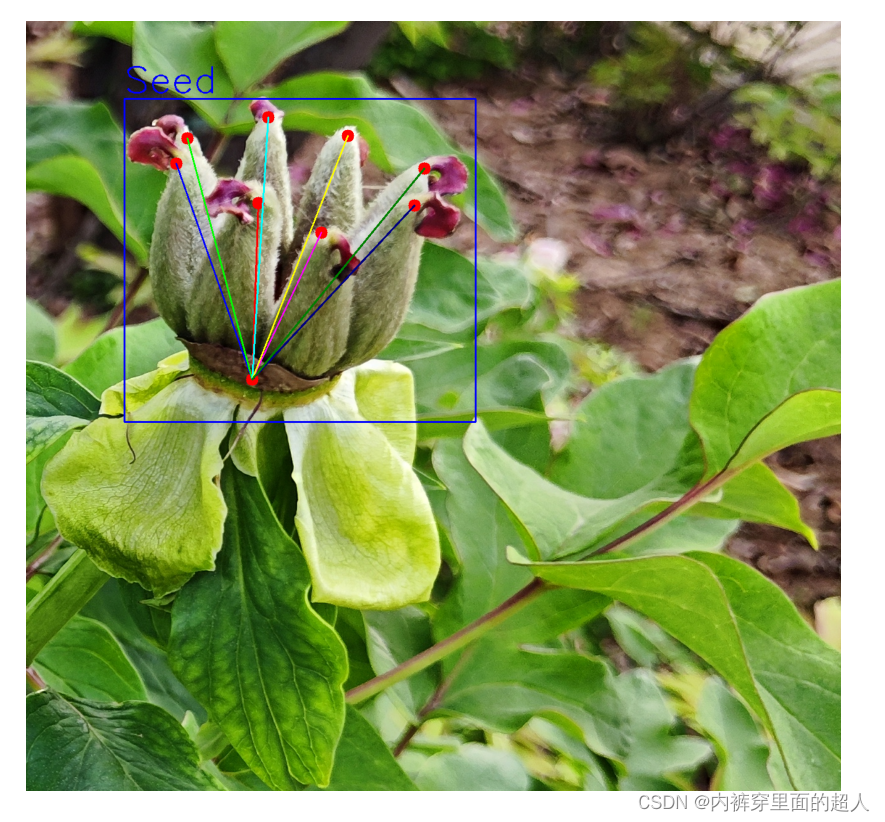
能够看出,转换格式后标的点是在对应的位置且清晰可见,而且想看的连接线也都是存在的。


 5464
5464

 被折叠的 条评论
为什么被折叠?
被折叠的 条评论
为什么被折叠?
 到【灌水乐园】发言


