


1、OpenCV 基本操作
1.1 颜色空间
-
RGB 图像:每个像素点包括三个通道(OpenCV 中分别为 BGR,matplotlib 中为 RGB),用一个三维数组表示。
-
灰度图:把白色与黑色之间按对数关系分为若干等级,称为灰度。灰度分为256阶。
-
二值图:只有黑白两色,用 0、1 或 0、255 表示。
1.2 图像运算
图像加减乘除等基本操作。
1.3 几何变换
平移、错切、镜像、旋转、透视等变换,关键在于找到相应的变换矩阵 M 。
1.4 阈值分割
-
直方图阈值分割:根据图像灰度直方图,人工寻找阈值。适用于双峰图像;
-
三角法阈值:适用于单峰阈值;
-
自适应阈值:即局部二值化。例如:文字扫描;
-
大津法:不断迭代,使类间方差最大,使用较多;
1.5 图像平滑处理
-
卷积滤波:就是利用卷积运算的原理来构成滤波器,来提取特征。卷积核和对应像素点进行运算;
-
均值滤波:即采用一个求平均值的卷积核;
-
中值滤波:它用邻域内所有像素值的中间值来替代当前像素点的像素值;
-
高斯滤波:离卷积核中心点越近的像素权重越大,越远权重越小(sigma 太小,几乎无滤波效果, 太大和中值滤波效果相近);
-
双边滤波:可保留边缘高频信息。
1.6 形态学操作
-
腐蚀:将图像的边界点消除,使图像沿着边界向内收缩,也可以将小于指定结构体元素的部分去除。可实现去除噪声、元素分割等功能。
-
膨胀:膨胀操作和腐蚀操作的作用是相反的,膨胀操作能对图像的边界进行扩张,可使图像更加紧凑。
-
开运算:先腐蚀、再膨胀,可以用于去噪、计数等。
-
闭运算:先膨胀、后腐蚀,它有助于关闭前景物体内部的小孔,或去除物体上的小黑点,还可以将不同的前景图像进行连接。
1.7 边缘检测
- Sobel 算子:
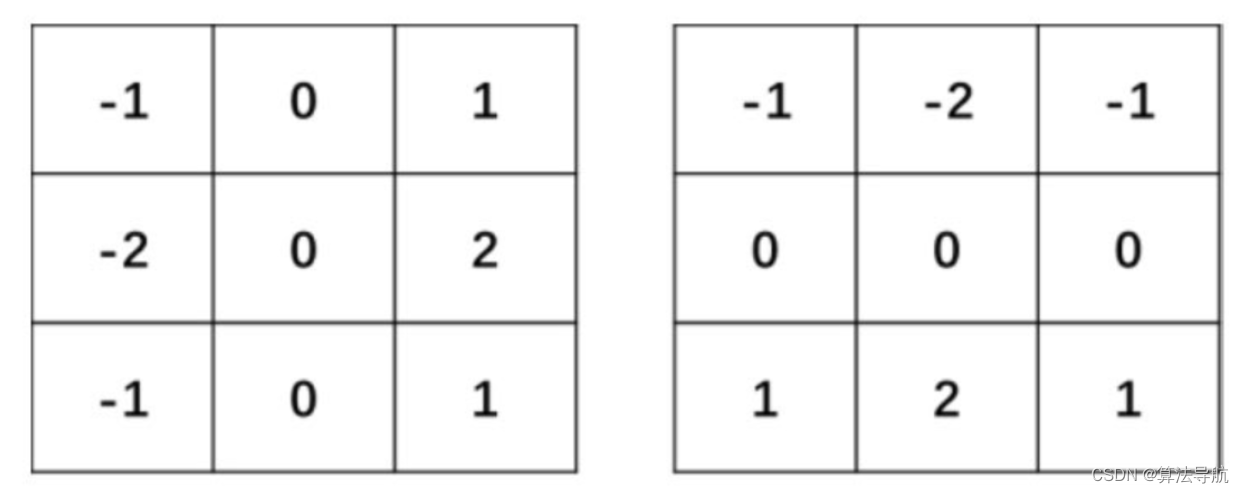
可分别计算水平和竖直方向的梯度,调用方式
imgX = cv.Sobel(img, -1, dx=1, dy=0)
imgY = cv.Sobel(img, -1, dx=0, dy=1)
imgXY = np.abs(imgX) + np.abs(imgY)
show(np.hstack([img, imgXY]))
- Canny 边缘检测
算法原理:
(1)降噪(高斯模糊)
(2)求梯度
(3)细化边缘
(4)双阈值抑制, 大于上限的为强边缘, 小于下限的不是边缘,中间部分为弱边缘,进入下一步判断。
(5)边缘追踪:如果弱边缘与强边缘相连,则其也为边缘,否则为弱边缘
函数调用:
edges = cv.Canny(imag, threshold1, threshold2[, apertureSize[,L2gradient]])
2、图像处理一般步骤
(1)图像导入
(2)图像预处理:滤波、去噪
(3)图像分割:即提取出感兴趣区域,包括灰度化、阈值分割、边缘检测
(4)特征识别
(5)显示结果
3、车牌识别
思路:
(1)车牌提取
(2)字符分割
(3)字符匹配
完整代码:
# @Time : 2021/12/3 19:46
# @Author : xiao cong
# @Function :
"""
(1)提取车牌位置,将车牌从图中分割出来;
(2)车牌字符的分割;
(3)通过模版匹配识别字符;
(4)将结果绘制在图片上显示出来。
"""
import numpy as np
import matplotlib.pyplot as plt
import cv2 as cv
import os
from PIL import ImageFont, ImageDraw, Image
# 显示图片
def cv_show(name, img):
cv.imshow(name, img)
cv.waitKey()
cv.destroyAllWindows()
def show(img):
if img.ndim == 2:
plt.imshow(img, cmap="gray", vmin=0, vmax=255)
else:
plt.imshow(cv.cvtColor(img, cv.COLOR_BGR2RGB))
plt.show()
# ******************************************************************************
"""
提取车牌位置
"""
# 加载图片
origin_img = cv.imread("car.jpg")
# 高斯滤波、转为灰度图
img = cv.GaussianBlur(origin_img, ksize=(5, 5), sigmaX=1)
img_gray = cv.cvtColor(img, cv.COLOR_BGR2GRAY)
# show(img_gray)
# Sobel 算子,X方向边缘检测,使车牌聚拢
imgX = cv.Sobel(img_gray, -1, dx=1, dy=0)
imgX_abs = abs(imgX)
# show(imgX_abs)
# 阈值分割,二值化图像
_, img_bin = cv.threshold(imgX_abs, 0, 255, cv.THRESH_OTSU)
# show(img_bin)
# 闭运算(先膨胀,再腐蚀),使车牌连成整体
kernel = cv.getStructuringElement(cv.MORPH_RECT, (17, 5)) # 17*5 的矩形核
img = cv.morphologyEx(img_bin, op=cv.MORPH_CLOSE, kernel=kernel, iterations=3)
# show(img)
# 去除白点,白线
kernel1 = cv.getStructuringElement(cv.MORPH_RECT, (10, 20))
kernel2 = cv.getStructuringElement(cv.MORPH_RECT, (20, 10))
# 腐蚀、膨胀
img = cv.erode(img, kernel1)
img = cv.dilate(img, kernel1)
# 膨胀、腐蚀
img = cv.dilate(img, kernel2)
img = cv.erode(img, kernel2)
# show(img)
# 中值滤波
img = cv.medianBlur(img, ksize=3)
# show(img)
# 轮廓检测
contours, _ = cv.findContours(img, cv.RETR_EXTERNAL, cv.CHAIN_APPROX_SIMPLE)
image = origin_img.copy()
cv.drawContours(image, contours, -1, color=(255, 0, 0), thickness=5) # 画在原图上
# show(image)
# 找出车牌位置,长宽比为 3:1 或 4:1
for item in contours:
rect = cv.boundingRect(item)
# cv2.boundingRect(img)函数可以获得一个图像的最小矩形边框一些信息,返回四个参数,左上角坐标,矩形的宽高.
x, y = rect[0], rect[1] # 矩形左上角坐标
w = rect[2]
h = rect[3]
if 3 < (w / h) < 4:
carLicense = origin_img[y:y + h, x:x + w]
show(carLicense)
cv.imwrite("carLicense.jpg", carLicense)
# ***************************************************************************************************
""""
车牌字符提取
"""
originImage = cv.imread("carLicense.jpg")
# 高斯模糊
Img = cv.GaussianBlur(originImage, ksize=(3, 3), sigmaX=1)
# 灰度
Img_gray = cv.cvtColor(Img, cv.COLOR_BGR2GRAY)
# show(Image)
# 二值化
_, Img = cv.threshold(Img_gray, 0, 255, cv.THRESH_OTSU)
# show(Image)
# 如果二值化后是白底黑字,则需要反转过来(绿牌可能会出现这种情况)
area_white, area_black = 0, 0
height, width = Img.shape
for i in range(height):
for j in range(width):
if Img[i][j] == 255:
area_white += 1
else:
area_black += 1
if area_white > area_black: # 此时白底黑字,进行反转
Img = cv.threshold(Img, 0, 255, cv.THRESH_BINARY_INV)
# 膨胀,使每个字符更紧凑
kernel = cv.getStructuringElement(cv.MORPH_RECT, (2, 2))
Img = cv.dilate(Img, kernel)
show(Img)
# 检测每个字的轮廓
contours, _ = cv.findContours(Img, cv.RETR_EXTERNAL, cv.CHAIN_APPROX_SIMPLE)
image = originImage.copy()
cv.drawContours(image, contours, -1, color=(0, 0, 255), thickness=1) # 画在原图上
show(image)
# 字符提取
words = [] # 存储所有字符轮廓
for item in contours:
word = [] # 存储每个轮廓的信息
rect = cv.boundingRect(item)
x, y = rect[0], rect[1]
w, h = rect[2], rect[3]
word.append(x)
word.append(y)
word.append(w)
word.append(h)
words.append(word)
words = sorted(words, key=lambda s: s[0], reverse=False) # 按照每个字符轮廓 x 坐标从小到大排序,保持车牌字符顺序
# 选择需要的字符
i = 0 # 计数
word_images = [] # 存储分割后的图片
for word in words:
if 1.8 < (word[3] / word[2]) < 3.5: # 注意 1 和 I ,长宽比比较大
i += 1
word_image = Img[word[1]:word[1] + word[3], word[0]:word[0] + word[2]]
# show(word_image)
word_images.append(word_image)
filename = "word_" + str(i) + ".jpg"
cv.imwrite(filename=filename, img=word_image)
# **************************************************************************************
"""
模板匹配
"""
template = ['0', '1', '2', '3', '4', '5', '6', '7', '8', '9',
'A', 'B', 'C', 'D', 'E', 'F', 'G', 'H', 'J', 'K', 'L', 'M', 'N', 'P', 'Q', 'R', 'S', 'T', 'U', 'V', 'W',
'X', 'Y', 'Z',
'藏', '川', '鄂', '甘', '赣', '贵', '桂', '黑', '沪', '吉', '冀', '津', '晋', '京', '辽', '鲁', '蒙', '闽', '宁',
'青', '琼', '陕', '苏', '皖', '湘', '新', '渝', '豫', '粤', '云', '浙']
# 读取一个文件夹下的所有图片,输入参数是文件名,返回模板文件地址列表
def read_directory(directory_name):
referImg_list = []
for filename in os.listdir(directory_name):
referImg_list.append(directory_name + '/' + filename)
return referImg_list
# 获得中文模板列表(只匹配车牌的第一个字符)
def get_chinese_word_list():
Chinese_words_list = []
for i in range(34, 64):
c_word = read_directory('./refer1/' + template[i]) # 记录每个中文字符文件下每张图片的目录
Chinese_words_list.append(c_word)
return Chinese_words_list
Chinese_words_list = get_chinese_word_list()
# 获得英文模板列表(只匹配车牌的第二个字符)
def get_english_word_list():
English_words_list = []
for i in range(10, 34):
e_word = read_directory('./refer1/' + template[i])
English_words_list.append(e_word)
return English_words_list
English_words_list = get_english_word_list()
# 获得英文和数字模板列表(匹配车牌后面的字符)
def get_eng_num_words_list():
eng_num_words_list = []
for i in range(0, 34):
word = read_directory('./refer1/' + template[i])
eng_num_words_list.append(word)
return eng_num_words_list
eng_num_words_list = get_eng_num_words_list()
# 读取一个模板地址与图片进行匹配,返回得分
def template_score(template, image): # 传入的是模板图片地址和需要匹配的图像
template_image = cv.imdecode(np.fromfile(template, dtype=np.uint8), 1)
# 灰度、二值化
template_image = cv.cvtColor(template_image, cv.COLOR_BGR2GRAY)
_, template_image = cv.threshold(template_image, 0, 255, cv.THRESH_OTSU)
img_ = image.copy()
height, width = img_.shape
template_image = cv.resize(template_image, (width, height)) # 缩放至同一尺寸
result = cv.matchTemplate(img_, template_image, cv.TM_CCOEFF)
return result[0][0]
# 对分割得到的字符逐一匹配
def template_matching(word_images):
results = []
for index, word_image in enumerate(word_images):
if index == 0: # 即为第一个:汉字
best_score = []
for chinese_words in Chinese_words_list:
score = []
for chinese_word in chinese_words:
result = template_score(chinese_word, word_image)
score.append(result)
best_score.append(max(score))
fit_index = best_score.index(max(best_score)) # 记录最佳匹配的下标
results.append(template[34 + fit_index])
continue
if index == 1: # 匹配第一个英文字母
best_score = []
for english_words in English_words_list:
score = []
for english_word in english_words:
result = template_score(english_word, word_image)
score.append(result)
best_score.append(max(score))
fit_index = best_score.index(max(best_score)) # 记录最佳匹配的下标
results.append(template[10 + fit_index])
continue
else:
best_score = []
for eng_num_words in eng_num_words_list:
score = []
for eng_num_word in eng_num_words:
result = template_score(eng_num_word, word_image)
score.append(result)
best_score.append(max(score))
fit_index = best_score.index(max(best_score))
results.append(template[fit_index])
return results
word_images_ = word_images.copy()
result = template_matching(word_images_)
# ************************************************************************************************
"""
显示识别结果
"""
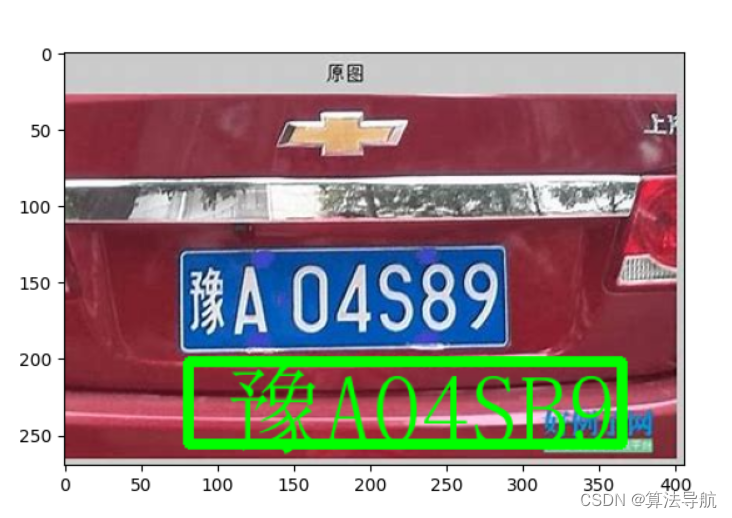
height, width = origin_img.shape[0:2]
# print(height, width)
img = origin_img.copy()
cv.rectangle(img, (np.int(0.2 * width), np.int(0.75 * height)), (np.int(width * 0.9), np.int(height * 0.95)), (0, 255, 0),
5) # 画出方框
# 设置文字
fontpath = "font/simsun.ttc"
font = ImageFont.truetype(fontpath, 64)
img_pil = Image.fromarray(img)
draw = ImageDraw.Draw(img_pil)
draw.text((np.int(0.2 * width) + 25, np.int(0.75 * height)), "".join(result), font=font, fill=(0, 255, 0))
bk_img = np.array(img_pil)
print("".join(result))
show(bk_img)
识别结果:
参考:


 7070
7070


 被折叠的 条评论
为什么被折叠?
被折叠的 条评论
为什么被折叠?
 到【灌水乐园】发言


