


要么出众,要么出局,乾坤未定,你我都是黑马。
欢迎访问我的博客
Sky’s blog
1 Keras后端?
Keras是一个模型级的库,提供了快速构建深度学习网络的模块。Keras并不处理如张量乘法、卷积等底层操作。这些操作依赖于某种特定的、优化良好的张量操作库。Keras依赖于处理张量的库就称为“后端引擎”。Keras提供了三种后端引擎Theano/Tensorflow/CNTK,并将其函数统一封装,使得用户可以以同一个接口调用不同后端引擎的函数
Theano是一个开源的符号主义张量操作框架,由蒙特利尔大学LISA/MILA实验室开发。
TensorFlow是一个符号主义的张量操作框架,由Google开发。
CNTK是一个由微软开发的商业级工具包。
1.1 切换后端
如果你至少运行过一次Keras,你将在下面的目录下找到Keras的配置文件:
c:/user/.keras/keras.json
如果该目录下没有该文件,你可以手动创建一个
文件的默认配置如下:
{
    "image_data_format": "channels_last",
    "epsilon": 1e-07,
    "floatx": "float32",
    "backend": "tensorflow"
}
将backend字段的值改写为你需要使用的后端:theano或tensorflow或者CNTK,即可完成后端的切换
2 第一个模型:全连接网络?
import tensorflow as tf
from keras.layers import Input, Dense
from keras.models import Model

# this returns a tensor
inputs = Input(shape=(784,))

# a layer instance is callable on a tensor, and returns a tensor
x = Dense(64, activation='relu')(inputs)
x = Dense(64, activation='relu')(x)
predictions = Dense(10, activation=softmax)(x)

# this creates a model that includes
# the Input layer and three Dense layers
model = Model(input=inputs, output=predictions)
model.compile(optimizer='rmsprop',
              loss='categorical_crossentropy',
              metrics=['accuracy'])
model.fit(data, labels)  # starts training
def softmax(x, axis=-1):
    """Softmax of a tensor.

    # Arguments
        x: A tensor or variable.
        axis: The dimension softmax would be performed on.
            The default is -1 which indicates the last dimension.

    # Returns
        A tensor.
    """
    return tf.nn.softmax(x, dim=axis)
2.1 函数介绍
2.1.1 Input
nput(shape=None,batch_shape=None,name=None,dtype=K.floatx(),sparse=False,tensor=None)
- shape: 形状元组(整型)
- batch_shape: 形状元组(整型)
- name: 对于该层是可选的名字字符串
- dtype: 预期的输入数据类型
- sparse: 特定的布尔值,占位符是否为sparse
- tensor: 可选的存在的向量包装到Input层,如果设置了,该层将不会创建一个占位张量。
返回值:一个张量
2.1.2 Dense
keras.layers.core.Dense(output_dim, init=‘glorot_uniform’, activation=‘linear’, weights=None, W_regularizer=None, b_regularizer=None, activity_regularizer=None, W_constraint=None, b_constraint=None, bias=True, input_dim=None)
Dense层就是全链接层
- output_dim:大于0的整数,代表该层的输出维度。模型中非首层的全连接层其输入维度可以自动推断,因此非首层的全连接定义时不需要指定输入维度。
- init:初始化方法,为预定义初始化方法名的字符串,或用于初始化权重的Theano函数。该参数仅在不传递weights参数时才有意义。
- activation:激活函数,
- weights:权值,为numpy array的list。该list应含有一个形如(input_dim,output_dim)的权重矩阵和一个形如(output_dim,)的偏置向量
- W_regularizer:施加在权重上的正则项,为WeightRegularizer对象
- b_regularizer:施加在偏置向量上的正则项,为WeightRegularizer对象
- activity_regularizer:施加在输出上的正则项,为ActivityRegularizer对象
- W_constraints:施加在权重上的约束项,为Constraints对象
- b_constraints:施加在偏置上的约束项,为Constraints对象
- bias:布尔值,是否包含偏置向量(即层对输入做线性变换还是仿射变换)
- input_dim:整数,输入数据的维度。当Dense层作为网络的第一层时,必须指定该参数或input_shape参数。
2.1.3 Model
函数式模型
常用Model属性
- model.layers:组成模型图的各个层
- model.inputs:模型的输入张量列表
- model.outputs:模型的输出张量列表
2.1.4 Model模型方法
compile
compile(self, optimizer, loss, metrics=None, loss_weights=None, sample_weight_mode=None, weighted_metrics=None, target_tensors=None)
- loss=‘目标函数’
- optimizer:优化器
- metrics=[‘accuracy’])metrics: 列表,包含评估模型在训练和测试时的性能的指标
其他,我这个菜鸡用的的比较少,这里不一一列举
fit
fit(self, x=None, y=None, batch_size=None, epochs=1, verbose=1, callbacks=None, validation_split=0.0, validation_data=None, shuffle=True, class_weight=None, sample_weight=None, initial_epoch=0, steps_per_epoch=None, validation_steps=None)
model.fit()向模型中输入训练集,验证集,迭代次数
fit()用于使用给定输入训练模型.
evaluate
evaluate(self, x, y, batch_size=32, verbose=1, sample_weight=None)
model.evaluate():就像他的名字一样,主要对模型进行评估
Keras中model.evaluate()返回的是 损失值和你选定的指标值(例如,精度accuracy)
predict
predict(self, x, batch_size=32, verbose=0)
predict()用于实际预测.它为输入样本生成输出预测.
Embedding
Embedding(input_dim, output_dim, embeddings_initializer=‘uniform’, embeddings_regularizer=None, activity_regularizer=None, embeddings_constraint=None, mask_zero=False, input_length=None)
嵌入层将正整数(下标)转换为具有固定大小的向量,如[[4],[20]]->[[0.25,0.1],[0.6,-0.2]]
Embedding层只能作为模型的第一层
- input_dim:大或等于0的整数,字典长度,即输入数据最大下标+1
- output_dim:大于0的整数,代表全连接嵌入的维度
- embeddings_initializer: 嵌入矩阵的初始化方法,为预定义初始化方法名的字符串,或用于初始化权重的初始化器。参考initializers
- embeddings_regularizer: 嵌入矩阵的正则项,为Regularizer对象
- embeddings_constraint: 嵌入矩阵的约束项,为Constraints对象
- mask_zero:布尔值,确定是否将输入中的‘0’看作是应该被忽略的‘填充’(padding)值,该参数在使用递归层处理变长输入时有用。设置为True的话,模型中后续的层必须都支持masking,否则会抛出异常。如果该值为True,则下标0在字典中不可用,input_dim应设置为|vocabulary| + 1。
- input_length:当输入序列的长度固定时,该值为其长度。如果要在该层后接Flatten层,然后接Dense层,则必须指定该参数,否则Dense层的输出维度无法自动推断。
3 Keras 实现手写数字识别?
下载数据.外网,要翻墙,下载速度快赶上蜗牛了
import keras
from keras.datasets import mnist
import matplotlib.pyplot as plt
%matplotlib inline
(train_images,train_labels),(test_images,test_labels) = mnist.load_data()
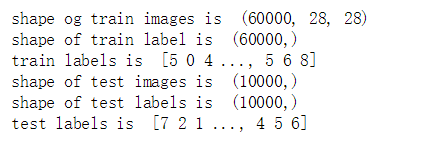
查看一下数据集大小
print("shape og train images is ",train_images.shape)
print("shape of train label is ",train_labels.shape)
print("train labels is ",train_labels)
print('shape of test images is ',test_labels.shape)
print('shape of test labels is ',test_labels.shape)
print("test labels is ",test_labels)
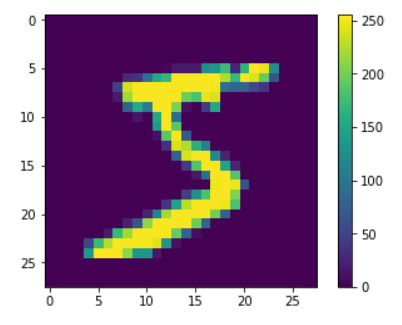
想不想看看手写数字长啥样??几行代码轻松搞定。
plt.figure()
plt.imshow(train_images[0])
plt.colorbar()
plt.grid(False)
plt.show()
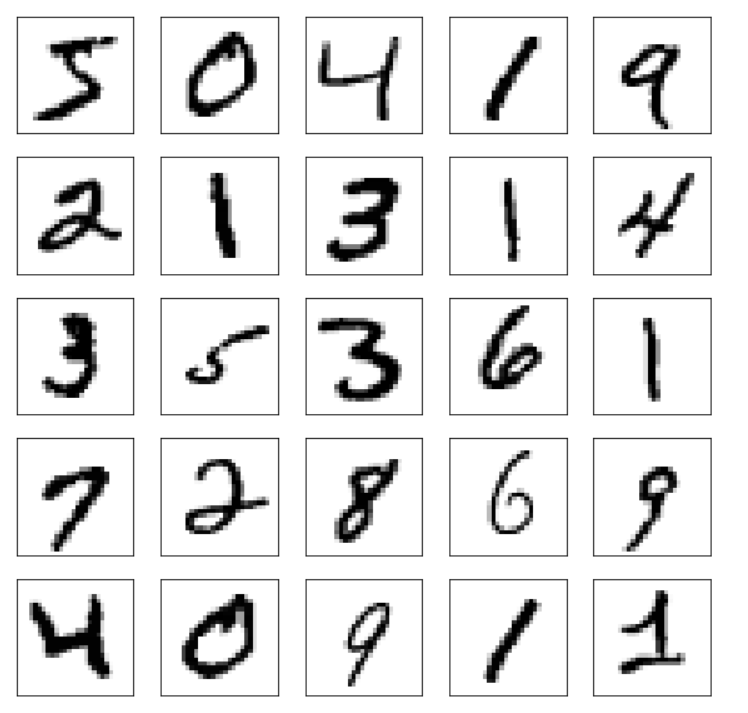
为什么会有颜色呢?让我们变为灰度图片再看看
train_images= train_images / 255.0
test_images= test_images / 255.0
plt.figure(figsize=(10,10))
for i in range(25):
    plt.subplot(5,5,i+1)
    plt.xticks([])
    plt.yticks([])
    plt.grid(False)
    plt.imshow(train_images[i], cmap=plt.cm.binary)
plt.show()
好了数据大小也有了,手写数字也看了,接下来就让我们建立神经网络模型了。
建立模型
def softmax(x, axis=-1):
    """Softmax of a tensor.

    # Arguments
        x: A tensor or variable.
        axis: The dimension softmax would be performed on.
            The default is -1 which indicates the last dimension.

    # Returns
        A tensor.
    """
    return tf.nn.softmax(x, dim=axis)
# 设计网络
from keras import models
from keras.layers import Dense
import tensorflow as tf

network = models.Sequential()
network.add(Dense(512,activation = "relu",input_shape=(28*28,)))
network.add(Dense(10,activation = softmax))
训练模型
#编译网络
network.compile(
optimizer = 'rmsprop',loss='categorical_crossentropy',metrics = ['accuracy'])
#数据处理
train_images = train_images.reshape((60000,28*28))
train_images = train_images.astype('float32')/255
test_images = test_images.reshape((10000,28*28))
test_images = test_images.astype('float32')/255
#处理标签
from keras.utils import to_categorical
train_labels = to_categorical(train_labels)
test_labels = to_categorical(test_labels)
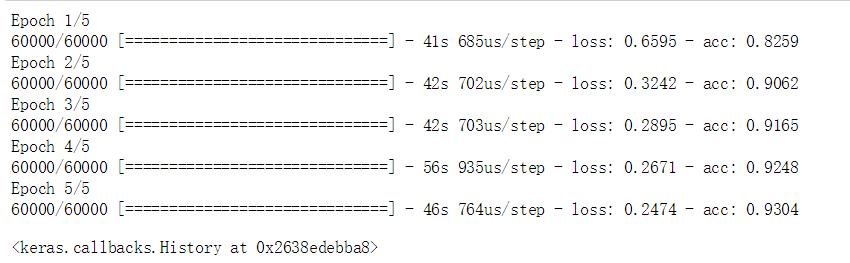
#训练模型
network.fit(train_images,train_labels,epochs = 5,batch_size = 10)
测试模型
test_loss,test_acc = network.evaluate(test_images,test_labels)
print(f'test_loss : {test_loss}')
print(f'test_acc :{test_acc}')

4.总结?
以上就简单的实现了用keras实现手写数据的识别,代码简短,但老记不住,忘记该用啥,该怎么拼写???,理论基础还是要背牢的,还要多多使用啊,熟能生巧


 817
817

 被折叠的 条评论
为什么被折叠?
被折叠的 条评论
为什么被折叠?
 到【灌水乐园】发言


