


Linux驱动
1. 字符设备驱动程序
1.1 第一个驱动程序
驱动程序
第一个简单的字符设备驱动程序hello_drv.c:
#include <linux/module.h>

#include <linux/fs.h>
#include <linux/errno.h>
#include <linux/miscdevice.h>
#include <linux/kernel.h>
#include <linux/major.h>
#include <linux/mutex.h>
#include <linux/proc_fs.h>
#include <linux/seq_file.h>
#include <linux/stat.h>
#include <linux/init.h>
#include <linux/device.h>
#include <linux/tty.h>
#include <linux/kmod.h>
#include <linux/gfp.h>

static ssize_t hello_drv_read (struct file *file, char __user *buf, size_t size, loff_t *offset);
static ssize_t hello_drv_write (struct file *file, const char __user *buf, size_t size, loff_t *offset);
static int hello_drv_open (struct inode *node, struct file *file);
static int hello_drv_close (struct inode *node, struct file *file);

/* 1. 确定主设备号                                                                 */
static int major = 0;
static char kernel_buf[1024];
static struct class *hello_class;
static const char *_dev_name = "hello";

#define MIN(a, b) (a < b ? a : b)

/* 2. 定义自己的file_operations结构体                                              */
static struct file_operations hello_drv = {
    .owner   = THIS_MODULE,
    .open    = hello_drv_open,
    .read    = hello_drv_read,
    .write   = hello_drv_write,
    .release = hello_drv_close,
};

/* 3. 实现对应的open/read/write等函数,填入file_operations结构体                   */
static ssize_t hello_drv_read (struct file *file, char __user *buf, size_t size, loff_t *offset)
{
    int err;
    printk("%s %s line %d\n", __FILE__, __FUNCTION__, __LINE__);
    /* 将内核空间的数据拷贝到用户空间 */
    err = copy_to_user(buf, kernel_buf, MIN(1024, size));
    if(err != 0) {
        printk("read failed\n");
    }
    return MIN(1024, size);
}

static ssize_t hello_drv_write (struct file *file, const char __user *buf, size_t size, loff_t *offset)
{
    int err;
    printk("%s %s line %d\n", __FILE__, __FUNCTION__, __LINE__);
    /* 将用户空间的数据拷贝到内核空间 */
    err = copy_from_user(kernel_buf, buf, size);
    if(err != 0) {
        printk("write failed\n");
    }
    return MIN(1024, size);
}

static int hello_drv_open (struct inode *node, struct file *file)
{
    printk("%s %s line %d\n", __FILE__, __FUNCTION__, __LINE__);
    return 0;
}

static int hello_drv_close (struct inode *node, struct file *file)
{
    printk("%s %s line %d\n", __FILE__, __FUNCTION__, __LINE__);
    return 0;
}

/* 4. 创建驱动入口函数,注册驱动程序
 * register_chrdev 是一个用于注册字符设备驱动的函数
 *      major: 主设备号,如果设置为0,表示由内核自动分配一个可用的主设备号。
 *      name: 设备的名称,在 /proc/devices 文件中会显示。
 *      fops: 指向一个 struct file_operations 结构体的指针,该结构体包含了字符设备操作的函数指针,如读、写、打开、释放等。
 */
static int __init hello_drv_init(void)
{
    int err;
    struct device *dev;

    printk("%s %s line %d\n", __FILE__, __FUNCTION__, __LINE__);
    /* /dev/hello */
    major = register_chrdev(major, _dev_name, &hello_drv);

    hello_class = class_create(THIS_MODULE, "hello_class");
    err = PTR_ERR(hello_class);
    if(IS_ERR(hello_class))
    {
        printk("%s %s line %d\n", __FILE__, __FUNCTION__, __LINE__);
        unregister_chrdev(major, _dev_name);
        return -1;
    }

    /* 创建设备结点 */
    dev = device_create(hello_class, NULL, MKDEV(major, 0), NULL, _dev_name);
    printk("device init name is: %s\n", dev->init_name);

    return 0;
}


/* 5. 创建驱动出口函数, 卸载驱动程序 */
static void __exit hello_drv_exit(void)
{
    printk("%s %s line %d\n", __FILE__, __FUNCTION__, __LINE__);
    device_destroy(hello_class, MKDEV(major, 0));
    class_destroy(hello_class);
    unregister_chrdev(major, _dev_name);
}

/* 6. 完善驱动程序 */
module_init(hello_drv_init);
module_exit(hello_drv_exit);

MODULE_LICENSE("GPL");
测试程序
驱动测试程序hello_drv_test.c
#include <stdio.h>
#include <sys/types.h>
#include <sys/stat.h>
#include <fcntl.h>
#include <string.h>
#include <unistd.h>

/*
 * ./hello_drv_test -w zmj
 * ./hello_drv_test -r
 */
int main(int argc, char **argv)
{
    int fd;
    int len;
    char buf[1024];

    /* 1.判断参数 */
    if(argc < 2)
    {
        printf("Usage: %s -w <string>\n", argv[0]);
        printf("Usage: %s -r\n", argv[0]);
        return -1;
    }
    /* 2.打开设备驱动文件 */
    const char *pathname = "/dev/hello";
    fd = open(pathname, O_RDWR);
    if(fd == -1)
    {
        printf("can not open device file %s\n", pathname);
        return -1;
    }
    /* 3. 读写文件 */
    if(strcmp(argv[1], "-w") == 0 && argc == 3)
    {
        // 写文件:将\0也写进去
        len = strlen(argv[2]) + 1;
        len = len < 1024 ? len : 1024;
        write(fd, argv[2], len);
    }
    else
    {
        // 读文件
        read(fd, buf, 1024);
        buf[1023] = '\0';
        printf("read data: %s\n", buf);
    }

    close(fd);

    return 0;
}
Makefile
编译文件Makefile
KERNEL_DIR = /home/book/100ask_imx6ull-sdk/Linux-4.9.88

obj-m += hello_drv.o

all:
    make -C $(KERNEL_DIR) M=`pwd` modules
    $(CROSS_COMPILE)gcc hello_drv_test.c -o hello_drv_test

clean:
    make -C $(KERNEL_DIR) M= `pwd` modules clean
    rm -rf modules.order
    rm -f hello_drv_test
1.2 驱动程序编写框架
驱动编写流程
- 确定主设备号,可以让内核分配
/* 1. 确定主设备号                                                                 */
static int major = 0;
major = register_chrdev(major, _dev_name, &hello_drv);
major设为0,注册驱动程序时内核会自动分配一个主设备号。
-
定义自己的file_operation结构体
file_operations结构体是用来定义字符设备驱动的操作函数的集合。每个字符设备都需要实现一组标准的操作,如读取、写入、打开等。这些操作由file_operations结构体中的函数指针指向实际的实现函数。
struct file_operations {
    struct module *owner;
    loff_t (*llseek) (struct file *, loff_t, int);
    ssize_t (*read) (struct file *, char __user *, size_t, loff_t *);        // 读取设备
    ssize_t (*write) (struct file *, const char __user *, size_t, loff_t *);
    ssize_t (*read_iter) (struct kiocb *, struct iov_iter *);
    ssize_t (*write_iter) (struct kiocb *, struct iov_iter *);
    int (*iterate) (struct file *, struct dir_context *);
    int (*iterate_shared) (struct file *, struct dir_context *);
    ......
}
-
实现
file_operations结构体中的函数,如read、write、open -
创建驱动入口函数,并注册驱动程序
static int __init hello_drv_init(void)
{
    major = register_chrdev(major, _dev_name, &hello_drv);
    return 0;
}
- 创建驱动出口函数,卸载驱动程序
static void __exit hello_drv_exit(void)
{
    device_destroy(hello_class, MKDEV(major, 0));
    class_destroy(hello_class);
    unregister_chrdev(major, _dev_name);
}
- 在入口函数中提供设备信息,创建设备结点
在/dev目录下创建一个名为 _dev_name 的设备节点文件,如/dev/hello
static int __init hello_drv_init(void)
{
    hello_class = class_create(THIS_MODULE, "hello_class");
    err = PTR_ERR(hello_class);
    if(IS_ERR(hello_class))
    {
        printk("%s %s line %d\n", __FILE__, __FUNCTION__, __LINE__);
        unregister_chrdev(major, _dev_name);
        return -1;
    }

    /* 创建设备结点 */
    dev = device_create(hello_class, NULL, MKDEV(major, 0), NULL, _dev_name);
}
-
class_create(THIS_MODULE, "hello_class"):创建一个设备类(device class)。在Linux内核中,设备类是一组具有相似属性的设备的集合。这个函数用于创建一个新的设备类,第一个参数指定了该类所属的内核模块,第二个参数是设备类的名称。如果创建失败,它返回一个错误码。 -
err = PTR_ERR(hello_class):将hello_class的指针转换为错误码。这是一个错误处理步骤,用于检查class_create函数的返回值是否表示错误。 -
if (IS_ERR(hello_class)) { ... }:检查hello_class的返回值是否是一个错误码。如果是,说明设备类的创建失败。在这种情况下,函数会输出错误信息,取消之前注册的字符设备,然后返回-1,表示初始化失败。 -
dev = device_create(hello_class, NULL, MKDEV(major, 0), NULL, _dev_name):创建一个设备结点(device node)。它将在/sys/class/hello_class/目录下创建一个设备结点。这个函数的参数包括设备类指针、父设备的指针(在这里为NULL,表示没有父设备)、设备号(使用MKDEV(major, 0)创建)和设备的名称(在这里为_dev_name)。
PTR_ERR补充知识-[chatgpt]:
在Linux内核编程中,PTR_ERR 是一个宏,用于从指针中提取错误码。它的作用是将内核中函数返回的指针类型转换为错误码。通常,在内核开发中,错误码是负数,而指针是正数或零。当函数执行出错时,返回的是一个指向错误码的指针。
使用方法如下:
err_ptr = some_function(); // some_function返回一个指针

err = PTR_ERR(err_ptr);
if (IS_ERR(err_ptr)) {
    // 出错处理
    printk("Error occurred: %ld\n", err);
}
在这个例子中,some_function() 返回一个指针。我们使用 PTR_ERR 宏将指针 err_ptr 转换为错误码 err。然后,我们使用 IS_ERR 宏检查 err_ptr 是否表示一个错误。如果是,我们可以从 err 中获得错误码,并进行相应的错误处理。
Makefile文件编写
/* 1. 定义Linux内核源码的目录路径 */
KERNEL_DIR = /home/book/100ask_imx6ull-sdk/Linux-4.9.88

/* 2.  声明需要编译的内核模块文件,将编译hello_drv.c驱动程序 */
obj-m += hello_drv.o

all:
    /* 3. 编译内核模块
     * C -指定内核源码目录,在这个目录下执行编译。
     * M -指定模块源码目录(当前目录),使得编译系统能够找到hello_drv.c文件。
     */
    make -C $(KERNEL_DIR) M=`pwd` modules
    /* 4. 跨平台编译用户空间测试程序*/
    $(CROSS_COMPILE)gcc hello_drv_test.c -o hello_drv_test

clean:
    /* 5.删除驱动文件及测试文件 */
    make -C $(KERNEL_DIR) M= `pwd` modules clean
    rm -rf modules.order
    rm -f hello_drv_test
Makefile解读
在这个Makefile中,make -C $(KERNEL_DIR) M=pwd modules 命令是用于在内核源码目录下编译内核模块的。
make -C $(KERNEL_DIR): 这部分指定了make命令的工作目录是$(KERNEL_DIR),也就是内核源码的路径。所有的编译和链接操作将在这个目录下进行。M=pwd: 这个部分通过M选项指定了模块源码目录。pwd命令用于获取当前目录的路径,这样make就知道了在哪里可以找到hello_drv.c等源代码文件。modules: 这个部分告诉make命令只编译内核模块
因此,当执行make -C $(KERNEL_DIR) M=pwd modules时,make命令会在内核源码目录下进行编译,但是它会把当前目录当作一个模块源码目录,这样在编译时就能找到当前目录下的驱动文件(例如hello_drv.c),并将其编译成内核模块。
obj-m是什么意思?
在Linux内核的Makefile中,obj-m 是一个变量,用于指定构建的目标是一个外部模块(out-of-tree module),而不是构建内核的一部分。外部模块是指不随内核源代码一起发布的模块,而是在内核外单独编写的、针对内核接口编写的代码。
obj-m 变量的主要作用是告诉内核构建系统哪些文件是外部模块的源文件,这些源文件将会被编译成内核模块(.ko文件)。这个变量通常在内核的顶层Makefile或者外部模块的Makefile中定义。
在一个外部模块的Makefile中,你通常会有类似以下的定义:
obj-m += mymodule1.o mymodule2.o
这里,mymodule1.o 是外部模块的源文件,它将会被编译成一个内核模块。使用 obj-m += mymodule1.o 将 mymodule1.o 添加到 obj-m 变量中,告诉内核构建系统将其编译为一个内核模块。
在执行 make 命令时,内核构建系统会根据 obj-m 变量的定义,将指定的源文件编译成模块。生成的模块文件(.ko文件)将会放在当前目录下,可以通过 insmod 或 modprobe 命令将其加载到内核中。
执行make后,编译生成的文件

.ko模块文件
.ko 文件是Linux内核模块的二进制文件。在Linux系统中,内核模块是一种可以动态加载到内核中并在运行时卸载的软件组件。这种动态加载的机制使得系统可以在不重新启动的情况下扩展或修改内核的功能。
1.3 驱动程序加载
将hello_drv.ko驱动程序和hello_drv_test测试上传至imx6ull开发板
安装驱动
insmod hello_drv.ko

查看驱动是否安装成功
cat /proc/devices | grep hello

hello驱动安装成功,内核分配的主设备号位245
在内核模块中也可以看到hello模块(Linux中驱动也是内核模块)
cat /proc/modules | grep hello

在Linux系统中,/proc/devices 文件用于显示当前系统中注册的设备和它们的主设备号。/proc/modules 文件则用于显示当前系统中加载的内核模块。在你的情况下:
-
/proc/devices中的输出:245 hello这表示设备号
245对应着一个名为hello的设备。这是你的字符设备驱动在内核中注册成功后的结果。 -
/proc/modules中的输出:hello_drv 3941 0 - Live 0x7f00f000 (O)这表示你的
hello_drv.ko模块已经成功加载到内核中。3941是模块的大小(以字节为单位),0表示没有其他模块依赖于它,0x7f00f000是模块的加载地址,(O)表示这是一个Out-of-Tree模块,即不是内核的一部分,而是外部加载的。
加载驱动后,系统会自动分配一个主设备号(在这个例子中为 245),并且你的设备就可以在 /dev/hello 目录下找到。你可以使用该设备进行读写操作,这些读写操作会通过你在驱动程序中定义的 hello_drv_read 和 hello_drv_write 函数来处理。
hello设备结点与hello_drv内核模块之间的联系
/dev/hello是一个设备结点,hello_drv是一个驱动模块。/dev/hello 是用户空间应用程序与内核空间字符设备通信的接口。当你用户空间打开 /dev/hello 文件时,对于hello文件的读写都会找到其关联的内核模块hello_drv的读写文件!
测试驱动
将编译的驱动测试程序可执行文件上传至开发板
-
写数据
./hello_drv_test -w china -
读数据
./hello_drv_test -r

卸载驱动
卸载字符设备驱动模块hello_drv
rmmod hello_drv

1.4 驱动程序相关知识
驱动程序出入口函数
2. LED驱动程序
2.1 简单的LED驱动程序
驱动程序
led_drv.c驱动程序
#include <linux/kernel.h>
#include <linux/module.h>
#include <linux/slab.h>
#include <linux/init.h>
#include <linux/fs.h>
#include <linux/delay.h>
#include <linux/poll.h>
#include <linux/mutex.h>
#include <linux/wait.h>
#include <linux/uaccess.h>
#include <linux/device.h>
#include <asm/io.h>


static ssize_t led_open(struct inode *node, struct file *flip);

static ssize_t led_write(struct file *filp, const char __user *buf,
			 size_t count, loff_t *ppos);

/* registers */
// IOMUXC_SNVS_SW_MUX_CTL_PAD_SNVS_TAMPER3 地址:0x02290000 + 0x14
static volatile unsigned int *IOMUXC_SNVS_SW_MUX_CTL_PAD_SNVS_TAMPER3;

// GPIO5_GDIR 地址:0x020AC004;
static volatile unsigned int *GPIO5_GDIR;

//GPIO5_DR 地址:0x020AC000;设置输出引脚的电平
static volatile unsigned int *GPIO5_DR;


/* 1. 确定主设备号 */
static int major = 0;
const char *DEVICE_NAME = "hz_led";
struct class *led_class;
dev_t devt;


/* 2. 自定义file_operations */
static const struct file_operations led_fops = {
	.owner = THIS_MODULE,
	.open = led_open,
	.write = led_write,
};

/* 3. 实现设备操作函数 */
static ssize_t led_write(struct file *filp, const char __user *buf,
			size_t count, loff_t *ppos)
{
    char val;
    /* copy_from_user: get data from userspace */
	copy_from_user(&val, buf, 1);

    if(val == 1)
    {
        // 设置gpio引脚,低电平打开led
        *GPIO5_DR |= ~(1 << 3);
    }
    else
    {
        // 高电平关闭led
        *GPIO5_DR &= (1 << 3);
    }

    return 1;
}


static ssize_t led_open(struct inode *node, struct file *flip)
{
    // 使能gpio
    *IOMUXC_SNVS_SW_MUX_CTL_PAD_SNVS_TAMPER3 &= ~0xf;   /*低4位清零*/
    *IOMUXC_SNVS_SW_MUX_CTL_PAD_SNVS_TAMPER3 |= 0x5;

    *GPIO5_GDIR |= (1 << 3);

	return 1;
}


/* 4. 定义入口函数 */
static int __init led_init(void)
{
	printk("%s, %s, line:%d\n", __FILE__, __FUNCTION__, __LINE__);

	int err;
	struct device *dev;

    /* 入口函数中将GPIO的物理地址映射为虚拟地址 */
    IOMUXC_SNVS_SW_MUX_CTL_PAD_SNVS_TAMPER3 = ioremap(0x02290000 + 0x14, 4);

    GPIO5_GDIR = ioremap(0x020AC004, 4);

    GPIO5_DR = ioremap(0x020AC000, 4);


	/* 注册驱动程序:major, device_name,        fops */
	major = register_chrdev(major, DEVICE_NAME, &led_fops);
	if(major < 0) {
		return major;
	}

	/* 创建模块类 */
	led_class = class_create(THIS_MODULE, "led_class");
	err = PTR_ERR(led_class);
	if(IS_ERR(led_class))
    {
		printk("%s, %s, line:%d\n", __FILE__, __FUNCTION__, __LINE__);
		unregister_chrdev(major, DEVICE_NAME);
		return err;
	}

	/* 根据模块类,创建设备结点 */
	devt = MKDEV(major, 0);
	dev = device_create(led_class, NULL, devt, NULL, DEVICE_NAME);
	printk("device init name is: %s\n", dev->init_name);

	return 0;
}

/* 5. 定义出口函数 */
static void __exit led_exit(void)
{
	printk("%s, %s, line:%d\n", __FILE__, __FUNCTION__, __LINE__);

    iounmap(IOMUXC_SNVS_SW_MUX_CTL_PAD_SNVS_TAMPER3);
    iounmap(GPIO5_GDIR);
    iounmap(GPIO5_DR);

	device_destroy(led_class, devt);
	class_destroy(led_class);
	unregister_chrdev(major, DEVICE_NAME);
}


module_init(led_init);
module_exit(led_exit);
MODULE_LICENSE("GPL");
测试程序
#include <stdio.h>
#include <sys/types.h>
#include <sys/stat.h>
#include <fcntl.h>
#include <string.h>
#include <unistd.h>

/**
 * led_drv_test /dev/hz_led on
 * led_drv_test /dev/hz_led off
 */
int main(int argc, char **argv)
{
    int fd;
    char status = 0;

    if(argc!= 3)
    {
        printf("Usage %s <dev> <on|off>\n", argv[0]);
        printf("  eg: %s /dev/hz_led on\n", argv[0]);
        printf("  eg: %s /dev/hz_led off\n", argv[0]);
        return -1;
    }

    /* open device */
    fd = open(argv[1], O_RDWR);
    if(fd < 0)
    {
        printf("can not open %s\n", argv[1]);
        return -1;
    }

    /* write device */
    if(strcmp(argv[2], "on") == 0)
    {
        status = 1;
    }
    write(fd, &status, 1);

    return 0;
}
2.2 LED驱动程序相关寄存器
LED硬件原理图
在imx6ull开发板原理图中搜索LED,可以找到LED灯的硬件原理图。从图中可以看到LED2连接到GPIO5_3接口上,即GPIO5的第3个引脚上。

IOMUXC引脚复用模式控制
GPIO5_3引脚使用IOMUXC_SNVS_SW_MUX_CTL_PAD_SNVS_TAMPER3寄存器控制引脚的复用,当低3位为101时,引脚用作gpio。
所以驱动LED2时,需要设置该寄存器低3位,寄存器的地址为:0x02290000 + 0x14:
IOMUXC_SNVS_SW_MUX_CTL_PAD_SNVS_TAMPER3 = ioremap(0x02290000 + 0x14, 4);

*IOMUXC_SNVS_SW_MUX_CTL_PAD_SNVS_TAMPER3 &= ~0xf;   /*低4位清零*/
*IOMUXC_SNVS_SW_MUX_CTL_PAD_SNVS_TAMPER3 |= 0x5;
GPIO相关寄存器
GPIO模块如下图所示,其中涉及三个寄存器:GDIR,GPIO_DR,GPIO_PSR。
GDIR:设置引脚的输出方向,每位对应着一个引脚,1为output,0为input。
GPIO5_GDIR的地址为Base address + 0x4,
GPIO_DR:设置输出引脚的电平,1为高电平,0为低电平。
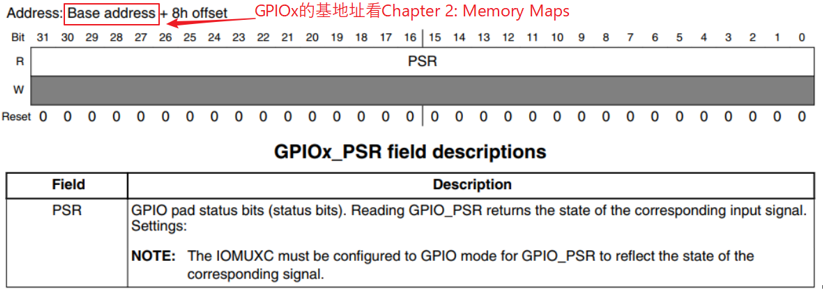
GPIO_PSR:读取引脚的电平,每位对应着一个引脚,1为高电平,0为低电平。
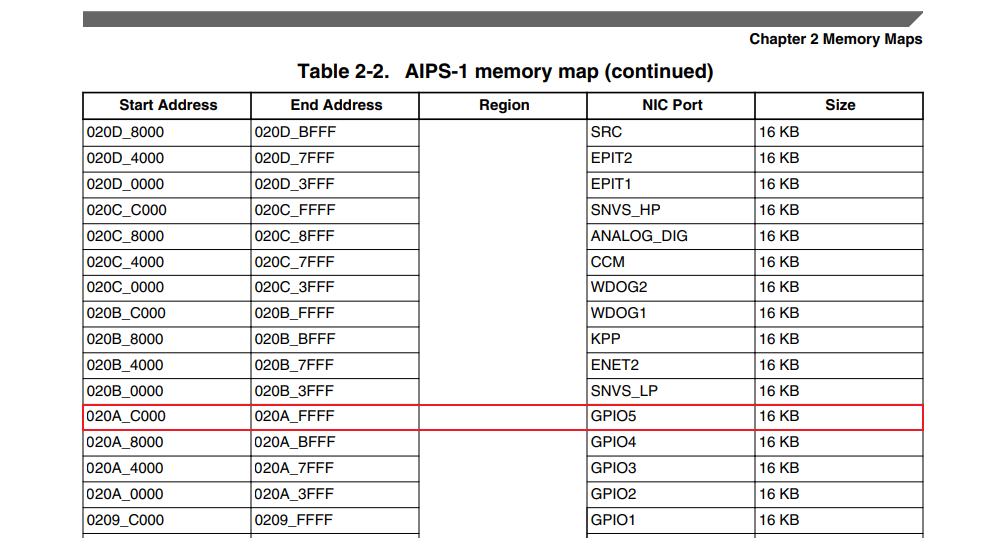
GPIO5的基地址可以在芯片手册的chapter2:Memory Maps中查到:
GPIO5 base adderss = 0x020AC000
GPIO编程
- 读GPIO
-
设置CCM_CCGRx寄存器中某位使能对应的GPIO模块, //
imx6ull默认使能 -
设置IOMUX来选择引脚用于GPIO
-
设置GPIOx_GDIR中某位为0,把该引脚设置为输入功能
-
读GPIOx_DR或GPIOx_PSR得到某位的值
- 写GPIO
-
设置CCM_CCGRx寄存器中某位使能对应的GPIO模块, //
imx6ull默认使能 -
设置IOMUX来选择引脚用于GPIO
-
设置GPIOx_GDIR中某位为1,把该引脚设置为输出功能
-
写GPIOx_DR某位的值
应着一个引脚,1为output,0为input。
GPIO5_GDIR的地址为Base address + 0x4,
[外链图片转存中…(img-PM2680UF-1697560590128)]
GPIO_DR:设置输出引脚的电平,1为高电平,0为低电平。
[外链图片转存中…(img-HZul5ozS-1697560590128)]
GPIO_PSR:读取引脚的电平,每位对应着一个引脚,1为高电平,0为低电平。
[外链图片转存中…(img-EPqwJwnN-1697560590129)]
GPIO5的基地址可以在芯片手册的chapter2:Memory Maps中查到:
GPIO5 base adderss = 0x020AC000
[外链图片转存中…(img-6Oq8jFAC-1697560590129)]
GPIO编程
- 读GPIO
-
设置CCM_CCGRx寄存器中某位使能对应的GPIO模块, //
imx6ull默认使能 -
设置IOMUX来选择引脚用于GPIO
-
设置GPIOx_GDIR中某位为0,把该引脚设置为输入功能
-
读GPIOx_DR或GPIOx_PSR得到某位的值
- 写GPIO
-
设置CCM_CCGRx寄存器中某位使能对应的GPIO模块, //
imx6ull默认使能 -
设置IOMUX来选择引脚用于GPIO
-
设置GPIOx_GDIR中某位为1,把该引脚设置为输出功能
-
写GPIOx_DR某位的值


 733
733


 被折叠的 条评论
为什么被折叠?
被折叠的 条评论
为什么被折叠?
 到【灌水乐园】发言


