


RGA的原理
区域生长算法的基本思想是将有相似性质的像素点合并到一起。对每一个区域要先指定一个种子点作为生长的起点,然后将种子点周围领域的像素点和种子点进行对比,将具有相似性质的点合并起来继续向外生长,直到没有满足条件的像素被包括进来为止。这样一个区域的生长就完成了。
-
实现该算法的一个关键问题是给定种子点(种子点如何选取?)
可以手动输入坐标作为种子点。也可根据自己划分的阈值自动生成种子。当然我感觉最好还是使用人工交互选取种子点。
算法步骤 :
a> 创建一个空白的图像(全黑);
b> 将种子点存入vector中,vector中存储待生长的种子点;
c> 依次弹出种子点并判断种子点如周围8邻域的关系(生长规则),相似的点则作为下次生长的种子点;
d> vector中不存在种子点后就停止生长。
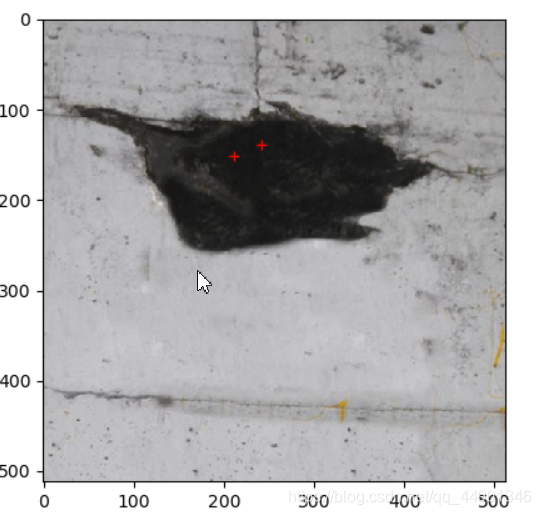
使用人工交互的方法获取种子点(鼠标点击)
import matplotlib.pyplot as plt
from  PIL import Image

def get_x_y(path,n): #path表示图片路径,n表示要获取的坐标个数
    im = Image.open(path)
    plt.imshow(im, cmap = plt.get_cmap("gray"))
    pos=plt.ginput(n)
    return pos   #得到的pos是列表中包含多个坐标元组
区域生长算法
#区域生长
def regionGrow(gray, seeds, thresh, p): #thresh表示与领域的相似距离,小于该距离就合并
seedMark = np.zeros(gray.shape)
#八邻域
if p == 8:
connection = [(-1, -1), (-1, 0), (-1, 1), (0, 1), (1, 1), (1, 0), (1, -1), (0, -1)]
#四邻域
elif p == 4:
connection = [(-1, 0), (0, 1), (1, 0), (0, -1)]
#seeds内无元素时候生长停止
while len(seeds) != 0:
#栈顶元素出栈
pt = seeds.pop(0)
for i in range(p):
tmpX = int(pt[0] + connection[i][0])
tmpY = int(pt[1] + connection[i][1])
#检测边界点
if tmpX < 0 or tmpY < 0 or tmpX >= gray.shape[0] or tmpY >= gray.shape[1]:
continue
if abs(int(gray[tmpX, tmpY]) - int(gray[pt])) < thresh and seedMark[tmpX, tmpY] == 0:
seedMark[tmpX, tmpY] = 255
seeds.append((tmpX, tmpY))
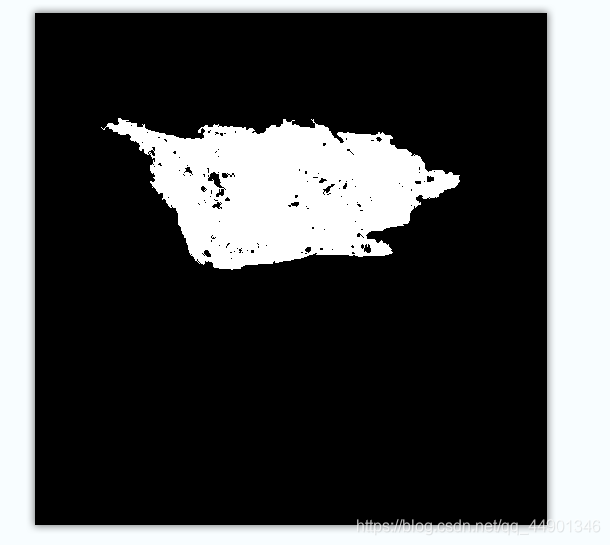
return seedMark
测试
path = r"H:\Dataset\water_leakage\qietu\train\img\34_01.jpg"
img = cv2.imread(path)
gray = cv2.cvtColor(img, cv2.COLOR_BGR2GRAY)
# hist = cv2.calcHist([gray], [0], None, [256], [0,256])#直方图
# seeds = originalSeed(gray, th=10)
# print(seeds)
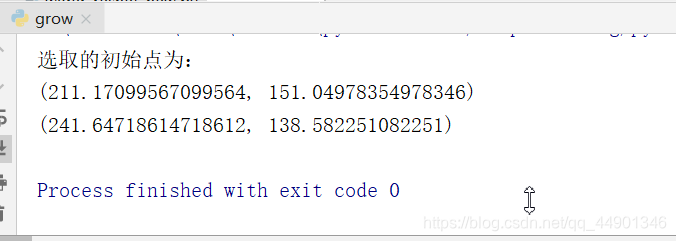
seeds=get_x_y(path=path,n=3) #获取初始种子
print("选取的初始点为:")
new_seeds=[]
for seed in seeds:
print(seed)
#下面是需要注意的一点
#第一: 用鼠标选取的坐标为float类型,需要转为int型
#第二:用鼠标选取的坐标为(W,H),而我们使用函数读取到的图片是(行,列),而这对应到原图是(H,W),所以这里需要调换一下坐标位置,这是很多人容易忽略的一点
new_seeds.append((int(seed[1]), int(seed[0])))#
result= regionGrow(gray, new_seeds, thresh=3, p=8)
#plt.plot(hist)
#plt.xlim([0, 256])
#plt.show()
result=Image.fromarray(result.astype(np.uint8))
result.show()
整合上面的函数,用于一个文件的所有图片
def RGA(img_path,save_path,n):
    imgs_path = os.listdir(img_path)
    for r in imgs_path:
        img=os.path.join(img_path,r)
        seeds = get_x_y(path=img, n=n)
        print("选取的初始点为:")
        new_seeds=[]
        for seed in seeds:
            print(seed)
            new_seeds.append((int(seed[1]), int(seed[0])))

        img = cv2.imread(img)
        gray = cv2.cvtColor(img, cv2.COLOR_BGR2GRAY)
        result = regionGrow(gray, new_seeds, thresh=3, p=8)
        result = Image.fromarray(result.astype(np.uint8))
        result.show()
        result.save(save_path+r)

img_path=r'H:\Dataset\water_leakage\qietu\val\img'
save_path=r'H:\Dataset\water_leakage\qietu\val\RAG'
RGA(img_path,save_path,3)
网上流行的另一个python版本的区域生长算法,将其改为人工交互模式
这个版本和上那个版本是区别是第一个版本在regionGrow函数中坐标是放在元组中。
而这个版本的坐标放在point函数中,相当于放到一个个的节点中吧
import os

import numpy as np
import cv2
from PIL import Image
import matplotlib.pyplot as plt


def get_x_y(path,n): #path表示图片路径,n表示要获取的坐标个数
    im = Image.open(path)
    plt.imshow(im, cmap = plt.get_cmap("gray"))
    pos=plt.ginput(n)
    return pos

class Point(object):
    def __init__(self, x, y):
        self.x = x
        self.y = y

    def getX(self):
        return self.x

    def getY(self):
        return self.y


def getGrayDiff(img, currentPoint, tmpPoint):
    return abs(int(img[currentPoint.x, currentPoint.y]) - int(img[tmpPoint.x, tmpPoint.y]))


def selectConnects(p):
    if p != 0:
        connects = [Point(-1, -1), Point(0, -1), Point(1, -1), Point(1, 0), Point(1, 1), Point(0, 1), Point(-1, 1),
                    Point(-1, 0)]
    else:
        connects = [Point(0, -1), Point(1, 0), Point(0, 1), Point(-1, 0)]
    return connects


def regionGrow(img, seeds, thresh, p=1):
    height, weight = img.shape
    seedMark = np.zeros(img.shape)
    seedList = []
    for seed in seeds:
        seedList.append(seed)
    label = 255
    connects = selectConnects(p)
    while (len(seedList) > 0):
        currentPoint = seedList.pop(0)

        seedMark[currentPoint.x, currentPoint.y] = label
        for i in range(8):
            tmpX = currentPoint.x + connects[i].x
            tmpY = currentPoint.y + connects[i].y
            if tmpX < 0 or tmpY < 0 or tmpX >= height or tmpY >= weight:
                continue
            grayDiff = getGrayDiff(img, currentPoint, Point(tmpX, tmpY))
            if grayDiff < thresh and seedMark[tmpX, tmpY] == 0:
                seedMark[tmpX, tmpY] = label
                seedList.append(Point(tmpX, tmpY))
    return seedMark

def RGA(img_path,savepath,n):
    imgs_path = os.listdir(img_path)

    for r in imgs_path:
        img=os.path.join(img_path,r)
        seeds = get_x_y(path=img, n=n)

        print("选取的初始点为:")

        seeds_point = []
        for seed in seeds:
            print(seed)
            seeds_point.append(Point(int(seed[1]),int(seed[0])))


        img = cv2.imread(img)
        gray = cv2.cvtColor(img, cv2.COLOR_BGR2GRAY)
        seedMark = regionGrow(gray, seeds_point, thresh=3, p=8)
        seedMark = Image.fromarray(seedMark.astype(np.uint8))
        seedMark.show()
        seedMark.save(os.path.join(savepath,r))

img_path=r'H:\Dataset\water_leakage\qietu\val\img'
save_path=r'H:\Dataset\water_leakage\qietu\val\RAG'
RGA(img_path,save_path,3)


 695
695

 被折叠的 条评论
为什么被折叠?
被折叠的 条评论
为什么被折叠?
 到【灌水乐园】发言


