


实现鼠标跟随效果
<!DOCTYPE html>
<html>
	<head>
		<meta charset="utf-8">
		<title></title>
		<script src="../lib/index.js"></script>
		<style>
			*{
				margin: 0;
				padding: 0;
			}
			canvas{
				margin: 50px auto 0;
				display: block;
				background: yellow;
			}
		</style>
	</head>
	<body>
		<canvas id="cancas" width="400" height="400"></canvas>
	</body>
	<script>
		const ctx = document.getElementById('cancas')
		const gl = ctx.getContext('webgl')
		//着色器
		//创建着色器源码
		const VERTEX_SHADER_SOURCE = `
		 //必须要存在 main 函数
		 attribute vec4 aPosition;
		 void main() {
			 //要绘制的点的坐标
			 gl_Position = aPosition; //默认为 vec4(0.0,0.0,0.0,1.0);
			 //点的大小
			 gl_PointSize=40.0;
		 }
		 `; //顶点着色器
		const FRAGMENT_SHADER_SOURCE = `
		void main(){
			gl_FragColor=vec4(1.0,0.0,0.0,1.0);
		}
		`; //片元着色器
		//执行绘画
		const program=initShader(gl,VERTEX_SHADER_SOURCE,FRAGMENT_SHADER_SOURCE)
		// 获取attribute变量
		const aPosition=gl.getAttribLocation(program,'aPosition')
		gl.vertexAttrib1f(aPosition,0.0)
		gl.drawArrays(gl.POINTS, 0, 1);//重新绘制

		// onmousemove 鼠标跟随效果
		ctx.onmousemove=function(ev){
			//坐标
			const x =ev.clientX
			const y=ev.clientY
			const domPosition= ev.target.getBoundingClientRect()
			console.log(domPosition,ctx.offsetTop,ctx.offsetLeft)
			const domx=x-domPosition.left;
			const domy=y-domPosition.top;
			/*
			画布的宽度是400,对应的画布坐标系
			0 200 400
			webgl对应的X坐标系
			-1 0 1
			把画布X坐标系转化成webgl对应的坐标系
			需要先 -200 (当前画布的宽度)然后再除以200
			画布的高度是400,对应的画布坐标系
			0 200 400
			webgl对应的Y坐标系
			1 0 -1
			把画布Y坐标系转化成webgl对应的坐标系
			需要先让200(当前画布的高度) 减这个数,然后再/200
			*/
		   const halfWidth=ctx.offsetWidth/2
		   const halfHeight=ctx.offsetHeight/2
		   const clickX=(domx-halfWidth)/halfWidth
		   const clickY=(halfHeight-domy) / halfHeight
		   gl.vertexAttrib2f(aPosition,clickX,clickY)
		   gl.drawArrays(gl.POINTS, 0, 1);
		}
	</script>
</html>
提示:需要把画布坐标转换成webgl坐标才能进行绘画
实现绘画效果
<!DOCTYPE html>
<html>
	<head>
		<meta charset="utf-8">
		<title></title>
		<script src="../lib/index.js"></script>
		<style>
			*{
				margin: 0;
				padding: 0;
			}
			canvas{
				margin: 50px auto 0;
				display: block;
				background: yellow;
			}
		</style>
	</head>
	<body>
		<canvas id="cancas" width="400" height="400"></canvas>
	</body>
	<script>
		const ctx = document.getElementById('cancas')
		const gl = ctx.getContext('webgl')
		//着色器
		//创建着色器源码
		const VERTEX_SHADER_SOURCE = `
		 //必须要存在 main 函数
		 attribute vec4 aPosition;
		 void main() {
			 //要绘制的点的坐标
			 gl_Position = aPosition; //默认为 vec4(0.0,0.0,0.0,1.0);
			 //点的大小
			 gl_PointSize=10.0;
		 }
		 `; //顶点着色器
		const FRAGMENT_SHADER_SOURCE = `
		void main(){
			gl_FragColor=vec4(1.0,0.0,0.0,1.0);
		}
		`; //片元着色器
		//执行绘画
		const program=initShader(gl,VERTEX_SHADER_SOURCE,FRAGMENT_SHADER_SOURCE)
		// 获取attribute变量
		const aPosition=gl.getAttribLocation(program,'aPosition')
		const points=[];
		gl.vertexAttrib1f(aPosition,0.0)
		gl.drawArrays(gl.POINTS, 0, 1);//重新绘制

		// 绘画效果
		ctx.onmousemove=function(ev){
			//坐标
			const x =ev.clientX
			const y=ev.clientY
			const domPosition= ev.target.getBoundingClientRect()
			console.log(domPosition,ctx.offsetTop,ctx.offsetLeft)
			const domx=x-domPosition.left;
			const domy=y-domPosition.top;
			/*
			画布的宽度是400,对应的画布坐标系
			0 200 400
			webgl对应的X坐标系
			-1 0 1
			把画布X坐标系转化成webgl对应的坐标系
			需要先 -200 (当前画布的宽度)然后再除以200
			画布的高度是400,对应的画布坐标系
			0 200 400
			webgl对应的Y坐标系
			1 0 -1
			把画布Y坐标系转化成webgl对应的坐标系
			需要先让200(当前画布的高度) 减这个数,然后再/200
			*/
		   const halfWidth=ctx.offsetWidth/2
		   const halfHeight=ctx.offsetHeight/2
		   const clickX=(domx-halfWidth)/halfWidth
		   const clickY=(halfHeight-domy) / halfHeight
		   points.push({clickX,clickY})
		   for(let i=0;i<points.length;i++)
		   {
			   gl.vertexAttrib2f(aPosition,points[i].clickX,points[i].clickY)
			   gl.drawArrays(gl.POINTS, 0, 1);
		   }

		}
	</script>
</html>
通过点击绘制多个点
<!DOCTYPE html>
<html>
	<head>
		<meta charset="utf-8">
		<title></title>
		<script src="../lib/index.js"></script>
		<style>
			*{
				margin: 0;
				padding: 0;
			}
			canvas{
				margin: 50px auto 0;
				display: block;
				background: yellow;
			}
		</style>
	</head>
	<body>
		<canvas id="cancas" width="400" height="400"></canvas>
	</body>
	<script>
		const ctx = document.getElementById('cancas')
		const gl = ctx.getContext('webgl')
		//着色器
		//创建着色器源码
		const VERTEX_SHADER_SOURCE = `
		 //必须要存在 main 函数
		 attribute vec4 aPosition;
		 void main() {
			 //要绘制的点的坐标
			 gl_Position = aPosition; //默认为 vec4(0.0,0.0,0.0,1.0);
			 //点的大小
			 gl_PointSize=10.0;
		 }
		 `; //顶点着色器
		const FRAGMENT_SHADER_SOURCE = `
		void main(){
			gl_FragColor=vec4(1.0,0.0,0.0,1.0);
		}
		`; //片元着色器
		//执行绘画
		const program=initShader(gl,VERTEX_SHADER_SOURCE,FRAGMENT_SHADER_SOURCE)
		// 获取attribute变量
		const aPosition=gl.getAttribLocation(program,'aPosition')
		const points=[];
		gl.vertexAttrib1f(aPosition,0.0)
		gl.drawArrays(gl.POINTS, 0, 1);//重新绘制

		// 通过点击绘制多个点
		ctx.onclick=function(ev){
			//坐标
			const x =ev.clientX
			const y=ev.clientY
			const domPosition= ev.target.getBoundingClientRect()
			console.log(domPosition,ctx.offsetTop,ctx.offsetLeft)
			const domx=x-domPosition.left;
			const domy=y-domPosition.top;
			/*
			画布的宽度是400,对应的画布坐标系
			0 200 400
			webgl对应的X坐标系
			-1 0 1
			把画布X坐标系转化成webgl对应的坐标系
			需要先 -200 (当前画布的宽度)然后再除以200
			画布的高度是400,对应的画布坐标系
			0 200 400
			webgl对应的Y坐标系
			1 0 -1
			把画布Y坐标系转化成webgl对应的坐标系
			需要先让200(当前画布的高度) 减这个数,然后再/200
			*/
		   const halfWidth=ctx.offsetWidth/2
		   const halfHeight=ctx.offsetHeight/2
		   const clickX=(domx-halfWidth)/halfWidth
		   const clickY=(halfHeight-domy) / halfHeight
		   points.push({clickX,clickY})
		   for(let i=0;i<points.length;i++)
		   {
			   gl.vertexAttrib2f(aPosition,points[i].clickX,points[i].clickY)
			   gl.drawArrays(gl.POINTS, 0, 1);
		   }

		}
	</script>
</html>
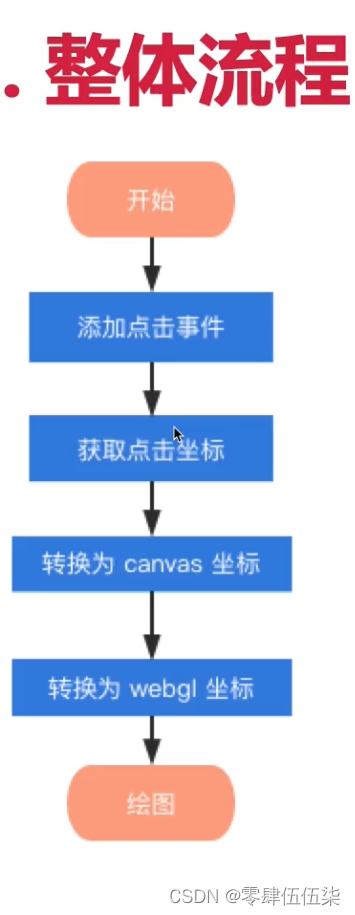
整体流程
代码中的initShader方法是自己封装好的方法
请参考https://blog.csdn.net/qq_45013951/article/details/134637108
下面是WebGL+Three.js入门与实战的总体链接
1.1 绘制一个点
1.2 webgl坐标系
1.3 学习使用attribute变量-绘制一个水平移动的点
1.4 通过鼠标控制绘制
1.5 修改点的颜色
1.6 实现贪吃蛇游戏
2.1 使用缓冲区对象-绘制多个点


 888
888


 被折叠的 条评论
为什么被折叠?
被折叠的 条评论
为什么被折叠?
 到【灌水乐园】发言


