


目录
自动补全
① 设置创建索引库(设置一个自动补全字段,类型为:completion)
② 重新插入数据
③ 查询(查询时要设置这个自动补全操作的名称,并且指定那个类型为completion的字段)
④ 分解结果(结果也需要根据之前设置这个自动查询操作的名称来取)
当用户在搜索框输入字符时,我们应该提示出与该字符有关的搜索项,如图:
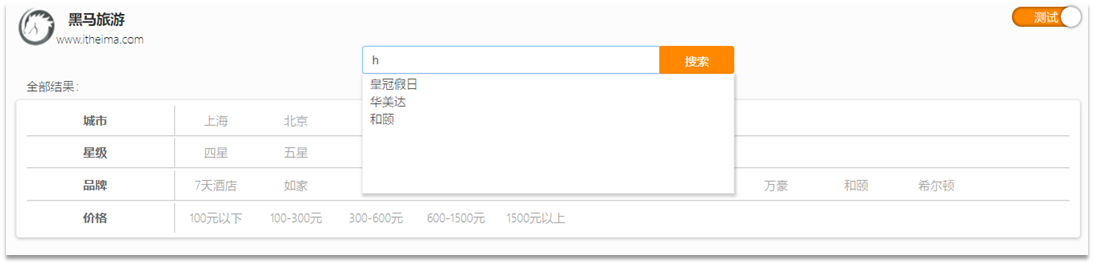
这种根据用户输入的字母,提示完整词条的功能,就是自动补全了。
1. 拼音分词器
下载拼音分词器记得版本要和ES对应,不对应会报错
要实现根据字母做补全,就必须对文档按照拼音分词。在GitHub上恰好有elasticsearch的拼音分词插件。地址:https://github.com/medcl/elasticsearch-analysis-pinyin
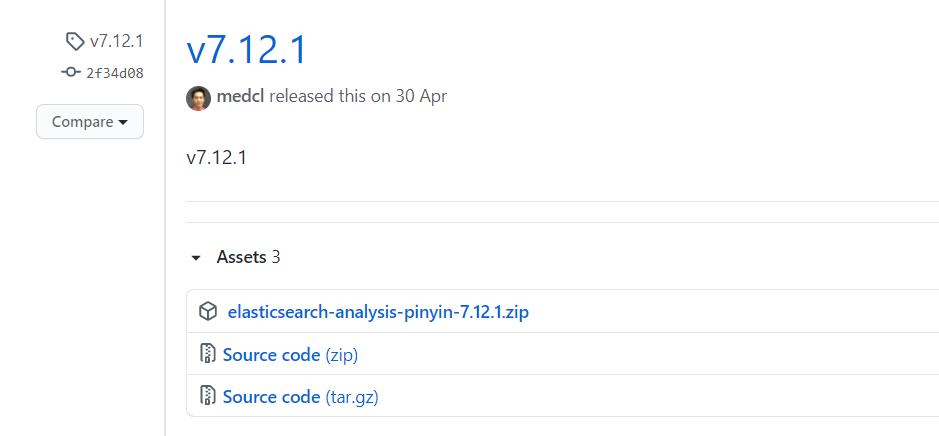
课前资料中也提供了拼音分词器的安装包:

安装方式与IK分词器一样,分三步:
①解压
②上传到虚拟机中,elasticsearch的plugin目录
③重启elasticsearch
④测试
详细安装步骤可以参考IK分词器的安装过程。
2. 自定义拼音分词器
如何使用拼音分词器?
①下载pinyin分词器
②解压并放到elasticsearch的plugin目录
③重启即可
如何自定义分词器?
①创建索引库时,在settings中配置,可以包含三部分
②character filter
③tokenizer
④filter
拼音分词器注意事项?
- 为了避免搜索到同音字,搜索时不要使用拼音分词器
默认的拼音分词器会将每个汉字单独分为拼音,而我们希望的是每个词条形成一组拼音,需要对拼音分词器做个性化定制,形成自定义分词器。官网文档查询地址:https://github.com/medcl/elasticsearch-analysis-pinyin
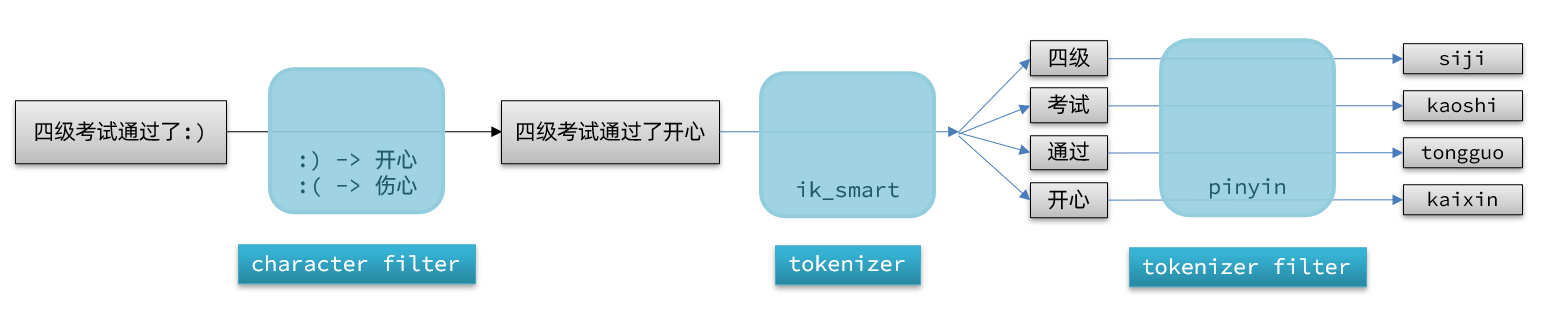
elasticsearch中分词器(analyzer)的组成包含三部分:
- character filters:在tokenizer之前对文本进行处理。例如删除字符、替换字符
- tokenizer:将文本按照一定的规则切割成词条(term)。例如keyword,就是不分词;还有ik_smart
- tokenizer filter:将tokenizer输出的词条做进一步处理。例如大小写转换、同义词处理、拼音处理等
文档分词时会依次由这三部分来处理文档:
声明自定义分词器的语法如下:
PUT /test
{
  "settings": {
    "analysis": {
      "analyzer": { // 自定义分词器
        "my_analyzer": {  // 分词器名称
          "tokenizer": "ik_max_word",
          "filter": "py"
        }
      },
      "filter": {   // 自定义tokenizer filter
        "py": {  // 过滤器名称
          "type": "pinyin", // 过滤器类型,这里是pinyin
		  "keep_full_pinyin": false,
          "keep_joined_full_pinyin": true,
          "keep_original": true,
          "limit_first_letter_length": 16,
          "remove_duplicated_term": true,
          "none_chinese_pinyin_tokenize": false
        }
      }
    }
  },
  "mappings": {
    "properties": {
      "name": {
        "type": "text",
        "analyzer": "my_analyzer",
        "search_analyzer": "ik_smart"
      }
    }
  }
}
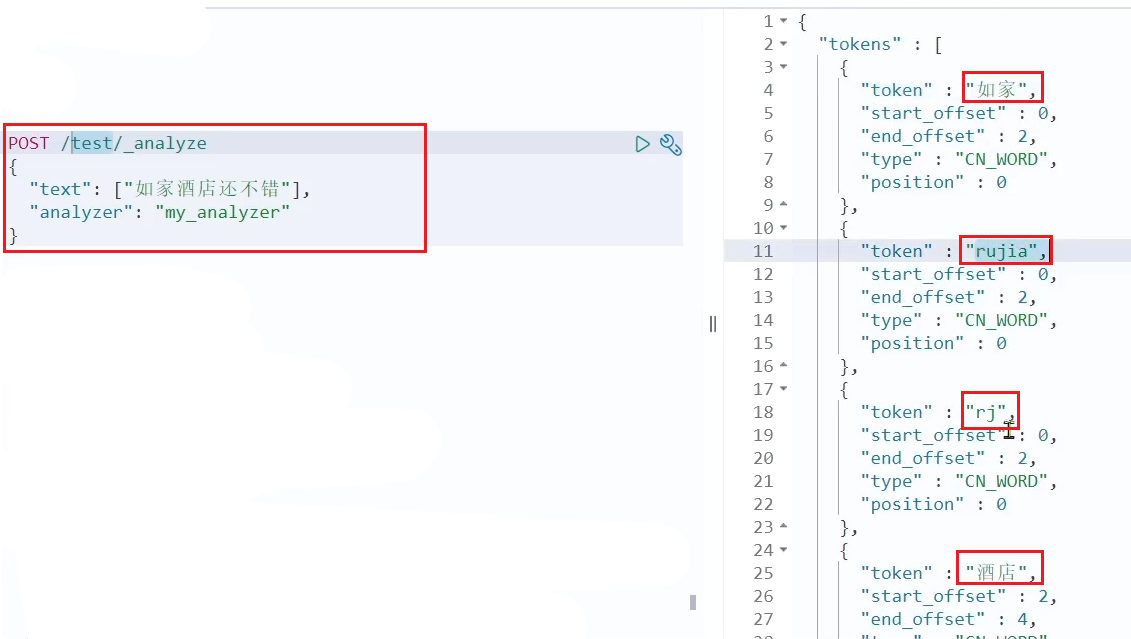
测试:
3. 自动补全查询
三步骤:
① 创建索引库
② 插入数据
③ 查询的DSL语句
elasticsearch提供了Completion Suggester查询来实现自动补全功能。这个查询会匹配以用户输入内容开头的词条并返回。为了提高补全查询的效率,对于文档中字段的类型有一些约束:
-
参与补全查询的字段必须是completion类型。
-
字段的内容一般是用来补全的多个词条形成的数组。
比如,一个这样的索引库:
// 创建索引库
PUT test
{
  "mappings": {
    "properties": {
      "title":{
        "type": "completion"
      }
    }
  }
}
然后插入下面的数据:
// 示例数据
POST test/_doc
{
  "title": ["Sony", "WH-1000XM3"]
}
POST test/_doc
{
  "title": ["SK-II", "PITERA"]
}
POST test/_doc
{
  "title": ["Nintendo", "switch"]
}
查询的DSL语句如下:
// 自动补全查询
GET /test/_search
{
  "suggest": {
    "title_suggest": {	//设置这个自动查询操作的名称
      "text": "s", // 关键字
      "completion": {
        "field": "title", // 补全查询的字段名
        "skip_duplicates": true, // 跳过重复的
        "size": 10 // 获取前10条结果
      }
    }
  }
}
4. 自动补全嵌入项目
4.1 修改索引库映射结构
重点注意:
① all、name字段等要 分词设置为自定义分词器("analyzer": "text_anlyzer")(一般要分词,然后再对分词后的词语进行拼音处理),查询设置为最精简分词器("search_analyzer": "ik_smart")
② 设置一个自动补全字段(如 suggestion) 类型必须为:completion,并且使用自定义分词器(一般不分词直接对整个词语进行拼音处理)
先删除之前的索引库,再设置如下:
// 酒店数据索引库
PUT /hotel
{
  "settings": {
    "analysis": {
      "analyzer": {
        "text_anlyzer": {
          "tokenizer": "ik_max_word",
          "filter": "py"
        },
        "completion_analyzer": {
          "tokenizer": "keyword",
          "filter": "py"
        }
      },
      "filter": {
        "py": {
          "type": "pinyin",
          "keep_full_pinyin": false,
          "keep_joined_full_pinyin": true,
          "keep_original": true,
          "limit_first_letter_length": 16,
          "remove_duplicated_term": true,
          "none_chinese_pinyin_tokenize": false
        }
      }
    }
  },
  "mappings": {
    "properties": {
      "id":{
        "type": "keyword"
      },
      "name":{
        "type": "text",
        "analyzer": "text_anlyzer",
        "search_analyzer": "ik_smart",
        "copy_to": "all"
      },
      "address":{
        "type": "keyword",
        "index": false
      },
      "price":{
        "type": "integer"
      },
      "score":{
        "type": "integer"
      },
      "brand":{
        "type": "keyword",
        "copy_to": "all"
      },
      "city":{
        "type": "keyword"
      },
      "starName":{
        "type": "keyword"
      },
      "business":{
        "type": "keyword",
        "copy_to": "all"
      },
      "location":{
        "type": "geo_point"
      },
      "pic":{
        "type": "keyword",
        "index": false
      },
      "all":{
        "type": "text",
        "analyzer": "text_anlyzer",
        "search_analyzer": "ik_smart"
      },
      "suggestion":{
          "type": "completion",
          "analyzer": "completion_analyzer"
      }
    }
  }
}
4.2 修改实体类
类型为completion的字段需要在改造方法里做组装
HotelDoc中要添加一个字段,用来做自动补全,内容可以是酒店品牌、城市、商圈等信息。按照自动补全字段的要求,最好是这些字段的数组。
因此我们在HotelDoc中添加一个suggestion字段,类型为List<String>,然后将brand、city、business等信息放到里面。
代码如下:
package cn.itcast.hotel.pojo;

import lombok.Data;
import lombok.NoArgsConstructor;

import java.util.ArrayList;
import java.util.Arrays;
import java.util.Collections;
import java.util.List;

@Data
@NoArgsConstructor
public class HotelDoc {
    private Long id;
    private String name;
    private String address;
    private Integer price;
    private Integer score;
    private String brand;
    private String city;
    private String starName;
    private String business;
    private String location;
    private String pic;
    private Object distance;
    private Boolean isAD;
    private List<String> suggestion;

    public HotelDoc(Hotel hotel) {
        this.id = hotel.getId();
        this.name = hotel.getName();
        this.address = hotel.getAddress();
        this.price = hotel.getPrice();
        this.score = hotel.getScore();
        this.brand = hotel.getBrand();
        this.city = hotel.getCity();
        this.starName = hotel.getStarName();
        this.business = hotel.getBusiness();
        this.location = hotel.getLatitude() + ", " + hotel.getLongitude();
        this.pic = hotel.getPic();
        // 组装suggestion
        if(this.business.contains("/")){
            // business有多个值,需要切割
            String[] arr = this.business.split("/");
            // 添加元素
            this.suggestion = new ArrayList<>();
            this.suggestion.add(this.brand);
            Collections.addAll(this.suggestion, arr);
        }else {
            this.suggestion = Arrays.asList(this.brand, this.business);
        }
    }
}
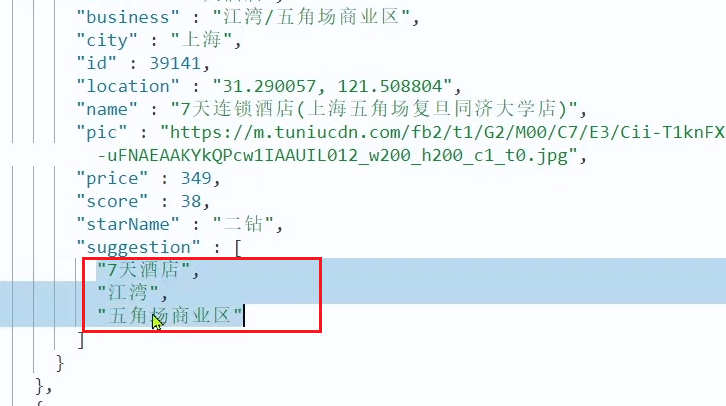
4.3 重新导入数据
先删除数据,再重新执行之前编写的导入数据功能,可以看到新的酒店数据中包含了suggestion:
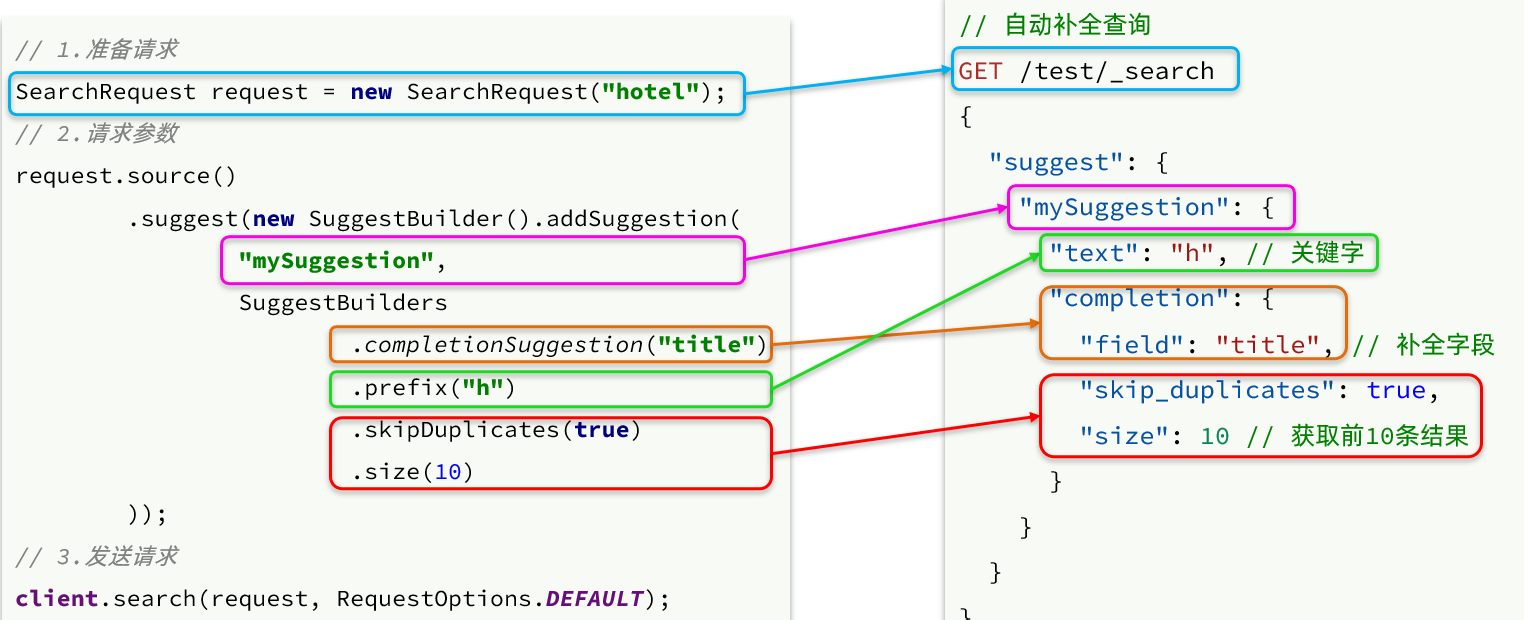
4.4 自动补全的JavaAPI
示例:(这两幅图有点乱,看不懂就忽略)
查询代码如下:
解析结果代码如下:

1)在cn.itcast.hotel.web包下的HotelController中添加新接口,接收新的请求:
@GetMapping("suggestion")
public List<String> getSuggestions(@RequestParam("key") String prefix) {
    return hotelService.getSuggestions(prefix);
}
2)在cn.itcast.hotel.service包下的IhotelService中添加方法:
List<String> getSuggestions(String prefix);
3)在cn.itcast.hotel.service.impl.HotelService中实现该方法:
@Override
public List<String> getSuggestion(String prefix) {
    try {
        // 1.准备Request
        SearchRequest request = new SearchRequest("hotel");
        // 2.准备DSL
        request.source().suggest(new SuggestBuilder().addSuggestion(
            "hotelSuggestion",  //设置这个自动补全操作的名称
            SuggestBuilders.completionSuggestion("suggestion") //类型为completion的字段名
            .prefix(prefix)
            .skipDuplicates(true)
            .size(10)
        ));
        // 3.发起请求
        SearchResponse response = client.search(request, RequestOptions.DEFAULT);
        // 4.解析结果
        Suggest suggest = response.getSuggest();
        // 4.1.根据补全查询名称,获取补全结果(这里的参数是索引库里类型为completion的字段名)
        CompletionSuggestion suggestions = suggest.getSuggestion("hotelSuggestion");  //之前设置的这个自动查询操作的名称
        // 4.2.获取options
        List<CompletionSuggestion.Entry.Option> options = suggestions.getOptions();
        // 4.3.遍历
        List<String> list = new ArrayList<>(options.size());
        for (CompletionSuggestion.Entry.Option option : options) {
            String text = option.getText().toString();
            list.add(text);
        }
        return list;
    } catch (IOException e) {
        throw new RuntimeException(e);
    }
}
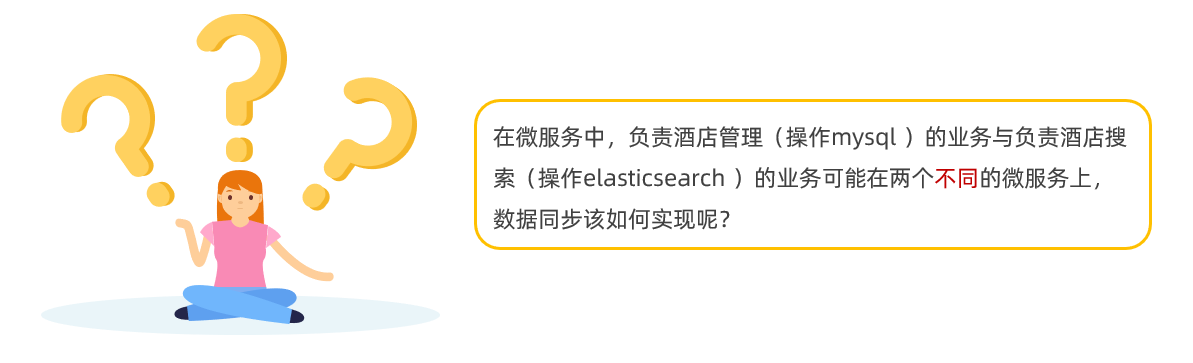
ES与Mysql数据同步
elasticsearch中的酒店数据来自于mysql数据库,因此mysql数据发生改变时,elasticsearch也必须跟着改变,这个就是elasticsearch与mysql之间的数据同步。
1. 三种方法
常见的数据同步方案有三种:
- 同步调用
- 异步通知
- 监听binlog
方式一:同步调用
- 优点:实现简单,粗暴
- 缺点:业务耦合度高
方式二:异步通知【常用】
- 优点:低耦合,实现难度一般
- 缺点:依赖mq的可靠性
方式三:监听binlog
- 优点:完全解除服务间耦合
- 缺点:开启binlog增加数据库负担、实现复杂度高
1.1.同步调用
方案一:同步调用
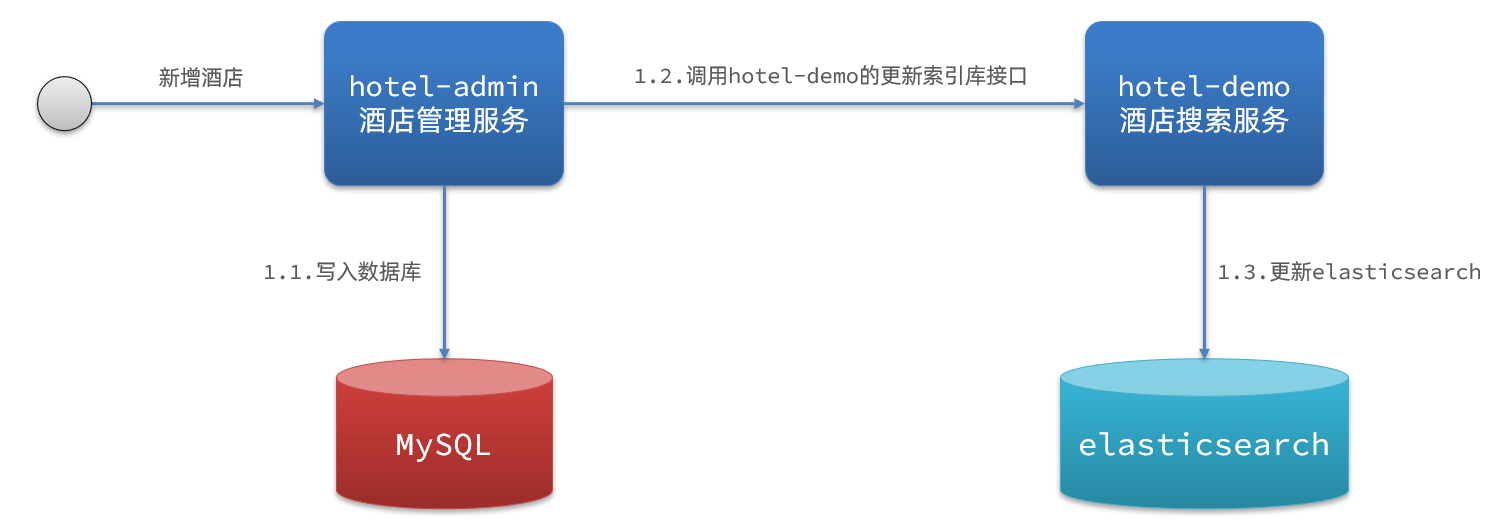
基本步骤如下:
- hotel-demo对外提供接口,用来修改elasticsearch中的数据
- 酒店管理服务在完成数据库操作后,直接调用hotel-demo提供的接口,
1.2.异步通知
方案二:异步通知
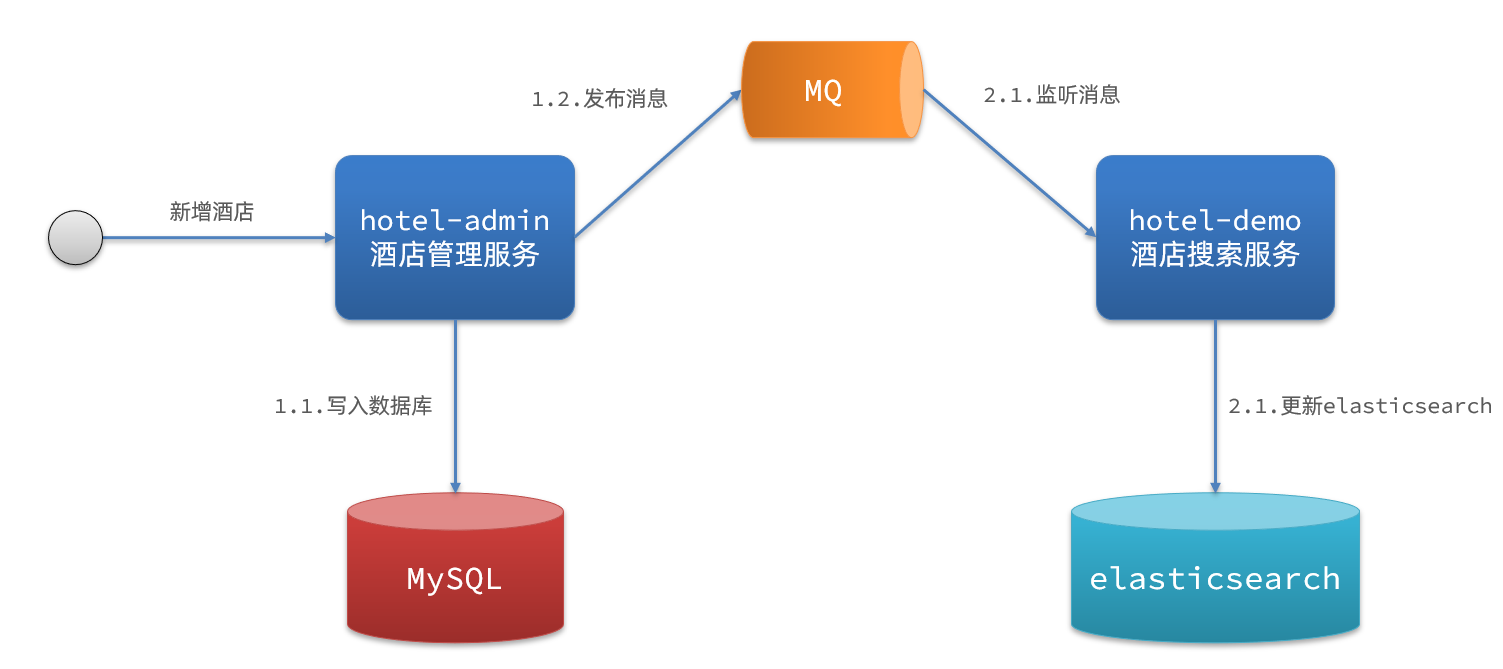
流程如下:
- hotel-admin对mysql数据库数据完成增、删、改后,发送MQ消息
- hotel-demo监听MQ,接收到消息后完成elasticsearch数据修改
1.3.监听binlog
方案三:监听binlog
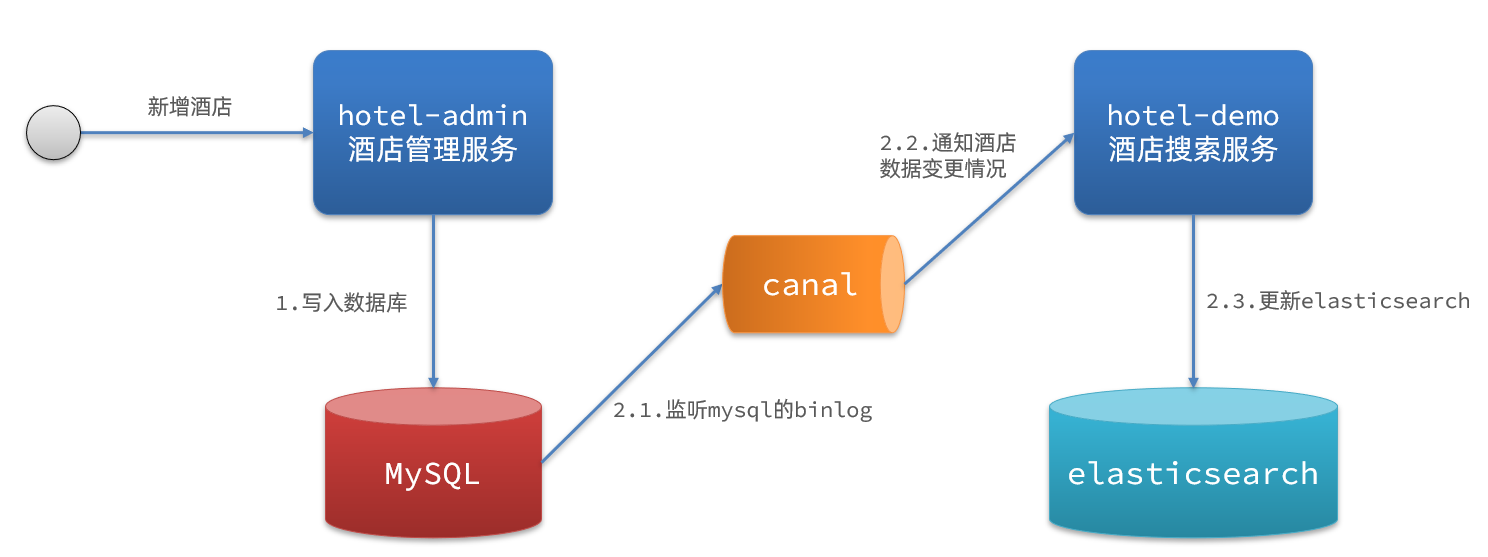
流程如下:
- 给mysql开启binlog功能
- mysql完成增、删、改操作都会记录在binlog中
- hotel-demo基于canal监听binlog变化,实时更新elasticsearch中的内容
2. 实现数据同步
当数据发生增、删、改时,要求对elasticsearch中数据也要完成相同操作。
步骤:
- 单机部署并启动MQ(单机部署在MQ部分有讲)
- 接收者中声明exchange、queue、RoutingKey
- 在hotel-admin发送者中的增、删、改业务中完成消息发送
- 在hotel-demo接收者中完成消息监听,并更新elasticsearch中数据
- 启动并测试数据同步功能
2.0 导入依赖和yaml
对发送者和消费者都添加依赖和yaml信息
1)引入依赖
<!--amqp-->
<dependency>
    <groupId>org.springframework.boot</groupId>
    <artifactId>spring-boot-starter-amqp</artifactId>
</dependency>
2)yaml
spring:
  rabbitmq:	#MQ配置
    host: 192.168.194.131 # 主机名
    port: 5672 # 端口
    virtual-host: / # 虚拟主机
    username: itcast # 用户名
    password: 123321 # 密码
2.1 声明交换机、队列
MQ结构如图:
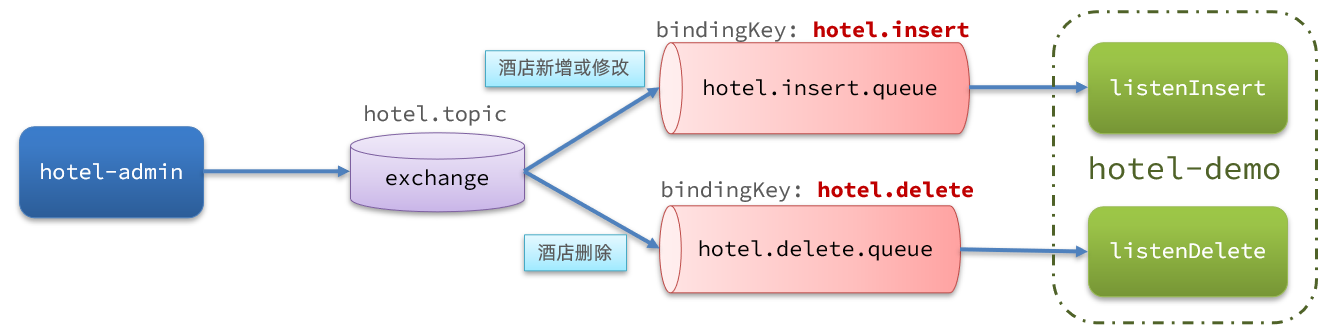
1)声明队列交换机名称
在hotel-admin发送者和hotel-demo消费者中的cn.itcast.hotel.constatnts包下新建一个类MqConstants:
package cn.itcast.hotel.constatnts;

public class MqConstants {
    /**
     * 交换机
     */
    public final static String HOTEL_EXCHANGE = "hotel.topic";
    /**
     * 监听新增和修改的队列
     */
    public final static String HOTEL_INSERT_QUEUE = "hotel.insert.queue";
    /**
     * 监听删除的队列
     */
    public final static String HOTEL_DELETE_QUEUE = "hotel.delete.queue";
    /**
     * 新增或修改的RoutingKey
     */
    public final static String HOTEL_INSERT_KEY = "hotel.insert";
    /**
     * 删除的RoutingKey
     */
    public final static String HOTEL_DELETE_KEY = "hotel.delete";
}
2)声明队列交换机
在hotel-demo消费者中,定义配置类,声明队列、交换机:
package cn.itcast.hotel.config;

import cn.itcast.hotel.constants.MqConstants;
import org.springframework.amqp.core.Binding;
import org.springframework.amqp.core.BindingBuilder;
import org.springframework.amqp.core.Queue;
import org.springframework.amqp.core.TopicExchange;
import org.springframework.context.annotation.Bean;
import org.springframework.context.annotation.Configuration;

@Configuration
public class MqConfig {
    @Bean
    public TopicExchange topicExchange(){
        return new TopicExchange(MqConstants.HOTEL_EXCHANGE, true, false);
    }

    @Bean
    public Queue insertQueue(){
        return new Queue(MqConstants.HOTEL_INSERT_QUEUE, true);
    }

    @Bean
    public Queue deleteQueue(){
        return new Queue(MqConstants.HOTEL_DELETE_QUEUE, true);
    }

    @Bean
    public Binding insertQueueBinding(){
        return BindingBuilder.bind(insertQueue()).to(topicExchange()).with(MqConstants.HOTEL_INSERT_KEY);
    }

    @Bean
    public Binding deleteQueueBinding(){
        return BindingBuilder.bind(deleteQueue()).to(topicExchange()).with(MqConstants.HOTEL_DELETE_KEY);
    }
}
2.2 发送MQ消息
在hotel-admin发送者中的增、删、改业务中分别发送MQ消息:

2.3 接收MQ消息
hotel-demo接收到MQ消息要做的事情包括:
- 新增消息:根据传递的hotel的id查询hotel信息,然后新增一条数据到索引库
- 删除消息:根据传递的hotel的id删除索引库中的一条数据
1)写SDL业务
首先在hotel-demo的cn.itcast.hotel.service包下的IHotelService中新增新增、删除业务
void deleteById(Long id);

void insertById(Long id);
给hotel-demo中的cn.itcast.hotel.service.impl包下的HotelService中实现业务:
@Override
public void deleteById(Long id) {
    try {
        // 1.准备Request
        DeleteRequest request = new DeleteRequest("hotel", id.toString());
        // 2.发送请求
        client.delete(request, RequestOptions.DEFAULT);
    } catch (IOException e) {
        throw new RuntimeException(e);
    }
}

@Override
public void insertById(Long id) {
    try {
        // 0.根据id查询酒店数据
        Hotel hotel = getById(id);
        // 转换为文档类型
        HotelDoc hotelDoc = new HotelDoc(hotel);

        // 1.准备Request对象
        IndexRequest request = new IndexRequest("hotel").id(hotel.getId().toString());
        // 2.准备Json文档
        request.source(JSON.toJSONString(hotelDoc), XContentType.JSON);
        // 3.发送请求
        client.index(request, RequestOptions.DEFAULT);
    } catch (IOException e) {
        throw new RuntimeException(e);
    }
}
2)编写监听器
在hotel-demo中的cn.itcast.hotel.mq包新增一个类:
package cn.itcast.hotel.mq;

import cn.itcast.hotel.constants.MqConstants;
import cn.itcast.hotel.service.IHotelService;
import org.springframework.amqp.rabbit.annotation.RabbitListener;
import org.springframework.beans.factory.annotation.Autowired;
import org.springframework.stereotype.Component;

@Component
public class HotelListener {

    @Autowired
    private IHotelService hotelService;

    /**
     * 监听酒店新增或修改的业务
     * @param id 酒店id
     */
    @RabbitListener(queues = MqConstants.HOTEL_INSERT_QUEUE)
    public void listenHotelInsertOrUpdate(Long id){
        hotelService.insertById(id);
    }

    /**
     * 监听酒店删除的业务
     * @param id 酒店id
     */
    @RabbitListener(queues = MqConstants.HOTEL_DELETE_QUEUE)
    public void listenHotelDelete(Long id){
        hotelService.deleteById(id);
    }
}
2.4 测试
用postman调用增加/删除/修改mysql数据库的接口,然后去页面搜索看看删除的数据还是否能查到,或者修改/增加的数据能不能查出来


 1044
1044


 被折叠的 条评论
为什么被折叠?
被折叠的 条评论
为什么被折叠?
 到【灌水乐园】发言


