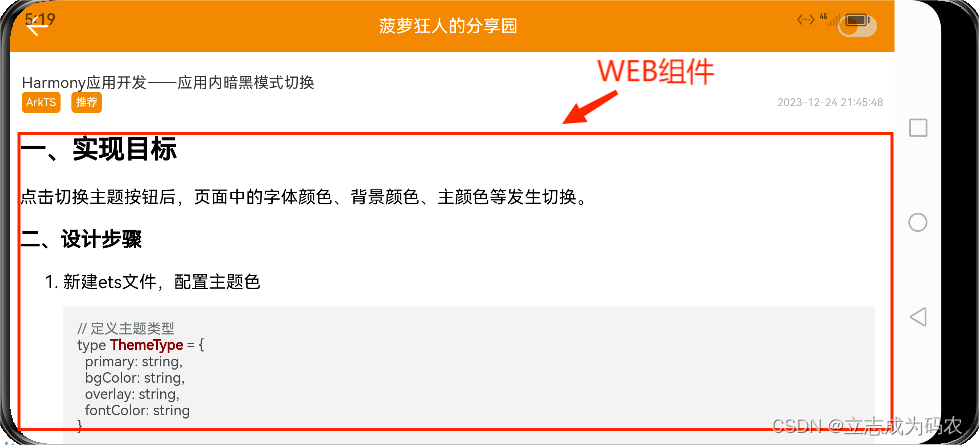
一、WEB组件
Web组件用于在应用程序中显示Web页面内容,为开发者提供页面加载、页面交互、页面调试等能力。
- 页面加载:Web组件提供基础的前端页面加载的能力,包括加载网络页面、本地页面、Html格式文本数据。
- 页面交互:Web组件提供丰富的页面交互的方式,包括:设置前端页面深色模式,新窗口中加载页面,位置权限管理,Cookie管理,应用侧使用前端页面JavaScript等能力。
- 页面调试:Web组件支持使用Devtools工具调试前端页面。
二、需求描述
我目前正在做个人博客的项目,项目中包含文章查看的功能。由于服务器保存的文章内容数据为html格式的文本,所以我首先想到的是利用Web组件引入写好的本地html资源。既能够正常显示html页面,也能为文章中的代码块实现高亮功能。

三、实现步骤
- 在rawfile下创建html文件并编写基本结构,然后保存到指定目录。
<!doctype html> <html lang="en"> <head> <meta charset="UTF-8"> <meta name="viewport" content="width=device-width, user-scalable=no, initial-scale=1.0, maximum-scale=1.0, minimum-scale=1.0"> <meta http-equiv="X-UA-Compatible" content="ie=edge"> <title>菠萝狂人的分享园</title> </head> <body> // 文章内容 <div id="content"></div> <script> // ... </script> </body> </html> - 在html中引入highlight.js库(用于代码高亮)
<!doctype html> <html lang="en"> <head> <meta charset="UTF-8"> <meta name="viewport" content="width=device-width, user-scalable=no, initial-scale=1.0, maximum-scale=1.0, minimum-scale=1.0"> <meta http-equiv="X-UA-Compatible" content="ie=edge"> <title>菠萝狂人的分享园</title> <link rel="stylesheet" href="./style/default.min.css"> </head> <body> <div id="content"></div> <script src="./script/highlight.min.js"></script> <script> // ... </script> </body> </html> - 在html中编写需要的全局函数
<!doctype html> <html lang="en"> <head> <meta charset="UTF-8"> <meta name="viewport" content="width=device-width, user-scalable=no, initial-scale=1.0, maximum-scale=1.0, minimum-scale=1.0"> <meta http-equiv="X-UA-Compatible" content="ie=edge"> <title>菠萝狂人的分享园</title> <link rel="stylesheet" href="./style/default.min.css"> </head> <body> <div id="content"></div> <script src="./script/highlight.min.js"></script> <script> var el = document.getElementById("content") function setContent(content) { el.innerHTML = content } </script> </body> </html> - 在Article.ets中声明WEB组件并加载html文件
// 文章内容
Web({
    src: $rawfile("web/index.html"),
    controller: this.webviewController
})
    .javaScriptAccess(true)
    .fileAccess(true)
    .imageAccess(true)
    .domStorageAccess(true)
    .onPageEnd(() => {})
在以上的代码中,通过创建Web组件并设置src为html文件路径从而实现html页面的加载。代码中还涉及了其它的Api及配置。controller的值为Web组件的控制器:WebviewController,本项目中通过调用controller.runJavaScript()实现将文章数据渲染到页面上。javaScriptAccess()用于设置是否允许执行脚本,默认为允许执行。fileAccess()用于设置是否开启应用中文件系统的访问,默认启用。domStorageAccess()用于设置是否开启文档对象模型存储接口权限,默认未开启。imageAccess()用于设置是否允许自动加载图片资源,默认允许。onPageEnd()为监听页面加载完毕后执行
- 获取文章数据后通过WEB组件的runJavaScript()执行指定函数
import TopBar from "../views/TopBar" import { Theme } from '../common/utils/theme' import LazyView from "../components/LazyView" import articleApi from "../common/apis/article" import router from '@ohos.router' import { ApiResult } from '../common/utils/http/request' import { ArticleContent, ArticleTag } from '../common/models/Article' import { parseTime } from "../common/utils/utils" import webview from '@ohos.web.webview' @Entry @Component struct Article { private params = router.getParams() @Provide @Watch("onThemeChange") theme: Theme = this.params["theme"] @State loading: boolean = true @State isError: boolean = false @State toggleLoad: boolean = false private content: ArticleContent = null private webviewController: WebviewController = new webview.WebviewController() @Builder ArticleContent() { // content Column() { // 文章信息 Column() { // 文章标题 Text(this.content.title) .fontSize(14).width("100%") .fontColor(this.theme.fontColor) // 文章标签和创建时间 Row() { // 标签 Row({ space: 10 }) { ForEach(this.content.tags, (tag: ArticleTag) => { Text(tag.name) .fontColor(0xFFFFFF) .padding(4) .borderRadius(4) .backgroundColor(this.theme.primary) .fontSize(10) }, (tag: ArticleTag) => tag.id + "") } // 创建时间 Text(parseTime(this.content.create_time)) .fontSize(10) .fontColor(0xAFAFAF) }.justifyContent(FlexAlign.SpaceBetween).width("100%") } .padding({ top: 10, left: 10 }) .width("100%") Column() { Scroll() { // 文章内容 Web({ src: $rawfile("web/index.html"), controller: this.webviewController }) .javaScriptAccess(true) .fileAccess(true) .imageAccess(true) .domStorageAccess(true) .onPageEnd(() => { this.webviewController.runJavaScript(`setContent(\`${this.content.content}\`)`) }) .backgroundColor(this.theme.overlay) } .width("100%") } .width("100%") } .width("100%") .backgroundColor(this.theme.overlay) .padding(10) } build() { Column() { TopBar({ backButton: true }) if (this.loading) { Text("加载中...") } else { if (this.isError) { Column() { Text("文章加载出错") Button(){ Text("重试") } .onClick(this.getContentHandle.bind(this)) } } else { this.ArticleContent() } } } .height("100%") .width("100%") .backgroundColor(this.theme.bgColor) } private getContentHandle() { this.loading = true this.isError = false articleApi.queryContentHandle(this.params["id"]).then((response: ApiResult<ArticleContent>) => { if (response.status === 200) { this.content = response.data.items[0] } else { this.isError = true } }) .catch((e) => { this.isError = true }) .finally(() => this.loading = false) } aboutToAppear() { this.getContentHandle() } } - 为代码块添加高亮功能
<!doctype html>
<html lang="en">

<head>
    <meta charset="UTF-8">
    <meta name="viewport"
          content="width=device-width, user-scalable=no, initial-scale=1.0, maximum-scale=1.0, minimum-scale=1.0">
    <meta http-equiv="X-UA-Compatible" content="ie=edge">
    <title>菠萝狂人的分享园</title>
    <link rel="stylesheet" href="./style/default.min.css">
    <link rel="stylesheet" href="./style/main.css">
</head>

<body>
<div id="content"></div>
<script src="./script/highlight.min.js"></script>
<script>
        var languageName = {
            javascript: "javascript.min.js",
            css: "css.min.js",
            markup: "xml.min.js"
        }
        var el = document.getElementById("content")
        function setContent(content) {
            el.innerHTML = content
            try {
                var languages = content.match(/(?<=\<\w+\sclas{2}="language-)\w+/g)
                if (languages) {
                    var loaded = {}
                    for (var i = 0; i < languages.length; i++) {
                        var language = languages[i]
                        if (loaded[language] || !languageName[language]) continue
                        var script = document.createElement("script")
                        script.src = "./script/languages/" + languageName[language]
                        document.body.appendChild(script)
                        loaded[language] = true
                    }
                }
            } catch (e) {
                document.write(e)
            }
            setTimeout(function () { hljs.highlightAll() }, 600)
        }
</script>
</body>

</html>
在以上的代码,通过引入highlight.js并封装setContent函数,参数content为html格式的文章数据。由于hightlight.js实现某个语言的代码高亮需要单独引入对应的文件,所以我通过正则表达式匹配出代码块的语言从而实现按需加载,避免没必要的js文件的引入。我的项目中文章数据里的代码块是通过给标签添加language-xxxx类名标注该代码块的语言。例如:javaScript代码块就为<pre class="language-javascript">...</pre>。所以就得出以下正则表达式:/(?<=\<\w+\sclas{2}="language-)\w+/g,通过这个正则表达式就可以匹配文章中所有代码块的语言。然后通过声明一个对象,属性为语言名称,值为该语言对应的文件名。最后遍历匹配结果,如果还没有引入该语言的js文件,就创建script并插入到页面中。这样就实现了按需加载
四、效果展示
2024-01-04 23-04-26
五、总结
今天我简单的分享了我在项目中如何使用Web组件来实现html的加载并通过runJavaScript将文章数据渲染到页面上。


 788
788


 被折叠的 条评论
为什么被折叠?


