


问题描述
在xubuntu系统中使用软件时,打开的软件弹窗都会置于最上方,如果软件全屏使用的话,上方的边框很影响用户使用体验。
原因分析:
该问题属于panel的设置问题。
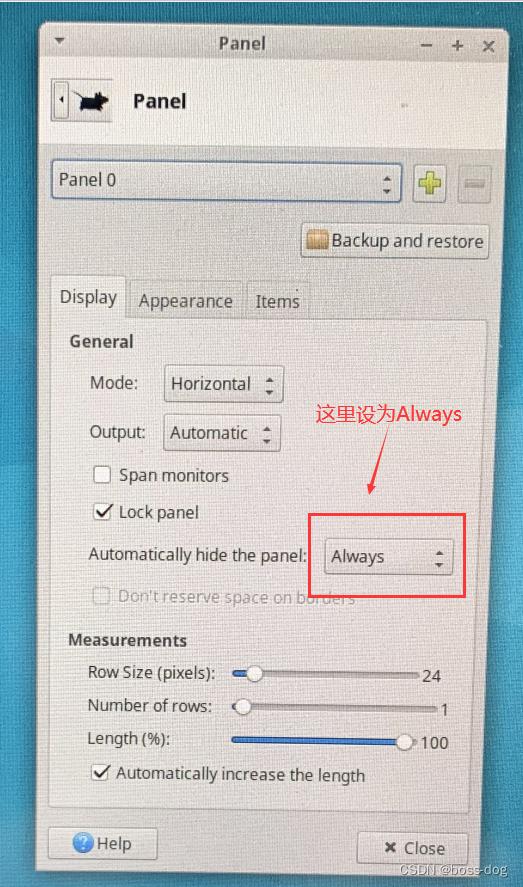
在界面操作上如下:桌面Applications–>Settings–>Panel->Automaticall hide the panel中设为“Always”

解决方案:
在系统中找到对应的配置文件,修改相关参数。
文件所在目录如下:
/root/.config/xfce4/xfconf/xfce-perchannel-xml/xfce4-panel.xml
<?xml version="1.0" encoding="UTF-8"?>

<channel name="xfce4-panel" version="1.0">
  <property name="panels" type="uint" value="1">
    <property name="panel-0" type="empty">
      <property name="position" type="string" value="p=6;x=0;y=0"/>
      <property name="length" type="uint" value="100"/>
      <property name="position-locked" type="bool" value="false"/>
      <property name="plugin-ids" type="array">
        <value type="int" value="1"/>
        <value type="int" value="2"/>
        <value type="int" value="3"/>
        <value type="int" value="4"/>
        <value type="int" value="5"/>
        <value type="int" value="6"/>
        <value type="int" value="7"/>
        <value type="int" value="8"/>
      </property>
      <property name="background-style" type="uint" value="0"/>
      <property name="background-alpha" type="uint" value="80"/>
      <property name="size" type="uint" value="24"/>
      <property name="length-adjust" type="bool" value="true"/>
      <property name="span-monitors" type="bool" value="false"/>
      <property name="enter-opacity" type="uint" value="100"/>
      <property name="leave-opacity" type="uint" value="100"/>
      <property name="mode" type="uint" value="0"/>
      <property name="autohide-behavior" type="uint" value="0"/>
    </property>
  </property>
  <property name="plugins" type="empty">
    <property name="plugin-1" type="string" value="whiskermenu"/>
    <property name="plugin-2" type="string" value="tasklist">
      <property name="flat-buttons" type="bool" value="true"/>
    </property>
    <property name="plugin-3" type="string" value="separator">
      <property name="style" type="uint" value="0"/>
      <property name="expand" type="bool" value="true"/>
    </property>
    <property name="plugin-4" type="string" value="systray">
      <property name="show-frame" type="bool" value="false"/>
      <property name="size-max" type="uint" value="22"/>
      <property name="names-visible" type="array">
        <value type="string" value="network"/>
        <value type="string" value="networkmanager applet"/>
        <value type="string" value="blueman-applet"/>
        <value type="string" value="thunar"/>
      </property>
    </property>
    <property name="plugin-5" type="string" value="power-manager-plugin"/>
    <property name="plugin-6" type="string" value="indicator">
      <property name="blacklist" type="array">
        <value type="string" value="libappmenu.so"/>
      </property>
      <property name="known-indicators" type="array">
        <value type="string" value="libapplication.so"/>
        <value type="string" value="com.canonical.indicator.messages"/>
        <value type="string" value="com.canonical.indicator.sound"/>
      </property>
    </property>
    <property name="plugin-7" type="string" value="separator">
      <property name="style" type="uint" value="0"/>
      <property name="expand" type="bool" value="false"/>
    </property>
    <property name="plugin-8" type="string" value="clock">
      <property name="digital-format" type="string" value="%d %b, %H:%M"/>
    </property>
  </property>
  <property name="configver" type="int" value="2"/>
</channel>
找到<property name="autohide-behavior" type="uint" value="0"/>这一行,将0改为2,即索引2对应Always。


 6615
6615


 被折叠的 条评论
为什么被折叠?
被折叠的 条评论
为什么被折叠?
 到【灌水乐园】发言


