


一、引入
某公司上新品一段时间,现在需要针对该新产品的下单用户做一个用户回访,需要提供用户的信息和相关的订单信息,以便相关业务人员做回访。
经过了解,需要用户的信息包括昵称、性别、手机号、邮箱,需要的订单信息包括订单号、下单时间、下单金额。
为了方便协作,将这七项数据同步到多维表上。
本文针对该需求展开,探讨如何将 MySQL 数据库的查询结果数据写入多维表。
二、流程分析
整个流程主要分为五个阶段:
- 第一个阶段是目标分析,引入部分已介绍;
- 第二个阶段是创建数据表,该流程可以通过手动在多维表创建,也可以通过 Python 调用 API 创建,本文采用 API 方式来处理;
- 第三阶段是连接 MySQL,并将数据查询出来;
- 第四阶段是对查询到的数据进行格式处理,将查询的数据转为飞书新增多条记录 API 要求的请求体格式
- 第五阶段是调用 API 将请求体数据写入多维表。
下面根据该流程从第二阶段开始展开叙述。
三、Python 创建数据表
创建数据表之前,还需要考虑字段的类型。
基于多维表的一些特性,首列一般作为唯一列,在数据表设计的时候,可以考虑使用值唯一的列,经过确认,一个用户只能下一单,所以用户ID和用户订单号是一一对应关系,且不为空,可以作为首列,当然也可以外加一列自增编号作为首列,这里使用用户ID。
昵称、性别、手机号、城市、订单号这些都是文本的格式,但是为了方便筛选,可以进行调整。在多维表中,文本的筛选比较局限,总结来讲就是两个:精确匹配和模糊匹配,也就是说只能筛选某一个或者某一类对象,即A或者A类,不能进行多选,即同时筛选A和B或者A和B类。而单选列可以弥补这一缺陷,所以可以根据需要进行调整列的类型,这里我把性别和城市字段修改为单选类型。
需要注意的是:单项选择字段中的选项总数不能超过 5000,如果超过了,只能考虑使用多行文本。
最终数据表的列信息梳理如下:
| 列名 | 字段类型 | type | ui_type | API 要求数据 |
|---|---|---|---|---|
| 用户ID | 自增编号 | 2 | Number | 无 |
| 昵称 | 多行文本 | 1 | Text | 字符串,如:“a” |
| 性别 | 单选 | 3 | SingleSelect | 字符串,如:“男” |
| 手机号 | 电话号码 | 13 | Phone | 字符串,如:“135xxx” |
| 城市 | 单选 | 3 | SingleSelect | 字符串,如:“北京市” |
| 订单号 | 多行文本 | 1 | Text | 字符串,如:“10001” |
| 下单时间 | 日期 | 5 | DateTime | 数字,如:“1704038400000” |
| 下单金额 | 数字 | 2 | Number | 数字,如:“999” |
转化为请求体如下,该结构做了一些属性设置,用户ID的属性"property": {"formatter": "0"},设置仅保留个位值,下单金额的属性"property": {"formatter": "0.00"}保留2为小数。下单时间的属性"property": {"date_formatter": "yyyy/MM/dd HH:mm","auto_fill": false}设置为年月日加时分的格式,且不自动填充。
Tips:更多字段的属性信息可参考:字段编辑指南。
# 请求体
{
    "table": {
        "name": "购买某产品的用户列表",
        "default_view_name": "所有数据视图",
        "fields": [
            {"field_name": "用户ID","type": 2,"ui_type": "Number","property": {"formatter": "0"}},
            {"field_name": "昵称","type": 1,"ui_type": "Text"},
            {"field_name": "性别","type": 3,"ui_type": "SingleSelect"},
            {"field_name": "手机号","type": 13,"ui_type": "Phone"},
            {"field_name": "城市","type": 3,"ui_type": "SingleSelect"},
            {"field_name": "订单号","type": 2,"ui_type": "Text"},
            {"field_name": "下单时间","type": 5,"ui_type": "DateTime","property": {"date_formatter": "yyyy/MM/dd HH:mm","auto_fill": false}},
            {"field_name": "下单金额","type": 2,"ui_type": "Number","property": {"formatter": "0.00"}}
        ]
    }
}
有了基本数据结构,接下来调用 API 建表。
注意:请求体中的“true”或“false”在 Python 代码中需要修改为“True”或“False”。
import requests
import json

def cre_data_sheet(access_token,app_token,request_body):
    url = f"https://open.feishu.cn/open-apis/bitable/v1/apps/{app_token}/tables"
    payload = json.dumps(request_body)

    headers = {
        'Content-Type': 'application/json',
        'Authorization': f'Bearer {access_token}'
    }

    payload = json.dumps(request_body)

    response = requests.request("POST", url, headers=headers, data=payload)
    code = response.json()['code']
    if code == 0:
        table_id = response.json().get("data").get("table_id")
        tb_name = request_body["table"]["name"]
        print(f"成功新建数据表:{tb_name},数据表的 table_id 为:{table_id}。关联函数:cre_data_sheet。")
        return table_id
    else:
        msg = response.json().get("msg")
        raise f"创建数据表失败,失败信息:{msg}。关联函数:cre_data_sheet。"

def get_tenant_access_token(app_id, app_secret):
    url = "https://open.feishu.cn/open-apis/auth/v3/tenant_access_token/internal"
    payload = json.dumps({
        "app_id": app_id,
        "app_secret": app_secret
    })
    headers = {'Content-Type': 'application/json'}
    response = requests.request("POST", url, headers=headers, data=payload)
    tenant_access_token = response.json()['tenant_access_token']
    print(f'成功获取tenant_access_token:{tenant_access_token}。关联函数:get_table_params。')
    return tenant_access_token

def main(request_body):
    app_id = 'your_app_id'
    app_secret = 'your_app_secret'
    access_token = get_tenant_access_token(app_id, app_secret)
    app_token = 'your_app_token'
    request_body = {
        "table": {
            "name": "购买某产品的用户列表",
            "default_view_name": "所有数据视图",
            "fields": [
                {"field_name": "用户ID","type": 2,"ui_type": "Number","property": {"formatter": "0"}},
                {"field_name": "昵称","type": 1,"ui_type": "Text"},
                {"field_name": "性别","type": 3,"ui_type": "SingleSelect"},
                {"field_name": "手机号","type": 13,"ui_type": "Phone"},
                {"field_name": "城市","type": 3,"ui_type": "SingleSelect"},
                {"field_name": "订单号","type": 2,"ui_type": "Text"},
                {"field_name": "下单时间","type": 5,"ui_type": "DateTime","property": {"date_formatter": "yyyy/MM/dd HH:mm","auto_fill": False}},
                {"field_name": "下单金额","type": 2,"ui_type": "Number","property": {"formatter": "0.00"}}
            ]
        }
    }
    table_id = cre_data_sheet(access_token,app_token,request_body)

if __name__ == '__main__':
    main()
四、读取 MySQL 查询数据与数据预处理
这两个流程节点为什么要放在一起来讨论呢?因为在 Pandas 中怎么处理数据,会受到数据源的影响,如果在 SQL 阶段对数据的值已经做了数据类型格式的预处理,在 Pandas 处理阶段就不需要再做处理,只需要修改数据结构即可。
比如日期列,如果在 SQL 阶段已经转为时间戳,那么在 Pandas 就不需要再处理该逻辑。如果在 SQL 阶段没做处理,则在 Pandas 阶段需要进行处理。
4.1 创建数据库表
在处理数据之前,有一些准备工作需要做:创建数据库表。
假设有 2 个表,表1 是用户表(users),表2 是订单表(user_orders)。
- 用户表的字段有:用户ID(id)、昵称(nickname)、性别(sex)、手机号(mobile)、城市(city)等
- 订单表的字段有:订单ID(id)、下单时间(paid_time)、下单金额(amount)、下单商品(production_id)、用户ID(user_id)等
创建下表单和插入测试数据:
-- 建库建表
BEGIN;
create database if not exists my_datas default charset utf8;
use my_datas;
create table if not exists users(
  id             bigint       auto_increment    	comment '用户ID,自增'
  ,mobile        varchar(20)  not null    				comment '用户注册手机号'
  ,nickname      varchar(50)              				comment '用户昵称'
  ,sex           bigint       default 2						comment '用户性别,0:女|1:男|2:未知'
  ,province      varchar(20)  										comment '省份'
  ,city          varchar(20)  										comment '城市'
  ,created_at    timestamp    not null default current_timestamp comment '创建时间'
  ,updated_at    timestamp    not null default current_timestamp on update current_timestamp comment '更新时间'
  ,primary key(id)
) engine=InnoDB comment '用户表';
create table if not exists user_orders(
  id             bigint       auto_increment    	comment '订单ID'
  ,user_id       bigint       not null    				comment '用户ID'
  ,production_id varchar(50)  not null     				comment '商品ID'
  ,paid_time     bigint       not null      			comment '用户付款时间'
  ,amount        bigint      						 					comment '订单付款金额/分'
  ,created_at    timestamp    not null default current_timestamp comment '创建时间'
  ,updated_at    timestamp    not null default current_timestamp on update current_timestamp comment '更新时间'
  ,primary key(id)
)engine=InnoDB comment '用户订单表';
-- 创建外键约束
ALTER TABLE user_orders ADD CONSTRAINT fk_user_orders_users FOREIGN KEY (user_id) REFERENCES users (id);
COMMIT;


-- 插入数据
BEGIN;
insert into my_datas.users(mobile,nickname,sex,province,city) values
('13511112222','a',0,'北京市','北京市'),
('13622223333','二',1,'上海市','上海市'),
('13733334444','三',2,'广东省','广州市'),
('13844445555','四',0,'广东省','深圳市');

insert into my_datas.user_orders(user_id,production_id,paid_time,amount) values
(1,10,1704095836,99900),
(2,10,1704195836,99900),
(3,10,1704295836,99900),
(4,12,1704395836,89900);
COMMIT;
注:仅需要【production_id=10】的订单数据。
如何执行上面的 SQL?
- 复制代码,放到文件“cre_table.sql”,放到 D 盘下,即:D:/cre_table.sql,以管理员身份打开 cmd。
# 终端操作
C:\WINDOWS\system32>mysql -u [用户名] -p  # 用户登陆
Enter password: ******             			 # 输入密码
mysql> source D:/cre_table.sql     			 # 插入数据,路径必须非中文
- 当然,也可以在 DataGrip、Navicat、Workbench 等可视化界面复制 SQL 一条条执行。
首先根据需求写出相关的 SQL,将数据查询出来:
select uo.user_id
  ,u.nickname
  ,(case u.sex when 0 then '女' when 1 then '男' else '未知' end) as sex
  ,u.mobile
  ,u.city
  ,uo.id            							as order_id
  ,from_unixtime(uo.paid_time)		as paid_time
  ,uo.amount/100    							as amount
from my_datas.user_orders uo
join my_datas.users u on u.id=uo.user_id
where uo.production_id=10;
查询结果如下:
4.2 字段名和字段值格式处理
有了数据库数据,再回过头来,读取数据库的数据,并进行数据的处理。
数据的处理分两步,一个是字段名和字段值的处理,一个是转为飞书新增多条记录的 API 的请求体要求的格式。
第一步有两种处理方式,一种是在 SQL 查询时利用 SQL 的函数将返回的数据处理为和多维表字段值一致的数据类型,再通过重命别名的方式将返回字段的名称处理为多维表的字段名,同名才能将数据插入;第二种则是将字段值格式化和重命名的工作放在 pandas 中处理。一般推荐使用在 SQL 阶段处理,因为处理逻辑更简单、便捷。
第二步则是在第一步的基础上,将格式化的数据按“规则”进行“打包”,以便飞书能正常接受。
4.2.1 在 SQL 阶段处理
在 SQL 阶段将数据处理为多维表需要的数据类型格式,主要是将时间转为毫秒时间戳格式,并将查询结果的字段名命别名为多维表的字段名,方便插入时直接匹配。
select uo.user_id									as "用户ID"
  ,u.nickname											as "昵称"
  ,(case u.sex when 0 then '女' when 1 then '男' else '未知' end) as "性别"
  ,u.mobile												as "手机号"
  ,u.city													as "城市"
  ,uo.id            							as "订单号"
  ,uo.paid_time*1000 							as "下单时间"
  ,uo.amount/100    							as "下单金额"
from my_datas.user_orders uo
join my_datas.users u on u.id=uo.user_id
where uo.production_id=10;
执行结果如下:
使用 Python 读取 上面 SQL 的查询结果:
Tips:以下 Python 代码在 jupyter 中执行。
# 在 jupyter 执行
import pandas as pd
from sqlalchemy import create_engine

def get_datas(sql):
    connect_info = 'mysql+pymysql://{}:{}@{}:{}/{}?charset=utf8'\
    .format("your_user_name", "your_password", "127.0.0.1", "3306","my_datas")
    engine = create_engine(connect_info)
    result = pd.read_sql(sql, engine)
    result = result.astype({"用户ID": int, "昵称": str, "性别": str, "手机号": str, "城市": str, "订单号": str, "下单时间": 'int64', "下单金额": float},errors='ignore')
    # result.info()
    return result
sql = '''
select uo.user_id								as "用户ID"
  ,u.nickname									as "昵称"
  ,(case u.sex when 0 then '女' when 1 then '男' else '未知' end) as "性别"
  ,u.mobile										as "手机号"
  ,u.city										as "城市"
  ,uo.id            							as "订单号"
  ,uo.paid_time*1000 							as "下单时间"
  ,uo.amount/100    							as "下单金额"
from my_datas.user_orders uo
join my_datas.users u on u.id=uo.user_id
where uo.production_id=10;
'''
df = get_datas(sql)
df
注意:在 .py 文件调试过程中,如果时间戳使用"下单时间": int会出现一个未知的 bug,数值变成负数,但是在 jupyter 中没问题,具体原因未详。故改为:"下单时间": 'int64'。
执行结果如下: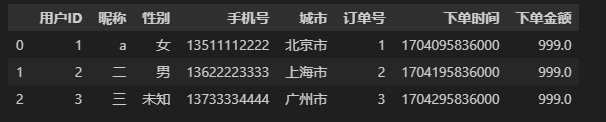
4.2.2 在 Pandas 阶段处理
如果是在 Pandas 阶段中再处理,即
- 将时间转为毫秒时间戳格式
- 将查询结果的字段名命名为多维表的字段名
直接从数据库读取相关数据,查询的结果数据,不做太多处理。
# 在 jupyter 执行
import pandas as pd
from sqlalchemy import create_engine

def get_datas(sql):
    connect_info = 'mysql+pymysql://{}:{}@{}:{}/{}?charset=utf8'\
    .format("your_user_name", "your_password", "127.0.0.1", "3306","my_datas")
    engine = create_engine(connect_info)
    result = pd.read_sql(sql, engine
                        # pandas 2.0.0 之后支持 dtype 参数,直接定义
                        # , dtype={"user_id": int, "nickname": str, "sex": str, "mobile": str, "city": str, "order_id": str, "paid_time": 'datetime64[ns]', "amount": float}
                        )
    result = result.astype({"user_id": int, "nickname": str, "sex": str, "mobile": str, "city": str, "order_id": str, "paid_time": 'datetime64[ns]', "amount": float})
    result.columns=["用户ID", "昵称", "性别", "手机号", "城市", "订单号", "下单时间", "下单金额"]
    # result.info()
    return result
sql = '''
select uo.user_id
  ,u.nickname
  ,(case u.sex when 0 then '女' when 1 then '男' else '未知' end) as sex
  ,u.mobile
  ,u.city
  ,uo.id            				      as order_id
  ,from_unixtime(uo.paid_time)			  as paid_time
  ,uo.amount/100    				      as amount
from my_datas.user_orders uo
join my_datas.users u on u.id=uo.user_id
where uo.production_id=10;
'''
df = get_datas(sql)
df
返回结果:
将时间转为毫秒级别时间戳
df['下单时间'] = (df['下单时间']- pd.Timestamp("1970-01-01") - pd.Timedelta(hours=8))// pd.Timedelta(milliseconds=1)
df
结果如下:
当有多个时间字段时,可以使用下面的代码进行自动转换
datetime_fields = df.columns[df.dtypes=='datetime64[ns]']
for datetime_field in datetime_fields:
    df[datetime_field] = (df[datetime_field]- pd.Timestamp("1970-01-01") - pd.Timedelta(hours=8))// pd.Timedelta(milliseconds=1)
4.3 转为 API 请求体格式
对字段名和字段值格式化之后,接下来将格式化后的数据转为飞书 API 请求体的结构,简单来讲就是加两层结构,一层是“fields”键值对,一层是“records”键值对。
参考飞书多维表新增多条记录 API 文档,请求体结构大致如下:
{
  "records": [
    {
      "fields": {
        "多行文本": "多行文本内容",
        "数字": 100,
        "单选": "选项1",
        "日期": 1674206443000
      },
      {
      "fields": {
        "多行文本": "多行文本内容",
        "数字": 100,
        "单选": "选项1",
        "日期": 1674206443000
      }
      ]
}
先使用 DataFrame 的to_dict()函数可以将数据转为字段结构,参考如下:
# 在 jupyter 执行
df_dict = df.to_dict(orient='records')
df_dict
结果如下,列表的每个元素就是请求体“fields”的值。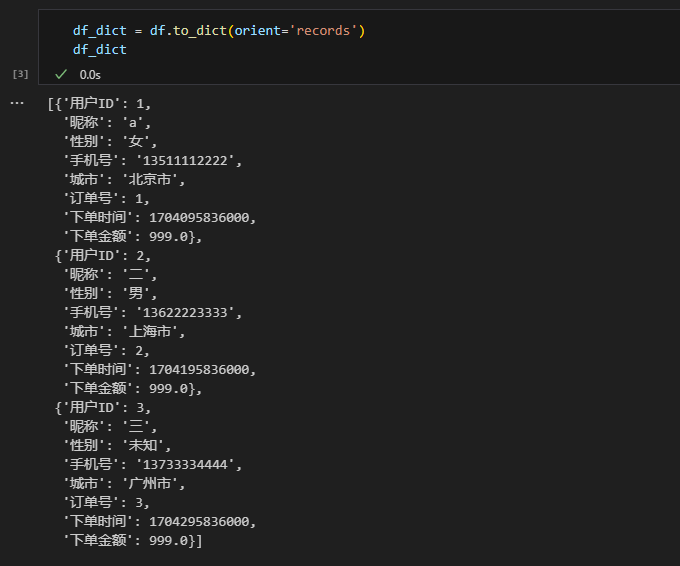
再通过列表推导式给列表的每个元素加上一个键“fields”,并把整个列表作为键“records”的值。
# 在 jupyter 执行
datas_field = [{'fields' : data} for data in df_dict]
datas_records = {"records": datas_field}
datas_records
返回结果如下,和请求体结构一致。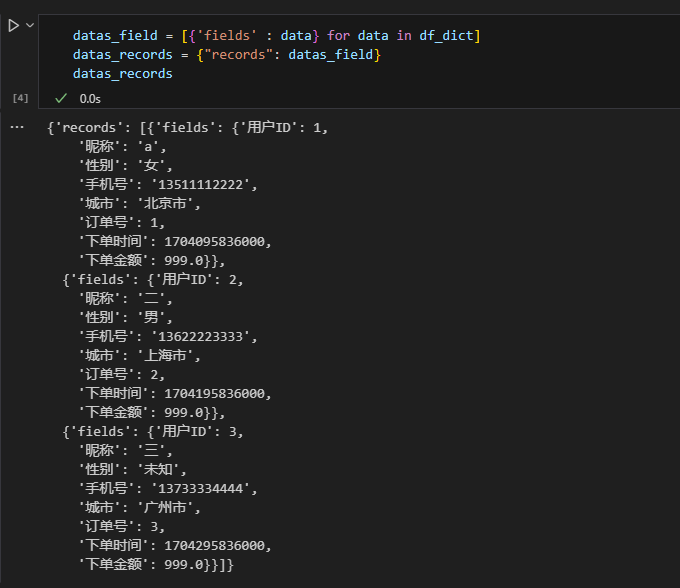
整理下本小节的代码,参考如下:
def format_to_reqbody(df):
    df_dict = df.to_dict(orient='records')
    datas_field = [{'fields' : data} for data in df_dict]
    datas_records = {"records": datas_field}
    return datas_records
五、写入多维表
写入多维表需要表单的“app_token”、“table_id”和请求体。上面搞定了请求体之后,写入就很简单了!
参考如下(注意:仅展示插入核心代码,不是完整代码。)
import requests
import json

def insert_records(access_token,app_token,table_id,request_body):
    url = f"https://open.feishu.cn/open-apis/bitable/v1/apps/{app_token}/tables/{table_id}/records/batch_create"
    payload = json.dumps(request_body)

    headers = {
        'Content-Type': 'application/json',
        'Authorization': f'Bearer {access_token}'
    }

    response = requests.request("POST", url, headers=headers, data=payload)
    code = response.json()['code']
    if code == 0:
        len_req = len(request_body["records"])
        print(f"成功插入 {len_req} 数据。关联函数:insert_records。")
    else:
        msg = response.json().get("msg")
        raise f"插入数据失败,失败信息:{msg}。关联函数:insert_records。"

def main():
    app_id = 'your_app_id'
    app_secret = 'your_app_secret'
    app_token = 'your_app_token'
    # table_id,如果是直接建表,可以从章节三中直接获取,如果是非首次,直接创建参数值
    table_id = 'your_table_id'
    # df 来自于 4.2 的数据处理结果
    request_body = format_to_reqbody(df)
    insert_datas(access_token,app_token,table_id,request_body)

if __name__ == '__main__':
    main()
由于本实例我用于测试的数据比较少,而且都么有空值,所以使用以上代码补充完整之后可以成功执行,但是在实际的应用中,可能会有两个问题需要进一步处理:
- 处理空值:即处理 nan 值
- 处理一次性写入的数据量,每次上限是 500 条记录

5.1 空值问题
为了更加直观观察该问题,我使用一个比较简单的案例来展开说明。
如下案例,使用一组带空值的文本和一组带空值的数字来做说明。
import json
import pandas as pd
dff = pd.DataFrame({
 '文本': [None, 'b', 'c'],
 '数字': [1, 2, None],
})
datas = dff.to_dict(orient='records')
print(datas)
json.dumps(datas)
可以发现:数据类型是文本的时候转为“null”,而为数字的时候转为“NaN”。经过测试发现,“null”是可以直接用于写入飞书表的,而“NaN”则不能。“NaN”是 numpy 的 nan 数据类型,可以理解为是一个数字,只不过比较特殊,它在 pandas 中可以正常识别,但是到了飞书多维表 API 则出现“水土不服”,飞书无法识别它。所以我们需要加一层处理, 把它替换为“null”。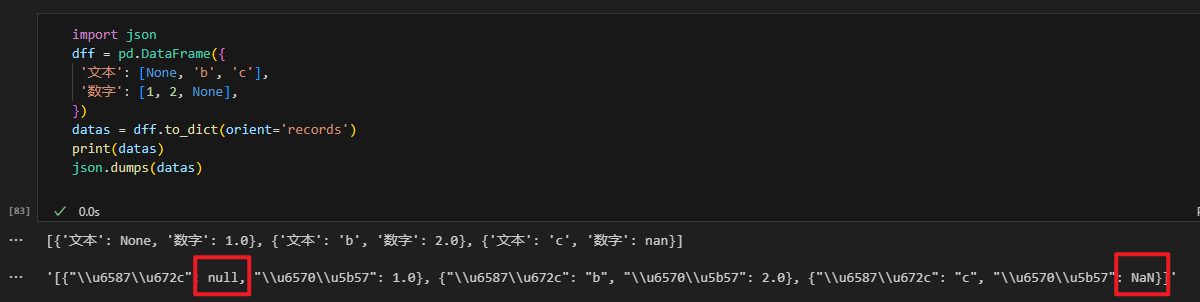
替换逻辑很简单,使用replace()函数即可。参考如下:
json.dumps(datas).replace(': NaN',': null')
5.2 分批问题
分配问题主要是 API 限制所产生的问题,API 单次写入最多 500 条记录,当数据量超过该数字时,就需要进行分批写入。
基本思路清晰了,那么要在哪里切分,怎么切分呢?
这里我选择在格式化字段和字段值之后,在处理为请求体之前进行。切分方式比较简单,直接使用列表的切片功能即可实现。所以直接修改下 4.3 的代码即可,参考如下:
def format_to_reqbody(df,change_size=500):
    df_dict = df.to_dict(orient='records')
    datas_field = [{'fields' : data} for data in df_dict]

    df_ls = []
    for i in range(0,len(datas_field), change_size):
        data_records = {"records": datas_field[i:i+change_size]}
        df_ls.append(data_records)

    print('数据切割:切割数据集为 %s 份。关联函数:format_to_reqbody' % (len(df_ls)))
    return df_ls
5.3 整合代码
以下是本案例的最终代码,如果要迁移到不同的需求项目上使用,可以参考以下几点信息进行修改:
- 使用飞书应用的“app_id”和“app_secret”;
- 如果直接建表,需要创建建表的字段信息“fields_request_body”;如果是使用已有表,则直接传递“table_id”即可;
- 根据不同的需求撰写对应的 SQL,并转为飞书 API 支持的字段值,字段值格式可以参考上一篇 飞书API 2-4,并把字段别名和飞书多维表的字段名称保持一致;
- 根据自己的 SQL 的值写一个字段名和字段值类型映射“fields_type”,用于指定 pandas 列的格式,避免写入飞书时值类型不一致导致报错;
- 根据自己数据库的用户等信息,修改“connect_info”,保证 Python 能够读取到数据库的数据。
import requests, json
import pandas as pd
from sqlalchemy import create_engine

def cre_data_sheet(access_token,app_token,request_body):
    url = f"https://open.feishu.cn/open-apis/bitable/v1/apps/{app_token}/tables"
    payload = json.dumps(request_body)

    headers = {
        'Content-Type': 'application/json',
        'Authorization': f'Bearer {access_token}'
    }

    payload = json.dumps(request_body)

    response = requests.request("POST", url, headers=headers, data=payload)
    code = response.json()['code']
    if code == 0:
        table_id = response.json().get("data").get("table_id")
        tb_name = request_body["table"]["name"]
        print(f"成功新建数据表:{tb_name},数据表的 table_id 为:{table_id}。关联函数:cre_data_sheet。")
        return table_id
    else:
        msg = response.json().get("msg")
        raise f"创建数据表失败,失败信息:{msg}。关联函数:cre_data_sheet。"

def get_datas(sql, connect_info, fields_type):
    # connect_info = 'mysql+pymysql://{}:{}@{}:{}/{}?charset=utf8'\
    # .format("your_user_name", "your_password", "127.0.0.1", "3306","my_datas")
    engine = create_engine(connect_info)
    result = pd.read_sql(sql, engine)
    result = result.astype(fields_type,errors='ignore')
    # result.info()
    return result

def format_to_reqbody(df,change_size=500):
    df_dict = df.to_dict(orient='records')
    datas_field = [{'fields' : data} for data in df_dict]

    df_ls = []
    for i in range(0,len(datas_field), change_size):
        data_records = {"records": datas_field[i:i+change_size]}
        # data_to_table = json.dumps(data_records).replace(': NaN',': null')
        df_ls.append(data_records)

    print('数据格式化并切割:切割数据集为 %s 份。关联函数:format_to_reqbody' % (len(df_ls)))
    return df_ls

def insert_records(access_token,app_token,table_id,request_body):
    url = f"https://open.feishu.cn/open-apis/bitable/v1/apps/{app_token}/tables/{table_id}/records/batch_create"
    payload =  json.dumps(request_body).replace(': NaN',': null')

    headers = {
        'Content-Type': 'application/json',
        'Authorization': f'Bearer {access_token}'
    }

    response = requests.request("POST", url, headers=headers, data=payload)
    code = response.json()['code']
    if code == 0:
        len_req = len(request_body["records"])
        print(f"成功插入 {len_req} 数据。关联函数:insert_records。")
    else:
        print(response.json())
        msg = response.json().get("msg")
        raise f"插入数据失败,失败信息:{msg}。关联函数:insert_records。"

def get_tenant_access_token(app_id, app_secret):
    url = "https://open.feishu.cn/open-apis/auth/v3/tenant_access_token/internal"
    payload = json.dumps({
        "app_id": app_id,
        "app_secret": app_secret
    })
    headers = {'Content-Type': 'application/json'}
    response = requests.request("POST", url, headers=headers, data=payload)
    tenant_access_token = response.json()['tenant_access_token']
    print(f'成功获取tenant_access_token:{tenant_access_token}。关联函数:get_table_params。')
    return tenant_access_token

def main():
    app_id = 'your_app_id'
    app_secret = 'your_app_secret'
    app_token = 'your_app_token'
    access_token = get_tenant_access_token(app_id, app_secret)

    # table_id,如果是直接建表,可以从章节三中直接获取,如果是非首次,直接创建参数值
    fields_request_body = {
        "table": {
            "name": "购买某产品的用户列表",
            "default_view_name": "所有数据视图",
            "fields": [
                {"field_name": "用户ID","type": 2,"ui_type": "Number","property": {"formatter": "0"}},
                {"field_name": "昵称","type": 1,"ui_type": "Text"},
                {"field_name": "性别","type": 3,"ui_type": "SingleSelect"},
                {"field_name": "手机号","type": 13,"ui_type": "Phone"},
                {"field_name": "城市","type": 3,"ui_type": "SingleSelect"},
                {"field_name": "订单号","type": 2,"ui_type": "Text"},
                {"field_name": "下单时间","type": 5,"ui_type": "DateTime","property": {"date_formatter": "yyyy/MM/dd HH:mm","auto_fill": False}},
                {"field_name": "下单金额","type": 2,"ui_type": "Number","property": {"formatter": "0.00"}}
            ]
        }
    }
    table_id = cre_data_sheet(access_token,app_token,fields_request_body)

    sql = '''
    select uo.user_id								as "用户ID"
      ,u.nickname									as "昵称"
      ,(case u.sex when 0 then '女' when 1 then '男' else '未知' end) as "性别"
      ,u.mobile										as "手机号"
      ,u.city										as "城市"
      ,uo.id            							as "订单号"
      ,uo.paid_time*1000 							as "下单时间"
      ,uo.amount/100    							as "下单金额"
    from my_datas.user_orders uo
    join my_datas.users u on u.id=uo.user_id
    where uo.production_id=10;
    '''
    fields_type = {"用户ID": int, "昵称": str, "性别": str, "手机号": str, "城市": str, "订单号": int, "下单时间": int, "下单金额": float}
    connect_info = 'mysql+pymysql://{}:{}@{}:{}/{}?charset=utf8'\
    .format("your_user_name", "your_password", "127.0.0.1", "3306","my_datas")
    df = get_datas(sql, connect_info, fields_type)
    request_bodys = format_to_reqbody(df,change_size=500)
    for request_body in request_bodys:
        insert_records(access_token,app_token,table_id,request_body)

if __name__ == '__main__':
    main()
填充飞书应用信息和数据库链接信息,执行结果参考如下,该结果符合预期。这里显示的订单号是一个小数,是因为建表的时候,没有设置属性保留个位数据,不过问题不大,可以在多维表上做一步修正。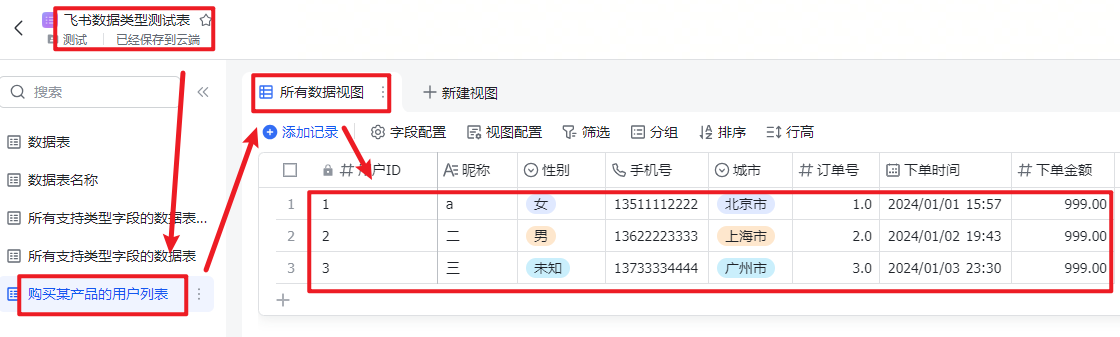
四、小结
本文完整探讨了使用 MySQL 数据库+ Pandas 库 + 飞书应用实现了业务的一个数据需求:将某产品的用户数据同步到飞书表上。
整个流程涉及了五大步骤:
- 目标分析:将需求数据同步到飞书多维表协作
- 创建飞书数据表:分析需求字段的类型、数据格式等
- 查询数据库数据:连表查询数据并对数据值和字段名进行格式化
- Pandas处理数据:将格式化的数据转为 API 需求的请求体的格式
- 写入飞书多维表:调用飞书新增多行记录的 API,将数据写入飞书多维表


 2547
2547

 被折叠的 条评论
为什么被折叠?
被折叠的 条评论
为什么被折叠?
 到【灌水乐园】发言


