


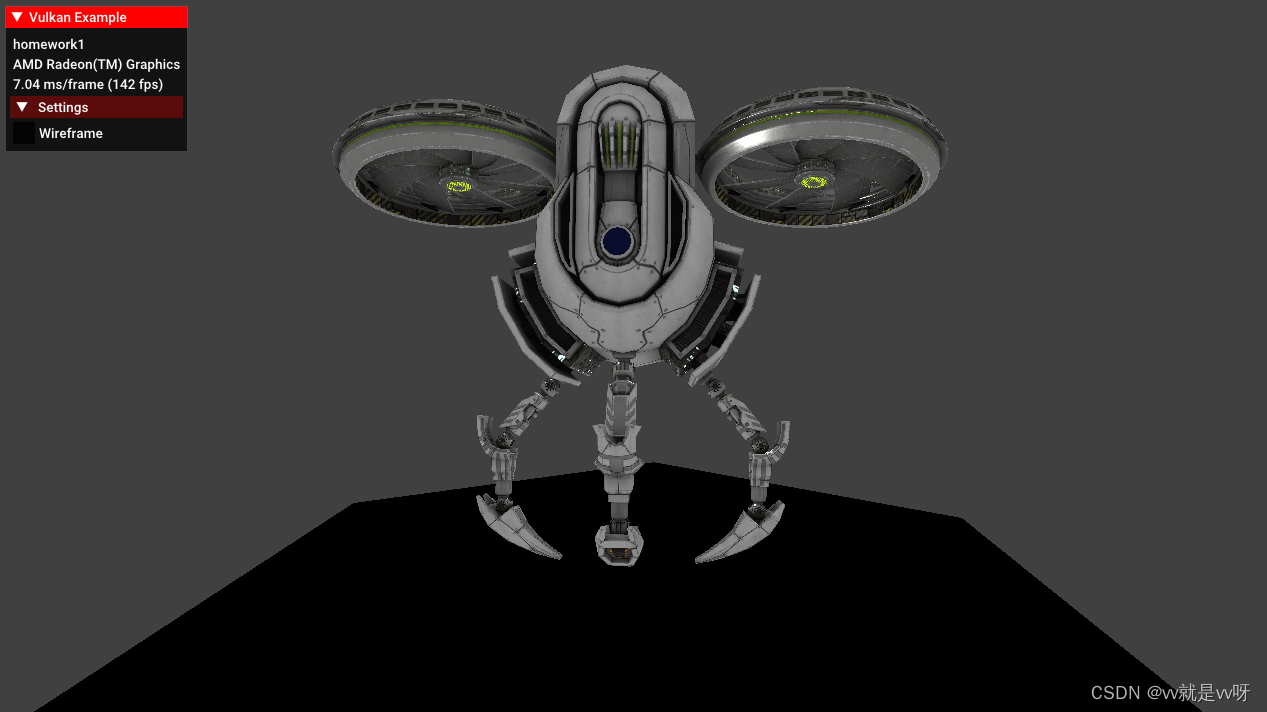
games106 homework1
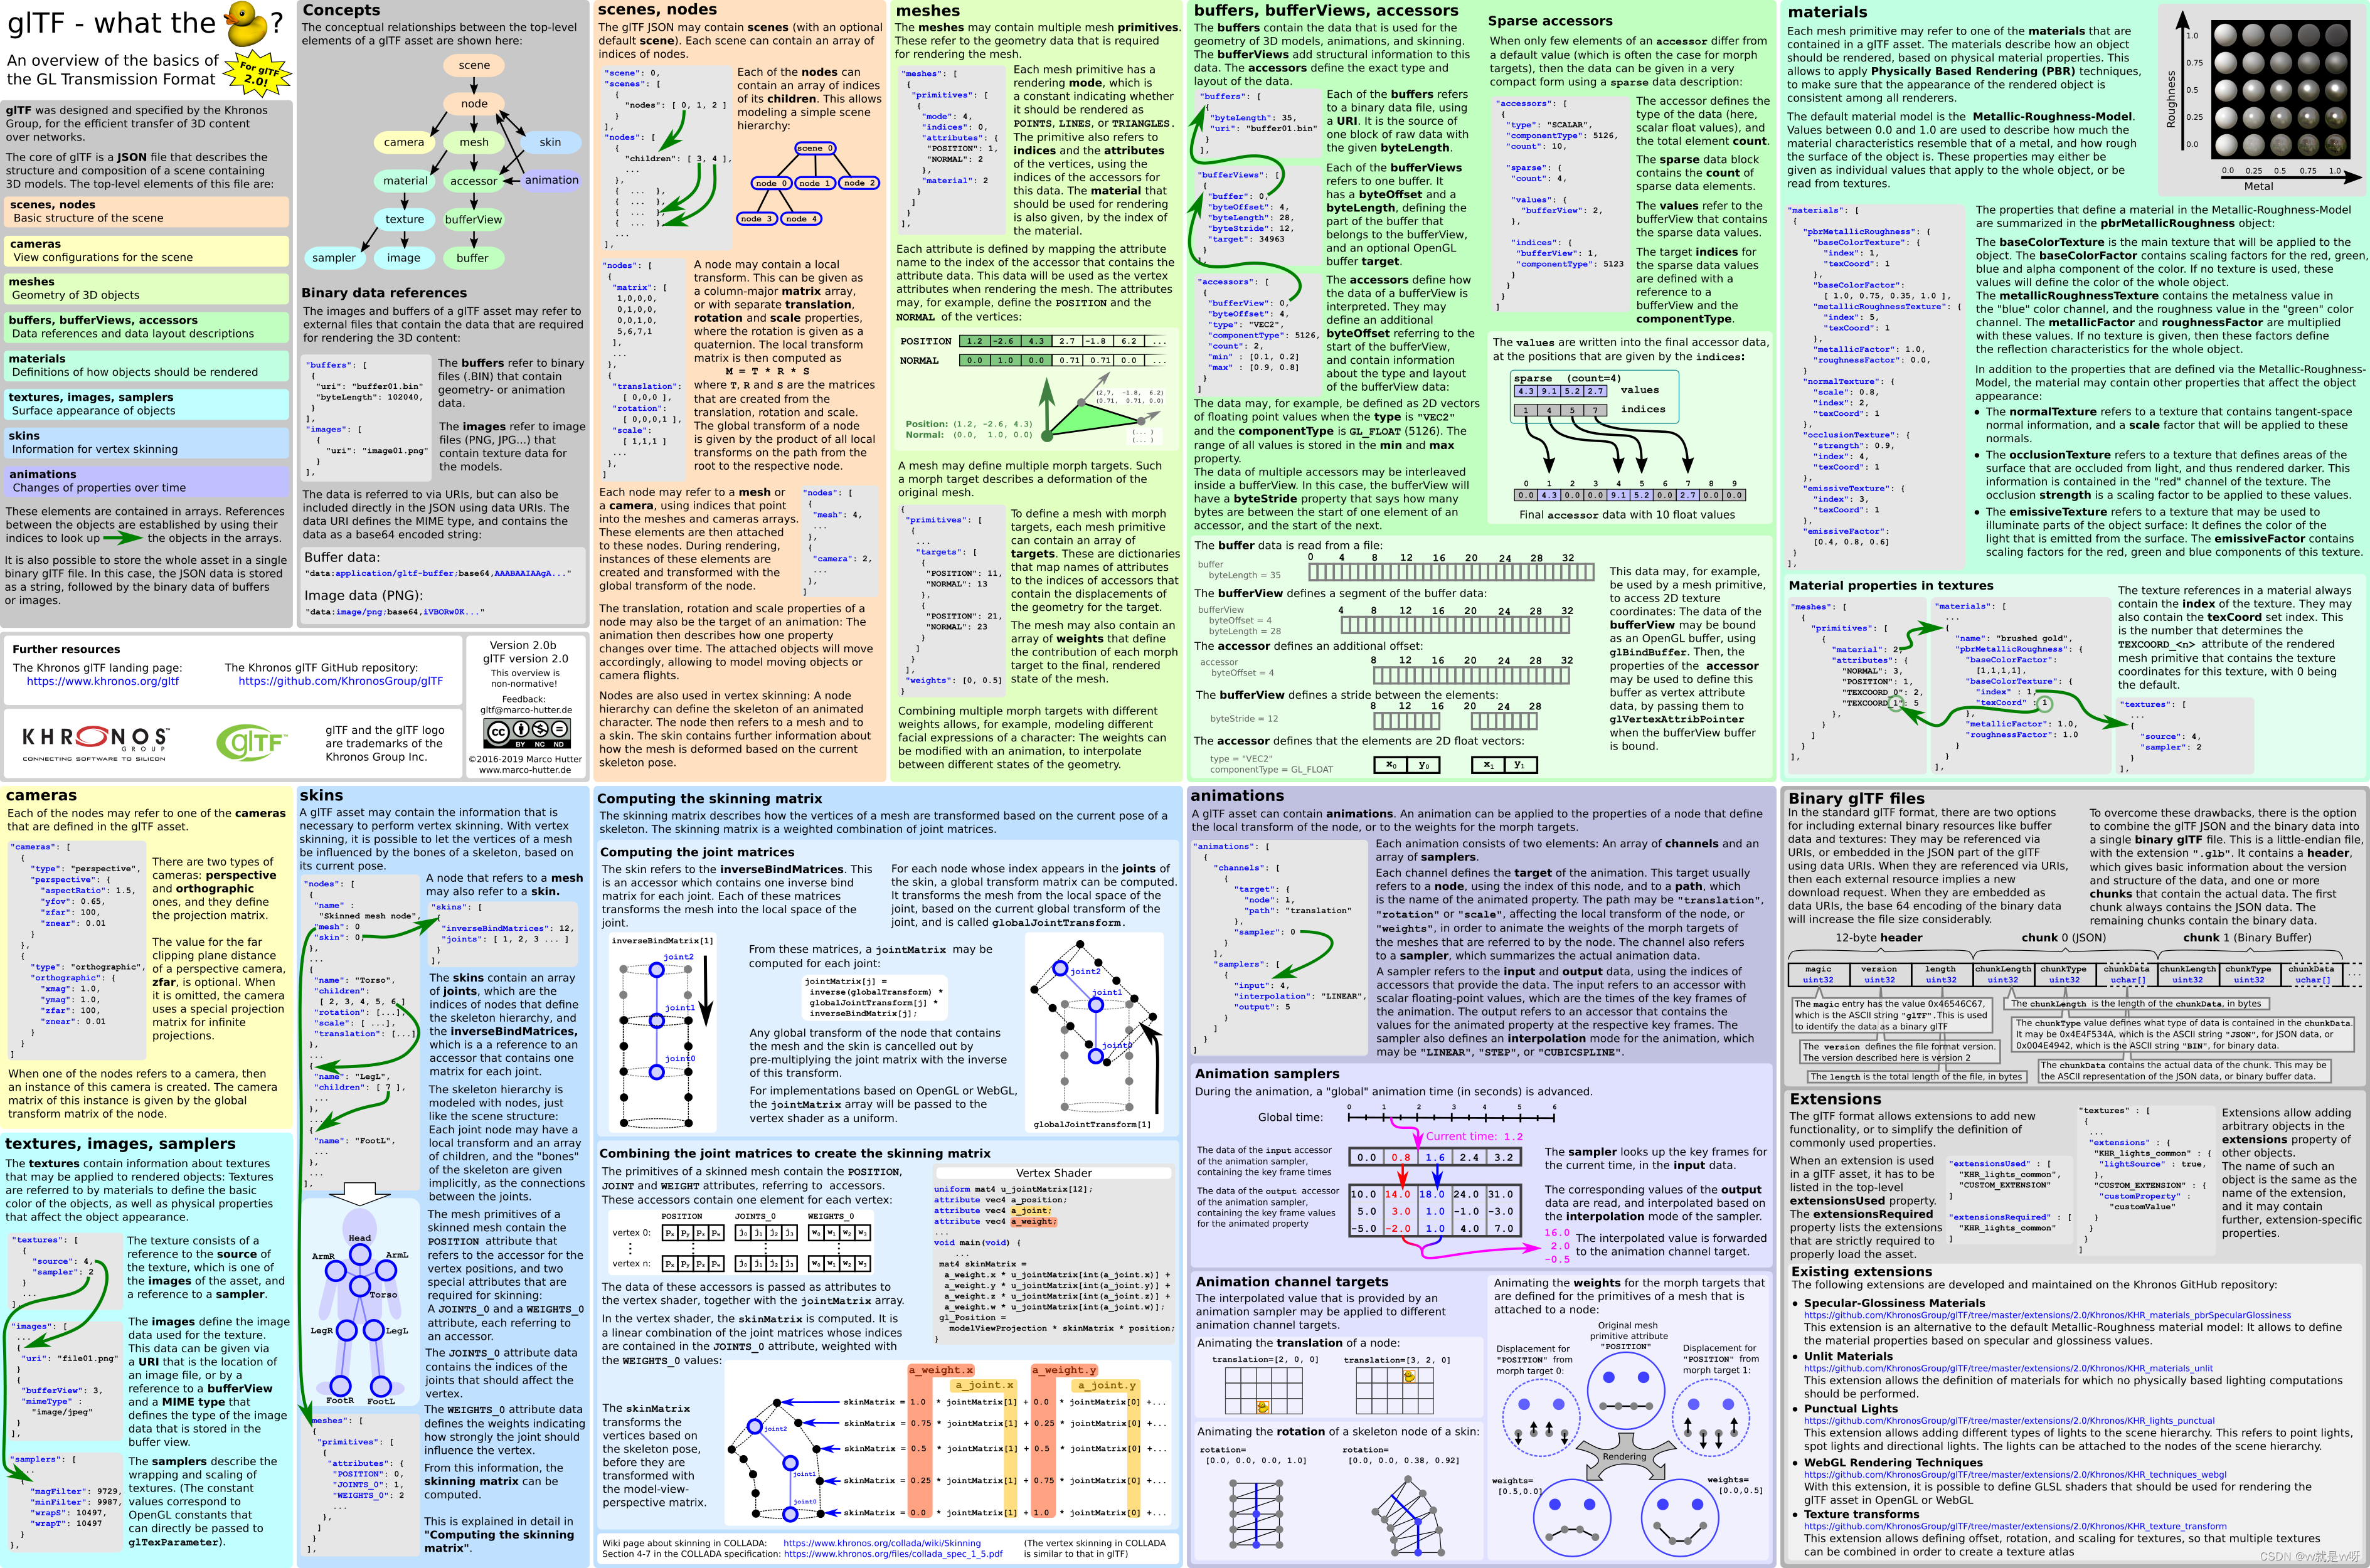
gltf介绍图:
骨骼动画
动画相关属性:
对GLTF的理解参照了这篇文章:
buffer和bufferView对象用于引用动画数据。 buffer对象用来指定原始动画数据, bufferView对象用来引用buffer对象。比如下面的bufferView对象引用了索引为0的指定了原始动画数据的buffer对象。
"buffers": [
	{
		"byteLength": 2514732,
		"uri": "busterDrone.bin"
	}
],
"bufferViews": [
	{
		"buffer": 0,
		"byteLength": 196356,
		"byteOffset": 0,
		"byteStride": 0,
		"target": 34963
	},
	{
		"buffer": 0,
		"byteLength": 99000,
		"byteOffset": 196356,
		"byteStride": 0,
		"target": 34962
	},
...
]
Accessor对象用于描述原始动画数据的结构。 count属性表示动画数据包含了1190个动画关键帧的计时信息,每个计时信息是一个float类型的标量,所有计时信息占用了14280个字节。第二个accessor对象引用的数据在计时信息这14280字节之后,共有1190个元素,每个元素是一个包含3个分量类型为float的向量,推测SCALAR类型为计时信息,VEC3为平移信息,VEC4为旋转四元数。
"accessors": [
	{
		"bufferView": 3,
		"byteOffset": 0,
		"componentType": 5126,
		"count": 1190,
		"max": [ 0.06134279, 0.07975265, 0.02774119 ],
		"min": [ -0.06144484, -0.1283657, -0.09091433 ],
		"type": "VEC3"
	},
	{
		"bufferView": 3,
		"byteOffset": 14280,
		"componentType": 5126,
		"count": 1190,
		"max": [ 1, 1, 1 ],
		"min": [ -1, -1, -1 ],
		"type": "VEC3"
	},
	{
		"bufferView": 2,
		"byteOffset": 0,
		"componentType": 5126,
		"count": 1190,
		"max": [ 0.9694519, 0.997895 ],
		"min": [ 0.001107991, 0.001113892 ],
		"type": "VEC2"
	},
...
]
Animation包含samplers和channels。samplers数组对象,用于描述动画数据来源。samplers数组对象,用于描述动画数据来源。
sampler对象包含了input和output属性,这两个属性通过索引来引用accessor对象 。这里的input属性引用了索引为2的用于计时信息accessor对象,output属性引用了索引 为3的用于旋转信息的accessor对象。此外,sampler对象还有包含了一个interpolation属性,用于指定插值方式,这里的示例使用的LINEAR插值方式。
channel对象用于在动画数据和node对象之间建立联系 ,指定动画所作用的node对象。
"samplers": [
	{
		"input": 60,
		"interpolation": "LINEAR",
		"output": 61
	},
...
]

"channels": [
	{
		"sampler": 0,
		"target": {
		"node": 8,
		"path": "translation"
		}
	},
...
]
代码修改:
详细查看了下gltfskinning.cpp中的动画代码。这个example读取的gltf文件多出来了一个skins属性,skins中包含inverseBindMatrices,joints,skeleton属性。
joints记录了作为关节点的node索引。gltf中的skeleton的形式更为简单,它包含着根骨骼的Node索引。inverseBindMatrices是gltf帮忙计算好的模型空间变换到对应骨骼空间的矩阵。
loadSkin函数把相关的joints node 存储在skin.joints 的容器中。我自己理解的意思是在render时,从骨骼的根节点开始依次处理joints及节点的变换。
对于结构体的更新可以直接参考gltfskinning.cpp去更新Node,添加AnimationSampler,AnimationChannel,Animation结构体。
对于动画的加载loadAnimation可以直接copy gltfskinning.cpp中的代码,更新时update Animation思路也相似,然而作业中的gltf文件没有蒙皮skins属性,所以不能直接使用updateJoint函数更新,此处动画的更新需要逐个去更新节点的位置。
初始代码的drawNode函数中表明最终绘制节点时用到的位置为node.matrix,通过vkCmdPushConstants传入shader对应的参数就是primitive. model。
	// drawNode Func
	glm::mat4              nodeMatrix    = node.matrix;
	VulkanglTFModel::Node *currentParent = node.parent;
	while (currentParent)
	{
		nodeMatrix    = currentParent->matrix * nodeMatrix;
		currentParent = currentParent->parent;
	}
	// Pass the final matrix to the vertex shader using push constants
	vkCmdPushConstants(commandBuffer, pipelineLayout, VK_SHADER_STAGE_VERTEX_BIT, 0, sizeof(glm::mat4), &nodeMatrix);
上面这一段drawNode函数的代码很重要,它实现的是一个全静态模型的传值。currentParent->matrix是初始loadNode时根据translation,rotate,scale计算得到的值,这个值在后面是没有再被更新的。
在update Animation函数中,根据动画的数据对每个时间node的translation,rotate,scale的值进行了插值计算更新,而传值得到的matrix并没有得到更新。
在drawNode中应该使用 getLocalMatrix()去计算此刻的matrix,同时不能漏掉node的parent更新,否则绘制出模型的就会错位(我就是这么做的,检查了好久的问题QAQ)。
glm::mat4 getLocalMatrix()
{
	return glm::translate(glm::mat4(1.0f), translation) * glm::mat4(rotation) * glm::scale(glm::mat4(1.0f), scale) * matrix;
}

// ** update nodeMatrix **
glm::mat4 nodeMatrix = node->getLocalMatrix(); //node->matrix;
VulkanglTFModel::Node* currentParent = node->parent;
while (currentParent) {
	nodeMatrix = currentParent->getLocalMatrix() * nodeMatrix;
	currentParent = currentParent->parent;
}
在初始化loadNode时,不需要更改node->matrix的值,加载初始的translation,rotate,scale即可。
// Get the local node matrix
// It's either made up from translation, rotation, scale or a 4x4 matrix
if (inputNode.translation.size() == 3) {
	//node->matrix = glm::translate(node->matrix, glm::vec3(glm::make_vec3(inputNode.translation.data())));
	node->translation = glm::make_vec3(inputNode.translation.data());
}
if (inputNode.rotation.size() == 4) {
	glm::quat q = glm::make_quat(inputNode.rotation.data());
	//node->matrix *= glm::mat4(q);
	node->rotation = q;
}
if (inputNode.scale.size() == 3) {
	//node->matrix = glm::scale(node->matrix, glm::vec3(glm::make_vec3(inputNode.scale.data())));
	node->scale = glm::make_vec3(inputNode.scale.data());
}
if (inputNode.matrix.size() == 16) {
	node->matrix = glm::make_mat4x4(inputNode.matrix.data());
};
由于计算以后没有push constant使得shader的参数更新,所以动画并不会显示出来。在render()中updateAnimation后重新调用一遍buildCommandBuffer即可。
PBR材质
PBR材质介绍:
PBR材质相关理解记录在了这篇文章里,作业中的实现参考了pbrbasic, pbribl, pbrtexture中的实现。
数据结构更新
pbr.cpp文件中pushconsts中传递了一些属性,然而在作业中 roughness,metallic,包括rgb参数其实都不需要cpp传递,可以直接从纹理图片中获取。所以直接更新Material的struct为下,同步修改loadMaterial中对材质参数的加载。
struct Material {
		uint32_t baseColorTextureIndex;
		uint32_t metallicRoughnessTextureIndex;
		uint32_t normalTextureIndex = -1;
		uint32_t emissiveTextureIndex = -1;
		uint32_t occlusionTextureIndex = -1;
		VkDescriptorSet descriptorSet;
	};
如下是mesh的相关属性,primitives对应的是vertex基础属性,material是gltf文件中materials中材质的索引。gltf相关图片中已经写的比较清楚,就不再细述。
"meshes": [
{
	"name": "mesh_L_P4_17366L_P4",
	"primitives": [
		{
			"attributes": {
				"POSITION": 0,
				"NORMAL": 1,
				"TEXCOORD_0": 2,
				"TANGENT": 3
			},
			"indices": 4,
			"material": 0,
			"mode": 4
		}
	]
},
]
根据primitives中的属性,应该给Vertex 新加上一个tangent属性。
在loadNode的过程中,会根据mesh的primitives数据向vertexBuffer中添加数据,Vertex新增属性tangent后也需要更新loadNode代码。
struct Vertex {
		glm::vec3 pos;
		glm::vec3 normal;
		glm::vec2 uv;
		glm::vec3 color;
		glm::vec4 tangent;
	};
在preparePipeline()中,需要更新VkVertexInputAttributeDescription的属性。
const std::vector<VkVertexInputAttributeDescription> vertexInputAttributes = {
	vks::initializers::vertexInputAttributeDescription(0, 0, VK_FORMAT_R32G32B32_SFLOAT, offsetof(VulkanglTFModel::Vertex, pos)),	// Location 0: Position
	vks::initializers::vertexInputAttributeDescription(0, 1, VK_FORMAT_R32G32B32_SFLOAT, offsetof(VulkanglTFModel::Vertex, normal)),// Location 1: Normal
	vks::initializers::vertexInputAttributeDescription(0, 2, VK_FORMAT_R32G32B32_SFLOAT, offsetof(VulkanglTFModel::Vertex, uv)),	// Location 2: Texture coordinates
	vks::initializers::vertexInputAttributeDescription(0, 3, VK_FORMAT_R32G32B32_SFLOAT, offsetof(VulkanglTFModel::Vertex, color)),	// Location 3: Color
	vks::initializers::vertexInputAttributeDescription(0, 4, VK_FORMAT_R32G32B32A32_SFLOAT, offsetof(VulkanglTFModel::Vertex, tangent)),    // Location 4: tangent
};
DescriptorBinding更新
数据结构和pipeline相关进行更新后也需要更新Descriptor的绑定。
在setupDescriptors()中对poolSizes,descriptorPoolInfo进行修改。VK_DESCRIPTOR_TYPE_UNIFORM_BUFFER对应的是shader中的ubo,数量只有一个,因为material没有多余属性需要其他的ubo传递。VK_DESCRIPTOR_TYPE_COMBINED_IMAGE_SAMPLER顾名思义是绑定的图片采样器,每张纹理有5个texture index。
std::vector<VkDescriptorPoolSize> poolSizes = {
	// matrices + materials uniform buffer
	vks::initializers::descriptorPoolSize(VK_DESCRIPTOR_TYPE_UNIFORM_BUFFER, 1),
	// One combined image sampler per model image/texture
	vks::initializers::descriptorPoolSize(VK_DESCRIPTOR_TYPE_COMBINED_IMAGE_SAMPLER, static_cast<uint32_t>(5 * glTFModel.materials.size())),
};
对于这两个类型的descriptior需要分别设定它们的layout。
对于uniform设定为VK_DESCRIPTOR_TYPE_STORAGE_BUFFER,纹理设定为VK_DESCRIPTOR_TYPE_COMBINED_IMAGE_SAMPLER。
// Descriptor set layout for passing matrices
VkDescriptorSetLayoutBinding setLayoutBinding = vks::initializers::descriptorSetLayoutBinding(VK_DESCRIPTOR_TYPE_STORAGE_BUFFER, VK_SHADER_STAGE_VERTEX_BIT, 0);
// Descriptor set layout for passing material textures
std::vector<VkDescriptorSetLayoutBinding> setLayoutBindings = {
	vks::initializers::descriptorSetLayoutBinding(VK_DESCRIPTOR_TYPE_COMBINED_IMAGE_SAMPLER, VK_SHADER_STAGE_FRAGMENT_BIT, 0),
	vks::initializers::descriptorSetLayoutBinding(VK_DESCRIPTOR_TYPE_COMBINED_IMAGE_SAMPLER, VK_SHADER_STAGE_FRAGMENT_BIT, 1),
	vks::initializers::descriptorSetLayoutBinding(VK_DESCRIPTOR_TYPE_COMBINED_IMAGE_SAMPLER, VK_SHADER_STAGE_FRAGMENT_BIT, 2),
	vks::initializers::descriptorSetLayoutBinding(VK_DESCRIPTOR_TYPE_COMBINED_IMAGE_SAMPLER, VK_SHADER_STAGE_FRAGMENT_BIT, 3),
	vks::initializers::descriptorSetLayoutBinding(VK_DESCRIPTOR_TYPE_COMBINED_IMAGE_SAMPLER, VK_SHADER_STAGE_FRAGMENT_BIT, 4)
};
根据descriptorPool和descriptorLayout的相关信息得到VkDescriptorSetAllocateInfo,并根据此信息调用vkAllocateDescriptorSets分配descriptor。最后再用vks::initializers::writeDescriptorSet把每个material对应的5张纹理的descriptor写入到material的descriptor中。
// Descriptor sets for materials textures
for (auto& mat : glTFModel.materials) {
	const VkDescriptorSetAllocateInfo allocInfo = vks::initializers::descriptorSetAllocateInfo(descriptorPool, &descriptorSetLayouts.textures, 1);
	VK_CHECK_RESULT(vkAllocateDescriptorSets(device, &allocInfo, &mat.descriptorSet));
	std::vector<VkWriteDescriptorSet> writeDescriptorSets = {
		vks::initializers::writeDescriptorSet(mat.descriptorSet, VK_DESCRIPTOR_TYPE_COMBINED_IMAGE_SAMPLER, 0, &glTFModel.images[mat.baseColorTextureIndex].texture.descriptor),
		vks::initializers::writeDescriptorSet(mat.descriptorSet, VK_DESCRIPTOR_TYPE_COMBINED_IMAGE_SAMPLER, 1, &glTFModel.images[mat.metallicRoughnessTextureIndex].texture.descriptor),
		vks::initializers::writeDescriptorSet(mat.descriptorSet, VK_DESCRIPTOR_TYPE_COMBINED_IMAGE_SAMPLER, 2, &glTFModel.images[mat.normalTextureIndex].texture.descriptor),
	};
	if (mat.emissiveTextureIndex >= 0 && mat.emissiveTextureIndex < glTFModel.images.size()) writeDescriptorSets.push_back(vks::initializers::writeDescriptorSet(mat.descriptorSet, VK_DESCRIPTOR_TYPE_COMBINED_IMAGE_SAMPLER, 3, &glTFModel.images[mat.emissiveTextureIndex].texture.descriptor));
	if (mat.occlusionTextureIndex >= 0 && mat.occlusionTextureIndex < glTFModel.images.size()) writeDescriptorSets.push_back(vks::initializers::writeDescriptorSet(mat.descriptorSet, VK_DESCRIPTOR_TYPE_COMBINED_IMAGE_SAMPLER, 4, &glTFModel.images[mat.occlusionTextureIndex].texture.descriptor));
	vkUpdateDescriptorSets(device, static_cast<uint32_t>(writeDescriptorSets.size()), writeDescriptorSets.data(), 0, nullptr);
}
如果material有其他一些参数要传入的话,可以考虑新建一个uniform buffer,此时需要对descriptorPoolSize的大小进行更新,对新建的uniform buffer的descriptor进行初始化,
除此外还需要参照Vertex shader uniform buffer block的建立,在prepareUniformBuffers()函数中给每个material新建一个uniform buffer并map。
着色器编译:
参照以下:
HLSL in Vulkan :: Vulkan Documentation Project Demo
vulkan读取的是编译后的spv文件,对于.frag和.vert文件编译。可以找到vulkansdk/bin/Win32/glslangValidator.exe的位置对glsl文件进行编译。
# glsl 编译
glslangValidator mesh.frag -V100 -o mesh.frag.spv
glslangValidator mesh.vert -V100 -o mesh.vert.spv

# hlsl编译
dxc -spirv -T vs_6_0 -E main .\mesh.vert -Fo .\mesh.vert.spv
dxc -spirv -T ps_6_0 -E main .\mesh.frag -Fo .\mesh.frag.spv
mark一下: hlsl中的texture register,space 关键字 (keyword) 指定声明变量绑定到的逻辑寄存器空间。该关键字省略默认是space0,register(t3, space0) 永远不会与 register(t3, space1)冲突,也永远不会与另一个空间中可能包含 t3 的任何数组冲突。
要注意space的分配,分配不当程序运行时可能会出现一些问题。
Texture2D<float4> tex1 : register(t3,  space0)
Texture2D<float4> tex2[4] : register(t10)
Texture2D<float4> tex3[7][5][3] : register(t20, space1)
ToneMapping Pass
这部分的实现参考了,尝试了离屏渲染方法:
GAMES106 作业1 问题整理(Tone Mapping 部分)
上面讲述了两个方案,render pass和subpass。
render pass思路概括:将原先绘制模型的pass绘制结果作为图片存储在对应的frame buffer里,进行后处理后再渲染到屏幕上。为此需要创建新的render pass和frame buffer对原来的模型绘制进行离屏渲染。
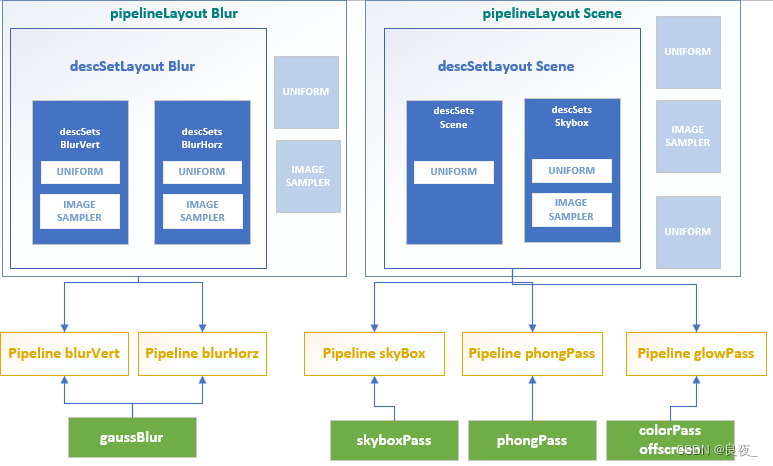
用新增的一个后处理pass进行tonemapping,需要新增一个实现tonemapping的shader,然后添加一个新的pipeline去加载这个新的shader module。需要新增实现的部分就是下图中从pipeline向上到DescriptorSetLayout部分。
[外链图片转存失败,源站可能有防盗链机制,建议将图片保存下来直接上传(img-8UaHyIIp-1691162057283)(/images/games106homewrok1/Untitled%201.png)]
离屏渲染RenderPass
离屏渲染的案例可以参考vulkan示例的bloom。
renderDoc调试观察bloom.exe, 这个程序被划分为了3个pass。colorpass(offscreen)→blur→scene。先对colorpass进行离屏渲染,然后将渲染结果blur模糊处理,最后在场景绘制中将离屏渲染的内容也绘制上。
对相关关系不是很熟练,所以如下图所示整理了一下bloom这个程序中的相关绑定,便于自己理解相关绑定。
-
资源绑定
首先需要对原先的数据结构进行修改。修改pipelines结构体,新增VkPipeline tonemap。
struct Pipelines {
	VkPipeline solid;
	VkPipeline wireframe = VK_NULL_HANDLE;
	VkPipeline tonemap = VK_NULL_HANDLE;
} pipelines;
对于新增的VkPipeline tonemap,也要创建一个VkPipelineLayout和VkDescriptorSet与之对应。同步更新对应的DescriptorSetLayouts结构体.
struct {
	VkPipelineLayout pipelineLayout;
	VkPipelineLayout postPipelineLayout;
} pipelineLayouts;

struct {
	VkDescriptorSet descriptorSet;
	VkDescriptorSet postDescriptorSet;
} descriptorSets;

struct DescriptorSetLayouts {
	VkDescriptorSetLayout matrices;
	VkDescriptorSetLayout textures;
	VkDescriptorSetLayout post;
} descriptorSetLayouts;
在setupDescriptors(),需要设置后处理pass的descriptor layout,把后处理pass需要用到的资源绑定到流水线中。
对于新的tonemap pass,只需要将一张offscreen渲染得到的图片传给shader即可,不再需要uniform input。
mark:记得修改descriptor poolSizes。
在preparaPipeline()中,需要创建VkGraphicsPipelineCreateInfo去记录pipeline基本的信息。其中pipelineCI.pVertexInputState绑定了vertexInputStateCI,即vertex输入信息,它会和vertexInputAttributes联系起来,记录要传递到shader的输入信息。
VkGraphicsPipelineCreateInfo pipelineCI = vks::initializers::pipelineCreateInfo(pipelineLayouts.pipelineLayout, renderPass, 0);
	pipelineCI.pVertexInputState = &vertexInputStateCI;
	pipelineCI.pInputAssemblyState = &inputAssemblyStateCI;
	pipelineCI.pRasterizationState = &rasterizationStateCI;
	pipelineCI.pColorBlendState = &colorBlendStateCI;
	pipelineCI.pMultisampleState = &multisampleStateCI;
	pipelineCI.pViewportState = &viewportStateCI;
	pipelineCI.pDepthStencilState = &depthStencilStateCI;
	pipelineCI.pDynamicState = &dynamicStateCI;
	pipelineCI.stageCount = static_cast<uint32_t>(shaderStages.size());
	pipelineCI.pStages = shaderStages.data();
而tonemap pass不需要绘制模型,所以不需要额外的vertex输入,所以pipelineCI.pVertexInputState传入为emptyInputState。
此外,表面剔除应该被禁用。pipelineCI.pRasterizationState中的cull mode需要修改为VK_CULL_MODE_NONE。
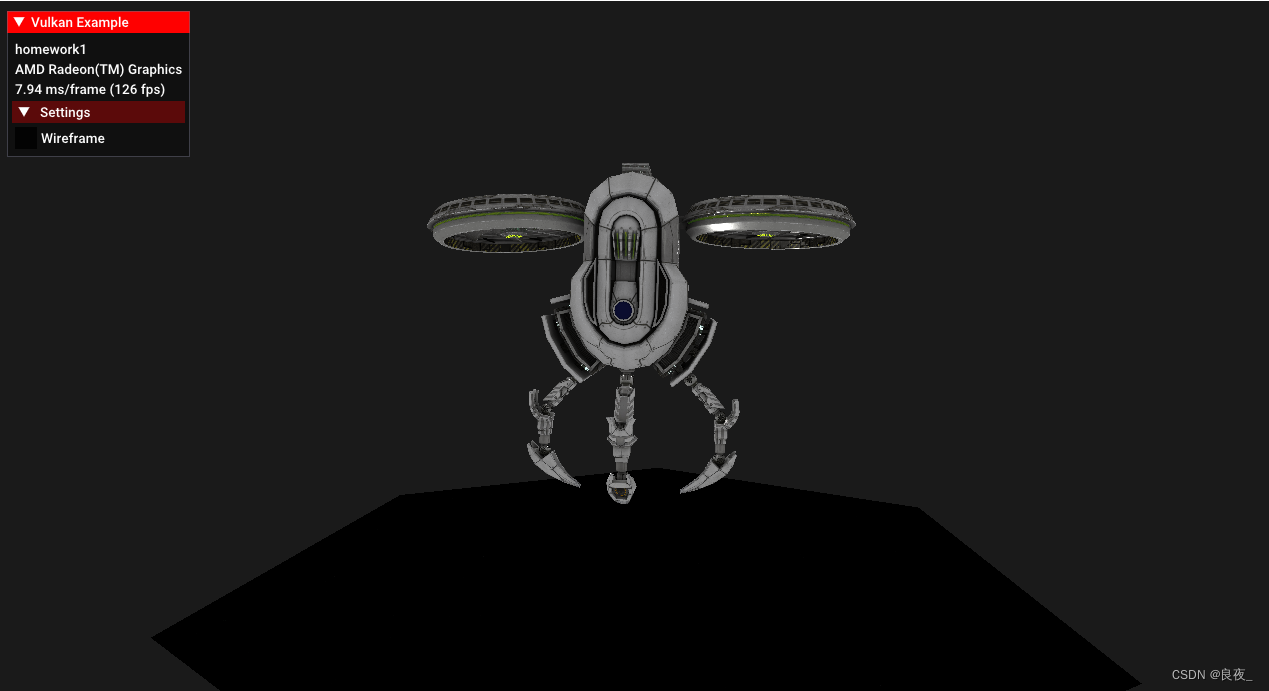
绑定好要用到的资源后,在buildCommandBuffers()中将绘制模型的pass中的renderPass和framebuffer改为offscreenPass的renderPass和framebuffer,此时模型被绘制在offscreenPass的frameBuffer中,运行将不再显示。
renderPassBeginInfo.renderPass = offscreenPass.renderPass;
renderPassBeginInfo.framebuffer = offscreenPass.frameBuffer;
之后在buildCommandBuffers()中新增tonemap pass,可以直接参考bloom中的代码。令其framebuffer = frameBuffers[i]。renderPass = renderPass;。最后的绘制命令利用vkCmdDraw(drawCmdBuffers[i], 3, 1, 0, 0)即可。
-
shader实现
tonemap pass的 frag shader已经给出,vert shader可以直接参照bloom中的gaussblur实现。
下面记录一些我遇到的花时间解决的问题。
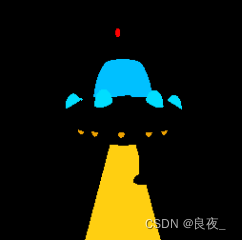
我的shader是hlsl实现,做出来是这个样子,百思不得其解…不清楚是怎么把第一个pass生成的而图像传入第二个pass输入中的。调试分析了下应该是tonemap pass的 frag shader中的Texture2D textureColor读取了绘制模型最后一个material的纹理。
[外链图片转存失败,源站可能有防盗链机制,建议将图片保存下来直接上传(img-M2o0Alec-1691162057285)(/images/games106homewrok1/Untitled%205.png)]
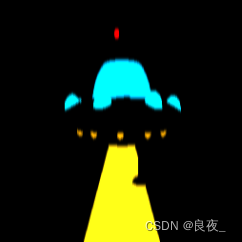
后续我将frag shader中space1修改为了space0,就能正确的绘制了。应该是原先的资源都被绑定到了逻辑寄存空间space1中,而新增的资源则是被绑定到默认的space0中。相关比较好的解释参考下面的链接:
Texture2D textureColor : register(t0, space0);
SamplerState samplerColor : register(s0, space0);
下面是tonemap前后效果的对比截图。


 303
303


 被折叠的 条评论
为什么被折叠?
被折叠的 条评论
为什么被折叠?
 到【灌水乐园】发言


