


这里写目录标题
蓝桥杯单片机模块化
建议命令类的程序全都用标志位,稳定且不易起冲突
uart 收发指令
15单片机串口重定向:解决发送问题
void putchar(char c){
     ES = 0;
     SBUF = c;
while(TI==0);
     TI = 0;
     ES = 1;
}
接收时,注意数组清空,和重新计数
串口波特率设置,利用isp就可以进行
串口1的中断使能为EA = 1;
而串口2的中断使能为IE2 = 1;
void UartInit()
{
	SCON = 0x50;		//8位数据,可变波特率
	AUXR |= 0x40;		//定时器1时钟为Fosc,即1T
	AUXR &= 0xFE;		//串口1选择定时器1为波特率发生器
	TMOD &= 0x0F;		//设定定时器1为16位自动重装方式
	TL1 = 0x8F;		//设定定时初值
	TH1 = 0xFD;		//设定定时初值
	ET1 = 0;		//禁止定时器1中断
	TR1 = 1;		//启动定时器1
	ES = 1;					//使能串口中断
}
串口中断函数:内含接收程序
RI 接收缓冲标志,一旦置一,表明从发送缓冲区接收到一个字符
TI 发送缓冲区标志,一旦置一,表明刚发送成功一个字符

void UART_Interrupt(void) interrupt 4
{
	if(RI)			//如果接收到
	{
		RI = 0;		//手动清零接收中断标志位
		a[recive] = SBUF;	//接收到后+1再发送回去  发送缓冲器
		SBUF = SBUF;
		recive++;
	}
	if(TI)			//如果发送完毕
	{
		TI = 0;		//手动清零发送中断标志位
	}
}
main函数里
if(a[6] != '\0')
		{
			if(a[0]=='A'&&a[1]=='T')
			{
				printf("ok");
			}
			else
			{
				printf("error");
			}
			a[0] = '\0';
			a[1] = '\0';
			a[2] = '\0';
			a[3] = '\0';
			a[4] = '\0';
			a[5] = '\0';
			a[6] = '\0';
			a[7] = '\0';
			a[8] = '\0';
			a[9] = '\0';
		}
注意下述代码放在while函数里哟,不能放在中断
				 if(rcv>2&&	receive[rcv-2] == '\r' && receive[rcv-1] == '\n')
				 {
					 rcv = 0;
				for (i = 0;i <8;i++)
					{
						receive[i] = '\0';
					}
				 }
				if(receive[0] == 'S' && receive[1] == 'T') {printf("the Temp is %d ℃\n\t",t);}
uart
有一个办法

大致改成这样,就可以发送数据啦~
void Uart_Isr() interrupt 4 using 1
{
	u8 b;
    if (RI)
    {
        RI = 0;             //Clear receive interrupt flag
		b = SBUF;
    }
    if (TI)  //串口发送完成
    {
        TI = 0;             //Clear transmit interrupt flag
        busy = 0;           //Clear transmit busy flag
    }
}
void SendData(u8 dat)
{
	  u8 a;
    while (busy);           //Wait for the completion of the previous data is sent
    a = dat;
    busy = 1;
    SBUF = a;             //Send data to UART buffer
}

void SendString(char *s)
{
    while (*s)              //Check the end of the string
    {
        SendData(*s++);     //Send current char and increment string ptr
    }
}
char putchar(char c)   //串口重定向
{
	ES=0;			//关串口中断
	SBUF=c;
	while(TI!=1);	//等待发送成功
	TI=0;			//清除发送中断标志
	ES=1;			//开串口中断
	return c;
}
void send(u8 *str)  // 发送代码
{
	u8 *p;
	p = str;
	ES = 0;
	while(*p != '\0')
	{
		SBUF = *p;
		while(TI == 0);  //没有接收到信号

			TI = 0;
			p++;

	}
	ES = 1;
}

	send("HELLO!\r\n");
	printf("printf Test!\r\n");   //这两行代码都可以打印出数据

注意:接收成功发宋成功,标志位都会置1
NE555测脉冲


工作方式 00 只能定时器工作,而01 00 定时器,计数器均可。
测试N555脉冲步骤:
初始化计数器0和定时器1
其中TMOD=0X05
计数器0的TL0,TH0初值设为0,因为要计数(这里还需要设置一个1s的标志位,1s检测一次)
定时器1的TH0和TL0初值设置为
TL0 = 0x20; //设置定时初值
TH0 = 0xD1; //设置定时初值
方法如下:
需要跳线帽将signal和P34短接
最后打开定时器1的中断ET1 = 1及总中断
void Timer0Init()//计数器0初始化
{
    TMOD = 0x05;                    //0000 0101set timer0 as mode1 (16-bit) 计数模式计数功能。加1计数器对来自输入引脚T0(P3.4)或T1(P3.5)的外部脉冲进行计数,一个脉冲加一,直到TFx加满溢出。
	TH0 = 0;
	TL0 = 0;
    TR0 = 1;                        //timer0 start running
    ET0 = 1;                        //enable timer0 interrupt
    EA = 1;                         //open global interrupt switch
}
//1s
				pinlv = TH0*256+TL0;
				TH0 = 0;
				TL0 = 0;
数码管
具体步骤:
首先打开isp的范例程序,复制下红框的断码部分
其次在中断里写一个2ms进入一次的函数
void smg_dis()  //测试程序
{
 P2 = (P2&0x1f)|0xc0); P0 = T_COM[smg_i];      P2 = (P2&0x1f);
 P2 = (P2&0x1f)|0xe0); P0 = ~t_display[smg_i];  P2 = (P2&0x1f);
 smg_i++;
 smg_i &= 0x07;
}


所以推测出数码管是打开Y7C(位选)0xe0 Y6C(段选)0xc0
由百度得知:人眼对bai于每11毫秒闪烁一次约du83赫兹基本感觉不到,每13毫秒闪zhi烁一次约dao66赫兹轻微频闪。
以及人眼的余晖效应,用2ms刷新一个数码管,累积下来就是16ms所有的数码管。

流水灯
建议flag标志位。(非状态)
并且流水灯是不用间隔的,所以使用标志位置1,然后软件清0,
到一定的时间有置1…从而来执行流水灯的操作
	if(s6_flag)  //按下s6然后,流水灯从两边向中间流动
	{
		if(flag500ms)
		{
		P2=0xa0;buzzer=1;P2=0x00;
		flag500ms = 0;
		led(0x01<<led_i1|0x80>>led_i1);
			led_i1++;
			led_i1 &= 3;
		}
void counter()
{
	if(s4_flag&&s5_flag == 0)//开始计时
	{
		count_num++;
		if(count_num%1000 == 0)
		{
			count_num = 0;
		   miao++;
			if(miao%60==0)
			{
				miao = 0;
				fen++;
				if(fen%60)
				{
					fen = 0;
				}
			}
		}

	}
	if(s6_flag)
	{
		s6_flag = 0; //只需要一次性的停止,而不需要长久的停止
		fen = 0;
		miao = 0;
		count_num = 0;
		s4_flag = 0;//停止计时
	}
}
void keyorder()
{
	//{P2=0x80; P0=0x05; P2=0x00;}
	if(keyval ==7)  {s7_flag=!s7_flag; }
	else if(keyval == 6) {s6_flag=1;}
	else if(keyval == 5) {s5_flag=!s5_flag;}  //状态位取反,是为了灵活转变暂停和启动
	else if(keyval == 4) {s4_flag=1;s5_flag=0;}  //为了不方暂停按钮影响第二次开启时的状况,于是将按下s4 变成(reset&复位)暂停按钮&开启定时器的功能。
}
长短矩阵按键
矩阵按键的长短按键
详细讲解请看:国赛模块超详细讲解
u8 key_scan()
{
	u8 key_return = 99, key = 99;
	h1 = 1; h2 = 1; h3 = 1; h4 = 1;
	l1 = 1; l2 = 1; l3 = 0; l4 = 1;
	if(h3 != 1) key = 13;
	if(h4 != 1) key = 12;
	h1 = 1; h2 = 1; h3 = 1; h4 = 1;
	l1 = 1; l2 = 1; l3 = 1; l4 = 1;
	if(h3 != 1) key = 17;
	if(h4 != 1) key = 16;
	switch(key_state)
	{
		case 0: if(key != 99) key_state = 1; flag_changan = 0; break;
		case 1: if(key == 99) key_state = 0;
		        else{key_val = key; key_state = 2; flag_changan = 1; } break; //以此判断是否有抖动,若无抖动,开始计时,并记录键值
		case 2: if(key == 99) {  if(key_count>980) key_return =  key_val*10;   //changan
                             else  key_return =  key_val;
                             key_state = 0;  flag_changan = 0; } //状态2主要判断按键是否松开,若松开就可以判断计时长短,否则一直停留此状态。
            break;   //每按一次键就计时
	return 		key_return;
	}
一次矩阵按键
bit flag_time;
要有一个按下按键的标志位,从这开始计时1s,1s后在检测是否还处于原来的按下状态,如果是,那么就是长按,否则是短按。
直接在里面实现功能。
void key_scan()
{
	uint8 key = 99, keyreturn  = 99;
  static uint8  real_time_count = 0;
	static uint8  key_press = 99;


	h1 = 1; h2 = 1; h3 = 0; h4 = 1;
	l1 = 1; l2 = 1; l3 = 1; l4 = 1;
	if(l3 != 1) key = 13;
	if(l4 != 1) key = 17;

	h1 = 1; h2 = 1; h3 = 1; h4 = 0;
	l1 = 1; l2 = 1; l3 = 1; l4 = 1;
	if(l3 != 1) key = 12;
	if(l4 != 1) key = 16;
	//led(0x55);
	switch(state)
	{
		case 0: if(key != 99) state = 1; break;
		case 1: if(key == 99) state = 0;
            else
             {state = 2; key_press = key; flag_time =1;}
		case 2: if(key == 99) state = 0;
	}
	if(flag_time) real_time_count++;
		if(real_time_count>90) //1s
		{
			if(key_press == key) //long press
			{
				switch(key_press)
				{
					case 13: led(0x81);  break;
					case 12: led(0x42); break;
					case 16: led(0x01); break;
					case 17: led(0x02); break;
				}
			}
			else
			{
				switch(key_press)
				{
					case 13: led(0x04);  break;
					case 12: led(0x08);  break;
					case 16: led(0x01);  break;
					case 17: led(0x02);  break;
				}
			}
			real_time_count = 0;
			key_press = 99;
			flag_time = 0;
		}
}
矩阵按键模块
主要利用状态机,其实无论矩阵按键还是独立按键都可以使用状态机
u8 keyjuzhen()
{
	u8 keyreturn=99,key=88;

	r1=0;r2=1;r3=1;r4=1;
	c1=1;c2=1;c3=1;c4=1;
	if(c1!=1) keyreturn = 7;
	if(c2!=1) keyreturn = 11;
	if(c3!=1) keyreturn = 15;
	if(c4!=1) keyreturn = 19;

	r1=1;r2=0;r3=1;r4=1;
	c1=1;c2=1;c3=1;c4=1;
	if(c1!=1) keyreturn = 6;
	if(c2!=1) keyreturn = 10;
	if(c3!=1) keyreturn = 14;
	if(c4!=1) keyreturn = 18;

	r1=1;r2=1;r3=0;r4=1;
	c1=1;c2=1;c3=1;c4=1;
	if(c1!=1) keyreturn = 5;
	if(c2!=1) keyreturn = 9;
	if(c3!=1) keyreturn = 13;
	if(c4!=1) keyreturn = 17;

	r1=1;r2=1;r3=1;r4=0;
	c1=1;c2=1;c3=1;c4=1;
	if(c1!=1) keyreturn = 4;
	if(c2!=1) keyreturn = 8;
	if(c3!=1) keyreturn = 12;
	if(c4!=1) keyreturn = 16;
	switch(keystate)
	{
		case 0: if(keyreturn) keystate = 1; break;
		case 1: if(keyreturn == 0)
		         {
							 keystate =0;
//							 break;
						 }
            else
							{
								key = keyreturn;
								keystate = 2;
							}
								break;
		case 2: if(keyreturn == 0)
							{
								keystate = 0;
							}
							break;


  }


	return key;
}
这里注意,按键的检测以及命令程序,不可以放在中断里面,否则会检测不出按键是否按下。
中断是一种使CPU中止正在执行的程序而转去处理特殊事件的操作。
(三行代码)独立按键
#define keypress P3
u8 trg,cont;
void keyscan()
{
u8 readat;
readat = keypress^0xff;
trg = readat&(readat^cont);
cont = readat;
}
矩阵按键可以用行列检测(先提前sbit定义)
sbit h1=P3^0;
sbit h2=P3^1;
sbit h3=P3^2;
sbit h4=P3^3;
sbit l1=P4^4;
sbit l2=P4^2;
sbit l3=P3^5;
sbit l4=P3^4;
u8 keyscan()
{
u8 key = 99, keyreturn = 99;
h1= 0; h2 = 1; h3 = 1; h4 = 1;
l1 = 1; l2 = 1; l3 = 1; l4 = 1;
if(l1 != 1) key = 7;
if(l2 != 1) key = 11;
if(l3 != 1) key = 15;
if(l4 != 1) key = 19;
h1= 1; h2 = 0; h3 = 1; h4 = 1;
l1 = 1; l2 = 1; l3 = 1; l4 = 1;
if(l1 != 1) key = 6;
if(l2 != 1) key = 10;
if(l3 != 1) key = 14;
if(l4 != 1) key = 18;
h1= 1; h2 = 1; h3 = 0; h4 = 1;
l1 = 1; l2 = 1; l3 = 1; l4 = 1;
if(l1 != 1) key = 5;
if(l2 != 1) key = 9;
if(l3 != 1) key = 13;
if(l4 != 1) key = 17;
h1= 1; h2 = 1; h3 = 1; h4 = 0;
l1 = 1; l2 = 1; l3 = 1; l4 = 1;
if(l1 != 1) key = 4;
if(l2 != 1) key = 8;
if(l3 != 1) key = 12;
if(l4 != 1) key = 16; //¼ì²âÍê±Ï°´¼üÊÇË
switch(state)
{
case 0: if(key != 99) state = 1; break;
case 1: if(key == 99) state = 0; else {keyreturn = key; state = 2;} break;
case 2: if(key == 99) state = 0; break;
}
return keyreturn;
}
void keycmd()
{
switch(key_val)
{
case 7: led(~0x01); break;
case 11: led(~0x02); break;
case 15: led(~0x04); break;
case 19: led(~0x08); break;
case 6: led(~0x00); break;
case 10: led(~0x01); break;
case 14: led(~0x01); break;
case 18: led(~0x01); break;
case 5: led(~0x01); break;
case 9: led(~0x01); break;
case 13: led(~0x01); break;
case 17: led(~0x01); break;
case 4: led(~0x01); break;
case 8: led(~0x01); break;
case 12: led(~0x01); break;
}
}
温度DS18B20(小数版本*100)
//#include "reg52.h"
#include<stc15f2k60s2.h>
#include<onewire.h>
sbit DQ = P1^4;  //单总线接口

unsigned char a;
//单总线延时函数
void Delay_OneWire(unsigned int t)  //STC89C52RC
{
	while(t--){
	for(a=0;a<12;a++);
	}

}

//通过单总线向DS18B20写一个字节
void Write_DS18B20(unsigned char dat)
{
	unsigned char i;
	for(i=0;i<8;i++)
	{
		DQ = 0;
		DQ = dat&0x01;
		Delay_OneWire(5);
		DQ = 1;
		dat >>= 1;
	}
	Delay_OneWire(5);
}

//从DS18B20读取一个字节
unsigned char Read_DS18B20(void)
{
	unsigned char i;
	unsigned char dat;

	for(i=0;i<8;i++)
	{
		DQ = 0;
		dat >>= 1;
		DQ = 1;
		if(DQ)
		{
			dat |= 0x80;
		}
		Delay_OneWire(5);
	}
	return dat;
}
//DS18B20设备初始化
bit init_ds18b20(void)
{
  	bit initflag = 0;

  	DQ = 1;
  	Delay_OneWire(12);
  	DQ = 0;
  	Delay_OneWire(80);
  	DQ = 1;
  	Delay_OneWire(10);
    initflag = DQ;
  	Delay_OneWire(5);

  	return initflag;
}

u16 read_T()
{
	u8 low,high;
	u16 T;
    EA=0;
	init_ds18b20();
	Write_DS18B20(0xcc);
	Write_DS18B20(0x44);
	Delay_OneWire(20);

	init_ds18b20();
	Write_DS18B20(0xcc);
	Write_DS18B20(0xbe);
	low = Read_DS18B20();
	high = Read_DS18B20();
	EA = 1;
	T = (int)((high<<8|low)*6.25);

	return T;
}

温度DS18B20
#include<stc15f2k60s2.h>
//#include "reg52.h"
#define u8 unsigned char
sbit DQ = P1^4;  //单总线接口


void Delay_OneWire(unsigned int t)  //STC12C5260S2
{
	unsigned char i;
	while(t--){
		for(i=0;i<12;i++);
	}
}


//通过单总线向DS18B20写一个字节
void Write_DS18B20(unsigned char dat)
{
	unsigned char i;
	for(i=0;i<8;i++)
	{
		DQ = 0;
		DQ = dat&0x01;
		Delay_OneWire(5);
		DQ = 1;
		dat >>= 1;
	}
	Delay_OneWire(5);
}

//从DS18B20读取一个字节
unsigned char Read_DS18B20(void)
{
	unsigned char i;
	unsigned char dat;

	for(i=0;i<8;i++)
	{
		DQ = 0;
		dat >>= 1;
		DQ = 1;
		if(DQ)
		{
			dat |= 0x80;
		}
		Delay_OneWire(5);
	}
	return dat;
}

//DS18B20设备初始化
bit init_ds18b20(void)
{
  	bit initflag = 0;

  	DQ = 1;
  	Delay_OneWire(12);
  	DQ = 0;
  	Delay_OneWire(80);
  	DQ = 1;
  	Delay_OneWire(10);
    initflag = DQ;
  	Delay_OneWire(5);

  	return initflag;
}

u8 readtemp() //读取温度
{

	u8 low,high,temp;
	init_ds18b20();
	Write_DS18B20(0xcc); //跳过rom
	Write_DS18B20(0x44);  //convert temp
	 //转换温度需要比较长的时间
	Delay_OneWire(20);

    init_ds18b20();   //十分重要,不能忘记写
	Write_DS18B20(0xcc); //跳过rom
	Write_DS18B20(0xbe);  //read temp
	low = Read_DS18B20();
	high = Read_DS18B20();
	temp = low>>4 | high<<4;
	EA=1;
	return temp;
}
时间DS1302
时间后面两个栈运算一定要用括号区分其优先级
(shi%10)
void set_time(u8 shi, u8 fen ,u8 miao)
{
	Write_Ds1302_Byte(0x8e, 0x00);   //该数据前关闭写保护位
	Write_Ds1302_Byte(0x84, shi/10*16+(shi%10) );
	Write_Ds1302_Byte(0x82, fen/10*16+(fen%10) );
	Write_Ds1302_Byte(0x80, miao/10*16+(miao%10) );
	Write_Ds1302_Byte(0x8e, 0x80);
}
iic
AT24C02(储存数据)
要注意:读AT24C02要5ms的延时
void PCF_W(u8 add)
{
	IIC_Start();
	IIC_SendByte(0x90);
	IIC_WaitAck();
	IIC_SendByte(add);
	IIC_WaitAck(); //¿´Í¼Ð´´úÂë¹þ
	IIC_Stop();
}

u8 PCF_R()
{
	u8 temp;
	IIC_Start();
	IIC_SendByte(0x91);
	IIC_WaitAck();
	temp = IIC_RecByte();
	IIC_Stop();
	return temp;
}
void AT24C02_W(u8 add, u8 dat)
{
	IIC_Start();
	IIC_SendByte(0xa0);
	IIC_WaitAck();
	IIC_SendByte(add);
	IIC_WaitAck();
	IIC_SendByte(dat);
	IIC_WaitAck();
	IIC_Stop();
}

u8 AT24C02_R(u8 add)
{
	u8 temp;
	IIC_Start();
	IIC_SendByte(0xa0);
	IIC_WaitAck();
	IIC_SendByte(add);
	IIC_WaitAck();

	IIC_Start();
	IIC_SendByte(0xa1);
	IIC_WaitAck();
	temp = IIC_RecByte();
	IIC_Stop();
	return temp;
}
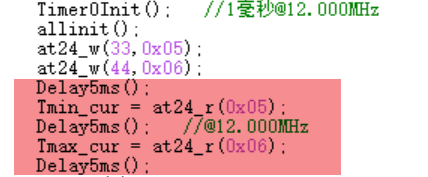
连续写
在连续写at24c02时记得在后面延时5ms
如果不是连续写的话,可以不用在写的后面加delay5ms
w_at24(0x55,v);Delay5ms(); w_at24(0x56,pinlv/100);Delay5ms(); w_at24(0x57,pinlv%100);Delay5ms(); w_at24(0x58,temp/100);Delay5ms(); w_at24(0x59,temp%100);Delay5ms(); //写的后面要delay5没事,才能写进去
连续读
无论是否是连续读,都在要在读取at24c02中数据前delay5ms
		flag_onece = 0;
		Delay5ms();   //刚刚没写这个,读出的数据re_v是255
	  re_v = r_at24(0x55);
		Delay5ms();
	  re_pinlv = r_at24(0x56);
    re_pinlv = re_pinlv*100;
		Delay5ms();
	  re_temp = r_at24(0x58)*100+r_at24(0x59);
我的建议当然是先写一个,保证你的模块正确,再去搞其他
PCF8591(adc转化)

上图为PCF8591写入的简单时序
依据数据手册,我们得出如果要D/A转化,即转化为电压的输出值datebyte 的 bit6需要置1,


/*
  程序说明: IIC总线驱动程序
  软件环境: Keil uVision 4.10
  硬件环境: CT107单片机综合实训平 台 8051,12MHz
  日    期: 2011-8-9
  通过pcf8591芯片实现ad转换。
  板子上ad采集主要采集滑动变阻器的电压值和与光敏电阻串联电阻的电压值。ad为8位精度,采集电压0-5V对应的值为0-255。根据需要可以对读取的值进行调整。

da也通过pcf8591输出,对应引脚在外部引出,在20PIN中19位。da为8位精度输出,输出0-255对应电压0-5V。
*/


//PCF8591 DA(重点在写入)输入电压
void DA_write(unsigned char dat){
	IIC_Start();
	IIC_SendByte(0x90);
	IIC_WaitAck();
	IIC_SendByte(0x40);
	IIC_WaitAck();
	IIC_SendByte(dat);
	IIC_WaitAck();
	IIC_Stop();
}
//PCF8591  AD,模拟电压值或读取光敏电阻的值(重点在读取)
u8 readPCF( u8 add)   //通道1光敏电阻,通道3电压信号
{
	u8 temp;
	IIC_Start();
	IIC_SendByte(0x90);//write
	IIC_WaitAck();
	IIC_SendByte(add);
	IIC_WaitAck();
	IIC_Stop();

	IIC_Start();
	IIC_SendByte(0x91);//read
	IIC_WaitAck();
  temp=IIC_RecByte();
	IIC_Stop();

	return temp;
}

void W_AT24C02(u8 add,u8 dat)
{
	IIC_Start();
	IIC_SendByte(0xa0);//write
	IIC_WaitAck();
	IIC_SendByte(add);
	IIC_WaitAck();
	IIC_SendByte(dat);
	IIC_WaitAck();     //一定要看仔细,每次接受或者发送某数据后面是否有ACK的信号应答
	IIC_Stop();
}

u8 R_AT24C02(u8 add)
{
	u8 temp;
	IIC_Start();
	IIC_SendByte(0xa0);//write
	IIC_WaitAck();
	IIC_SendByte(add);
	IIC_WaitAck();

	IIC_Start();
	IIC_SendByte(0xa1);//read
	IIC_WaitAck();
	temp=IIC_RecByte();
	IIC_Stop();
	return temp;
}


AT24C02可以存储255个字节的数据。
AT24C02是美国ATMEL公司的低功耗CMOS串行EEPROM,它是内含256×8位存储空间,即2048bit换成字节是256Byte,也就是说可以存储255个字节的数据。
main.c
#include<stc15f2k60s2.h>
#include<onewire.h> //头文件一定是.h
#include<ds1302.h>
#include<iic.h>
#define u8 unsigned char
#define keypress P3
//定义r为行,c为列,如果r1=0,c1=0,按键则为第一行第一列,其余同理;
sbit r1=P3^0;
sbit r2=P3^1;
sbit r3=P3^2;
sbit r4=P3^3;
sbit c1=P4^4;
sbit c2=P4^2;
sbit c3=P3^5;
sbit c4=P3^4;

sbit buzzer=P0^6;
u8 smg_i,key, R_light, off_times = 0 ;
u8 table1[8], table2[8],table3[8], temp;//1表示温度,2表示时间
u8 shi, fen, miao,time[8];
bit smg_flag,wendu_flag,rd_time_f , key_flag;

u8 code d_display[] = { 0x3F,0x06,0x5B,0x4F,0x66,0x6D,0x7D,0x07,0x7F,0x6F};
u8 code w_display[] = {0x01,0x02,0x04,0x08,0x10,0x20,0x40,0x80};


typedef unsigned char BYTE;
typedef unsigned int WORD;


void Delay10ms()		//@12.000MHz
{
	unsigned char i, j;

	i = 117;
	j = 184;
	do
	{
		while (--j);
	} while (--i);
}

//-----------------------------------------------qwq所以15和52的终端区别是什么呢

/* define constants */
#define FOSC 11059200L

#define T1MS (65536-FOSC/12/1000)   //1ms timer calculation method in 12T mode

/* define SFR */
sbit TEST_LED = P1^0;               //work LED, flash once per second

/* define variables */
WORD count,smg_count, key_count;                         //1000 times counter

//-----------------------------------------------

/* Timer0 interrupt routine */
void tm1_isr() interrupt 3 using 1
{
    TL1 = T1MS;                     //reload timer1 low byte
    TH1 = T1MS >> 8;                //reload timer1 high byte
    if (count-- == 0)               //1ms * 1000 -> 1s
    {
        count = 1000;               //reset counter
        wendu_flag=1;
			  rd_time_f = 1;
		}
		if (smg_count-- == 0)               //1ms * 1000 -> 1s
    {
        smg_count = 2;               //reset counter
		P2 = 0xc0;
		P0 = w_display[smg_i];
		P2 = 0;

		P2 = 0xe0;
		P0 = ~table1[smg_i];
		P2 = 0;
			smg_i++;
		if(smg_i == 8) smg_i = 0;

    }
		if(key_count-- == 0)
		{
			key_count = 10;
			key_flag = 1;
		}

}
u8 trg,cont;
void keyduli()
{
	u8 readdat;
	//readdat = kepress^0x00;
	readdat = keypress^0xff;
	trg = readdat&(cont^readdat);
	cont = readdat;
}


u8 keystate=0;
u8 keyjuzhen()
{
	u8 keyreturn=0,key=0;

	r1=0;r2=1;r3=1;r4=1;
	c1=1;c2=1;c3=1;c4=1;
	if(c1!=1) keyreturn = 7;
	if(c2!=1) keyreturn = 11;
	if(c3!=1) keyreturn = 15;
	if(c4!=1) keyreturn = 19;

	r1=1;r2=0;r3=1;r4=1;
	c1=1;c2=1;c3=1;c4=1;
	if(c1!=1) keyreturn = 6;
	if(c2!=1) keyreturn = 10;
	if(c3!=1) keyreturn = 14;
	if(c4!=1) keyreturn = 18;

	r1=1;r2=1;r3=0;r4=1;
	c1=1;c2=1;c3=1;c4=1;
	if(c1!=1) keyreturn = 5;
	if(c2!=1) keyreturn = 9;
	if(c3!=1) keyreturn = 13;
	if(c4!=1) keyreturn = 17;

	r1=1;r2=1;r3=1;r4=0;
	c1=1;c2=1;c3=1;c4=1;
	if(c1!=1) keyreturn = 4;
	if(c2!=1) keyreturn = 8;
	if(c3!=1) keyreturn = 12;
	if(c4!=1) keyreturn = 16;
	switch(keystate)
	{
		case 0: if(keyreturn) keystate = 1; break;
		case 1: if(keyreturn == 0)
		         {
							 keystate =0;
//							 break;
						 }
            else
							{
								key = keyreturn;
								keystate = 2;
							}
								break;
		case 2: if(keyreturn == 0)
							{
								keystate = 0;
							}
							break;


  }


	return key;
}


//-----------------------------------------------

/* main program */

void main()
{
	  u8 i;
	  P2=(P2&0x1f)|0xa0;
	  buzzer=0;
    TMOD = 0x10;                    //set timer1 as mode1 (16-bit)
    TL1 = T1MS;                     //initial timer1 low byte
    TH1 = T1MS >> 8;                //initial timer1 high byte
    TR1 = 1;                        //timer1 start running
    ET1 = 1;                        //enable timer1 interrupt
    EA = 1;                         //open global interrupt switch
    count = 0;                      //initial counter
	set_time(23,59,55);
			  EA=0;
			  temp = readtemp();
				Delay10ms();

				Delay10ms();
				Delay10ms();
				Delay10ms();
				Delay10ms();
				Delay10ms();
				Delay10ms();Delay10ms();
				Delay10ms();
				Delay10ms();
				Delay10ms();
				Delay10ms();
				Delay10ms();
	      temp = readtemp();
				Delay10ms();
				off_times = R_AT24C02(0x44);
				off_times++;
        W_AT24C02(0x44,off_times);
			  EA=1;


    while (1)
		{

			EA=0;
			writePCF(0x01);//读取光敏电阻值
			R_light = readPCF(0x01);

			if(wendu_flag)
			{
			  temp = readtemp();
				wendu_flag = 0;
			}
			if(rd_time_f)
			{
				rd_time_f = 0;
				shi = Read_Ds1302_Byte(0x85)/16*10+(Read_Ds1302_Byte(0x85)%16);
				fen = Read_Ds1302_Byte(0x83)/16*10+(Read_Ds1302_Byte(0x83)%16);
				miao = Read_Ds1302_Byte(0x81)/16*10+(Read_Ds1302_Byte(0x81)%16);
			}//read time
			EA=1;
			for(i = 0; i<4; i++)
			{
				table1[i] = 0x00;   //温度显示(最后两
			}
			table1[5] = 0x40;
			table1[6] = d_display[temp/10];
      table1[7] = d_display[temp%10];

      table2[0] = d_display[shi/10];//the dat about time
			table2[1] = d_display[shi%10];
			table2[2] = 0x40;
			table2[3] = d_display[fen/10];
			table2[4] = d_display[fen%10];
      table2[5] = 0x40;
			table2[6] = d_display[miao/10];
			table2[7] = d_display[miao%10];

			table1[1] = d_display[off_times/10%10];
			table1[2] = d_display[off_times%10];
			table1[0] = d_display[off_times/100];
			table3[3] = 0x00;
			table3[4] = 0x40;
			table3[5] = d_display[R_light/100];
			table3[6] = d_display[R_light/10%10];
			table3[7] = d_display[R_light%10];

			if( key_flag)
			{
				//keyduli();//scan button
				key = keyjuzhen();
				key_flag = 0;
//				switch(trg)
//				{
//					case 0x80: break;
//					case 0x01: shi++;set_time(shi,fen,miao); P2=0x80;P0=0x55;P2=0;break;
//					case 0x02: fen++;set_time(shi,fen,miao); break;
//					case 0x04: shi--;set_time(shi,fen,miao); break;
//					case 0x08: fen--;set_time(shi,fen,miao); break;
//				}
				if(key)
				{
								switch(key)
				{
					case 7: break;
					case 6: shi++; if(shi == 24) shi = 0; set_time(shi,fen,miao); P2=0x80;P0=0x55;P2=0;break;
					case 5: fen++; if(fen == 60) fen = 0; set_time(shi,fen,miao); break;
					case 10: shi--; if(shi == 0) shi = 23; set_time(shi,fen,miao); break;
					case 9: fen--; if(fen == 0) fen = 59; set_time(shi,fen,miao); break;
				}
				//if(key == 0)  P2=0x80;P0=0x55;P2=0;
			}
			}
		}
}
超声波
void sendsonic()
{
	u8 i;
	for(i=0;i<8;i++)
	{
		TX = 1;
		somenop;somenop;somenop;somenop;somenop;somenop;somenop;somenop;somenop;somenop;
		TX = 0;
		somenop;somenop;somenop;somenop;somenop;somenop;somenop;somenop;somenop;somenop;
	}
}
void r_distance()
{
	sendsonic();
	TR0 = 1; //counter0 start count
	while(TF0 != 1 && RX != 0 ); //注意这个为&&,两个同时满足才会一直等待
	TR0 = 0;
	if(RX == 0)
	{
		distance = (TH0*256+TL0)*0.017;
		TL0 = 0;
	    TH0 = 0;
	}
	else
	{distance = 99;
		TF0 = 0;
		TL0 = 0;
	    TH0 = 0;
	}
}


 1万+
1万+


 被折叠的 条评论
为什么被折叠?
被折叠的 条评论
为什么被折叠?
 到【灌水乐园】发言


