


前言:
实际采集的图片背景比较复杂,所以我想着采用框选矩形框+掩膜的方式简单粗暴的消除背景对图片有用区域的干扰。网上搜索了一圈尝试了几种不同的方式去框选,最后发现还是Qt的鼠标事件比较容易上手。
效果图:

主要思路:
1.主类作用:读入图片、确认ROI、掩膜、显示图片
2.标签类作用:鼠标事件、发送矩形框的信息给主类
相关代码:
(1)标签类:
<myLabel.h>
#pragma once
#include <QLabel>
#include <QPoint>
#include <QColor>
#include <QPaintEvent>
#include <QImage>
#include <QPixmap>
#include <opencv2/opencv.hpp>
//Q_DECLARE_METATYPE(cv::Point);

class myLabel : public QLabel
{
	Q_OBJECT
public:
	myLabel(QWidget *parent);
	void paintEvent(QPaintEvent* event);
	void mousePressEvent(QMouseEvent* event);
	void mouseReleaseEvent(QMouseEvent* event);
	void mouseMoveEvent(QMouseEvent* event);

	QPoint toRealPoint(QPoint p);
	void showLocalImg(cv::Mat src);
public:
	QPoint p_start;
	QPoint p_end;
	QPoint p_startInImg;
	QPoint p_endInImg;
	bool is_pressed;
	bool is_ROI;//ROI按钮是否点击判断
	double xScaled;//x方向图片缩放系数
	double yScaled;//y方向图片缩放系数
	QImage Img;
	QPixmap PixImg;
signals:
	void send2Points(cv::Point p_s, cv::Point p_e);
};
<mylabel.cpp>
#include"myLabel.h"
#include <QPen>
#include<QPainter>
#include<iostream>
using namespace std;

myLabel::myLabel(QWidget *parent):QLabel(parent)
{
	p_start =QPoint(-1, -1);
	p_end = QPoint(-1, -1);
	is_pressed = false;
	is_ROI = true;
	xScaled = 1;
	yScaled = 1;
}
void myLabel::paintEvent(QPaintEvent *event)
{
	QLabel::paintEvent(event);//继承父窗口绘图事件, 显式的调用父类的paintEvent方法
	if (is_ROI)
	{
		QPainter painter(this);
		painter.setPen(QPen(Qt::red, 2));
		int width = p_end.x() - p_start.x();
		int height = p_end.y() - p_start.y();
		painter.drawRect(QRect(p_start.x(), p_start.y(), width, height));
	}
}
void myLabel::mousePressEvent(QMouseEvent *event)
{
	if (is_ROI)
	{
		QCursor cursor;
		cursor.setShape(Qt::ArrowCursor);
		is_pressed = true;
		p_start = event->pos();
		cout << "鼠标按下" << p_start.x() << " " << p_start.y() << endl;
		p_startInImg = toRealPoint(p_start);
	}
}
void myLabel::mouseReleaseEvent(QMouseEvent *event)
{
	if (is_ROI)
	{
		p_end = event->pos(); //鼠标相对于所在控件的位置
		is_pressed = false;
		update();
		cout << "鼠标松开" << p_end.x() <<" "<<p_end.y()<< endl;
		p_endInImg = toRealPoint(p_end);
		emit send2Points(cv::Point(p_startInImg.x(), p_startInImg.y()), cv::Point(p_endInImg.x(), p_endInImg.y()));
	}
}

void myLabel::mouseMoveEvent(QMouseEvent *event)
{
	if (is_ROI)
	{
		if (event->buttons() & Qt::LeftButton) {
			p_end = event->pos(); //鼠标相对于所在控件的位置
			update();
		}
	}
}

QPoint myLabel::toRealPoint(QPoint p)
{
	//图片左上角坐标系的坐标相对于qlabel的偏移量
	int xoffset;
	xoffset = (this->width() - PixImg.width())/2;
	int yoffset;
	yoffset = (this->height() - PixImg.height())/2;
	//考虑缩放比例
	QPoint pic_pos;
	pic_pos.setX((p.x()-xoffset)*xScaled);
	pic_pos.setY((p.y()-yoffset)*yScaled);
	return pic_pos;
}

void myLabel::showLocalImg(cv::Mat src)
{
	cv::Mat Rgb;
	if (src.channels() == 3)//RGB Img
	{
		cv::cvtColor(src, Rgb, CV_BGR2RGB);//颜色空间转换
		Img = QImage((const uchar*)(Rgb.data), Rgb.cols, Rgb.rows, Rgb.cols * Rgb.channels(), QImage::Format_RGB888);
	}
	else//Gray Img
	{
		Img = QImage((const uchar*)(src.data), src.cols, src.rows, src.cols*src.channels(), QImage::Format_Indexed8);
	}
	PixImg = QPixmap::fromImage(Img);
	this->setScaledContents(false);//取消图片自适应qlabel大小,这种自适应不是同比例放大缩小
	PixImg = PixImg.scaled(this->width(), this->height(), Qt::KeepAspectRatio, Qt::SmoothTransformation);//确保qlabel显示等比例缩放最大宽度的图片
	//PixImg = PixImg.scaledToHeight( this->height(), Qt::SmoothTransformation);//确保qlabel显示等比例缩放最大宽度的图片
	this->setPixmap(PixImg);
	cout << this->width() << " " << this->height() << endl;
	xScaled =double(src.cols)/PixImg.width();
	yScaled =double(src.rows)/PixImg.height();
}
(2)主类
ROImain::ROImain(QWidget *parent)
    : QMainWindow(parent)
{
	ui.setupUi(this);
	img_current_location = 0;//默认位置为第一张图
	connect(ui.label_Img1, &myLabel::send2Points, this, &ROImain::get2Points);
}
//确认ROI区域
void ROImain::on_pushButton_RoiConfirm_clicked()
{
	ui.label_Img1->is_ROI = false;
	//生成掩膜
	Mat mask = Mat::zeros(imgInputVec[img_current_location].size(), CV_8UC1);
	for (int i = p_start.x; i < p_end.x; ++i)
	{
		for (int j = p_start.y; j < p_end.y; ++j)
		{
			mask.at<uchar>(j, i) = 255;
		}
	}
	Mat dst;
	imgInputVec[img_current_location].copyTo(dst, mask);
	//存储掩膜后图片
	int a = imgMaskVec.size() - img_current_location;//判断掩膜存储位置是否与当前位置一致
	if (a!=0 && imgMaskVec.size()>0)
	{
		for (int k = 0; k < a;++k)
			imgMaskVec.pop_back();
	}
	imgMaskVec.push_back(dst);
	ui.label_Img2->showLocalImg(imgMaskVec[img_current_location]);
}
//接收ROI的两个坐标点(矩形左上角、右下角)
void ROImain::get2Points(Point p1, Point p2)
{
	p_start = p1;
	p_end = p2;
}
代码详解
1、把qlabel控件提升为自己写的类(myLabel),这么做的目的是在QLabel的基础上可以自定义想要的功能与属性,相当于一个拓展,具体做法:
①在Qlabel右键,点击提升为
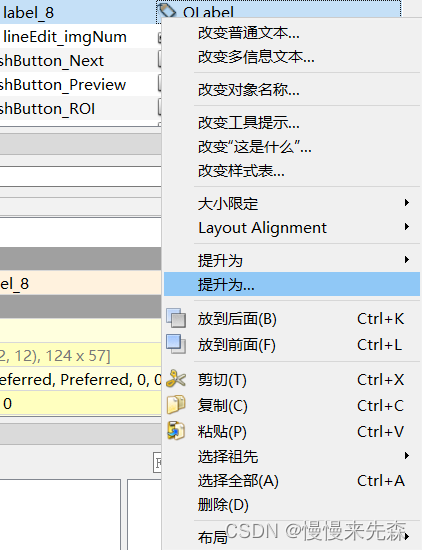
②输入自己定义的类名进行提升即可

2.鼠标框选的坐标和实际图片坐标转换问题。
1)我想要显示同比例缩放的图片,所以显示图片时候要取消图片自适应QLabel大小,这种自适应不是同比例放大缩小
this->setScaledContents(false);
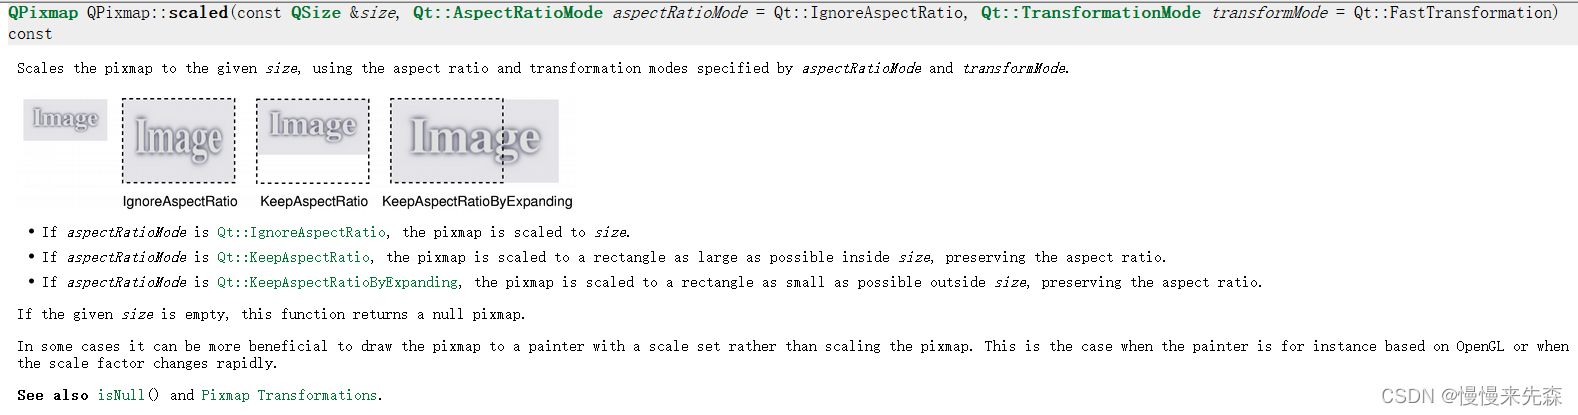
2)pixmap显示图片有好几种方式,我采用scaled(),其中参数设置为同比例缩放(KeepAaspectRatio)

3)鼠标相对于控件的坐标系和图片左上角的坐标系关系
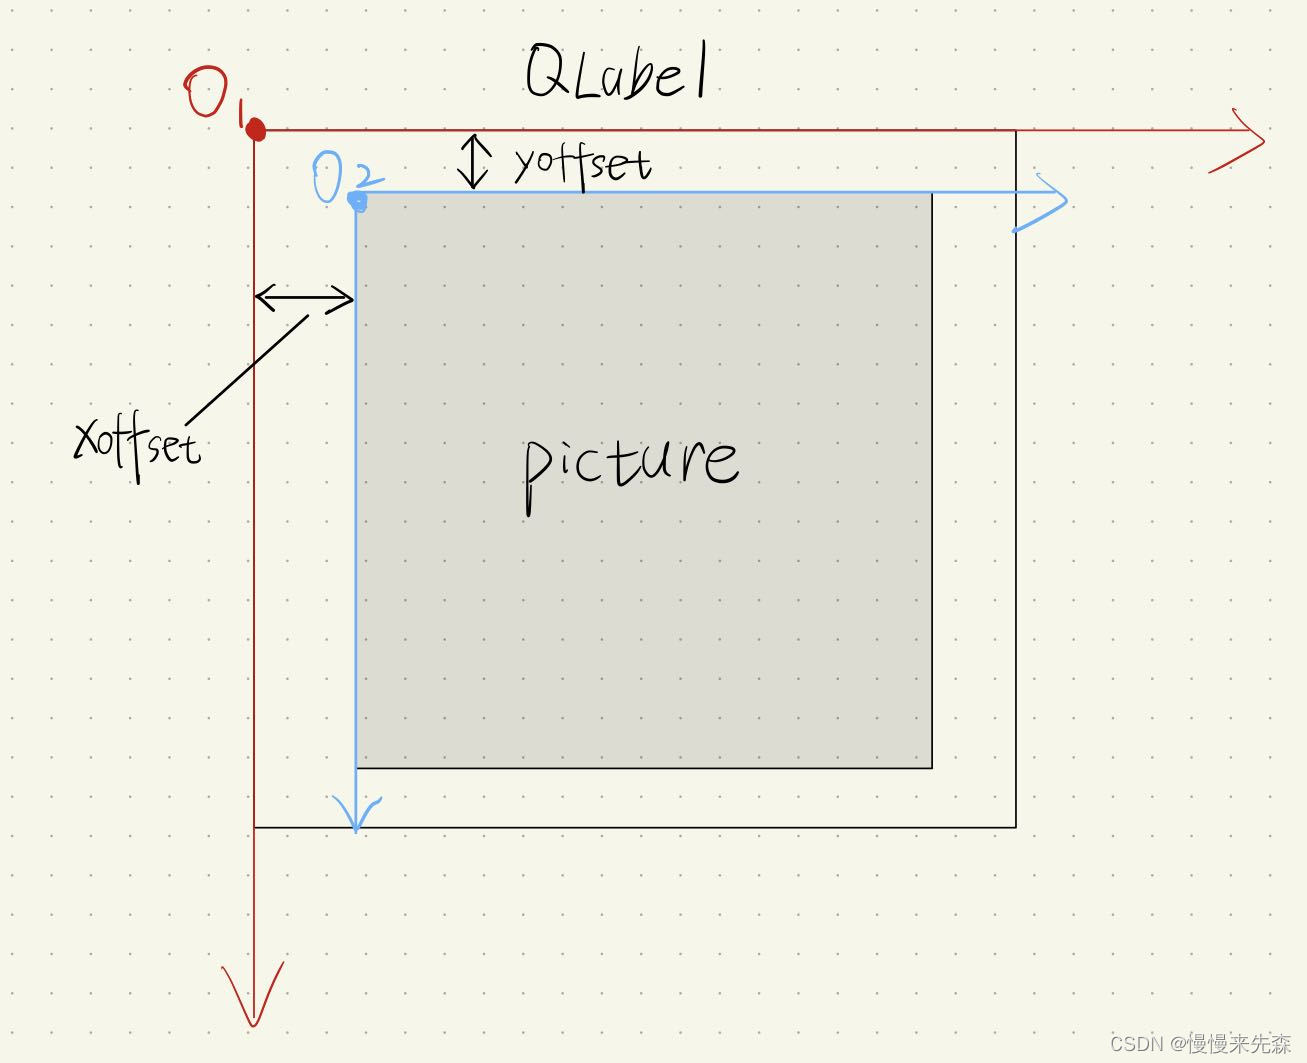
把图片在Qlabel上下左右居中显示,这样的话可以通过求得的x和y方向偏移量把坐标系从O1转换到O2
QPoint myLabel::toRealPoint(QPoint p)
{
	//图片左上角坐标系的坐标相对于qlabel的偏移量
	int xoffset;
	xoffset = (this->width() - PixImg.width())/2;
	int yoffset;
	yoffset = (this->height() - PixImg.height())/2;
	//考虑缩放比例
	QPoint pic_pos;
	pic_pos.setX((p.x()-xoffset)*xScaled);
	pic_pos.setY((p.y()-yoffset)*yScaled);
	return pic_pos;
}
缩放系数xScaled和yScaled在输入图片时候就可以计算得到
	xScaled =double(src.cols)/PixImg.width();
	yScaled =double(src.rows)/PixImg.height();
3.鼠标框选到输出真实图片坐标的流程
①鼠标左键按下mousePressEvent→得到相对于控件的坐标p_start
②坐标转换toRealPoint(p_start)
③鼠标左键松开mouseReleaseEvent→得到相对于控件的坐标p_end
④坐标转换toRealPoint(p_end)
⑤发送转换后的坐标给主类对象中
主类对象和标签类对象的信号与槽连接:
connect(ui.label_Img1, &myLabel::send2Points, this, &circleCalib::get2Points);
4.掩膜
主要是A.copyTo(B,Mask)函数的理解:我个人是理解成A和Mask的相同位置像素进行与运算赋值给B,即一旦Mask有像素值为0,那么在B中同样位置的像素就赋值为0(被掩盖住了)。
注:如有错误,务必留言指正,共同学习进步!(如有帮助,不妨点赞评论。)


 998
998


 被折叠的 条评论
为什么被折叠?
被折叠的 条评论
为什么被折叠?
 到【灌水乐园】发言


