


目录
很久没碰Unity好多功能用法都快忘了,幸亏写了博客可以回顾看一下,这就是写笔记的好处。Unity专栏里上一篇文章是做一个会飞的超人,其实我真正想做的是飞机,终于有机会摸鱼趁着这个时间实现了,效果看下面的GIF图片,最后还来了一个迫降。
实例中有两套控制系统,分别是飞机在地上和天上两种不同的控制方式;
起飞前按住W不断加速,松开W速度会下降,加速到一定数值后按空格弹射起飞;
起飞后Q、E控制飞机旋转、空格升左Ctrl键降,鼠标控制飞行方向,鼠标左键发射子弹;

GIF很糊是压缩后的,原图有一百多M,说实话这个压缩后的画风有点像油画还挺好看的。

📚一、准备工作
用到的资源都是免费的,大家可以直接去资源商店下载

这个资源我博客讲物理系统时用到过,子弹爆炸逻辑也是和物理系统这篇文章中的小实例一样的。Unity之物理系统_unity物理系统-CSDN博客 https://blog.csdn.net/qq_48512649/article/details/135600857这个资源中用到了飞机的尾部喷气粒子特效和子弹打到物体后的爆炸特效。

💻二、飞机的两套控制器
将飞机模型加到场景中,摄像机加到飞机模型上跟随飞机,选一个自己喜欢颜色的粒子特效加入到飞机尾部(注意朝向 —— 旋转一下粒子特效)然后我们开始编写飞行控制器脚本。

🎮2.1 起飞前
讲一下实现思路,在PlayerControl脚本中先定义一个移动速度的变量MoveSpeed,当玩家按住W时MoveSpeed会自增实现加速效果,松开W键会由加速状态变为减速状态,加速减速通过布尔型SpeedUp来控制。当加速到一定数值(自己定义)按空格键执行TackOff()方法
using UnityEngine;


public class PlayerControl : MonoBehaviour
{
    public float MoveSpeed = 0.1f;
    // Start is called before the first frame update

    public float takeOffForce = 100f; // 起飞力大小

    private Rigidbody rb;

    public ParticleSystem particleSystem;

    public bool SpeedUp = false;

    void Start()
    {
        rb = GetComponent<Rigidbody>();
        //particleSystem = GetComponent<ParticleSystem>();
    }

    // Update is called once per frame
    void Update()
    {
            //水平轴
            float horizontal = Input.GetAxis("Horizontal");
            //垂直轴
            float vertical = Input.GetAxis("Vertical");

            //创建成一个方向向量
            Vector3 dir = new Vector3(horizontal, 0, vertical);

            //朝方向向量移动
            transform.Translate(dir * MoveSpeed * Time.deltaTime);

            //加速
            if (Input.GetKey(KeyCode.W) && MoveSpeed <= 200)
            {
                MoveSpeed += 0.1f;
                Debug.Log("__________" + MoveSpeed);
                SpeedUp = true;
                // 加速时播放飞机尾部喷气粒子特效
                particleSystem.Play();
            }

            if (Input.GetKeyUp(KeyCode.W))
            {
                SpeedUp = false;
            }

            if (!SpeedUp)
            {
                // 减速时关闭飞机尾部喷气粒子特效
                particleSystem.Stop();
            }

            //减速
            if (MoveSpeed >= 1 && !SpeedUp)
            {
                MoveSpeed -= 0.1f;
                Debug.Log("**********" + MoveSpeed);
            }

            // 检测玩家输入,按下空格键开始起飞
            if (Input.GetKeyDown(KeyCode.Space) && MoveSpeed >= 100)
            {
                TakeOff();
            }

            //飞机起飞前控制器脚本启用时,重力也启用
            if (GetComponent<PlayerControl>().enabled)
            {
                rb.useGravity = true;
            }
    }

    void TakeOff()
    {
        // 给飞机施加向上的力来模拟起飞
        rb.AddForce(Vector3.up * takeOffForce);

        GetComponent<PlayerControl>().enabled = false; // 关掉起飞前脚本
        GetComponent<FlyContro>().enabled = true;      // 启用起飞后脚本
        rb.useGravity = !rb.useGravity;                //起飞前使用重力,起飞后关掉重力
    }
}🕹️2.2 起飞后
unity制作3维飞行_哔哩哔哩_bilibili这是飞行控制器的教程。
起飞后除了前后左右移动还增加了悬停和翻滚,打开输入管理器后Ctrl+D复制两个垂直然后改成Hover和Roll
(Futura AI (bestzpr.cn)一个套壳AI网站,这次案例实现过程中也帮了我很多)


using UnityEngine;

public class FlyContro : MonoBehaviour
{
    //前进速度、转向速度、悬停速度
    public float forwardSpeed = 200f, strafeSpeed = 7.5f, hoverSpeed = 5f;

    //获取到玩家操作输入的前进速度、转向速度、悬停速度
    private float activeforwardSpeed, activeStrafeSpeed, activeHoverSpeed;

    //定义加速度
    private float forwardAcceleration = 2.5f, strafeAcceleration = 2f, hoverAcceleration = 2f;

    public float lookRateSpeed = 90f;
    private Vector2 lookInput, screenCenter, mouseDistance;

    private float rollInput;
    public float rollSpeed = 90f, rollAcceleration = 3.5f;

    public Rigidbody rb;

    // Start is called before the first frame update
    void Start()
    {
        //屏幕中心位置
        screenCenter.x = Screen.width * 0.5f;
        screenCenter.y = Screen.height * 0.5f;
        Cursor.lockState = CursorLockMode.Confined;
        rb = GetComponent<Rigidbody>();
    }

    // Update is called once per frame
    void Update()
    {
        // 记录鼠标的位置
        lookInput.x = Input.mousePosition.x;
        lookInput.y = Input.mousePosition.y;

        //获取到鼠标的距离
        mouseDistance.x = (lookInput.x - screenCenter.x) / screenCenter.y;
        mouseDistance.y = (lookInput.y - screenCenter.y) / screenCenter.y;

        //限制鼠标操控飞机朝向的速度
        mouseDistance = Vector2.ClampMagnitude(mouseDistance, 1f);

        //获取翻滚输入
        rollInput = Mathf.Lerp(rollInput, Input.GetAxisRaw("Roll"), rollAcceleration * Time.deltaTime);

        //实现鼠标控制朝向
        transform.Rotate(-mouseDistance.y * lookRateSpeed * Time.deltaTime, mouseDistance.x * lookRateSpeed * Time.deltaTime,rollInput * rollSpeed * Time.deltaTime, Space.Self);


        //获取按键输入速度
        activeforwardSpeed = Mathf.Lerp(activeforwardSpeed,Input.GetAxisRaw("Vertical") * forwardSpeed,forwardAcceleration * Time.deltaTime);
        activeStrafeSpeed = Mathf.Lerp(activeStrafeSpeed,Input.GetAxisRaw("Horizontal") * strafeSpeed,strafeAcceleration * Time.deltaTime);
        activeHoverSpeed = Mathf.Lerp(activeHoverSpeed,Input.GetAxisRaw("Hover") * hoverSpeed, hoverAcceleration * Time.deltaTime);

        //实现飞机移动
        transform.position += transform.forward * activeforwardSpeed * Time.deltaTime;
        transform.position += (transform.right * activeStrafeSpeed * Time.deltaTime) + (transform.up * activeHoverSpeed * Time.deltaTime);

    }

    //监听发生碰撞: 只监听发生碰撞的一瞬间
    private void OnCollisionEnter(Collision collision)  //参数 collision 就是你碰撞到的物体的碰撞信息
    {
        //当飞机落地时转换飞机的控制器 (地面设置标签为Ground)
        if (collision.gameObject.layer == LayerMask.NameToLayer("Ground"))
        {
            Debug.Log("物体接触到指定图层标签的物体");
            // 在这里执行接触到指定图层标签的物体时的操作
            GetComponent<PlayerControl>().enabled = true; // 启用脚本
            GetComponent<FlyContro>().enabled = false;    // 禁用脚本
            //rb.useGravity = !rb.useGravity;
        }
    }
}🚀三、实现射击功能
准备工作里我们说了射击的原理和物理系统那篇文章中的小案例是一样的
子弹发射出去(射击脚本)碰到物体子弹销毁产生爆炸特效(爆炸脚本),爆炸特效完成后爆炸物消失(爆炸特效脚本)
💥3.1 射击脚本
编写射击脚本Shoot
using UnityEngine;

public class Shoot : MonoBehaviour
{
    // Start is called before the first frame update

    //子弹预设体序列化
    [SerializeField]
    private GameObject bulletPrefab;

    //游戏对象子弹发射点
    [SerializeField]
    private GameObject bulletPoint1;

    //游戏对象子弹发射点
    [SerializeField]
    private GameObject bulletPoint2;

    //子弹速度
    [SerializeField]
    private float bulletSpeed = 10000000;
    void Start()
    {

    }

    // Update is called once per frame
    void Update()
    {
        //是否持续按下鼠标
        if (Input.GetMouseButton(0) && GetComponent<FlyContro>().enabled)
        {
            GameObject bullet1 = Instantiate(bulletPrefab, bulletPoint1.transform.position, transform.rotation);
            GameObject bullet2 = Instantiate(bulletPrefab, bulletPoint2.transform.position, transform.rotation);
            //给子弹一个向前的力
            bullet1.GetComponent<Rigidbody>().AddForce(transform.forward * bulletSpeed * Time.deltaTime);
            bullet2.GetComponent<Rigidbody>().AddForce(transform.forward * bulletSpeed * Time.deltaTime);
            //3秒后销毁子弹
            Destroy(bullet1,3);
            Destroy(bullet2,3);
        }
    }
}💥3.2 爆炸脚本
编写子弹打到物体后爆炸脚本Bomb
public class Bomb : MonoBehaviour
{
    //创建一个爆炸的预设体
    public GameObject Prefab;

    // Start is called before the first frame update
    void Start()
    {

    }

    // Update is called once per frame
    void Update()
    {

    }

    //监听发生碰撞: 只监听发生碰撞的一瞬间
    private void OnCollisionEnter(Collision collision)  //参数 collision 就是你碰撞到的物体的碰撞信息
    {
        if (collision.gameObject.name == "Bullet(Clone)")
        {
            return;
        }

        //创建一个爆炸物体
        Instantiate(Prefab, transform.position, Quaternion.identity);   //参数: 预设体,爆炸位置是自身位置,不旋转
        //销毁自身: 子弹撞击地面爆炸物产生子弹销毁
        Destroy(gameObject);

        //获取碰撞到物体看一下参数collision —— 打印一下物体名称,这里打印的是地面的名称
        Debug.Log(collision.gameObject.name);
    }
}💥3.3 爆炸特效脚本
编写爆炸物特效脚本Explosion
using UnityEngine;

public class Explosion : MonoBehaviour
{
    float timer = 0;
    // Start is called before the first frame update
    void Start()
    {

    }

    // Update is called once per frame
    void Update()
    {
        //如果时间大于一秒就销毁爆炸物
        timer += Time.deltaTime;
        if (timer > 1)
        {
            Destroy(gameObject);
        }
    }
}
🛠️四、组装
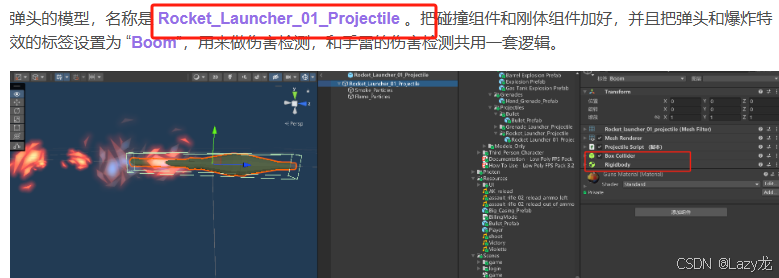
子弹我是用球体做的拉伸成长条状,给子弹挂载Bomb脚本、碰撞组件、刚体

飞机挂载刚体、碰撞组件、两个控制器脚本(默认飞行前控制器启用、飞行后控制器禁用),在飞机模型上创建两个空物体作为发射点(注意:飞机发射点要调整到子弹和飞机不能相撞的位置),挂载射击脚本把子弹预设物、发射点、子弹速度设置好。

爆炸特效也装上脚本

对了,鼠标图标是我自己找的一个icon,大家可以自己找一个喜欢的自己设置

到这里基本就结束了,不过我们还可以给飞机加上血条,我们也学习了PUN插件可以做成联机空战游戏,嗯?奇怪的想法又增加了。
本篇先到这里,感谢大家支持求三连,拜拜┏(^0^)┛
分割线:临近下班又加了导弹,素材是联机游戏那里边的火箭筒弹头,发射导弹和发射子弹逻辑一样的写在射击脚本中,这里就先不说了
【免费】PUN2插件实现联机FPS射击游戏的素材包_pun2资源-CSDN文库


 被折叠的 条评论
为什么被折叠?
被折叠的 条评论
为什么被折叠?
 到【灌水乐园】发言


