


AdaIN任意风格迁移代码分析
按照论文的结构,将代码分为三个部分
一、编码器
二、融合模块
三、解码器
四、训练
五、测试
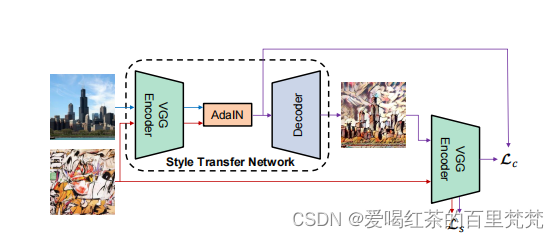
一、编码器在这里插入图片描述
1、使用预训练模型vgg作为编码器
vgg = nn.Sequential(
    nn.Conv2d(3, 3, (1, 1)),
    nn.ReflectionPad2d((1, 1, 1, 1)),
    nn.Conv2d(3, 64, (3, 3)),
    nn.ReLU(),  # relu1-1
    nn.ReflectionPad2d((1, 1, 1, 1)),
    nn.Conv2d(64, 64, (3, 3)),
    nn.ReLU(),  # relu1-2
    nn.MaxPool2d((2, 2), (2, 2), (0, 0), ceil_mode=True),
    nn.ReflectionPad2d((1, 1, 1, 1)),
    nn.Conv2d(64, 128, (3, 3)),
    nn.ReLU(),  # relu2-1
    nn.ReflectionPad2d((1, 1, 1, 1)),
    nn.Conv2d(128, 128, (3, 3)),
    nn.ReLU(),  # relu2-2
    nn.MaxPool2d((2, 2), (2, 2), (0, 0), ceil_mode=True),
    nn.ReflectionPad2d((1, 1, 1, 1)),
    nn.Conv2d(128, 256, (3, 3)),
    nn.ReLU(),  # relu3-1
    nn.ReflectionPad2d((1, 1, 1, 1)),
    nn.Conv2d(256, 256, (3, 3)),
    nn.ReLU(),  # relu3-2
    nn.ReflectionPad2d((1, 1, 1, 1)),
    nn.Conv2d(256, 256, (3, 3)),
    nn.ReLU(),  # relu3-3
    nn.ReflectionPad2d((1, 1, 1, 1)),
    nn.Conv2d(256, 256, (3, 3)),
    nn.ReLU(),  # relu3-4
    nn.MaxPool2d((2, 2), (2, 2), (0, 0), ceil_mode=True),
    nn.ReflectionPad2d((1, 1, 1, 1)),
    nn.Conv2d(256, 512, (3, 3)),
    nn.ReLU(),  # relu4-1, this is the last layer used
    nn.ReflectionPad2d((1, 1, 1, 1)),
    nn.Conv2d(512, 512, (3, 3)),
    nn.ReLU(),  # relu4-2
    nn.ReflectionPad2d((1, 1, 1, 1)),
    nn.Conv2d(512, 512, (3, 3)),
    nn.ReLU(),  # relu4-3
    nn.ReflectionPad2d((1, 1, 1, 1)),
    nn.Conv2d(512, 512, (3, 3)),
    nn.ReLU(),  # relu4-4
    nn.MaxPool2d((2, 2), (2, 2), (0, 0), ceil_mode=True),
    nn.ReflectionPad2d((1, 1, 1, 1)),
    nn.Conv2d(512, 512, (3, 3)),
    nn.ReLU(),  # relu5-1
    nn.ReflectionPad2d((1, 1, 1, 1)),
    nn.Conv2d(512, 512, (3, 3)),
    nn.ReLU(),  # relu5-2
    nn.ReflectionPad2d((1, 1, 1, 1)),
    nn.Conv2d(512, 512, (3, 3)),
    nn.ReLU(),  # relu5-3
    nn.ReflectionPad2d((1, 1, 1, 1)),
    nn.Conv2d(512, 512, (3, 3)),
    nn.ReLU()  # relu5-4
)
2、修改vgg网络,选取前三十一层作为编码器
    def __init__(self, encoder, decoder):
        super(Net, self).__init__()
        enc_layers = list(encoder.children())
        self.enc_1 = nn.Sequential(*enc_layers[:4])  # input -> relu1_1
        self.enc_2 = nn.Sequential(*enc_layers[4:11])  # relu1_1 -> relu2_1
        self.enc_3 = nn.Sequential(*enc_layers[11:18])  # relu2_1 -> relu3_1
        self.enc_4 = nn.Sequential(*enc_layers[18:31])  # relu3_1 -> relu4_1
        self.decoder = decoder
        self.mse_loss = nn.MSELoss()
        # fix the encoder
        for name in ['enc_1', 'enc_2', 'enc_3', 'enc_4']:
            for param in getattr(self, name).parameters():
                param.requires_grad = False
    # extract relu1_1, relu2_1, relu3_1, relu4_1 from input image
3、网络的总体结构
# 已分析
class Net(nn.Module):
    def __init__(self, encoder, decoder):
        super(Net, self).__init__()
        enc_layers = list(encoder.children())
        self.enc_1 = nn.Sequential(*enc_layers[:4])  # input -> relu1_1
        self.enc_2 = nn.Sequential(*enc_layers[4:11])  # relu1_1 -> relu2_1
        self.enc_3 = nn.Sequential(*enc_layers[11:18])  # relu2_1 -> relu3_1
        self.enc_4 = nn.Sequential(*enc_layers[18:31])  # relu3_1 -> relu4_1
        self.decoder = decoder
        self.mse_loss = nn.MSELoss()
        # fix the encoder
        for name in ['enc_1', 'enc_2', 'enc_3', 'enc_4']:
            for param in getattr(self, name).parameters():
                param.requires_grad = False
    # extract relu1_1, relu2_1, relu3_1, relu4_1 from input image
    def encode_with_intermediate(self, input):
        results = [input]
        for i in range(4):
            func = getattr(self, 'enc_{:d}'.format(i + 1))
            results.append(func(results[-1]))
        return results[1:]

    # extract relu4_1 from input image
    def encode(self, input):
        for i in range(4):
            input = getattr(self, 'enc_{:d}'.format(i + 1))(input)
        return input

    def calc_content_loss(self, input, target):
        assert (input.size() == target.size())
        assert (target.requires_grad is False)
        return self.mse_loss(input, target)

    def calc_style_loss(self, input, target):
        assert (input.size() == target.size())
        assert (target.requires_grad is False)
        input_mean, input_std = calc_mean_std(input)
        target_mean, target_std = calc_mean_std(target)
        return self.mse_loss(input_mean, target_mean) + \
               self.mse_loss(input_std, target_std)

    def forward(self, content, style, alpha=1.0):
        assert 0 <= alpha <= 1
        style_feats = self.encode_with_intermediate(style)
        content_feat = self.encode(content)
        t = adain(content_feat, style_feats[-1])
        t = alpha * t + (1 - alpha) * content_feat

        g_t = self.decoder(t)
        g_t_feats = self.encode_with_intermediate(g_t)

        loss_c = self.calc_content_loss(g_t_feats[-1], t)
        loss_s = self.calc_style_loss(g_t_feats[0], style_feats[0])
        for i in range(1, 4):
            loss_s += self.calc_style_loss(g_t_feats[i], style_feats[i])
        return loss_c, loss_s
model = Net(vgg,decoder)
# 打印网络结构
print(model)
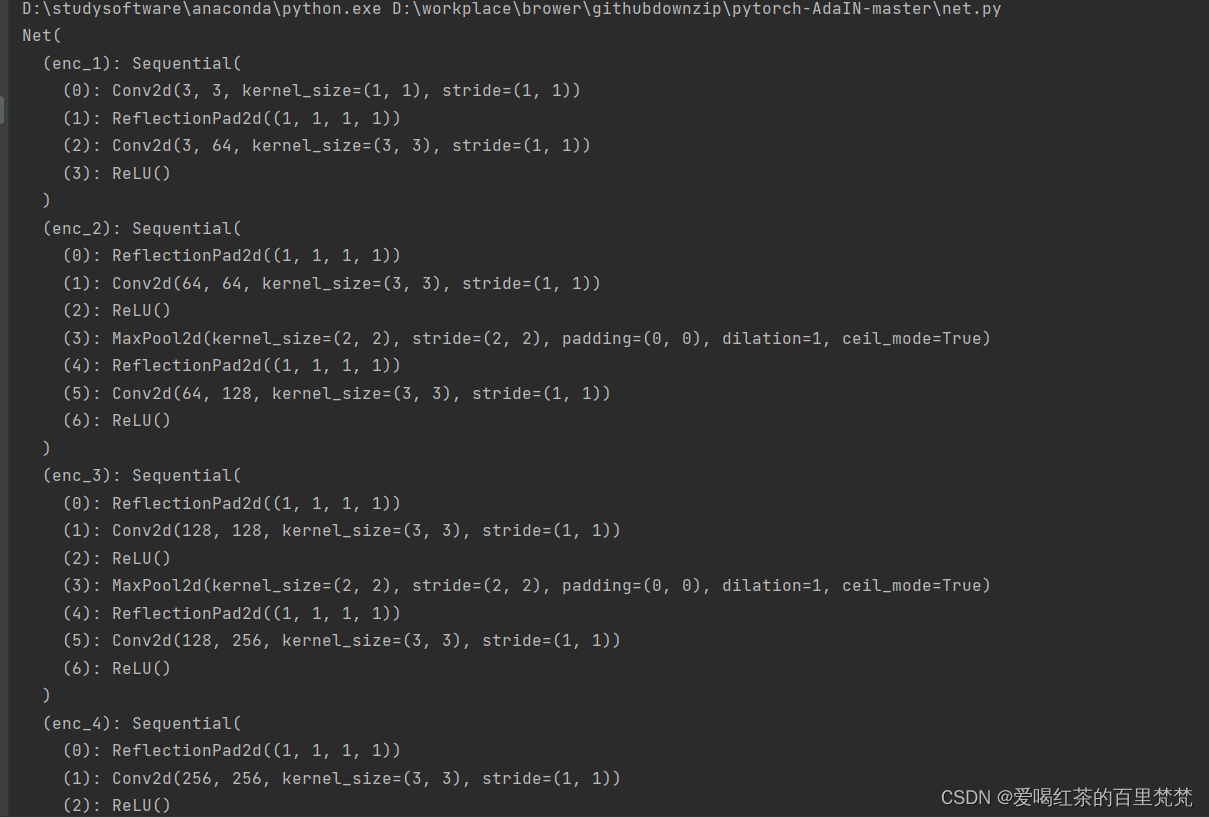
自己打印一下网络的结构
model = Net(vgg,decoder)
# 打印网络结构
print(model)
其网络结构输出如图所示:
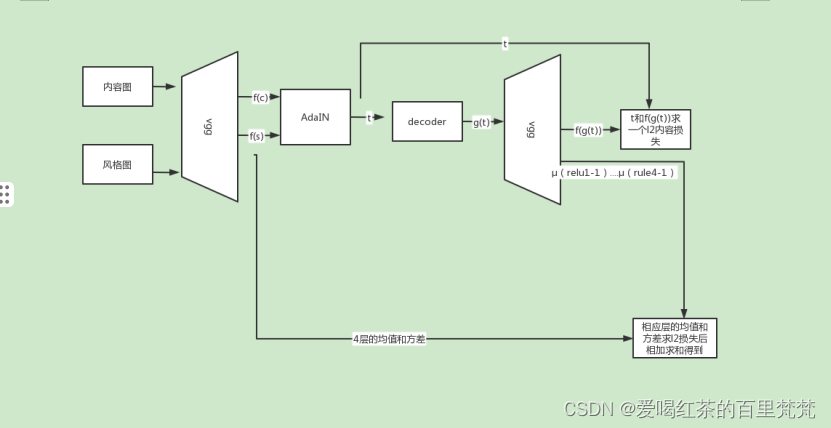
二、融合模块
1、计算特征图的均值和标准差
def calc_mean_std(feat, eps=1e-5):
    # eps是一个小值,用于避免方差为零时的除以零错误。
    size = feat.size()
    assert (len(size) == 4)
    N, C = size[:2]
    # 将特征图转换为形状为[N, C, H, W]的张量,并计算每个通道的方差
    feat_var = feat.view(N, C, -1).var(dim=2) + eps
    # 计算每个通道的标准差,并将形状转换为[N, C, 1, 1]
    feat_std = feat_var.sqrt().view(N, C, 1, 1)
    # 计算每个通道的均值,并将形状转换为[N, C, 1, 1]
    feat_mean = feat.view(N, C, -1).mean(dim=2).view(N, C, 1, 1)
    # 返回特征的均值和标准差
    return feat_mean, feat_std
(1)解释函数:feat_var=feat.view()rashape的操作
举个例子:例如一个张量(2,3,4,4)
feat_var=feat.view(N,C,-1)→(2,3,16).var(dim)→(2,3)
例如:
feat =
tensor([[[ 1,  2,  3,  4,  5,  6,  7,  8,  9, 10, 11, 12, 13, 14, 15, 16],
         [ 2,  4,  6,  8, 10, 12, 14, 16, 18, 20, 22, 24, 26, 28, 30, 32],
         [ 3,  6,  9, 12, 15, 18, 21, 24, 27, 30, 33, 36, 39, 42, 45, 48]],

        [[ 4,  8, 12, 16, 20, 24, 28, 32, 36, 40, 44, 48, 52, 56, 60, 64],
         [ 5, 10, 15, 20, 25, 30, 35, 40, 45, 50, 55, 60, 65, 70, 75, 80],
         [ 6, 12, 18, 24, 30, 36, 42, 48, 54, 60, 66, 72, 78, 84, 90, 96]]])
feat_viewed = feat.view(2, 3, 16) =
tensor([[[ 1,  2,  3,  4,  5,  6,  7,  8,  9, 10, 11, 12, 13, 14, 15, 16],
         [ 2,  4,  6,  8, 10, 12, 14, 16, 18, 20, 22, 24, 26, 28, 30, 32],
         [ 3,  6,  9, 12, 15, 18, 21, 24, 27, 30, 33, 36, 39, 42, 45, 48]],

        [[ 4,  8, 12, 16, 20, 24, 28, 32, 36, 40, 44, 48, 52, 56, 60, 64],
         [ 5, 10, 15, 20, 25, 30, 35, 40, 45, 50, 55, 60, 65, 70, 75, 80],
         [ 6, 12, 18, 24, 30, 36, 42, 48, 54, 60, 66, 72, 78, 84, 90, 96]]])
feat_var[0] = feat_viewed[0].var(dim=1) =
tensor([ 22.9167, 170.6667, 340.6667])
feat_var[1] = feat_viewed[1].var(dim=1) =
tensor([  230.6667,  850.0000, 1360.6667])
feat_var =
tensor([[  22.9167,  170.6667,  340.6667],
        [ 230.6667,  850.0000, 1360.6667]])
(2)解释函数feat_std = feat_var.sqrt().view(N, C, 1, 1)
#开方
feat_std = feat_var.sqrt() =
tensor([[  4.7917,  13.0535,  18.4506],
        [ 15.1905,  29.1548,  36.9193]])
#reshape
feat_std = feat_std.view(2, 3, 1, 1) =
tensor([[[[  4.7917]],

         [[ 13.0535]],

         [[ 18.4506]]],


        [[[ 15.1905]],

         [[ 29.1548]],

         [[ 36.9193]]]])
(3)解释 feat_mean = feat.view(N, C, -1).mean(dim=2).view(N, C, 1, 1)
feat =
tensor([[  8.5000,  18.5000,  28.5000],
        [ 36.5000,  46.5000,  56.5000]])
feat =
tensor([[[[  8.5000]],

         [[ 18.5000]],

         [[ 28.5000]]],


        [[[ 36.5000]],

         [[ 46.5000]],

         [[ 56.5000]]]])
2、归一化的处理
这个就是重点了,这几行代码可以说是论文的创新点了

def adaptive_instance_normalization(content_feat, style_feat):
    assert (content_feat.size()[:2] == style_feat.size()[:2])
    size = content_feat.size()
    style_mean, style_std = calc_mean_std(style_feat)
    content_mean, content_std = calc_mean_std(content_feat)
    normalized_feat = (content_feat - content_mean.expand(
        size)) / content_std.expand(size)
    return normalized_feat * style_std.expand(size) + style_mean.expand(size)
需要解释的是.expand(size)
content_feat = torch.tensor([[1, 2], [3, 4]])
content_mean = torch.tensor([10])
size = content_feat.size()
#过程如下:[2,2],和一个[1]
[[10,10],[10,10]]
三、解码器
对此网络的训练主要是训练一个解码器
1、解码器
decoder = nn.Sequential(
    nn.ReflectionPad2d((1, 1, 1, 1)),
    nn.Conv2d(512, 256, (3, 3)),
    nn.ReLU(),
    nn.Upsample(scale_factor=2, mode='nearest'),
    nn.ReflectionPad2d((1, 1, 1, 1)),
    nn.Conv2d(256, 256, (3, 3)),
    nn.ReLU(),
    nn.ReflectionPad2d((1, 1, 1, 1)),
    nn.Conv2d(256, 256, (3, 3)),
    nn.ReLU(),
    nn.ReflectionPad2d((1, 1, 1, 1)),
    nn.Conv2d(256, 256, (3, 3)),
    nn.ReLU(),
    nn.ReflectionPad2d((1, 1, 1, 1)),
    nn.Conv2d(256, 128, (3, 3)),
    nn.ReLU(),
    nn.Upsample(scale_factor=2, mode='nearest'),
    nn.ReflectionPad2d((1, 1, 1, 1)),
    nn.Conv2d(128, 128, (3, 3)),
    nn.ReLU(),
    nn.ReflectionPad2d((1, 1, 1, 1)),
    nn.Conv2d(128, 64, (3, 3)),
    nn.ReLU(),
    nn.Upsample(scale_factor=2, mode='nearest'),
    nn.ReflectionPad2d((1, 1, 1, 1)),
    nn.Conv2d(64, 64, (3, 3)),
    nn.ReLU(),
    nn.ReflectionPad2d((1, 1, 1, 1)),
    nn.Conv2d(64, 3, (3, 3)),
)
2、内容损失函数
计算一个l2的损失,均方误差
    def calc_content_loss(self, input, target):
        assert (input.size() == target.size())
        assert (target.requires_grad is False)
        return self.mse_loss(input, target)
3、风格损失函数
计算均值和方差的l2的损失
    def calc_style_loss(self, input, target):
        assert (input.size() == target.size())
        assert (target.requires_grad is False)
        input_mean, input_std = calc_mean_std(input)
        target_mean, target_std = calc_mean_std(target)
        return self.mse_loss(input_mean, target_mean) + \
               self.mse_loss(input_std, target_std)
4、前向传播的过程
    def forward(self, content, style, alpha=1.0):
        assert 0 <= alpha <= 1
        style_feats = self.encode_with_intermediate(style)
        content_feat = self.encode(content)
        t = adain(content_feat, style_feats[-1])
        t = alpha * t + (1 - alpha) * content_feat
        g_t = self.decoder(t)
        g_t_feats = self.encode_with_intermediate(g_t)
        loss_c = self.calc_content_loss(g_t_feats[-1], t)
        loss_s = self.calc_style_loss(g_t_feats[0], style_feats[0])
        for i in range(1, 4):
            loss_s += self.calc_style_loss(g_t_feats[i], style_feats[i])
        return loss_c, loss_s
四、训练
训练的是一个解码器所以并没有风格迁移模块的存在。
1、对数据的处理
def train_transform():
    transform_list = [
        transforms.Resize(size=(512, 512)),
        transforms.RandomCrop(256),
        #随机裁剪图像为256x256像素
        transforms.ToTensor()
    ]
    return transforms.Compose(transform_list)
class FlatFolderDataset(data.Dataset):
    def __init__(self, root, transform):
        super(FlatFolderDataset, self).__init__()  # 调用父类的构造函数
        self.root = root  # 图像文件夹的路径
        self.paths = list(Path(self.root).glob('*'))  # 获取图像文件夹下所有图像文件的路径
        self.transform = transform  # 图像预处理的操作对象
    def __getitem__(self, index):
        path = self.paths[index]  # 获取给定索引对应的图像文件路径
        img = Image.open(str(path)).convert('RGB')  # 使用 PIL.Image.open 打开图像文件,并转换为 RGB 格式
        img = self.transform(img)  # 对图像进行预处理操作
        return img
    def __len__(self):
        return len(self.paths)  # 返回数据集中图像的总数
    def name(self):
        return 'FlatFolderDataset'  # 返回数据集类的名称
无限循环便利采样器
def InfiniteSampler(n):
    # i = 0
    i = n - 1
    order = np.random.permutation(n)
    while True:
        yield order[i]
        i += 1
        if i >= n:
            np.random.seed()
            order = np.random.permutation(n)
            i = 0


class InfiniteSamplerWrapper(data.sampler.Sampler):
    def __init__(self, data_source):
        self.num_samples = len(data_source)

    def __iter__(self):
        return iter(InfiniteSampler(self.num_samples))

    def __len__(self):
        return 2 ** 31
2、自动优化学习率
def adjust_learning_rate(optimizer, iteration_count):
    # 计算学习率,使用原始实现的公式
    lr = args.lr / (1.0 + args.lr_decay * iteration_count)

    # 遍历优化器中的每个参数组
    for param_group in optimizer.param_groups:
        # 更新参数组的学习率为新计算的学习率值
        param_group['lr'] = lr
3、基础操作(模型训练时需要的超参数)
parser = argparse.ArgumentParser()
# Basic options
parser.add_argument('--content_dir', type=str, required=True,
                    help='Directory path to a batch of content images')
parser.add_argument('--style_dir', type=str, required=True,
                    help='Directory path to a batch of style images')
parser.add_argument('--vgg', type=str, default='models/vgg_normalised.pth')
# training options
parser.add_argument('--save_dir', default='./experiments',
                    help='Directory to save the model')
parser.add_argument('--log_dir', default='./logs',
                    help='Directory to save the log')
parser.add_argument('--lr', type=float, default=1e-4)
parser.add_argument('--lr_decay', type=float, default=5e-5)
parser.add_argument('--max_iter', type=int, default=1600)
parser.add_argument('--batch_size', type=int, default=8)
parser.add_argument('--style_weight', type=float, default=10.0)
parser.add_argument('--content_weight', type=float, default=1.0)
parser.add_argument('--n_threads', type=int, default=16)
parser.add_argument('--save_model_interval', type=int, default=10000)
args = parser.parse_args()
4、训练
for i in tqdm(range(args.max_iter)):
    adjust_learning_rate(optimizer, iteration_count=i)
    content_images = next(content_iter).to(device)
    style_images = next(style_iter).to(device)
    loss_c, loss_s = network(content_images, style_images)
    loss_c = args.content_weight * loss_c
    loss_s = args.style_weight * loss_s
    loss = loss_c + loss_s

    optimizer.zero_grad()
    loss.backward()
    optimizer.step()

    writer.add_scalar('loss_content', loss_c.item(), i + 1)
    writer.add_scalar('loss_style', loss_s.item(), i + 1)

    if (i + 1) % args.save_model_interval == 0 or (i + 1) == args.max_iter:
        state_dict = net.decoder.state_dict()
        for key in state_dict.keys():
            state_dict[key] = state_dict[key].to(torch.device('cpu'))
        torch.save(state_dict, save_dir /
                   'decoder_iter_{:d}.pth'.format(i + 1))
writer.close()
五、测试
1、图片风格迁移测试
(1)数据处理
def test_transform(size, crop):
    transform_list = []
    if size != 0:
        transform_list.append(transforms.Resize(size))
    if crop:
        transform_list.append(transforms.CenterCrop(size))
    transform_list.append(transforms.ToTensor())
    transform = transforms.Compose(transform_list)
    return transform
(2)融合函数
def style_transfer(vgg, decoder, content, style, alpha=1.0,
                   interpolation_weights=None):
    assert (0.0 <= alpha <= 1.0)
    content_f = vgg(content)
    style_f = vgg(style)
    if interpolation_weights:
        _, C, H, W = content_f.size()
        feat = torch.FloatTensor(1, C, H, W).zero_().to(device)
        base_feat = adaptive_instance_normalization(content_f, style_f)
        for i, w in enumerate(interpolation_weights):
            feat = feat + w * base_feat[i:i + 1]
        content_f = content_f[0:1]
    else:
        feat = adaptive_instance_normalization(content_f, style_f)
    feat = feat * alpha + content_f * (1 - alpha)
    return decoder(feat)
(3)基础操作设置
parser = argparse.ArgumentParser()
# Basic options
parser.add_argument('--content', type=str,
                    help='File path to the content image')
parser.add_argument('--content_dir', type=str,
                    help='Directory path to a batch of content images')
parser.add_argument('--style', type=str,
                    help='File path to the style image, or multiple style \
                    images separated by commas if you want to do style \
                    interpolation or spatial control')
parser.add_argument('--style_dir', type=str,
                    help='Directory path to a batch of style images')
parser.add_argument('--vgg', type=str, default='models/vgg_normalised.pth')
parser.add_argument('--decoder', type=str, default='models/decoder.pth')

# Additional options
parser.add_argument('--content_size', type=int, default=512,
                    help='New (minimum) size for the content image, \
                    keeping the original size if set to 0')
parser.add_argument('--style_size', type=int, default=512,
                    help='New (minimum) size for the style image, \
                    keeping the original size if set to 0')
parser.add_argument('--crop', action='store_true',
                    help='do center crop to create squared image')
parser.add_argument('--save_ext', default='.jpg',
                    help='The extension name of the output image')
parser.add_argument('--output', type=str, default='output',
                    help='Directory to save the output image(s)')

# Advanced options
parser.add_argument('--preserve_color', action='store_true',
                    help='If specified, preserve color of the content image')
parser.add_argument('--alpha', type=float, default=1.0,
                    help='The weight that controls the degree of \
                             stylization. Should be between 0 and 1')
parser.add_argument(
    '--style_interpolation_weights', type=str, default='',
    help='The weight for blending the style of multiple style images')

args = parser.parse_args()
(4)使用训练的模型
decoder = net.decoder
vgg = net.vgg

decoder.eval()
vgg.eval()

decoder.load_state_dict(torch.load(args.decoder))
vgg.load_state_dict(torch.load(args.vgg))
vgg = nn.Sequential(*list(vgg.children())[:31])

vgg.to(device)
decoder.to(device)

content_tf = test_transform(args.content_size, args.crop)
style_tf = test_transform(args.style_size, args.crop)

for content_path in content_paths:
    if do_interpolation:  # one content image, N style image
        style = torch.stack([style_tf(Image.open(str(p))) for p in style_paths])
        content = content_tf(Image.open(str(content_path))) \
            .unsqueeze(0).expand_as(style)
        style = style.to(device)
        content = content.to(device)
        with torch.no_grad():
            output = style_transfer(vgg, decoder, content, style,
                                    args.alpha, interpolation_weights)
        output = output.cpu()
        output_name = output_dir / '{:s}_interpolation{:s}'.format(
            content_path.stem, args.save_ext)
        save_image(output, str(output_name))

    else:  # process one content and one style
        for style_path in style_paths:
            content = content_tf(Image.open(str(content_path)))
            style = style_tf(Image.open(str(style_path)))
            if args.preserve_color:
                style = coral(style, content)
            style = style.to(device).unsqueeze(0)
            content = content.to(device).unsqueeze(0)
            with torch.no_grad():
                output = style_transfer(vgg, decoder, content, style,
                                        args.alpha)
            output = output.cpu()

            output_name = output_dir / '{:s}_stylized_{:s}{:s}'.format(
                content_path.stem, style_path.stem, args.save_ext)
            save_image(output, str(output_name))


 2万+
2万+


 被折叠的 条评论
为什么被折叠?
被折叠的 条评论
为什么被折叠?
 到【灌水乐园】发言


