


1. 哈希桶的模拟实现
哈希桶模型解析
开散列法又叫链地址法(开链法),首先对关键码集合用散列函数计算散列地址,具有相同地址的关键码归于同一子集合,每一个子集合称为一个桶,各个桶中的元素通过一个单链表链接起来,各链表的头结点存储在哈希表中。

从上图可以看出,开散列中每个桶中放的都是发生哈希冲突的元素
模拟代码
public class HashBuck<T,V> {
    public static class Node<T,V>{
        public T key;
        public V value;
        public Node<T,V> next;
        public Node(T key, V value){
            this.key = key;
            this.value = value;
        }
    }
    //负载因子
    double DEFAULT_LOAD_FACTOR=0.75;
    //初始容量
    int INIT_CAPACITY=8;
    public Node<T,V> [] array = (Node<T, V>[]) new Node[INIT_CAPACITY];
    public int usedSize;
    //利用反射创建泛型数组,但是在这里先用上面的形式
//    public HashBuck(){
//        array = (Node<T,V>[]) Array.newInstance(Node.class,INIT_CAPACITY);
//    }

    //插入数据
    public void put(T key,V val){
        Node<T,V> node = new Node<>(key,val);
        int index=key.hashCode()% array.length;
        Node cur=array[index];
        //查看是否已经存在key,如果存在就进行value的更新
        while(cur!=null){
            if(cur.key.equals(key)){
                cur.value=val;
                return;
            }
            cur=cur.next;
        }
        node.next=array[index];
        array[index]=node;
        usedSize++;
        //判断是否超过负载因子,如果超过就进行扩容和重写hash
        if(usedSize*1.0/ array.length>=DEFAULT_LOAD_FACTOR){
            //进行扩容
            Node<T,V> []temp = new Node[array.length*2];
            //重新Hash
            for(int i=0;i< array.length;i++){
                cur=array[i];
                while(cur!=null){
                    index=cur.key.hashCode()% array.length;
                    Node nextCur=cur.next;
                    cur.next=temp[index];
                    temp[index]=cur;
                    cur=nextCur;
                }
            }
            array=temp;
        }
    }
    //删除数据
    public void remove(T key){
        int index=key.hashCode()%array.length;
        if(array[index].key.equals(key)){
            array[index]=array[index].next;
            return;
        }
        Node cur=array[index].next;
        Node curPer=array[index];
        while(cur!=null){
            if(cur.key.equals(key)){
                curPer.next=cur.next;
                return;
            }
            curPer=cur;
            cur=cur.next;
        }
    }
}
测试1
public static void main(String[] args) {
        HashBuck<String,Integer> hashBuck = new HashBuck<>();
        hashBuck.put("as",1);
        hashBuck.put("sx",2);
        hashBuck.put("fa",4);
        hashBuck.put("da",3);
        hashBuck.put("gz",5);
        hashBuck.put("hx",6);
        hashBuck.put("ja",7);
        hashBuck.put("kx",8);
        hashBuck.put("lw",9);
        hashBuck.put("ma",10);

        hashBuck.remove("gz");
        hashBuck.remove("ma");
    }
这里的测试属于是常规测试
测试2
class Students {
    int id;
    String name;

    public Students(int id, String name) {
        this.id = id;
        this.name = name;
    }

    @Override
    public boolean equals(Object o) {
        if (this == o) return true;
        if (o == null || getClass() != o.getClass()) return false;
        Students students = (Students) o;
        return id == students.id && name.equals(students.name);
    }

    @Override
    public int hashCode() {
        return Objects.hash(id, name);
    }
}
public class TestHashBuck {
    public static void main(String[] args) {
        Students student1=new Students(123,"lisi");
        Students student2=new Students(123,"lisi");
        HashBuck<Students, Integer> hashBuck = new HashBuck<Students, Integer>();
        hashBuck.put(student1,2);
        hashBuck.put(student2,3);
    }
}
在这个测试中,重写了 Students 类 的equals和hashcode方法
重写equals方法:使在id和name相同的情况下,判定为相同
重写hashcode方法:使id和name相同的情况下,形成相同的hash值
加入不进行上面的hashcode重写,就会出现下面的情况:
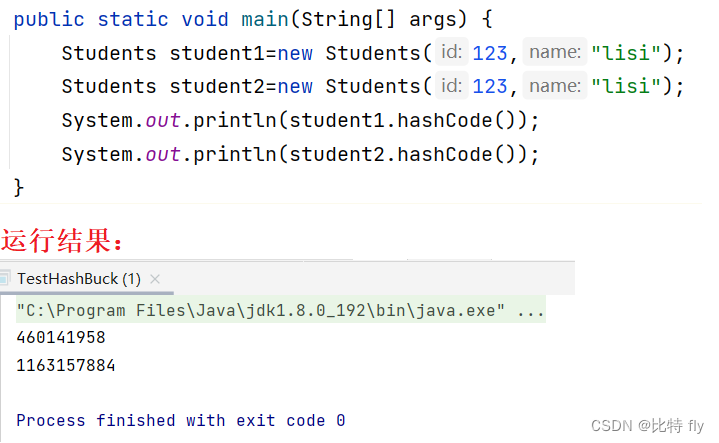
很明显,同一个学生生成了不一样的hashcode,这是不符合正常理解的,所以通过重写hashcode方法来满足自己的处理需求。
面试问题·:hashMap当中的hashcode和equals
- 他们分别起什么作用?
hashcode确定下标的位置,而equals比较key是否相同
- 如果hashcode一样,那么equals一定一样吗?
不一定,因为同一个下标当中可能存储多个元素(链表)
- 如果equals一样,那么hashcode一定一样吗?
一定,因为当equals一样时,说明两个对象相同,即hashcode一样。
2. HashMap源码解析
基础规定
在Java中,HashMap的底层是 数组+链表+红黑树,他们之间存在转换关系:
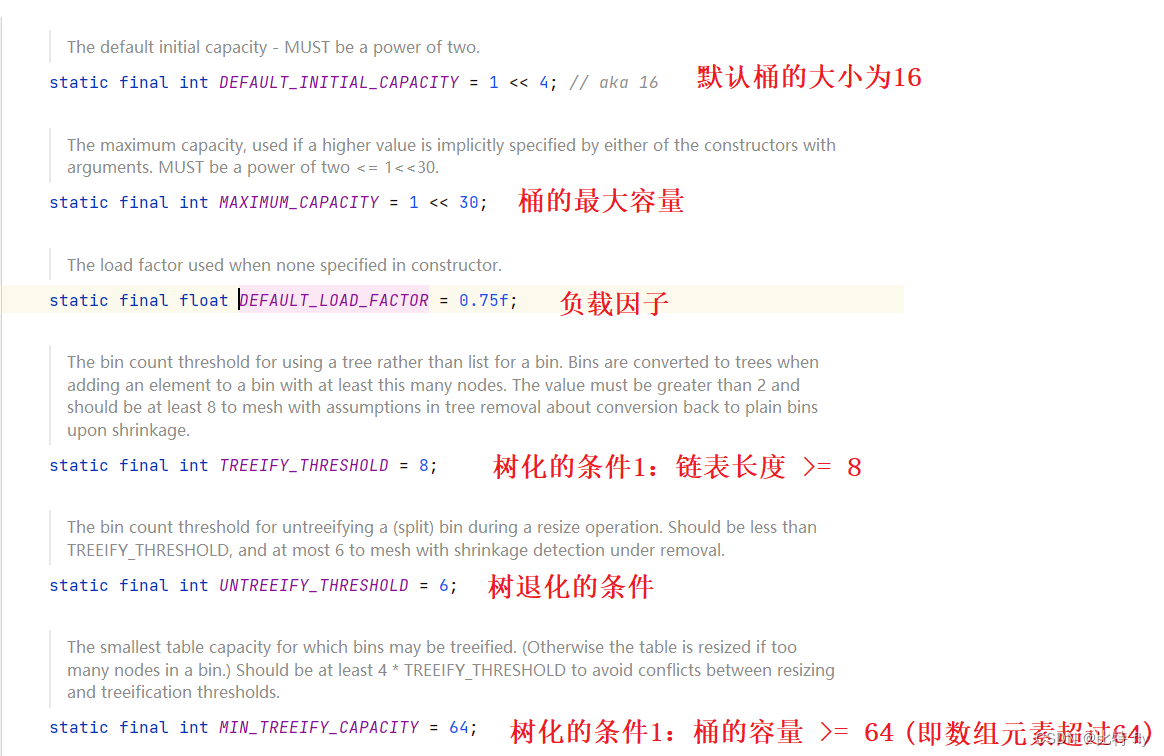
即有:当数组元素超过64并且链表长度超过8时,就进行树化
面试问题:实例化时的数组大小问题
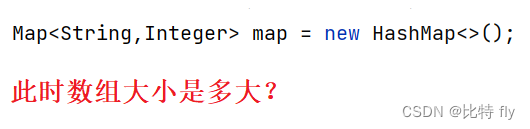
大小为0,当插入元素时,才会进行内容的分配,数组容量就变成了16.

当指定容量时,就会分配内存,大小为:大于指定容量,并且是最小的以2 为底的幂次方
面试问题:何时进行扩容
当超过负载因子的时候进行扩容
后续还会进行补充~~


 377
377


 被折叠的 条评论
为什么被折叠?
被折叠的 条评论
为什么被折叠?
 到【灌水乐园】发言


