


说明
1、Vue 脚手架是 Vue 官方提供的标准化开发工具(开发平台)。
2、最新的版本是 5.x。
3、文档: Vue CLI
具体步骤
第一步(仅第一次执行):全局安装@vue/cli。
npm install -g @vue/cli
第二步:切换到你要创建项目的目录,然后使用命令创建项目
vue create xxxx (xxx项目名)
或者vue ui(打开创建项目ui界面)
第三步:启动项目
npm run serve
备注:
- 如出现下载缓慢请配置 npm 淘宝镜像:npm config set registry https://registry.npm.taobao.org
- Vue 脚手架隐藏了所有 webpack 相关的配置,若想查看具体的 webpakc 配置,
请执行:vue inspect > output.js
脚手架文件结构:
vue_test
├── node_modules
├── public
│ ├── index.html:主页面
│ └── favicon.ico:页签图标
├── src
│ ├── assets:存放静态资源
│ │ └── logo.png
│ ├── components:存放组件
│ │ └── HelloWorld.vue
│ ├── App.vue:汇总组件
│ └── main.js:入口文件
├── .gitignore:git版本管制忽略的配置
├── babel.config.js:babel的配置文件
├── package.json:应用包配置文件
├── README.md:应用描述文件
├── package-lock.json:包版本控制文件
├── jsconfig.json
└── vue.config.js
代码视图
src下main.js代码
/*
  该文件是整个项目的入口文件
*/
//引入Vue
import Vue from "vue";
//import Vue from "vue/dist/vue"; //引入完整版Vue.js

//引入App组件,他是所有组件的父组件
import App from "./App.vue";

//关闭vue的生产提示
Vue.config.productionTip = false;

let a = 1;

/*
  关于不同版本的Vue:
    1、vue.js 与 vue.runtime.xxx.js 的区别:
        (1)、vue.js是完整版的Vue,包含:核心功能 + 模板解析器
        (2)、vue.runtime.xxx.js试运行版的Vue,只包含:核心功能;没有模板解析器。

    2、因为vue.runtime.xxx.js 没有模板解析器,所以不能使用template配置项,需要使用
       render函数接收到 createElement函数 去指定具体内容
          完整写法:
              render(createElement) {
                  return createElement(element, "value");
              },

          简写写法:
              render: (createElement) => createElement(element, "value"),

*/

//创建Vue实例对象-----vm
new Vue({
  el: "#app",
  //下面这行代码一会解释,完成了这个功能:将App组件放入容器中
  //简写:
  render: (h) => h(App),

  //template: `<h1>你好啊</h1>`,
  // components: { App },
});
src下App.vue
<template>
  <div>
    <img src="./assets/logo.png" alt="" />
    <School></School>
    <Studen></Studen>
  </div>
</template>

<script>
//引入组件
import School from "./components/School";
import Studen from "./components/Student";
export default {
  name: "App",
  components: {
    School,
    Studen,
  },
};
</script>
src下components里的 School.vue 和 Student.vue
// ---- School
<template>
  <!-- 组件的结构 -->
  <div class="school">
    <h2>学校名称:{{ name }}</h2>
    <h2>学校地址:{{ address }}</h2>
    <button @click="showName">点我显示学校名字</button>
  </div>
</template>

<script>
export default {
  name: "MySchool",
  data() {
    return {
      name: "xx",
      address: "北京",
    };
  },
  methods: {
    showName() {
      alert(this.name);
    },
  },
};
</script>

<style>
/* 组件的样式 */
.school {
  background-color: pink;
}
</style>

// ---- Student
<template>
  <!-- 组件的结构 -->
  <div class="student">
    <h2>学生名称:{{ name }}</h2>
    <h2>学生年龄:{{ age }}</h2>
  </div>
</template>

<script>
export default {
  name: "MyStuden",
  data() {
    return {
      name: "xinze",
      age: 18,
    };
  },
};
</script>

<style>
/* 组件的样式 */
.student {
  background-color: plum;
}
</style>
public下的index.html
<!DOCTYPE html>
<html lang="">
  <head>
    <meta charset="utf-8" />
    <!-- 针对IE浏览器的一个特殊配置,含义是让IE浏览器以最高的渲染级别渲染页面 -->
    <meta http-equiv="X-UA-Compatible" content="IE=edge" />
    <!-- 开启移动端的理想视口 -->
    <meta name="viewport" content="width=device-width,initial-scale=1.0" />
    <!-- 配置页签图标 -->
    <link rel="icon" href="<%= BASE_URL %>favicon.ico" />
    <!-- 配置网页标题 -->
    <title><%= htmlWebpackPlugin.options.title %></title>
  </head>
  <body>
    <!-- 当浏览器不支持 Js 的时候 noscript 中的元素就会被渲染-->
    <noscript>
      <strong
        >We're sorry but <%= htmlWebpackPlugin.options.title %> doesn't work
        properly without JavaScript enabled. Please enable it to
        continue.</strong
      >
    </noscript>
    <!-- 容器 -->
    <div id="app"></div>
    <!-- built files will be auto injected -->
  </body>
</html>
关于不同版本的 Vue
1、vue.js 与 vue.runtime.xxx.js 的区别
(1)、vue.js 是完整版的 Vue,包含:核心功能 + 模板解析器
(2)、vue.runtime.xxx.js 试运行版的 Vue,只包含:核心功能;没有模板解析器。
2、因为 vue.runtime.xxx.js 没有模板解析器,所以不能使用 template 配置项,需要使用 render
完整写法:
           render(createElement) {

               return createElement(element, "value");
           },

简写写法:
           render: (createElement) => createElement(element, "value"),
vue.config.js 配置文件
使用 Vue inspect > output.js 可以查看到 Vue 脚手架的默认值。(把默认值输出到 output.js 的文件里)
使用 vue.config.js 可以对脚手架进行个性化定之,详情见:http://cli.vuejs.org/zh
在 vue.config.js 中配置 lintOnSave: false, 可以关闭关闭语法检查
const { defineConfig } = require("@vue/cli-service");

module.exports = defineConfig({
  transpileDependencies: true,
  //关闭语法检查
  lintOnSave: false,
});
在 package.json 里的 "rules": 中配置 "no-unused-vars": "off", 可以关闭波浪线提示
"rules": {
      "no-unused-vars": "off"
    }
ref 属性
1、被用来给元素或子组件注册引用信息(id的代替者)
2、应用在html标签上获取的是真实DOM元素,应用在组件标签上是组件实例对象(vc)
3、使用方法:
打标识:<h1 ref="xxx">...</h1> 或 <School ref="xxx"></School>
获取:this.$refs.xxx
App.vue
<template>
  <div>
    <h1 v-text="mas" ref="title"></h1>
    <button @click="showName" ref="bth">点我打印元素</button>
    <!-- 组件标签的ref命名不能为 组件名标签名相同 -->
    <School ref="sch" />
  </div>
</template>

<script>
//引入School组件
import School from "./components/School";
export default {
  name: "App",
  components: { School },
  data() {
    return {
      mas: "欢迎学习Vue",
    };
  },
  methods: {
    showName() {
      console.log(this.$refs.title); //真实DOM元素
      console.log(this.$refs.bth); //真实DOM元素
      console.log(this.$refs.sch); //School组件的实例对象(vc)
    },
  },
};
</script>
配置项 props
功能:让组件接收到外部传过来的数据
(1)、传递数据:
<Demo name="xxx" :age="18">
Demo === 组件标签 name === 想传递的属性
想要传递的参数为数字获得表达式 可以添加 :单向绑定 : === v-bind:
(2)、接收数据:
第一种方式(只接受): //用的最多
props:["name","age"]
第二种方式(限制类型):
props:{
name:String,
age:Number
}
第三种方式(限制类型、限制必传性、指定默认值):
props:{
name:{
type:String, //类型
required:true //限制必传性
},
age:{
type:Number,
default:99 //没有传参时指定默认值
}
}
required:true 和 default:99没必要出现在一个属性里
备注:
props是只读的,Vue底层会监测你对props的修改,如果进行了修改,就会发出警告,
若业务需求确实需要修改,那么请复制props的内容到data中一份,然后去修改data中的数据
App.vue
<template>
  <div>
    <!-- 这次传参的时候 也可以用到绑定语法 -->
    <Student ref="stu" name="xinze" sex="男" :age="18" />
    <hr />
  </div>
</template>

<script>
//引入School组件
import Student from "./components/Student";
export default {
  name: "App",
  components: { Student },
};
</script>
Student.vue
<template>
  <div class="student">
    <h1>{{ msg }}</h1>
    <h2>名字:{{ name }}</h2>
    <h2>性别:{{ sex }}</h2>
    <h2>年龄:{{ age + 1 }}</h2>
    <h2>可修改的年龄:{{ MyAge }}</h2>
    <button @click="MyAge++">点我年龄+1</button>
  </div>
</template>

<script>
export default {
  name: "MyStudent",
  data() {
    return {
      msg: "个人信息",
      MyAge: this.age,
    };
  },
  //简单声明接收
  /* props: ["name", "sex", "age"], */

  //对象接收(可以控制接收类型)
  /* props: {
    name: String,
    sex: String,
    age: Number,
  }, */

  //对象接收:在限制传参类型的基础上  再加  是否必传 和 不传的时候现实的默认值
  props: {
    name: {
      type: String, //类型为String
      required: true, //设置这个属性就必须 传参
    },
    sex: {
      type: String,
      default: "男", //这个属性是:在没有接收到传参值的情况下 默认赋值
    },
    age: {
      type: Number,
      required: true,
    },
  },
};
</script>

<style>
.student {
  background: pink;
}
</style>
mixin混入(合)
 功能:可以把多个组件公用的配置提取成一个混入对象
    使用方式:
        第一步定义混合,例如:
            {
                data(){....},
                methods:{....},
                ....
            }
        第二部使用混入,例如:
            (1)、全局混入:Vue.mixin(xxx)
            (2)、局部混入:mixins:['xxx']
mixin.js(定义混入)
export const hunhe1 = {
  methods: {
    showName() {
      alert(this.name);
    },
  },
  mounted() {
    console.log(this, "挂载完毕");
  },
};
export const hunhe2 = {
  data() {
    //这里的data 谁调用了 就会参与赋值
    //赋值过程中 如过调用的data中 有相同的属性 就不会参与赋值 采取使用原身的属性
    return {
      x: 100,
      y: 200,
    };
  },
};
main.js(引入全局)
//引入vue
import Vue from "vue";
//引入组件App
import App from "./App.vue";

//引入 混入  全局引入
import { hunhe1, hunhe2 } from "./tools/mixin";
//使用引入的混入
Vue.mixin(hunhe1);
Vue.mixin(hunhe2);

//关闭vue的生产提示
Vue.config.productionTip = false;

//创建vm
new Vue({
  el: "#app",
  render: (h) => h(App),
});
App.vue
<template>
  <div>
    <Student />
    <School />
    <hr />
  </div>
</template>

<script>
import School from "./components/School";
//引入School组件
import Student from "./components/Student";
export default {
  name: "App",
  components: { Student, School },
};
</script>
School.vue (引入局部)
<template>
  <div class="school">
    <h2 @click="showName">学校名称:{{ name }}</h2>
    <h2>地址{{ sex }}</h2>
  </div>
</template>

<script>
//引入混入    局部引用
/* import { hunhe1 } from "../tools/mixin";
import { hunhe2 } from "../tools/mixin"; */

export default {
  name: "MySchool",
  data() {
    return {
      name: "清华",
      sex: "北京",
    };
  },

  /*  mixins: [hunhe1, hunhe2], //调用引入的 混入 */
};
</script>

<style>
.school {
  background: plum;
}
</style>
Student.vue (引入局部)
<template>
  <div class="student">
    <h2 @click="showName">名字:{{ name }}</h2>
    <h2>性别:{{ sex }}</h2>
  </div>
</template>

<script>
//引入混入    局部引用
/* import { hunhe1 } from "../tools/mixin";
import { hunhe2 } from "../tools/mixin"; */

export default {
  name: "MyStudent",
  data() {
    return {
      name: "xinze",
      sex: "男",
      x: 666,
    };
  },

  /*  mixins: [hunhe1, hunhe2], //调用引入的 混入 */
};
</script>

<style>
.student {
  background: pink;
}
</style>
插件
功能:用于增强Vue
    本质:包含install方法的一个对象,install的第一个参数是Vue,第二个以后的参数是插件使用者传递的数据。
    定义插件:
        对象.install = function (Vue, options){
            //1、添加全局过滤器
            Vue.filter(....)

            //2、添加全局指令
            Vue.directive(....)

            //3、配置全局混入(合)

            //4、添加实例方法
            Vue.prototype.$myMethod = function(){....}
            Vue.prototype.$myProperty = xxx
        }
    使用插件:
        引入:
            import xxx from "xxx";
        开启
            Vue.use()
plugins.js(定义插件)
export default {
  //定义 一个插件ue
  install(Vue) {
    console.log("@@@install");
    //创建全局自定义指令  自动获取焦点
    Vue.directive("fbind", {
      //指令与元素成功绑定时(一上来) 调用bind()
      bind(element, binding) {
        element.value = binding.value;
      },
      //当元素插入DOM模块后 调用inserted()
      inserted(element, binding) {
        element.focus();
      },
      //指令所在的模板被重新解析时。调用update()
      update(element, binding) {
        element.value = binding.value;
      },
    });
    // 设置全局过滤器  获取字符的前四位
    Vue.filter("mySlice", function (value) {
      return value.slice(0, 4);
    });
    //定义混入      给所有 vm vc实例对象添加连个属性
    Vue.mixin({
      data() {
        //这里的data 谁调用了 就会参与赋值
        //赋值过程中 如过调用的data中 有相同的属性 就不会参与赋值 采取使用原身的属性
        return {
          x: 100,
          y: 200,
        };
      },
    });

    //给vue原型身上添加一个方法(vm和vc都能用)
    Vue.prototype.hello = () => {
      alert("你好!");
    };
  },
};
main.js(引入插件)
//引入vue
import Vue from "vue";
//引入组件App
import App from "./App.vue";
//引入插件
import insatll from "./plugins";

//关闭vue的生产提示
Vue.config.productionTip = false;

//使用(应用)插件    要在vm实例之前使用插件
Vue.use(insatll);

//创建vm
new Vue({
  el: "#app",
  render: (h) => h(App),
});
使用插件
一、
<template>
  <div class="school">
    <h2>学校名称:{{ name }}</h2>
    <h2>地址{{ sex }}</h2>
    <input type="text" v-fbind:value="name" />
  </div>
</template>

<script>
export default {
  name: "MySchool",
  data() {
    return {
      name: "清华",
      sex: "北京",
    };
  },
};
</script>

<style>
.school {
  background: plum;
}
</style>

二、
<template>
  <div class="student">
    <h2>名字:{{ name | mySlice }}</h2>
    <h2>性别:{{ sex }}</h2>
    <button @click="hello">欢迎</button>
  </div>
</template>

<script>
export default {
  name: "MyStudent",
  data() {
    return {
      name: "xinze",
      sex: "男",
    };
  },
  methods: {
    holle() {
      this.hello;
    },
  },
};
</script>

<style>
.student {
  background: pink;
}
</style>
scoped 样式
    作用:让样式在局部生效,防止冲突
    写法:<style scoped>

一、
<template>
  <div class="demo">
    <h2>学校名称:{{ name }}</h2>
    <h2>地址{{ sex }}</h2>
  </div>
</template>

<script>
export default {
  name: "MySchool",
  data() {
    return {
      name: "清华",
      sex: "北京",
    };
  },
};
</script>

<style scoped>
/* 默认css样式  声明了lang="xxx"  可以使用别的样式  scoped在当前组件可用 */
.demo {
  background: plum;
}
</style>


二、

<template>
  <div class="demo">
    <h2>名字:{{ name }}</h2>
    <h2 class="qwe">性别:{{ sex }}</h2>
  </div>
</template>

<script>
export default {
  name: "MyStudent",
  data() {
    return {
      name: "xinze",
      sex: "男",
    };
  },
};
</script>

<style lang="less" scoped>
//默认css样式  声明了lang="xxx"  可以使用别的样式  scoped在当前组件可用
.demo {
  background: pink;
  .qwe {
    font-size: 40px;
  }
}
</style>
组件的自定义事件
绑定事件监听
<Header @addTodo="addTodo"/>
或者
<Header ref="header"/>
this.$refs.header.$on('addTodo', this.addTodo)
触发事件
this.$emit('addTodo', todo)
说明
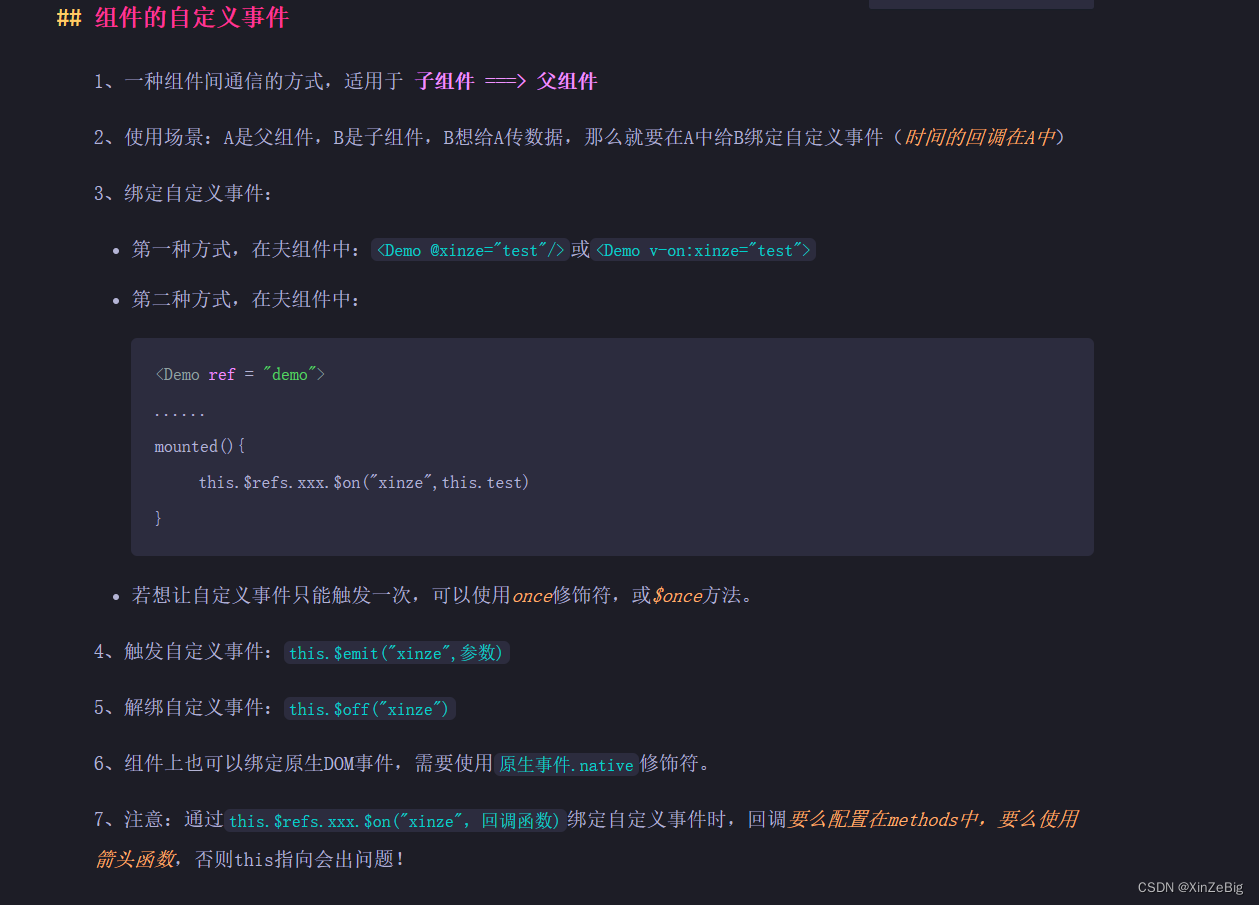
1、一种组件间通信的方式,适用于 子组件 ===> 父组件

2、使用场景:A是父组件,B是子组件,B想给A传数据,那么就要在A中给B绑定自定义事件(时间的回调在A中)

3、绑定自定义事件:

第一种方式,在夫组件中:<Demo @xinze="test"/>或<Demo v-on:xinze="test">

第二种方式,在夫组件中:

<Demo ref = "demo">
......
mounted(){
    this.$refs.xxx.$on("xinze",this.test)
}
若想让自定义事件只能触发一次,可以使用once修饰符,或$once方法。

4、触发自定义事件:this.$emit("xinze",参数)

5、解绑自定义事件:this.$off("xinze")

6、组件上也可以绑定原生DOM事件,需要使用原生事件.native修饰符。

7、注意:通过this.$refs.xxx.$on("xinze",回调函数)绑定自定义事件时,回调要么配置在methods中,要么使用箭头函数,否则this指向会出问题!
App.vue
<template>
  <div class="app">
    <h1>{{ msg }}</h1>
    <h2>学生姓名:{{ stuName }}</h2>
    <!-- 通过父组件给自子组件传递函数的props实现:子给夫传递数据 -->
    <School :getSchoolNmae="getSchoolNmae" />

    <!-- 通过父组件给子组件绑定一个自定义事件实现:子给夫传递数据 (第一种写法,使用@或v-on)-->
    <!-- <Student @xinze.once="getStudentName" /> -->

    <!--
    绑定一个自定义事件  @事件名="函数名"
    绑定原生DOM事件 @click.native  不能直接传原生DOM事件 不然vue会认定为他是自定义事件  原生DOM事件需要加上 .navite
    -->
    <Student @xinze="getStudentName" @demo="m1" @click.native="show" />

    <!-- 通过父组件给子组件绑定一个自定义事件实现:子给夫传递数据 (第二种写法,使用ref)-->
    <!-- <Student ref="student" /> -->
  </div>
</template>

<script>
import School from "./components/School";
//引入School组件
import Student from "./components/Student";
export default {
  name: "App",
  components: { Student, School },
  data() {
    return {
      msg: "你好~",
      stuName: "",
    };
  },
  methods: {
    getSchoolNmae(schooleName) {
      console.log("app接收到了学校名:", schooleName);
    },
    getStudentName(stundentName, ...params) {
      //...params 会把其余的参数封装成一个数组
      console.log("app接收到了学生名:", stundentName, "其余参数:", params);
      this.stuName = stundentName;
    },
    m1() {
      console.log("demo事件被执行");
    },
    show() {
      alert(11);
    },
  },
  mounted() {
    /* 绑定自定义事件 */
    //this.$refs.student.$on("xinze", this.getStudentName);
    /* 绑定自定义事件 直接写函数  记住不能写 普通函数是有自身的this  而箭头函数是往外找的this */
    /* this.$refs.student.$on("xinze", (stundentName) => {
      console.log(this);
      this.stuName = stundentName;
    }); */
    //this.$refs.student.$once("xinze", this.getStudentName); //绑定自定义事件 (一次性)
  },
};
</script>
<style>
.app {
  background-color: pink;
  padding: 5px;
}
</style>
Stundent.vue
<template>
  <div class="student">
    <h2>名字:{{ name }}</h2>
    <h2>性别:{{ sex }}</h2>
    <h2>当前num值:{{ num }}</h2>
    <button @click="add()">点我num++</button>
    <button @click="tranStudentName">把学生名传入app中</button>
    <button @click="unbind">解绑xinze事件</button>
    <button @click="del">点我删除当前vc实例</button>
  </div>
</template>

<script>
export default {
  name: "MyStudent",
  data() {
    return {
      name: "xinze",
      sex: "男",
      num: 1,
    };
  },
  methods: {
    tranStudentName() {
      //使用自定义事件    this。$emit(事件名,(传参))
      //this.$emit("xinze", { name: this.name, a: 444, b: 333, c: 111 });
      this.$emit("xinze", this.name, 444, 333, 111);
      this.$emit("demo");
    },
    unbind() {
      this.$off("xinze"); //解绑一个自定义事件
      //this.$off("xinze", "demo"); //解绑多个自定义事件
      //this.$off(); //解绑所有的自定义事件
    },
    add() {
      console.log("add()被回了");
      this.num++;
    },
    del() {
      this.$destroy(); //销毁了当前Student的组件实例,销毁后所有Student实例的自定义事件全都不奏效。
    },
  },
};
</script>

<style lang="less" scoped>
//默认css样式  声明了lang="xxx"  可以使用别的样式  scoped在当前组件可用
.student {
  background: plum;
  padding: 5px;
  margin-top: 30px;
}
</style>
School.vue
<template>
  <div class="school">
    <h2>学校名称:{{ name }}</h2>
    <h2>地址{{ sex }}</h2>
    <button @click="tranSchoolName">把学校名传入app中</button>
  </div>
</template>

<script>
export default {
  name: "MySchool",
  props: ["getSchoolNmae"],
  data() {
    return {
      name: "清华",
      sex: "北京",
    };
  },
  methods: {
    tranSchoolName() {
      this.getSchoolNmae(this.name);
    },
  },
};
</script>

<style scoped>
/* 默认css样式  声明了lang="xxx"  可以使用别的样式  scoped在当前组件可用 */
.school {
  background: palevioletred;
  padding: 5px;
}
</style>
全局事件总线
Vue 原型对象上包含事件处理的方法
$on(eventName, listener): 绑定自定义事件监听
$emit(eventName, data): 分发自定义事件
$off(eventName): 解绑自定义事件监听
$once(eventName, listener): 绑定事件监听, 但只能处理一次
所有组件实例对象的原型对象的原型对象就是 Vue 的原型对像
VueComponent.prototyp.__proto__ === Vue.prototype
所有组件对象(vc)都能看到 Vue (vm)原型对象上的属性和方法
Vue.prototype.$bus = new Vue(), 所有的组件对象都能看到$bus 这个属性对象
什么是全局事件总线
包含事件处理相关方法的对象(只有一个)
一种组件间通信的方式,适用于任意组件间通信。
安装全局事件总线
new Vue({
	.....
	beforeCreate(){
		Vue.prototype.$bus = this //安装全局事件总线,$bus就是当前应用的vm
	},
	.....
})
使用事件总线
接收数据:A组件想接受数据,则在A组件中给$bus绑定自定义事件,时间的回调留在A组件自身
 mounted() {
    //挂载前  给全局事件总线上绑定一个getName事件
    this.$bus.$on("getName", (val) =>
      console.log("我是Shool组件,我收到了:", val)
    );
  },
  或者
  methods(){
  	demo(val){
      console.log("我是Shool组件,我收到了:", val)
    }
  }
  ......
  mounted() {
    this.$bus.$on("getName", this.demo(val));
  },
提供数据 :this.$bus.$emit("xxx",数据)
最好在beforeDestroy钩子中用$off去解绑当前组件所用到的事件
 beforeDestroy() {
    //销毁前  解绑自身给全局事件总线身上绑定的事件
    this.$bus.off("getName");
  },
main.js
//引入vue
import Vue from "vue";
//引入组件App
import App from "./App.vue";

//关闭vue的生产提示
Vue.config.productionTip = false;

//创建vm
new Vue({
  el: "#app",
  render: (h) => h(App),
  beforeCreate() {
    //Vue实力创建前
    Vue.prototype.$bus = this; //安装全局事件总线
  },
});
School.vue
<template>
  <div class="school">
    <h2>学校名称:{{ name }}</h2>
    <h2>地址{{ sex }}</h2>
  </div>
</template>

<script>
export default {
  name: "MySchool",
  data() {
    return {
      name: "清华",
      sex: "北京",
    };
  },
  mounted() {
    //挂载前  给全局事件总线上绑定一个getName事件
    this.$bus.$on("getName", (val) =>
      console.log("我是Shool组件,我收到了:", val)
    );
  },
  beforeDestroy() {
    //销毁前  解绑自身给全局事件总线身上绑定的事件
    this.$bus.off("getName");
  },
};
</script>

<style scoped>
/* 默认css样式  声明了lang="xxx"  可以使用别的样式  scoped在当前组件可用 */
.school {
  background: palevioletred;
  padding: 5px;
}
</style>
Student.vue
<template>
  <div class="student">
    <h2>名字:{{ name }}</h2>
    <h2>性别:{{ sex }}</h2>
    <button @click="tranName">点我给School发送学生名</button>
  </div>
</template>

<script>
export default {
  name: "MyStudent",
  data() {
    return {
      name: "xinze",
      sex: "男",
    };
  },
  methods: {
    tranName() {
      this.$bus.$emit("getName", this.name);
    },
  },
};
</script>

<style lang="less" scoped>
//默认css样式  声明了lang="xxx"  可以使用别的样式  scoped在当前组件可用
.student {
  background: plum;
  padding: 5px;
  margin-top: 30px;
}
</style>
消息订阅与发布
使用说明
1、一种组件间通信的方式,适用于任意组件间通信。
2、使用步骤:
安装 pubsub.js:npm i pubsub-js
引入包:import pubsub from 'pubsub-js'
3、接收数据:A组件想接受数据,则在A组件中订阅消息,订阅消息的回调留在A组件自身。
mounted() {
    this.pubId = pubsub.subscribe("hello", (msgName, data) => {
     //订阅一个名为 hello的消息  他的回调函数有两个参数 第一个时 消息名,第二个开始才是你传入的数据
      console.log("有人发布了hello消息,hello消息的回调执行了", msgName, data);
    });
  },
  或者

  methods(){
    demo( msgName, data){
       console.log("有人发布了hello消息,hello消息的回调执行了", msgName, data);
    }
  }
  ......
  mounted() {
    this.pubId = pubsub.subscribe("hello",demo
}, 4、提供数据:pubsub.publish('xxxx',数据)
methods: {
    tranName() {
      /* this.$bus.$emit("getName", this.name); */
      pubsub.publish("hello", 666); //发布一个消息 消息名时helo  ,额外参数 666
    },
},5、最好在beforDestory钩子中,用pubsub.unsubscribe(pid)去取消订阅
pubsub.unsubscribe(this.pubId); //pubId时创建订阅的时候接收到的School.vue
<template>
  <div class="school">
    <h2>学校名称:{{ name }}</h2>
    <h2>地址{{ sex }}</h2>
  </div>
</template>

<script>
//引入 pubsub库(消息订阅与发布)
import pubsub from "pubsub-js";
export default {
  name: "MySchool",
  data() {
    return {
      name: "清华",
      sex: "北京",
    };
  },

  mounted() {
    //挂载前  给全局事件总线上绑定一个getName事件
    /* this.$bus.$on("getName", (val) =>
      console.log("我是Shool组件,我收到了:", val)
    ); */

    this.pubId = pubsub.subscribe("hello", (msgName, data) => {
      //订阅一个名为 hello的消息  他的回调函数有两个参数 第一个时 消息名,第二个开始才是你传入的数据
      console.log("有人发布了hello消息,hello消息的回调执行了", msgName, data);
    });
  },
  beforeDestroy() {
    //销毁前  解绑自身给全局事件总线身上绑定的事件
    /*  this.$bus.off("getName"); */
    pubsub.unsubscribe(this.pubId);
  },
};
</script>

<style scoped>
/* 默认css样式  声明了lang="xxx"  可以使用别的样式  scoped在当前组件可用 */
.school {
  background: palevioletred;
  padding: 5px;
}
</style>
Student.vue
<template>
  <div class="student">
    <h2>名字:{{ name }}</h2>
    <h2>性别:{{ sex }}</h2>
    <button @click="tranName">点我给School发送学生名</button>
  </div>
</template>

<script>
//引入 pubsub库(消息订阅与发布)
import pubsub from "pubsub-js";
export default {
  name: "MyStudent",
  data() {
    return {
      name: "xinze",
      sex: "男",
    };
  },
  methods: {
    tranName() {
      /* this.$bus.$emit("getName", this.name); */
      pubsub.publish("hello", 666); //发布一个消息 消息名时helo  ,额外参数 666
    },
  },
};
</script>

<style lang="less" scoped>
//默认css样式  声明了lang="xxx"  可以使用别的样式  scoped在当前组件可用
.student {
  background: plum;
  padding: 5px;
  margin-top: 30px;
}
</style>
nextTick()
1、语法:this.$nextTick(回调函数)
2、作用:在下一次DOM 更新结束后执行其指定的回调。
3、什么时候用:当改变数据后,要基于更新后的新DOM进行某些操作时,要在nextTick()所指定的会点函数中进行。
说明:因为vue 你只要改了数据 就会从新解析 DOM 如果你刚改数据就执行某些操作,那么等下次解析DOM 的时候就会失去功能 而设置了nextTice里的回调函数里的操作 会在 下一次解析完DOM 才执行
// $nextTick() 会在模板解析下一次执行里面的函数
      this.$nextTick(() => this.$refs.inputFocus.focus());
Vue封装的过渡与动画
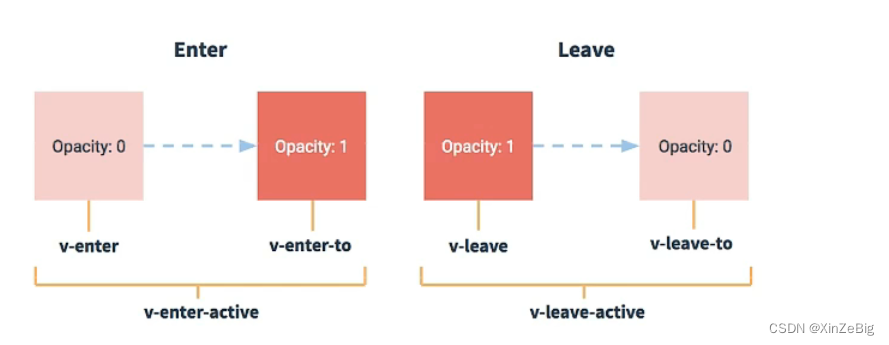
1、作用:再插入、更新或移除DOM元素时,再合适的时候给元素添加样式类名。
2、图示:
3、写法:
-
准备好样式:
-
元素进入时的样式:
-
v-enter:进入的起点
-
v-enter-active:进入过程中
-
v-enter-to:进入的终点
-
-
元素离开的样式:
-
v-leave:离开的起点
-
v-leave-active:离开过程中
-
v-leave-to:离开的终点
-
-
-
使用
<transition>包裹要过度的元素,并配置name属性:
name 可以替换掉 动画类名开头 的 v
<transition name="h1" appear>
    <!-- appear 初始执行 -->
    <h1 v-show="isShow">你好~</h1>
</transition>-
备注:若有多个元素需要过度,则需要使用:
<transition-group>,且每个元素都要指定key值
动画
<template>
  <div>
    <button @click="isShow = !isShow">点我显示隐藏</button>
    <!-- transition 标签是动画标签 不会被解析 仅供vue实现动过效果用的  -->
    <!-- 标签下仅支持写一个根元素
    开始动画的时候会自动调用 .v-enter-active
    结束动画时会自动调用    .v-leave-active
    如果标签内写了 name属性 那么name里的值就可以替换掉上面的 v
    -->
    <transition name="h1" appear>
      <!-- appear 初始执行 -->
      <h1 v-show="isShow">你好~</h1>
    </transition>
  </div>
</template>

<script>
export default {
  name: "Test-1",
  data() {
    return {
      isShow: true,
    };
  },
};
</script>

<style scoped>
h1 {
  background-color: pink;
}
.h1-enter-active {
  animation: goto 0.5s linear;
}
.h1-leave-active {
  animation: goto 0.5s linear reverse;
}

@keyframes goto {
  from {
    transform: translateX(-100%);
  }
  to {
    transform: translateX(0%);
  }
}
</style>
过渡
<template>
  <div>
    <button @click="isShow = !isShow">点我显示隐藏</button>
    <!--
      如果有多个根元素 需要变化标签为  transition-group
      不过需要把每个根元素加一个 key 来识别
       -->
    <transition-group name="h1" appear>
      <!-- appear 初始执行 -->
      <h1 v-show="isShow" key="1">你好~</h1>
      <h1 v-show="!isShow" key="2">你好~</h1>
    </transition-group>
  </div>
</template>

<script>
export default {
  name: "Test-2",
  data() {
    return {
      isShow: true,
    };
  },
};
</script>

<style scoped>
h1 {
  /* 第一种 谁用 给谁属性里添加 */
  /* 设置过度 0.5s  linear 匀速 */
  /* transition: 0.5s linear; */
  background-color: pink;
}
/* 第二种动画 执行 */
.h1-enter-active,
.h1-leave-active {
  transition: 0.5s linear;
}
/* 进入的起点  和离开的终点*/
.h1-enter,
.h1-leave-to {
  transform: translateX(-100%);
}
/* 进入的终点 和离开的起点*/
.h1-enter-to,
.h1-leave {
  transform: translateX(0);
}
</style>
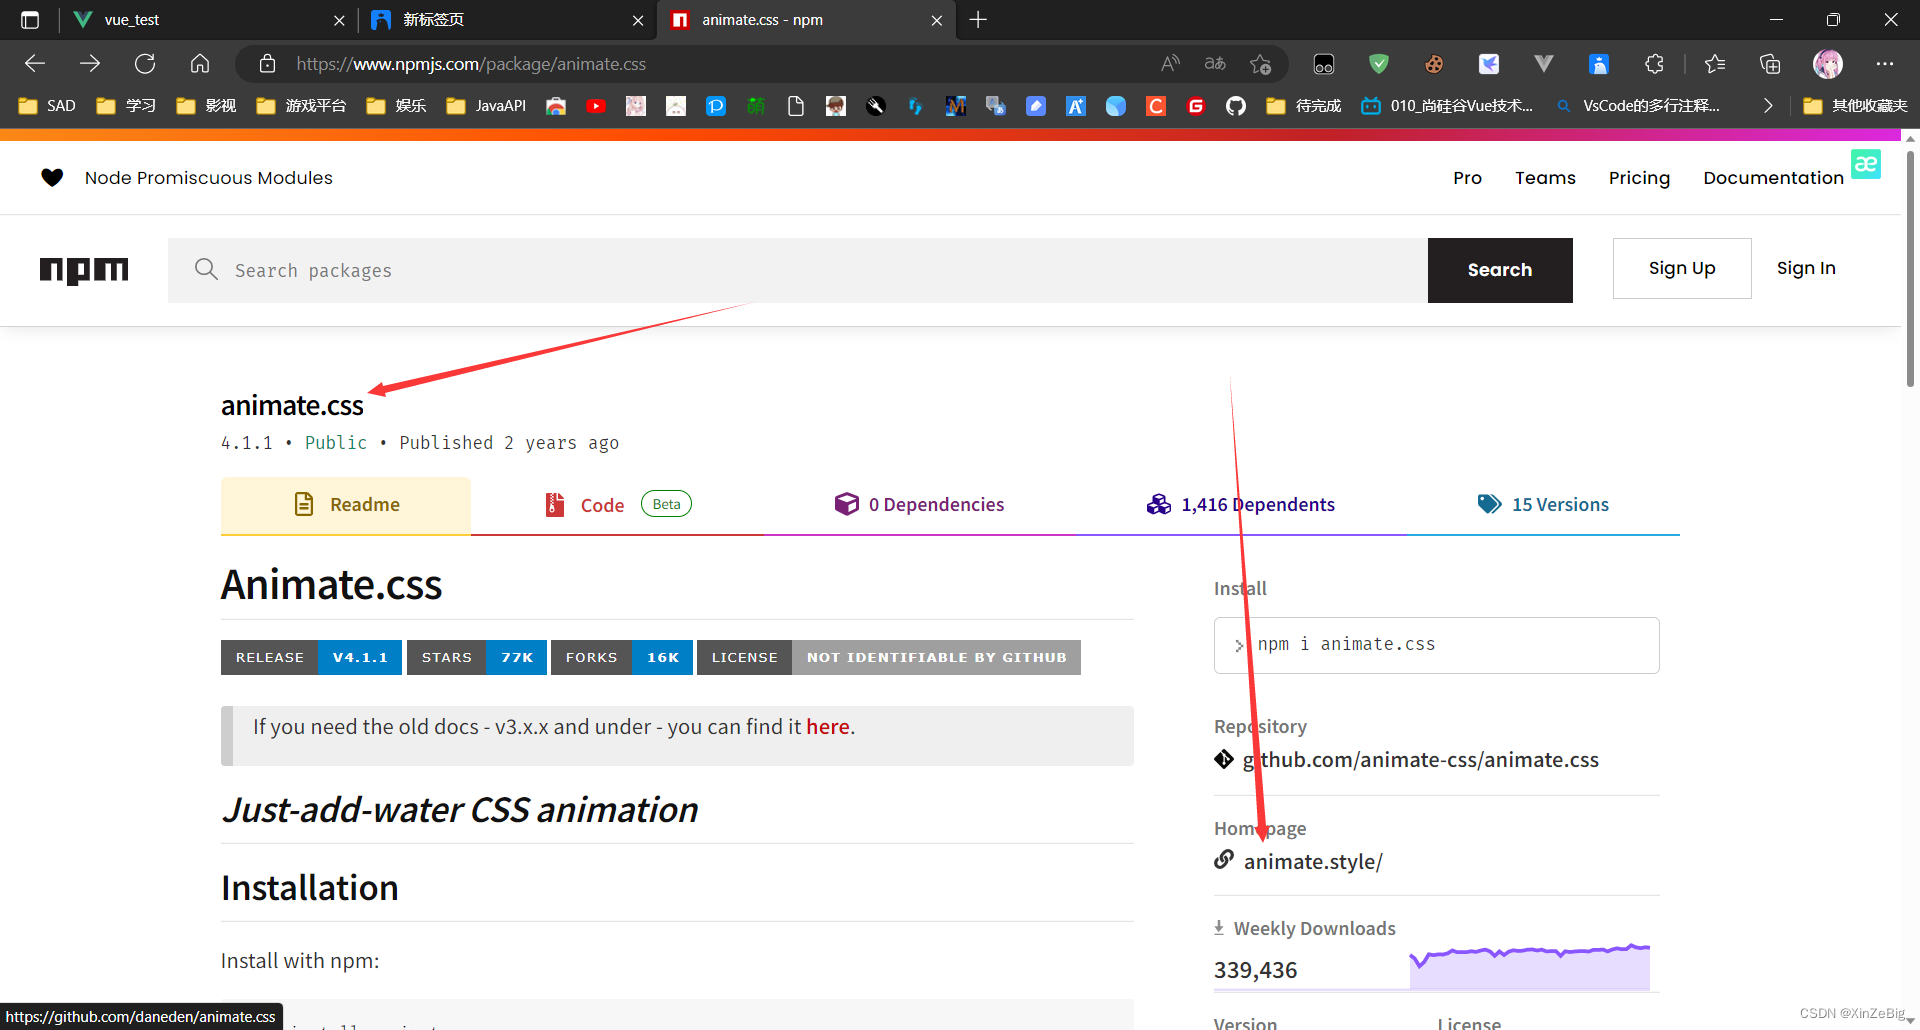
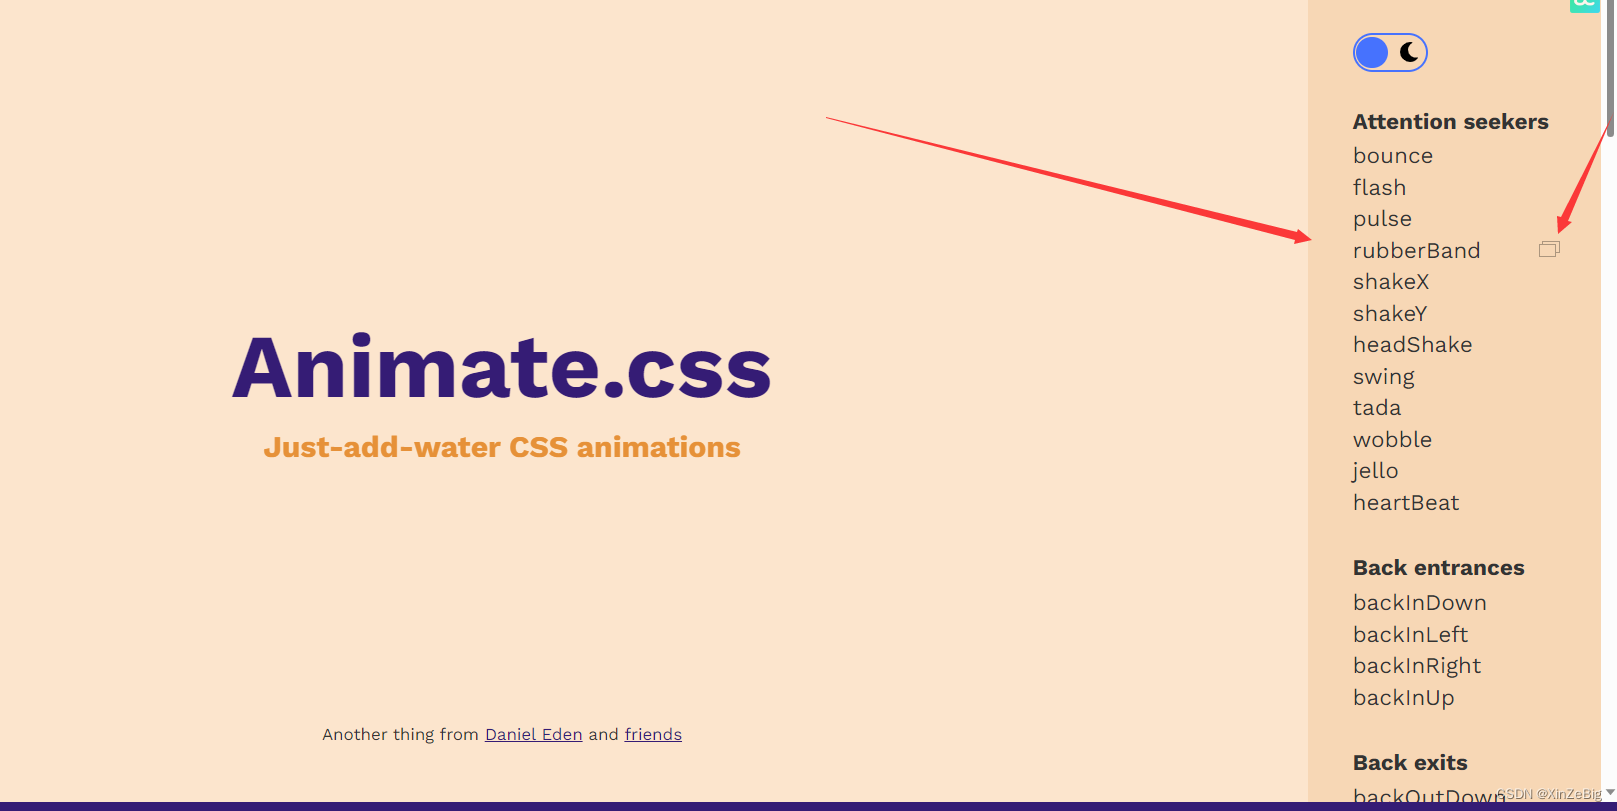
第三方动画库
<template>
  <div>
    <button @click="isShow = !isShow">点我显示隐藏</button>
    <!--
      第三发库
      引入
      将官方说的类名加入到name中
      appear  初始执行
      enter-active-class  开始执行  后面可加 库里面的类名
      leave-active-class  结束执行  后面可加 库里面的类名
       -->
    <transition-group
      name="animate__animated animate__bounce"
      appear
      enter-active-class="animate__swing"
      leave-active-class="animate__backOutUp"
    >
      <!-- appear 初始执行 -->
      <h1 v-show="isShow" key="1">你好~</h1>
      <h1 v-show="isShow" key="2">你好~</h1>
    </transition-group>
  </div>
</template>

<script>
//引入
import "animate.css";
export default {
  name: "Test-3",
  data() {
    return {
      isShow: true,
    };
  },
};
</script>

<style scoped>
h1 {
  background-color: pink;
}
</style>
Vue脚手架配置代理
方法一
在vue.config.js中添加如下配置:
devServer: {
    proxy: "http://localhost:5000",
  },
说明:
1、优点:配置简单,请求资源时直接发给前端(8080)即可。
2、缺点:不能配置多个代理,不能灵活的控制请求是否走代理
3、工作方式:若按照上述配置代理,当请求了前端不存在的资源时,那么该请求会转发给服务器(优先匹配前端资源(8080))
方法二
编写vue.config.js配置具体代理规则:
//开启代理服务器(方式二)可以配置多个代理
devServer: {
proxy: {
"/xinze": { //匹配所有以 "/xinze"开头的请求路径
target: "http://localhost:5000", //代理目标的基础路径
pathRewrite: { "^/xinze": "" }, //将开头为 "/xinze" 转为 ""
//ws: true, //用于支持websocket 默认为true
//changeOrigin: true, //默认为true 用于控制请求头中的host值
//写了true 隐藏自身端口号 访问那个 就是那个的端口号 false 表明自身的端口号
},
"/demo": {
target: "http://localhost:5001",
pathRewrite: { "^/demo": "" },
//ws: true, //用于支持websocket
//changeOrigin: true, // 用于控制请求头中的host值
},
},
},
/*
changeOrigin设置为true时,服务器收到的请求头中的host为: localhost :5000
change0rigin设置为false时,服务器收到的请求头中的host为: localhost:8080
change0rigin默认值为true
*/
说明:
1、优点:可以配置多个代理,且可以灵活的控制请求是否走代理。
2、缺点:配置略微繁琐,请求资源时必须加前缀。
App.vue
<template>
  <div>
    <button @click="getStudents">获取学生信息</button>
    <button @click="getCars">获取汽车信息</button>
  </div>
</template>

<script>
//引入 axios
import axios from "axios";
export default {
  name: "App",
  methods: {
    getStudents() {
      axios.get("http://localhost:8080/xinze/students").then(
        (response) => {
          console.log("请求成功了", response.data);
        },
        (error) => {
          console.log("请求失败了", error.message);
        }
      );
    },
    getCars() {
      axios.get("http://localhost:8080/demo/cars").then(
        (response) => {
          console.log("请求成功了", response.data);
        },
        (error) => {
          console.log("请求失败了", error.message);
        }
      );
    },
  },
};
</script>
vue.config.js
const { defineConfig } = require("@vue/cli-service");

module.exports = defineConfig({
  transpileDependencies: true,
  //关闭语法检查
  lintOnSave: false,
  //开启代理服务器(方式一)
  /*  devServer: {
    proxy: "http://localhost:5000",
  }, */
  //开启代理服务器(方式二)可以配置多个代理
  devServer: {
    proxy: {
      "/xinze": {
        target: "http://localhost:5000",
        pathRewrite: { "^/xinze": "" },
        //ws: true, //用于支持websocket   默认为true
        //写了true 隐藏自身端口号 访问那个 就是那个的端口号 false 表明自身的端口号
        //changeOrigin: true, //默认为true 用于控制请求头中的host值
      },
      "/demo": {
        target: "http://localhost:5001",
        pathRewrite: { "^/demo": "" },
        //ws: true, //用于支持websocket
        //changeOrigin: true, // 用于控制请求头中的host值
      },
    },
  },
});
vue 项目中常用的 2 个 Ajax 库
axios
通用的 Ajax 请求库, 官方推荐,使用广泛
安装:npm i axios
引用:import axios from "axios";
vue-resource插件
Vue里的发送ajax请求 插件
安装:npm i vue-resource
使用:
//引入vue-rusource
import vueResource from "vue-resource";
//使用插件
Vue.use(vueResource);
vue 插件库, vue1.x 使用广泛,官方已不维护。(不推荐)
插槽
说明
1、作用:让父组件可以向子组件指定位置插入 html结构,也是一种组件间通信的方式,适用于
父组件 ===> 子组件
2、分类:默认插槽、具名插槽、作用域插槽
3、使用方式:
-
默认插槽
父组件中: <category> <div>html结构</div> </category> 子组件中: <template> <div> <!-- 定义一个插槽(挖个坑,等组件的使用者进行填充) 如果没传入值 就会显示标签体内的内容--> <slot>插槽默认值</slot> </div> </template> -
具名插槽
父组件中: <category> //slot="xxx" 对应插槽的 name <div slot="center">html结构</div> </category> <!-- 这里可以写v-slot:footer来指定插槽 但是这种写法仅支持 template标签 --> <template v-slot:footer> //v-slot:xxx 对应插槽的 name </template> 子组件中: <template> <div> <!-- 定义一个插槽(挖个坑,等组件的使用者进行填充) 如果没传入值 就会显示标签体内的内容--> <!-- 这里的name属性是根据 传入结构的时候如果需要命名该 name值 才能指定的插入当前插槽 --> <slot name="center">插槽默认值</slot> <slot name="footer">插槽默认值</slot> </div> </template> -
作用域插槽
-
理解:数据在组件自身,但根据数据生成的结构需要组件的使用者来决定。(game数据在Category组件中,但使用数据所遍历出来的结构有App组件做决定)
-
具体编码
父组件---》 <!-- 接收作用域插槽里的绑定的参数方法: 1、scope="{games}" {} 是吧该插槽绑定的数据转外参数使用 这种使用的前提必须实在template中接受 2、slot-scope="{ games }" 这个可以在普通元素标签中接受 3、v-slot="{ games }" 也可以在普通元素标签中接受 备注:作用域插槽 也可以具名(name) 写法: v-slot:插槽名=“games” --> <category title="游戏"> 方法一 <template scope="{games}"> <ul> <li v-for="(item, index) in games" :key="index">{{ item }}</li> </ul> </template> </category> <category title="游戏"> 方法二 <template slot-scope="{ games }"> <ol> <li v-for="(item, index) in games" :key="index">{{ item }}</li> </ol> </template> </category> <category title="游戏"> 方法三 <template v-slot="{ games }"> <h4 v-for="(item, index) in games" :key="index">{{ item }}</h4> </template> </category> ---》子组件 <!-- 作用域插槽: 给插槽绑定一个参数 , 使用者需要接收该插槽里的参数(接受方法有三种) 但是接收名必须跟这边的插槽对应上才能拿到该插槽 备注:作用域插槽 也可以具名(name) --> <template> <div> <slot :games="games">插槽默认值</slot> </div> </template> <script> export default { name: "Category-list", data() { 数据在子组件中 return { games: ["红色警戒", "穿越火线", "劲舞团", "超级玛丽"], }; }, }; </script>
-
默认插槽
App.vue
<template>
  <div class="container">
    <category title="美食" :ListData="foods">
      <img src="https://s3.ax1x.com/2021/01/16/srJlq0.jpg" alt="" />
    </category>
    <category title="游戏" :ListData="games">
      <ul>
        <li v-for="(item, index) in games" :key="index">{{ item }}</li>
      </ul>
    </category>
    <category title="电影" :ListData="films">
      <video
        controls
        src="http://clips.vorwaerts-gmbh.de/big_buck_bunny.mp4"
      ></video>
    </category>
  </div>
</template>

<script>
import Category from "./components/Category.vue";
export default {
  components: { Category },
  name: "App",
  data() {
    return {
      foods: ["火锅", "烧烤", "小龙虾", "牛排"],
      games: ["红色警戒", "穿越火线", "劲舞团", "超级玛丽"],
      films: ["《教父》", "《拆弹专家》", "《你好,李焕英》", "《功夫》"],
    };
  },
};
</script>
<style lang="css">
.container {
  /* 设置弹性布局  默认想右水平方向排序 */
  display: flex;
  /*定义项目在主轴上的对齐方式  设置属性剧中*/
  justify-content: space-around;
}
</style>
components/Category.vue
<template>
  <div class="category">
    <h3>{{ title }}分类</h3>
    <!-- 定义一个插槽(挖个坑,等组件的使用者进行填充) 如果没传入值 就会显示标签体内的内容-->
    <slot>我是一些默认值,当使用者没有传递具体结构时,我会出现</slot>
  </div>
</template>

<script>
export default {
  props: ["title", "ListData"],
  name: "Category-list",
};
</script>

<style>
.category {
  background-color: pink;
  width: 200px;
  height: 300px;
}
h3 {
  text-align: center;
  background-color: palevioletred;
}
img,
video {
  width: 100%;
}
</style>
具名插槽
App.vue
<template>
  <div class="container">
    <category title="美食" :ListData="foods">
      <img
        slot="center"
        src="https://s3.ax1x.com/2021/01/16/srJlq0.jpg"
        alt=""
      />
      <div class="foot" slot="footer">
        <a href="#">更多美食</a>
      </div>
    </category>

    <category title="游戏" :ListData="games">
      <ul slot="center">
        <li v-for="(item, index) in games" :key="index">{{ item }}</li>
      </ul>
      <div class="foot" slot="footer">
        <a href="#">单机游戏</a>
        <a href="#">网络游戏</a>
      </div>
    </category>

    <category title="电影" :ListData="films">
      <video
        slot="center"
        controls
        src="http://clips.vorwaerts-gmbh.de/big_buck_bunny.mp4"
      ></video>
      <!-- 这里可以写v-slot:footer来指定插槽  但是这种写法仅支持 template标签 -->
      <template v-slot:footer>
        <div class="foot">
          <a href="#">经典</a>
          <a href="#">热门</a>
          <a href="#">推荐</a>
        </div>
        <h4>欢迎前来观影</h4>
      </template>
    </category>
  </div>
</template>

<script>
import Category from "./components/Category.vue";
export default {
  components: { Category },
  name: "App",
  data() {
    return {
      foods: ["火锅", "烧烤", "小龙虾", "牛排"],
      games: ["红色警戒", "穿越火线", "劲舞团", "超级玛丽"],
      films: ["《教父》", "《拆弹专家》", "《你好,李焕英》", "《功夫》"],
    };
  },
};
</script>
<style lang="css">
.container,
.foot {
  /* 设置弹性布局  默认想右水平方向排序 */
  display: flex;
  /*定义项目在主轴上的对齐方式  设置属性剧中*/
  justify-content: space-around;
}
img,
video {
  width: 100%;
}
h4 {
  text-align: center;
}
</style>
components/Category.vue
<template>
  <div class="category">
    <h3>{{ title }}分类</h3>
    <!-- 定义一个插槽(挖个坑,等组件的使用者进行填充) 如果没传入值 就会显示标签体内的内容-->
    <!-- 这里的name属性是根据 传入结构的时候如果需要命名该 name值 才能指定的插入当前插槽 -->
    <slot name="center">
      我是一些默认值,当使用者没有传递具体结构时,我会出现1
    </slot>
    <slot name="footer">
      我是一些默认值,当使用者没有传递具体结构时,我会出现2
    </slot>
  </div>
</template>

<script>
export default {
  props: ["title", "ListData"],
  name: "Category-list",
};
</script>

<style>
.category {
  background-color: pink;
  width: 200px;
  height: 300px;
}
h3 {
  text-align: center;
  background-color: palevioletred;
}
</style>
具名插槽
App.vue
<template>
  <div class="container">
    <!-- 接收插槽里的绑定的参数方法:
      1、scope="{games}" {} 是吧该插槽绑定的数据转外参数使用
        这种使用的前提必须实在template中接受
      2、slot-scope="{ games }" 这个可以在普通元素标签中接受
      3、v-slot="{ games }"     也可以在普通元素标签中接受
     -->
    <category title="游戏">
      <template scope="games">
        <ul>
          <li v-for="(item, index) in games.games" :key="index">{{ item }}</li>
        </ul>
      </template>
    </category>

    <category title="游戏">
      <template slot-scope="{ games }">
        <ol>
          <li v-for="(item, index) in games" :key="index">{{ item }}</li>
        </ol>
      </template>
    </category>

    <category title="游戏">
      <template v-slot="{ games }">
        <h4 v-for="(item, index) in games" :key="index">{{ item }}</h4>
      </template>
    </category>
  </div>
</template>

<script>
import Category from "./components/Category.vue";
export default {
  components: { Category },
  name: "App",
  data() {
    return {};
  },
};
</script>
<style lang="css">
.container,
.foot {
  /* 设置弹性布局  默认想右水平方向排序 */
  display: flex;
  /*定义项目在主轴上的对齐方式  设置属性剧中*/
  justify-content: space-around;
}
img,
video {
  width: 100%;
}
h4 {
  text-align: center;
}
</style>
components/Category.vue
<template>
  <div class="category">
    <h3>{{ title }}分类</h3>
    <!-- 定义一个插槽(挖个坑,等组件的使用者进行填充) 如果没传入值 就会显示标签体内的内容-->
    <!--
    作用域插槽: 给插槽绑定一个参数 ,
    使用者需要接收该插槽里的参数(接受方法有三种)但是接收名必须跟这边的插槽对应上才能拿到该插槽-->
    <slot :games="games"> 我是一些默认值 </slot>
  </div>
</template>

<script>
export default {
  props: ["title", "ListData"],
  name: "Category-list",
  data() {
    return {
      games: ["红色警戒", "穿越火线", "劲舞团", "超级玛丽"],
    };
  },
};
</script>

<style>
.category {
  background-color: pink;
  width: 200px;
  height: 300px;
}
h3 {
  text-align: center;
  background-color: palevioletred;
}
img,
video {
  width: 100%;
}
</style>


 3万+
3万+


 被折叠的 条评论
为什么被折叠?
被折叠的 条评论
为什么被折叠?
 到【灌水乐园】发言


