深入理解ResNet网络:实现与应用

Resnet

在深度学习领域,卷积神经网络(CNN)是一种非常重要的模型,它在图像识别、目标检测等领域取得了显著的成果。然而,随着网络层数的增加,梯度消失和梯度爆炸问题变得越来越严重,导致训练深层网络变得非常困难。为了解决这个问题,研究人员提出了残差网络(ResNet),通过引入残差模块,使得深度网络的训练变得更加容易。本文将详细介绍ResNet网络的原理、实现以及应用。
我的pytorch代码实现:Resnet
Resnet

ResNet网络原理

  • 残差模块
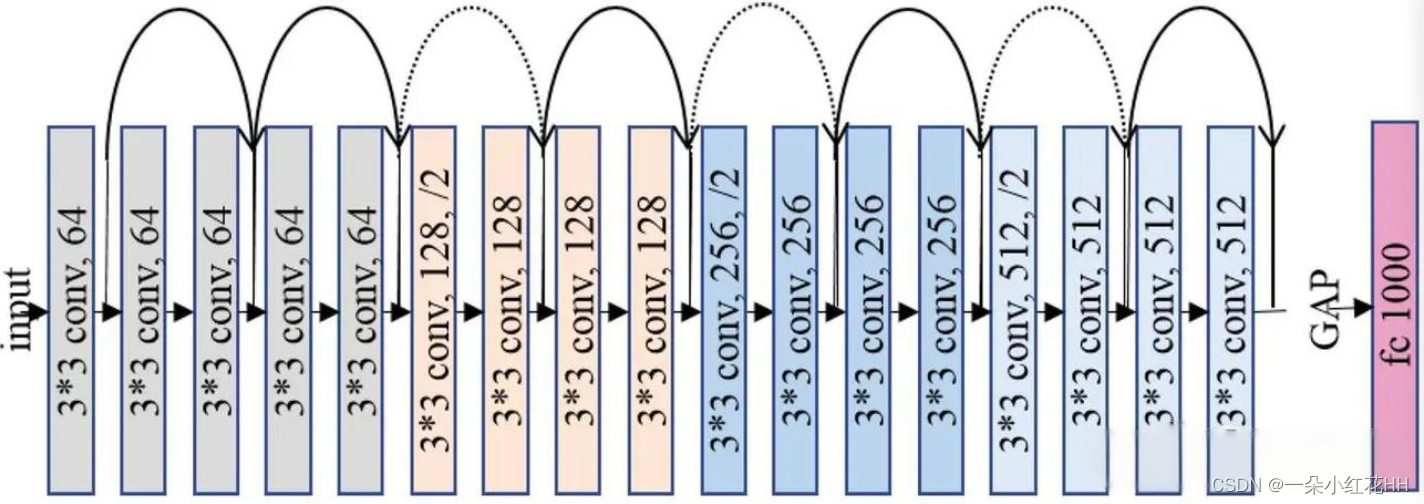
    ResNet的核心思想是引入残差模块(Residual Block),每个残差模块包含两个或多个卷积层。残差模块的输入和输出之间存在一个恒等映射关系,即:
    F(x) = H(x) + x
    其中,F(x)表示残差模块的输出,H(x)表示卷积层的输出,x表示输入。这种恒等映射关系使得深层网络的训练变得更加容易。
  • 跳跃连接
    为了进一步解决梯度消失和梯度爆炸问题,ResNet采用了跳跃连接(Skip Connection)的方式。跳跃连接是指将前面若干层的输出直接连接到后面的层,这样可以帮助梯度更快地传播到更深的层次。
  • 深度可分离卷积
    为了减少计算量和参数数量,ResNet采用了深度可分离卷积(Depthwise Separable Convolution)。深度可分离卷积将标准的卷积分解为逐深度卷积(Depthwise Convolution)和逐点卷积(Pointwise Convolution),从而降低了计算复杂度。

ResNet网络实现

  • 定义残差模块(Residual Block)
class ResidualBlock(nn.Module):
    def __init__(self, in_channels, out_channels, stride=1):
        super(ResidualBlock, self).__init__()
        self.conv1 = nn.Conv2d(in_channels, out_channels, kernel_size=3, stride=stride, padding=1, bias=False)
        self.bn1 = nn.BatchNorm2d(out_channels)
        self.relu = nn.ReLU(inplace=True)
        self.conv2 = nn.Conv2d(out_channels, out_channels, kernel_size=3, stride=1, padding=1, bias=False)
        self.bn2 = nn.BatchNorm2d(out_channels)
        
        self.shortcut = nn.Sequential()
        if stride != 1 or in_channels != out_channels:
            self.shortcut = nn.Sequential(
                nn.Conv2d(in_channels, out_channels, kernel_size=1, stride=stride, bias=False),
                nn.BatchNorm2d(out_channels)
            )
    
    def forward(self, x):
        out = self.relu(self.bn1(self.conv1(x)))
        out = self.bn2(self.conv2(out))
        out += self.shortcut(x)
        out = self.relu(out)
        return out

  • 定义ResNet网络结构
class ResNet(nn.Module):
    def __init__(self, block, num_blocks, num_classes=1000):
        super(ResNet, self).__init__()
        self.in_channels = 64
        
        self.conv1 = nn.Conv2d(3, 64, kernel_size=7, stride=2, padding=3, bias=False)
        self.bn1 = nn.BatchNorm2d(64)
        self.relu = nn.ReLU(inplace=True)
        self.maxpool = nn.MaxPool2d(kernel_size=3, stride=2, padding=1)
        
        self.layer1 = self._make_layer(block, 64, num_blocks[0], stride=1)
        self.layer2 = self._make_layer(block, 128, num_blocks[1], stride=2)
        self.layer3 = self._make_layer(block, 256, num_blocks[2], stride=2)
        self.layer4 = self._make_layer(block, 512, num_blocks[3], stride=2)
        
        self.avgpool = nn.AdaptiveAvgPool2d((1, 1))
        self.fc = nn.Linear(512 * block.expansion, num_classes)
        
    def _make_layer(self, block, out_channels, num_blocks, stride):
        strides = [stride] + [1] * (num_blocks - 1)
        layers = []
        for stride in strides:
            layers.append(block(self.in_channels, out_channels, stride))
            self.in_channels = out_channels * block.expansion
        return nn.Sequential(*layers)
    
    def forward(self, x):
        out = self.relu(self.bn1(self.conv1(x)))
        out = self.maxpool(out)
        out = self.layer1(out)
        out = self.layer2(out)
        out = self.layer3(out)
        out = self.layer4(out)
        out = self.avgpool(out)
        out = torch.flatten(out, 1)
        out = self.fc(out)
        return out

ResNet网络应用

ResNet网络在许多计算机视觉任务中都取得了优异的性能,例如图像分类、物体检测和语义分割等。
我们在vgg16神经网络上训练了SIGNS数据集,这是一个分类的数据集,在我的github上有介绍怎么下载数据集以及如何训练。

  • 4
    点赞
  • 0
    收藏
    觉得还不错? 一键收藏
  • 打赏
    打赏
  • 0
    评论
ResNet是一个非常深的深度学习网络结构,可以有效地解决梯度消失问题。在此提供通过ResNet网络模型实现MNIST手写数字识别的代码示例,如下所示: ```python import keras from keras.layers import Conv2D, MaxPooling2D, GlobalAveragePooling2D, Dense from keras.layers import Input, add, Activation, Flatten, Dropout from keras.models import Model from keras.datasets import mnist from keras.utils import np_utils from keras.optimizers import SGD # 定义ResNet网络模型 def residual_module(layer_in, n_filters): merge_input = layer_in # 第一层卷积 layer = Conv2D(n_filters, (3,3), padding='same', activation='relu')(layer_in) # 第二层卷积 layer = Conv2D(n_filters, (3,3), padding='same', activation='linear')(layer) # 合并 layer = add([layer, merge_input]) # 激活函数 layer_out = Activation('relu')(layer) return layer_out def build_resnet(input_shape, num_classes): # 输入层 inputs = Input(shape=input_shape) # 第一层卷积 conv1 = Conv2D(64, (3,3), padding='same', activation='linear')(inputs) # 残差模块1 res1 = residual_module(conv1, 64) res1 = residual_module(res1, 64) res1 = residual_module(res1, 64) # 残差模块2 res2 = residual_module(res1, 128) res2 = residual_module(res2, 128) res2 = residual_module(res2, 128) # 残差模块3 res3 = residual_module(res2, 256) res3 = residual_module(res3, 256) res3 = residual_module(res3, 256) # 池化层 pool = GlobalAveragePooling2D()(res3) # 全连接层 fc1 = Dense(512, activation='relu')(pool) fc2 = Dropout(0.5)(fc1) output = Dense(num_classes, activation='softmax')(fc2) # 定义模型 model = Model(inputs=inputs, outputs=output) return model # 加载MNIST数据集 (X_train, y_train), (X_test, y_test) = mnist.load_data() # 数据预处理 X_train = X_train.reshape(X_train.shape[0], 28, 28, 1).astype('float32') / 255 X_test = X_test.reshape(X_test.shape[0], 28, 28, 1).astype('float32') / 255 y_train = np_utils.to_categorical(y_train) y_test = np_utils.to_categorical(y_test) # 构建ResNet网络模型 model = build_resnet((28,28,1), 10) model.summary() # 编译模型 learning_rate = 0.1 sgd = SGD(lr=learning_rate, momentum=0.9, nesterov=True) model.compile(loss='categorical_crossentropy', optimizer=sgd, metrics=['accuracy']) # 训练模型 epochs = 10 batch_size = 128 history = model.fit(X_train, y_train, batch_size=batch_size, epochs=epochs, validation_data=(X_test, y_test)) # 评估模型 loss, accuracy = model.evaluate(X_test, y_test) print("Accuracy: {:.2f}%".format(accuracy * 100)) # 绘制准确率和损失值的曲线 import matplotlib.pyplot as plt plt.plot(history.history['accuracy'], label='train accuracy') plt.plot(history.history['val_accuracy'], label='validation accuracy') plt.plot(history.history['loss'], label='train loss') plt.plot(history.history['val_loss'], label='validation loss') plt.title('ResNet MNIST') plt.xlabel('Epoch') plt.ylabel('Accuracy/Loss') plt.legend() plt.show() ``` 在进行更大的迭代次数后,该示例代码可使准确度达到大约98%。

“相关推荐”对你有帮助么?

  • 非常没帮助
  • 没帮助
  • 一般
  • 有帮助
  • 非常有帮助
提交
评论
添加红包

请填写红包祝福语或标题

红包个数最小为10个

红包金额最低5元

当前余额3.43前往充值 >
需支付:10.00
成就一亿技术人!
领取后你会自动成为博主和红包主的粉丝 规则
hope_wisdom
发出的红包

打赏作者

一朵小红花HH

你的鼓励将是我创作的最大动力

¥1 ¥2 ¥4 ¥6 ¥10 ¥20
扫码支付:¥1
获取中
扫码支付

您的余额不足,请更换扫码支付或充值

打赏作者

实付
使用余额支付
点击重新获取
扫码支付
钱包余额 0

抵扣说明:

1.余额是钱包充值的虚拟货币,按照1:1的比例进行支付金额的抵扣。
2.余额无法直接购买下载,可以购买VIP、付费专栏及课程。

余额充值