


一、前提
ceph版本: 15.2.17 octopus (stable)
安装方式:ceph-deploy
系统版本:Centos7.6_x64
版本说明:Ceph官方文档:https://docs.ceph.com/en/latest/releases/#active-releases

二、环境准备
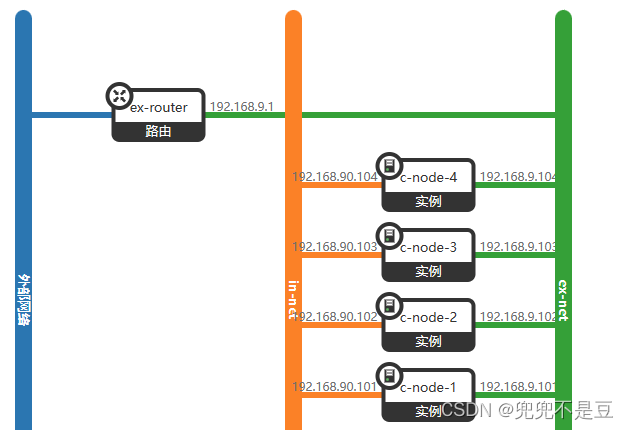
| 主机 | public network | cluster_network | 磁盘配置 |
| c-node-1 | 192.168.9.101 | 192.168.90.101 | 系统盘: sda OSD盘: sdb、sdc |
| c-node-2 | 192.168.9.102 | 192.168.90.102 | 系统盘: sda OSD盘: sdb、sdc |
| c-node-3 | 192.168.9.103 | 192.168.90.103 | 系统盘: sda OSD盘: sdb、sdc |
| c-node-4 | 192.168.9.104 | 192.168.90.104 | 系统盘: sda OSD盘: sdb、sdc |
三、基础环境配置
1、修改/etc/hosts、并下发到其他节点
vim /etc/hosts
192.168.90.101 c-node-1
192.168.90.102 c-node-2
192.168.90.103 c-node-3
192.168.90.104 c-node-4

scp /etc/hosts c-node-2:/etc/
scp /etc/hosts c-node-3:/etc/
scp /etc/hosts c-node-4:/etc/
2、设置ssh无密码登录
#生成密钥
ssh-keygen
#将公钥拷贝给自己及其他节点
ssh-copy-id -i /root/.ssh/id_rsa.pub c-node-1
ssh-copy-id -i /root/.ssh/id_rsa.pub c-node-2
ssh-copy-id -i /root/.ssh/id_rsa.pub c-node-3
ssh-copy-id -i /root/.ssh/id_rsa.pub c-node-4
3、每个节点关闭防火墙和selinux
#查看
getenforce  #(若不是disabled,则:vim /etc/selinux/config 然后再临时关闭selinux:setenforce 0)
#关闭防火墙
systemctl disable firewalld && systemctl stop firewalld
#查看
firewall-cmd --list-all4、ntp时间同步
(1)每个节点安装ntp
yum -y install ntp(2)c-node-1启动ntp服务
systemctl restart ntpd && systemctl enable ntpd(3)其他节点调置配置文件指向c-node-1:server 192.168.90.101 iburst
vim /etc/ntp.conf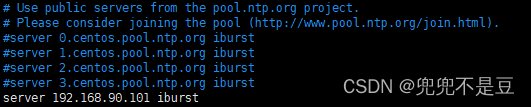
(4) 其他节点重启ntp服务:systemctl restart ntpd && systemctl enable ntpd
(5)文件下发
scp /etc/ntp.conf c-node-2:/etc/
scp /etc/ntp.conf c-node-3:/etc/
scp /etc/ntp.conf c-node-4:/etc/
四、Ceph部署
阿里云镜像:https://developer.aliyun.com/mirror/
1、配置ceph的yum源
(1)每个节点删除默认yum源:
cd /etc/yum.repos.d/
rm -rf *![]()
(2)c-node-1进行以下操作
curl -o /etc/yum.repos.d/CentOS-Base.repo https://mirrors.aliyun.com/repo/Centos-7.repo
curl -o /etc/yum.repos.d/epel.repo http://mirrors.aliyun.com/repo/epel-7.repo

vim ceph.repo

[norch]
name=norch
baseurl=https://mirrors.aliyun.com/ceph/rpm-octopus/el7/noarch/
enabled=1
gpgcheck=0

[x86_64]
name=x86_64
baseurl=https://mirrors.aliyun.com/ceph/rpm-octopus/el7/x86_64/
enabled=1
gpgcheck=0

cd
yum repolist
yum makecache
(2)下发到其他节
cd /etc/yum.repos.d
scp * c-node-2:/etc/yum.repos.d/
scp * c-node-3:/etc/yum.repos.d/
scp * c-node-4:/etc/yum.repos.d/
(3)每个节点生成下缓存
yum makecache2、安装ceph-deploy
安装O版需要2.0版本以上的ceph-deploy,阿里云O版yum源自带的版本不符合,故安装时可能出现错误,因此需要从其他源中wget。在c-node-1安装2.0以上的ceph-deploy
wget https://mirrors.aliyun.com/ceph/rpm-nautilus/el7/noarch/ceph-deploy-2.0.1-0.noarch.rpm

rpm -Uvh ceph-deploy-2.0.1-0.noarch.rpm
ceph-deploy --version
3、部署monitor节点
创建目录:mkdir ceph-deploy 然后cd ceph-deploy
节点创建集群:ceph-deploy new --public-network 192.168.9.0/24 --cluster-network 192.168.90.0/24  c-node-1 c-node-2 c-node-3 c-node-4
每个节点安装包:yum -y install ceph ceph-mon ceph-mgr ceph-radosgw ceph-mds
节点部署monitor:ceph-deploy mon create-initial
节点推送配置文件:ceph-deploy admin c-node-1 c-node-2 c-node-3 c-node-4
节点部署mgr:ceph-deploy mgr create c-node-1 c-node-2 c-node-3 c-node-4
ceph-deploy  --overwrite-conf config  push c-node-1 c-node-2 c-node-3 c-node-4
4、部署OSD节点
openstack创建卷连接到实例上。
查看节点磁盘情况:lsblk
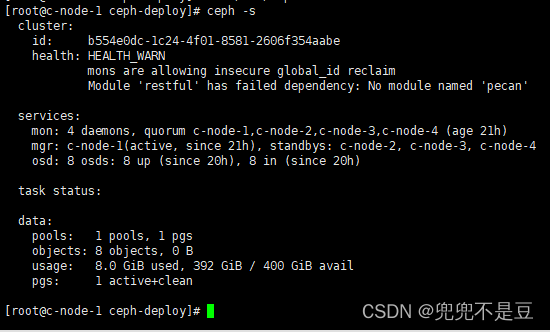
把空闲盘加做OSD:ceph-deploy osd create --data /dev/vdb c-node-15、最终集群


 5540
5540


 被折叠的 条评论
为什么被折叠?
被折叠的 条评论
为什么被折叠?
 到【灌水乐园】发言


