


目录
基于多层感知机:Surname Classification with a Multilayer Perceptron
2.Vocabulary, Vectorizer, and DataLoader
3.The Surname Classifier Model(模型)
5.Model Evaluation and Prediction
6.Regularizing MLPs: Weight Regularization and Structural Regularization (or Dropout)
2.Vocabulary, Vectorizer, and DataLoader
3.CNN Model :Reimplementing the SurnameClassifier with Convolutional Networks
5.Model Evaluation and Prediction
4.相关补充:Miscellaneous Topics in CNNs
Batch Normalization (BatchNorm)
Network-in-Network Connections (1x1 Convolutions)
Residual Connections/Residual Block
Part1 内容介绍
1.具体内容
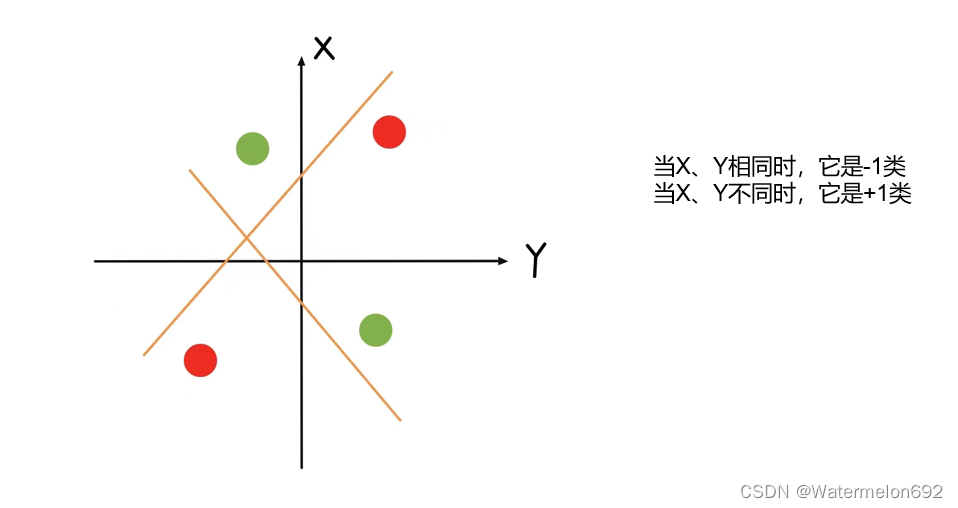
感知机存在的问题XOR问题,感知机不能拟合XOR函数,它只能产生线性分割面,这导致人工智能迎来了第一次寒冬。直到1986年,BP反向传播算法的诞生,解决了多层感知机的学习计算问题,使得多层感知机爆火。
这里介绍基于多层感知机和卷积神经网络来实现姓氏分类。
多层感知机(MLP):
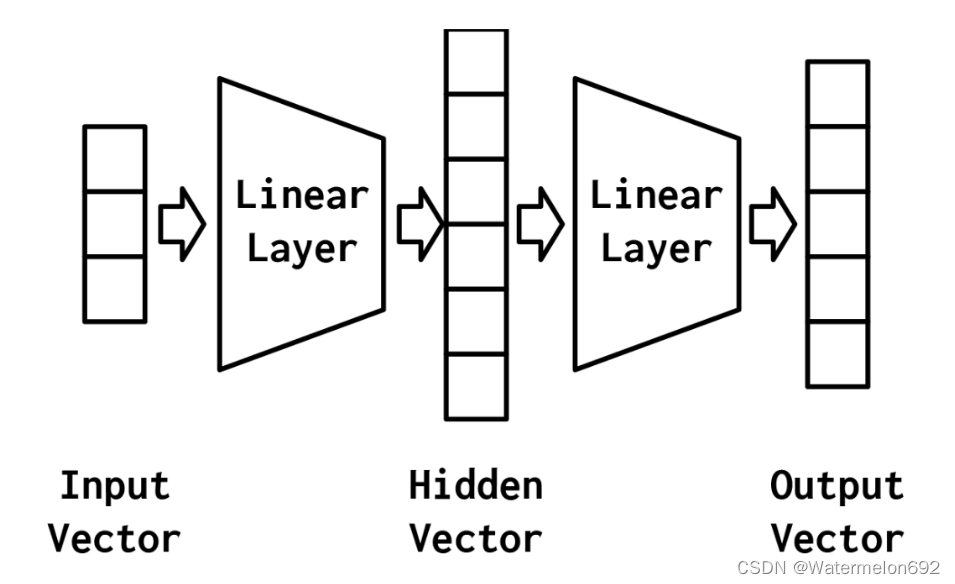
 如果缺少了激活函数(关于激活函数可以自行查阅相关信息),或者激活函数是一个线性的,那么无论神经网络有多少层,都是一个线性分类器,无法在非线性模型中使用。
卷积神经网络(CNN):
【深度学习】一文搞懂卷积神经网络(CNN)的原理(超详细)_卷积神经网络原理-CSDN博客
关于CNN的信息可以参考这篇内容。
(下面是本人大创时学的一些关于CNN的内容)
卷积层:
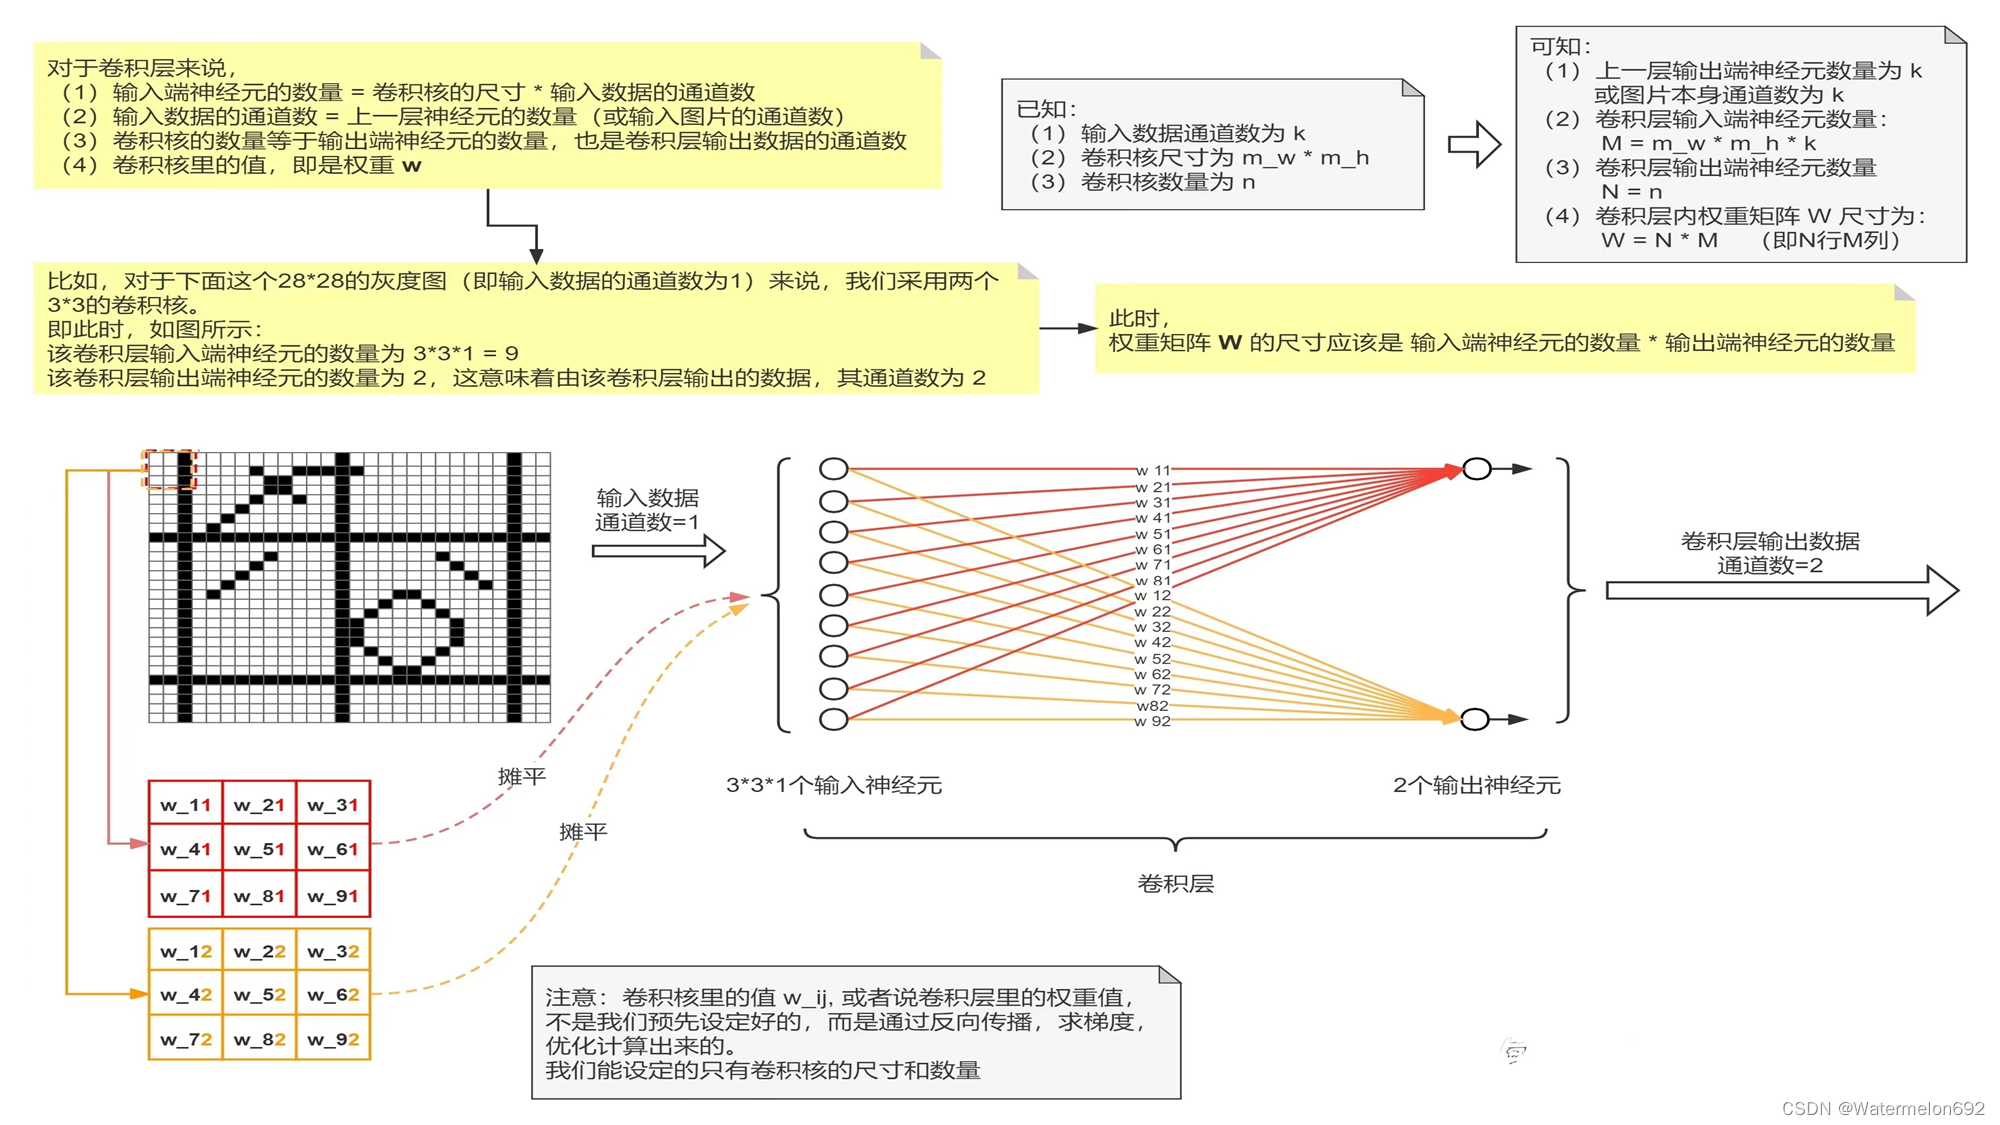
(做大创的时候偶然看见的图,忘记在哪看到的了)
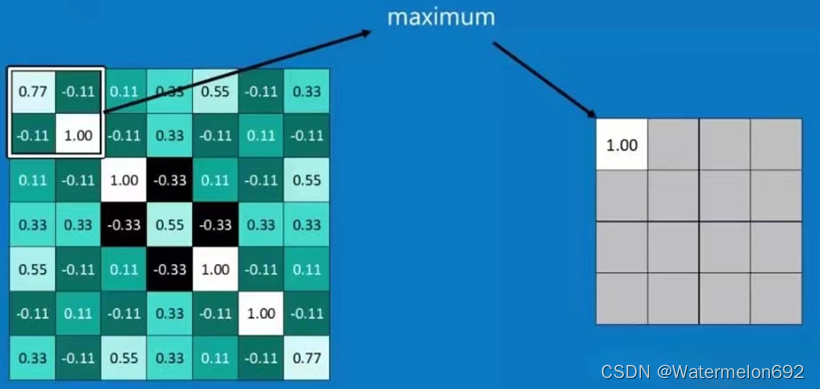
池化层:
2.实验环境:
python 3.6.7
Part2 具体实现
3.实验步骤:
基于多层感知机:Surname Classification with a Multilayer Perceptron
1.构建数据集SurnameDataset:
构建数据集,用于后续的模型训练和测试
class SurnameDataset(Dataset):


    def __getitem__(self, index):
        row = self._target_df.iloc[index]
        surname_vector = \
            self._vectorizer.vectorize(row.surname)
        #用vectorize方法将姓氏转化为向量
        nationality_index = \
            self._vectorizer.nationality_vocab.lookup_token(row.nationality)#lookup_token方法用于检索索引
        #字典self._vectorizer.nationality_vocab

        return {'x_surname': surname_vector,
                'y_nationality': nationality_index}
返回姓氏的向量表示(x_surname键对应的值),国籍的索引(y_nationality键对应的值)
2.Vocabulary, Vectorizer, and DataLoader
为了使用字符对姓氏进行分类,我们使用词汇表、向量化器和DataLoader将姓氏字符串转换为向量化的minibatches
class SurnameVectorizer(object):
    """ The Vectorizer which coordinates the Vocabularies and puts them to use"""
    def __init__(self, surname_vocab, nationality_vocab):#SurnameVectorizer类的构造函数,接受两个参数surname_vocab,nationality_vocab
        #surname_vocab和nationality_vocab都是词汇表,一个用来处理姓氏,一个用来处理国籍
        self.surname_vocab = surname_vocab
        self.nationality_vocab = nationality_vocab

    def vectorize(self, surname):#vectorize方法接受一个参数surname
        """Vectorize the provided surname

        Args:
            surname (str): the surname
        Returns:
            one_hot (np.ndarray): a collapsed one-hot encoding
        """
        vocab = self.surname_vocab
        one_hot = np.zeros(len(vocab), dtype=np.float32)
        for token in surname:#遍历输入姓氏中的每个字符,并使用 surname_vocab 的 lookup_token 方法将每个字符转换为对应的索引
            #如果该字符在词汇表中存在,对应的索引位置的值被设置为1
            one_hot[vocab.lookup_token(token)] = 1
        return one_hot#返回一个表示输入姓氏的独热编码(one-hot encoding)向量

    @classmethod
    def from_dataframe(cls, surname_df):#from_dataframe方法接受一个参数surname_df
        """Instantiate the vectorizer from the dataset dataframe

        Args:
            surname_df (pandas.DataFrame): the surnames dataset
        Returns:
            an instance of the SurnameVectorizer
        """
        surname_vocab = Vocabulary(unk_token="@")
        nationality_vocab = Vocabulary(add_unk=False)

        for index, row in surname_df.iterrows():#遍历
            for letter in row.surname:
                surname_vocab.add_token(letter)#将每个姓氏字符添加到姓氏词汇表中
            nationality_vocab.add_token(row.nationality)#将每个国籍添加到国籍词汇表中

return cls(surname_vocab, nationality_vocab)# 示例数据集
import pandas as pd
data = {
'surname': ['Smith', 'Johnson', 'Williams'],
'nationality': ['English', 'English', 'English']
}
surname_df = pd.DataFrame(data)
# 使用 from_dataframe 方法创建 SurnameVectorizer 实例
vectorizer = SurnameVectorizer.from_dataframe(surname_df)
# 使用 vectorize 方法将姓氏转换为独热编码向量
surname = 'Smith'
vectorized_surname = vectorizer.vectorize(surname)
print(vectorized_surname)
这段代码会输出姓氏 "Smith" 对应的独热编码向量,用于表示该姓氏在词汇表中的位置
3.The Surname Classifier Model(模型)
import torch.nn as nn
import torch.nn.functional as F

class SurnameClassifier(nn.Module):
    """ A 2-layer Multilayer Perceptron for classifying surnames """
    def __init__(self, input_dim, hidden_dim, output_dim):
        """
        Args:
            input_dim (int): the size of the input vectors
            hidden_dim (int): the output size of the first Linear layer
            output_dim (int): the output size of the second Linear layer
        """
        super(SurnameClassifier, self).__init__()
        self.fc1 = nn.Linear(input_dim, hidden_dim)
        self.fc2 = nn.Linear(hidden_dim, output_dim)

    def forward(self, x_in, apply_softmax=False):#参数值等于false,不使用softmax函数
        """The forward pass of the classifier

        Args:
            x_in (torch.Tensor): an input data tensor.
                x_in.shape should be (batch, input_dim)
            apply_softmax (bool): a flag for the softmax activation
                should be false if used with the Cross Entropy losses
        Returns:
            the resulting tensor. tensor.shape should be (batch, output_dim)
        """
        intermediate_vector = F.relu(self.fc1(x_in))#使用relu函数实现非线性操作
        prediction_vector = self.fc2(intermediate_vector)

        if apply_softmax:
            prediction_vector = F.softmax(prediction_vector, dim=1)#使用softmax函数,实现归一化处理

        return prediction_vector
第一个线性层将输入向量映射到中间向量,并对该向量应用非线性。第二线性层将中间向量映射到预测向量。在最后一步中,可选地应用softmax操作,以确保输出和为1;这就是所谓的“概率”
4.The Training Routine
配置模型的训练和存储过程:
args = Namespace(
    # Data and path information
    surname_csv="/home/jovyan/surnames_with_splits.csv",
    vectorizer_file="vectorizer.json",
    model_state_file="model.pth",
    save_dir="model_storage/ch4/surname_mlp",
    # Model hyper parameters
    hidden_dim=300,
    # Training  hyper parameters
    seed=1337,
    num_epochs=100,
    early_stopping_criteria=5,#早停准则
    learning_rate=0.001,
    batch_size=64,
    # Runtime options omitted for space
)dataset = SurnameDataset.load_dataset_and_make_vectorizer(args.surname_csv)
vectorizer = dataset.get_vectorizer()
classifier = SurnameClassifier(input_dim=len(vectorizer.surname_vocab),
hidden_dim=args.hidden_dim,
output_dim=len(vectorizer.nationality_vocab))
classifier = classifier.to(args.device)
loss_func = nn.CrossEntropyLoss(dataset.class_weights)
optimizer = optim.Adam(classifier.parameters(), lr=args.learning_rate)THE TRAINING LOOP:
# the training routine is these 5 steps:

# --------------------------------------
# step 1. zero the gradients
optimizer.zero_grad()
#将优化器中所有参数的梯度置零。因为PyTorch默认会累积梯度(accumulate gradients),所以在每个batch开始时需要手动将其清零,以避免梯度的混乱计算

# step 2. compute the output
y_pred = classifier(batch_dict['x_surname'])

# step 3. compute the loss
loss = loss_func(y_pred, batch_dict['y_nationality'])
loss_batch = loss.to("cpu").item()
running_loss += (loss_batch - running_loss) / (batch_index + 1)

# step 4. use loss to produce gradients
loss.backward()

# step 5. use optimizer to take gradient step
optimizer.step()
5.Model Evaluation and Prediction
从定性地角度了解模型的性能,可以通过查看分类器的top-k预测来为一个新示例开发模型所了解的内容的直觉
EVALUATING ON THE TEST DATASET
我们将数据集设置为遍历测试数据,调用classifier.eval()方法,并遍历测试数据以同样的方式与其他数据
#用于在完成训练后评估模型在测试集上的性能
dataset.set_split('test')
batch_generator = generate_batches(dataset,
                                   batch_size=args.batch_size,
                                   device=args.device)
running_loss = 0.
running_acc = 0.
classifier.eval()#将模型设置为评估模式。在评估模式下,模型不会更新其参数,用于准确率计算和模型性能评估

for batch_index, batch_dict in enumerate(batch_generator):
    # compute the output
    y_pred = classifier(x_in=batch_dict['x_data'].float())

    # compute the loss
    loss = loss_func(y_pred, batch_dict['y_target'].float())
    loss_batch = loss.item()
    running_loss += (loss_batch - running_loss) / (batch_index + 1)

    # compute the accuracy
    acc_batch = compute_accuracy(y_pred, batch_dict['y_target'])
    running_acc += (acc_batch - running_acc) / (batch_index + 1)

train_state['test_loss'] = running_loss
train_state['test_acc'] = running_acc

#该测试循环在每个epoch的末尾执行,
#用于评估模型在测试集上的性能。累积的测试损失和准确率存储在训练状态字典中
CLASSIFYING A NEW SURNAME
将输入的姓名通过预训练好的 classifier 模型进行国籍预测,并返回预测的国籍和其对应的概率
def predict_nationality(name, classifier, vectorizer):
    #使用名为 vectorizer 的对象的 vectorize 方法,将输入的姓名 name 向量化
    vectorized_name = vectorizer.vectorize(name)
    #将向量化后的姓名转换为PyTorch的Tensor对象,并通过 .view(1, -1) 将其形状调整为 (1,vector_size),其中 vector_size 是向量化后的特征维度
    vectorized_name = torch.tensor(vectorized_name).view(1, -1)
    #调用名为 classifier 的模型(神经网络),将向量化后的姓名作为输入进行预测。参数 apply_softmax=True 表示在输出前应用softmax函数,以获取概率分布
    result = classifier(vectorized_name, apply_softmax=True)

    #result.max(dim=1) 返回每个类别的预测概率值 probability_values 和对应的索引 indices。.max(dim=1) 表示沿着第一个维度(通常是类别维度)取最大值
    probability_values, indices = result.max(dim=1)
    index = indices.item()

    #使用 vectorizer 对象的 nationality_vocab,根据预测的索引 index 查找对应的国籍标签。然后,probability_values.item() 将预测的概率值转换为Python数值
    predicted_nationality = vectorizer.nationality_vocab.lookup_index(index)
    probability_value = probability_values.item()

    return {'nationality': predicted_nationality,
            'probability': probability_value}
RETRIEVING THE TOP-K PREDICTIONS FOR A NEW SURNAME
不仅要看最好的预测,还要看更多的预测
一次性获取输入姓名的前 k 个可能的国籍预测结果,每个结果包含国籍标签和对应的预测概率
def predict_topk_nationality(name, classifier, vectorizer, k=5):
    vectorized_name = vectorizer.vectorize(name)
    vectorized_name = torch.tensor(vectorized_name).view(1, -1)
    prediction_vector = classifier(vectorized_name, apply_softmax=True)
    #使用 torch.topk 函数获取预测概率向量中的前 k 个最大值及其对应的索引。probability_values 是前 k 个概率值的Tensor,indices 是对应的索引
    probability_values, indices = torch.topk(prediction_vector, k=k)

    # returned size is 1,k
    #将 probability_values 和 indices 转换为NumPy数组,便于后续处理
    probability_values = probability_values.detach().numpy()[0]
    indices = indices.detach().numpy()[0]

    #遍历前 k 个国籍的概率值和对应的索引,使用 vectorizer 对象的 nationality_vocab 将索引转换为对应的国籍标签,并构建一个包含国籍和概率的字典列表
    results = []
    for prob_value, index in zip(probability_values, indices):
        nationality = vectorizer.nationality_vocab.lookup_index(index)
        results.append({'nationality': nationality,
                        'probability': prob_value})

return results6.Regularizing MLPs: Weight Regularization and Structural Regularization (or Dropout)
- 最优方案----------------------获取更多训练数据
- 次优方案----------------------调节模型允许存储的信息量或者对模型允许存储的信息加以约束,该类方法也称正则化
调节模型大小
约束模型权重,即权重正则化weight regularization(常用的有L1 ,L2正则化)
随机失活(Dropout)
DROPOUT:
随机失活:让隐层的神经元以一定的概率不被激活
实现方式:训练过程中,对某一层使用Dropout,就是随即将该层的一些输出舍弃(输出值设置为0),这些被舍弃的神经元就好像被网络删除了一样.
随机失活比率(Dropout ratio):是被设为0的特征所占的比例,通常在0.2~0.5范围内.
例:假设某一层对给定输入样本的返回值应该是向量:[0.2,0.5,1.3,0.8,1.1];
使用dropout后,这个向量会有几个随机的元素变成:[0,0.5,1.3,0,1.1]
#带Dropout的MLP的实现
import torch.nn as nn
import torch.nn.functional as F

class MultilayerPerceptron(nn.Module):
    def __init__(self, input_dim, hidden_dim, output_dim):
        """
        Args:
            input_dim (int): the size of the input vectors
            hidden_dim (int): the output size of the first Linear layer
            output_dim (int): the output size of the second Linear layer
        """
        super(MultilayerPerceptron, self).__init__()
        self.fc1 = nn.Linear(input_dim, hidden_dim)
        self.fc2 = nn.Linear(hidden_dim, output_dim)

    def forward(self, x_in, apply_softmax=False):
        """The forward pass of the MLP

        Args:
            x_in (torch.Tensor): an input data tensor.
                x_in.shape should be (batch, input_dim)
            apply_softmax (bool): a flag for the softmax activation
                should be false if used with the Cross Entropy losses
        Returns:
            the resulting tensor. tensor.shape should be (batch, output_dim)
        """
        intermediate = F.relu(self.fc1(x_in))
        output = self.fc2(F.dropout(intermediate, p=0.5))

        if apply_softmax:
            output = F.softmax(output, dim=1)
        return output
基于卷积神经网络CNN:
卷积神经网络的原理在上文已经提到了,这里就不再重复.
基于卷积神经网络CNN实现姓氏分类的步骤与MLP基本一致
1.构建数据集The SurnameDataset:
使用了来自“示例:带有多层感知器的姓氏分类”中的相同数据集,但在实现上有一个不同之处:数据集由onehot向量矩阵组成,而不是一个收缩的onehot向量.
#将一个包含姓氏和国籍标签的数据集包装成一个 PyTorch Dataset 对象,
#以便于后续在训练模型时使用 DataLoader 加载和处理数据

class SurnameDataset(Dataset):


    def __getitem__(self, index):
        row = self._target_df.iloc[index]

        surname_matrix = \
            self._vectorizer.vectorize(row.surname, self._max_seq_length)#提取的姓氏 row.surname 转换为一个固定长度的向量矩阵
                                                        #跟踪最长的姓氏,并将其作为矩阵中包含的行数提供给矢量化器
        nationality_index = \
             self._vectorizer.nationality_vocab.lookup_token(row.nationality)

        return {'x_surname': surname_matrix,
'y_nationality': nationality_index}2.Vocabulary, Vectorizer, and DataLoader
词汇表和DataLoader的实现方式与“示例:带有多层感知器的姓氏分类”中的示例相同,但Vectorizer的vectorize()方法已经更改,以适应CNN模型的需要。具体来说,将字符串中的每个字符映射到一个整数,然后使用该整数构造一个由onehot向量组成的矩阵。重要的是,矩阵中的每一列都是不同的onehot向量。主要原因是,我们将使用的Conv1d层要求数据张量在第0维上具有批处理,在第1维上具有通道,在第2维上具有特性。
除了更改为使用onehot矩阵之外,还修改了矢量化器,以便计算姓氏的最大长度并将其保存为max_surname_length
class SurnameVectorizer(object):
    """ The Vectorizer which coordinates the Vocabularies and puts them to use"""
    def vectorize(self, surname):#接受一个姓氏字符串,并返回一个独热向量矩阵。
        #这个矩阵的每一行代表一个字符
        """
        Args:
            surname (str): the surname
        Returns:
            one_hot_matrix (np.ndarray): a matrix of one-hot vectors
        """
        #将字符串中的每个字符映射到一个整数,然后使用该整数构造一个由onehot向量组成的矩阵
        one_hot_matrix_size = (len(self.character_vocab), self.max_surname_length)
        one_hot_matrix = np.zeros(one_hot_matrix_size, dtype=np.float32)

        for position_index, character in enumerate(surname):
            character_index = self.character_vocab.lookup_token(character)
            one_hot_matrix[character_index][position_index] = 1

        return one_hot_matrix

    @classmethod
    def from_dataframe(cls, surname_df):
        #接受一个包含姓氏和国籍的数据框(DataFrame),
        #并从数据框中构建字符和国籍的词汇表,以及最大的姓氏长度。然后,它使用这些信息实例化 SurnameVectorizer 类。
        """Instantiate the vectorizer from the dataset dataframe

        Args:
            surname_df (pandas.DataFrame): the surnames dataset
        Returns:
            an instance of the SurnameVectorizer
        """
        character_vocab = Vocabulary(unk_token="@")
        nationality_vocab = Vocabulary(add_unk=False)
        max_surname_length = 0

        for index, row in surname_df.iterrows():
            max_surname_length = max(max_surname_length, len(row.surname))
            for letter in row.surname:
                character_vocab.add_token(letter)
            nationality_vocab.add_token(row.nationality)

        return cls(character_vocab, nationality_vocab, max_surname_length)
3.CNN Model :Reimplementing the SurnameClassifier with Convolutional Networks
思想:使用一系列一维卷积来增量地计算更多的特征,从而得到一个单特征向量。
本例中的新内容是使用sequence和ELU PyTorch模块。序列模块是封装线性操作序列的方便包装器。在这种情况下,我们使用它来封装Conv1d序列的应用程序。ELU是类似于ReLU的非线性函数,但是它不是将值裁剪到0以下,而是对它们求幂。ELU已经被证明是卷积层之间使用的一种很有前途的非线性(Clevert et al., 2015)
#定义了一个姓氏分类器 SurnameClassifier,它包含一个卷积网络和一个全连接层,用于从姓氏数据中预测国籍

import torch.nn as nn
import torch.nn.functional as F

#类定义和初始化
class SurnameClassifier(nn.Module):#包括一个卷积网络和一个全连接层
    def __init__(self, initial_num_channels, num_classes, num_channels):
        """
        Args:
            initial_num_channels (int): size of the incoming feature vector
            num_classes (int): size of the output prediction vector
            num_channels (int): constant channel size to use throughout network
        """
        super(SurnameClassifier, self).__init__()

         #卷积神经网络定义
        self.convnet = nn.Sequential(#卷积网络包含多个卷积层和 ELU 激活函数
            nn.Conv1d(in_channels=initial_num_channels,
                      out_channels=num_channels, kernel_size=3),
            nn.ELU(),
            nn.Conv1d(in_channels=num_channels, out_channels=num_channels,
                      kernel_size=3, stride=2),
            nn.ELU(),
            nn.Conv1d(in_channels=num_channels, out_channels=num_channels,
                      kernel_size=3, stride=2),
            nn.ELU(),
            nn.Conv1d(in_channels=num_channels, out_channels=num_channels,
                      kernel_size=3),
            nn.ELU()
        )

        #全连接层定义
        #fc 是一个全连接层,用于将卷积层输出的特征映射到最终的预测向量空间。
        #输入尺寸为 num_channels,输出尺寸为 num_classes,对应于预测的国籍类别数
        self.fc = nn.Linear(num_channels, num_classes)#一个全连接层

    def forward(self, x_surname, apply_softmax=False):
        #数据的前向传播过程。它首先通过卷积网络处理输入张量 x_surname,
        #然后将输出张量通过一个全连接层得到最终的预测向量。
        #如果 apply_softmax 为 True,则在输出之前应用 softmax 激活函数,以便得到概率分布
        """The forward pass of the classifier

        Args:
            x_surname (torch.Tensor): an input data tensor.
                x_surname.shape should be (batch, initial_num_channels,
                                           max_surname_length)
            apply_softmax (bool): a flag for the softmax activation
                should be false if used with the Cross Entropy losses
        Returns:
            the resulting tensor. tensor.shape should be (batch, num_classes)
        """
        features = self.convnet(x_surname).squeeze(dim=2)
        prediction_vector = self.fc(features)

        if apply_softmax:
            prediction_vector = F.softmax(prediction_vector, dim=1)

return prediction_vector4.The Training Routine
训练程序包括以下似曾相识的的操作序列:实例化数据集,实例化模型,实例化损失函数,实例化优化器,遍历数据集的训练分区和更新模型参数,遍历数据集的验证分区和测量性能,然后重复数据集迭代一定次数.
#与MLP完全一致,只有输入参数不同

args = Namespace(
    # Data and Path information
    surname_csv="data/surnames/surnames_with_splits.csv",
    vectorizer_file="vectorizer.json",
    model_state_file="model.pth",
    save_dir="model_storage/ch4/cnn",
    # Model hyper parameters
    hidden_dim=100,
    num_channels=256,
    # Training hyper parameters
    seed=1337,
    learning_rate=0.001,
    batch_size=128,
    num_epochs=100,
    early_stopping_criteria=5,
    dropout_p=0.1,
    # Runtime omitted for space ...
)
5.Model Evaluation and Prediction
Evaluating on the Test Dataset
“带有多层感知器(MLP)的姓氏分类”中的示例与本示例之间的训练例程没有变化一样,执行评估的代码也没有变化。总之,调用分类器的eval()方法来防止反向传播,并迭代测试数据集
Classifying or retrieving top predictions for a new surname
predict_nationality()函数的一部分发生了更改,没有使用视图方法重塑新创建的数据张量以添加批处理维度,而是使用PyTorch的unsqueeze()函数在批处理应该在的位置添加大小为1的维度。相同的更改反映在predict_topk_nationality()函数中。
#使用一个已训练的姓氏分类器来预测一个新姓氏的国籍
def predict_nationality(surname, classifier, vectorizer):
    """Predict the nationality from a new surname

    Args:
        surname (str): the surname to classifier
        classifier (SurnameClassifer): an instance of the classifier
        vectorizer (SurnameVectorizer): the corresponding vectorizer
    Returns:
        a dictionary with the most likely nationality and its probability
    """
    vectorized_surname = vectorizer.vectorize(surname)#将输入的姓氏转换为向量
    vectorized_surname = torch.tensor(vectorized_surname).unsqueeze(0)
    #使用PyTorch的unsqueeze()函数在批处理应该在的位置添加大小为1的维度
    result = classifier(vectorized_surname, apply_softmax=True)

    probability_values, indices = result.max(dim=1)#获取每个批次的最大概率值及其索引
    index = indices.item()

    predicted_nationality = vectorizer.nationality_vocab.lookup_index(index)#将索引转换为实际的国籍标签
    probability_value = probability_values.item()

    #返回一个字典,包含预测的国籍及其概率值
    return {'nationality': predicted_nationality, 'probability': probability_value}
Part3 CNN的补充
4.相关补充:Miscellaneous Topics in CNNs
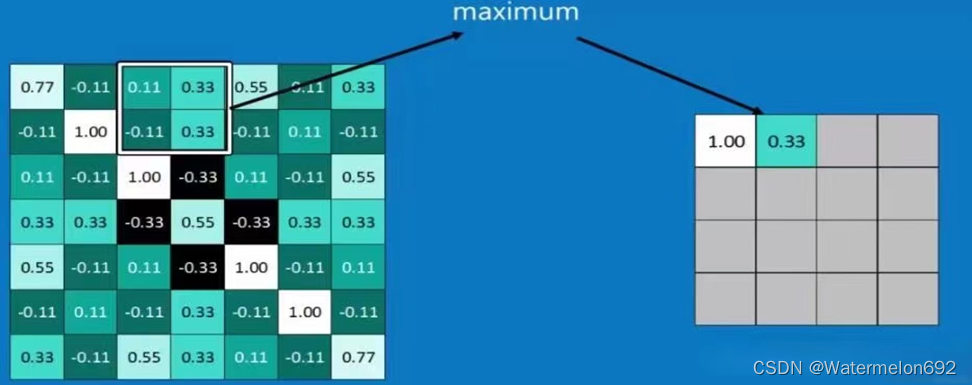
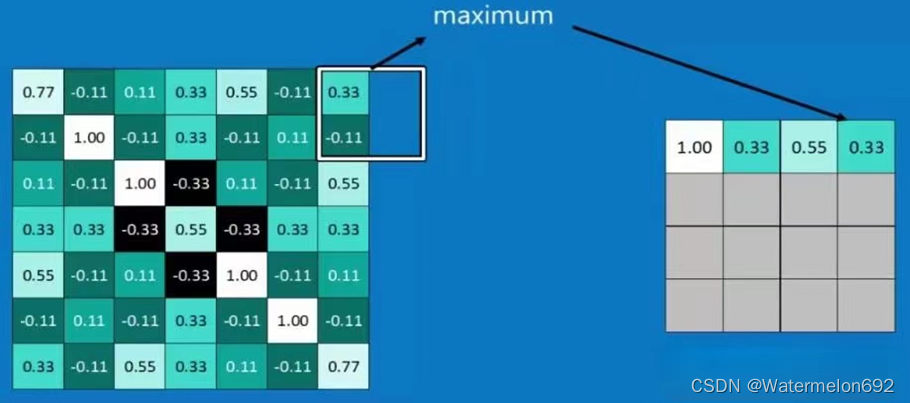
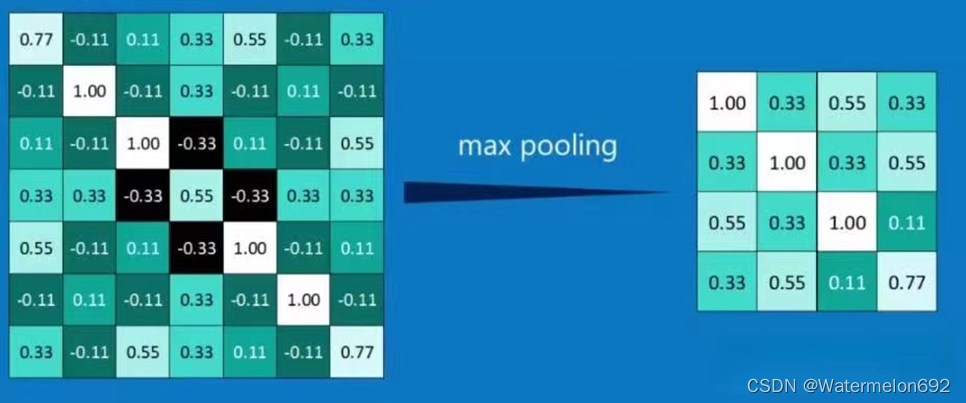
Pooling Operation
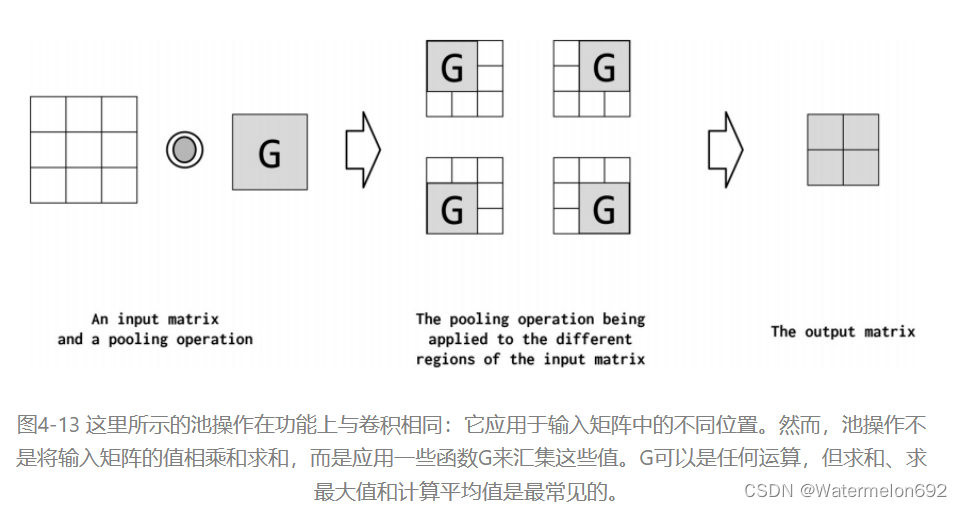
Pooling是将高维特征映射总结为低维特征映射的操作。卷积的输出是一个特征映射。feature map中的值总结了输入的一些区域。由于卷积计算的重叠性,许多计算出的特征可能是冗余的。Pooling是一种将高维(可能是冗余的)特征映射总结为低维特征映射的方法。在形式上,池是一种像sum、mean或max这样的算术运算符,系统地应用于feature map中的局部区域,得到的池操作分别称为sum pooling、average pooling和max pooling。池还可以作为一种方法,将较大但较弱的feature map的统计强度改进为较小但较强的feature map
Batch Normalization (BatchNorm)
批处理标准化是设计网络时经常使用的一种工具。BatchNorm对CNN的输出进行转换,方法是将激活量缩放为零均值和单位方差。它用于Z-transform的平均值和方差值每批更新一次,这样任何单个批中的波动都不会太大地移动或影响它。BatchNorm允许模型对参数的初始化不那么敏感,并且简化了学习速率的调整(Ioffe and Szegedy, 2015)。在PyTorch中,批处理规范是在nn模块中定义的
# ...
     #卷积层,输入通道数为 1,输出通道数为 10,卷积核大小为 5,步长为 1
        self.conv1 = nn.Conv1d(in_channels=1, out_channels=10,
                               kernel_size=5,
                               stride=1)
    #批量归一化层,它应用于卷积层的输出
        self.conv1_bn = nn.BatchNorm1d(num_features=10)
        # ...

    def forward(self, x):
       # ...
       x = F.relu(self.conv1(x))#使用 ReLU 激活函数应用于卷积层的输出,非线性激活函数可以增加模型的非线性能力
       x = self.conv1_bn(x)#应用批量归一化层,有助于稳定训练过程中的梯度,并加快收敛速度
       # ...
Network-in-Network Connections (1x1 Convolutions)
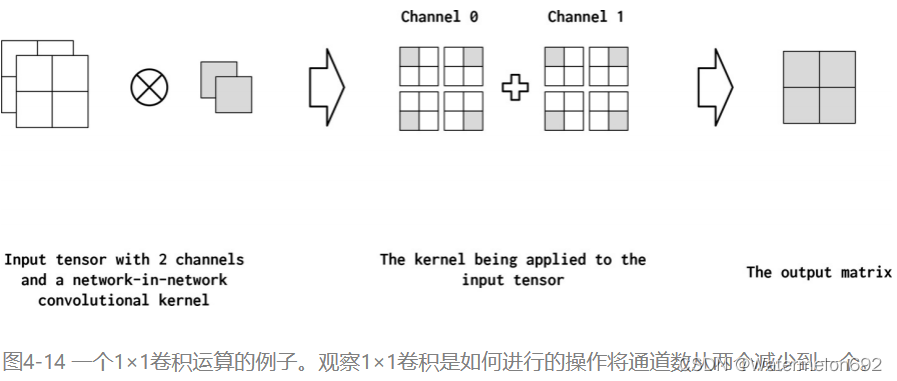
Network-in-Network (NiN)连接是具有kernel_size=1的卷积内核,具有一些有趣的特性。具体来说,1x1卷积就像通道之间的一个完全连通的线性层。这在从多通道feature map映射到更浅的feature map时非常有用。在图4-14中,我们展示了一个应用于输入矩阵的NiN连接。它将两个通道简化为一个通道。因此,NiN或1x1卷积提供了一种廉价的方法来合并参数较少的额外非线性(Lin et al., 2013)
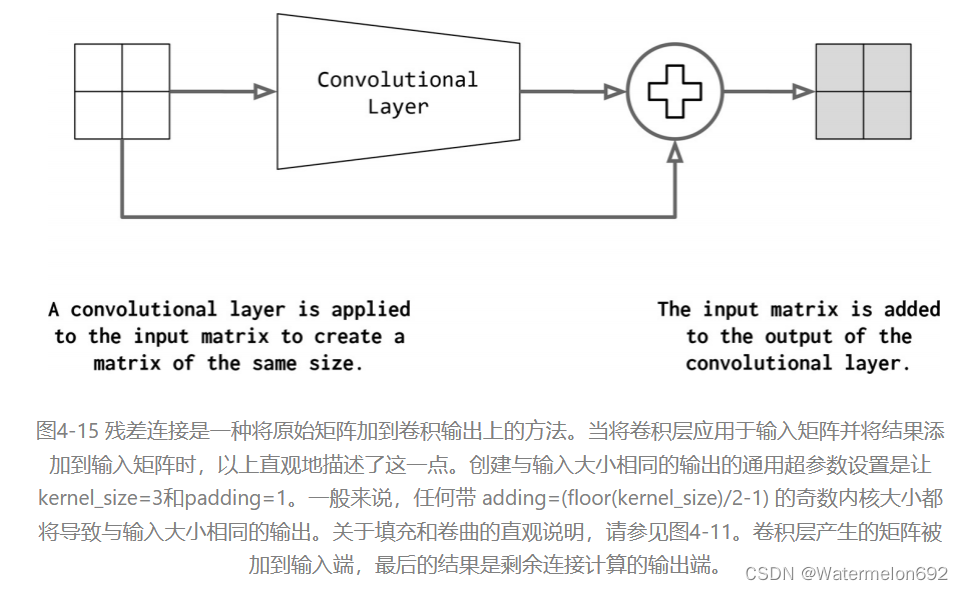
Residual Connections/Residual Block
CNNs中最重要的趋势之一是Residual connection,它支持真正深层的网络(超过100层)。它也称为skip connection。如果将卷积函数表示为conv,则residual block的输出如下:
𝑜𝑢𝑡𝑝𝑢𝑡=𝑐𝑜𝑛𝑣(𝑖𝑛𝑝𝑢𝑡)+𝑖𝑛𝑝𝑢𝑡𝑜𝑢𝑡𝑝𝑢𝑡=𝑐𝑜𝑛𝑣(𝑖𝑛𝑝𝑢𝑡)+𝑖𝑛𝑝𝑢𝑡
然而,这个操作有一个隐含的技巧,如图4-15所示。对于要添加到卷积输出的输入,它们必须具有相同的形状。为此,标准做法是在卷积之前应用填充。在图4-15中,填充尺寸为1,卷积大小为3


 921
921


 被折叠的 条评论
为什么被折叠?
被折叠的 条评论
为什么被折叠?
 到【灌水乐园】发言


