


简介
2018年BMVC,从通道和空间两方面去解释注意力机制,和CBAM为同一团队打造。论文连接:BAM
BAM:Bottleneck Attention Module,顾名思义,瓶颈注意力模块。将模块放在模型的瓶颈处。
思考
为什么要做混合注意力?
混合域注意力机制如何混合?
为什么?
因为不同的维度所代表的意义不同,所携带的信息不同。通道注意力机制主要是特征信息的表达(what),空间注意力更注重位置信息的表达(where)。
如何?
1、并联,特征图权重相加;
2、并联,特征图concat;
3、串联。
步骤
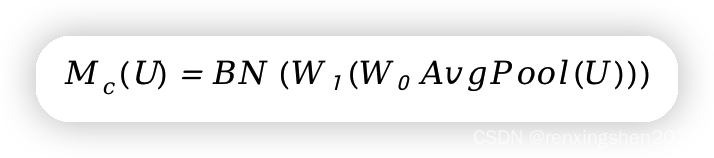
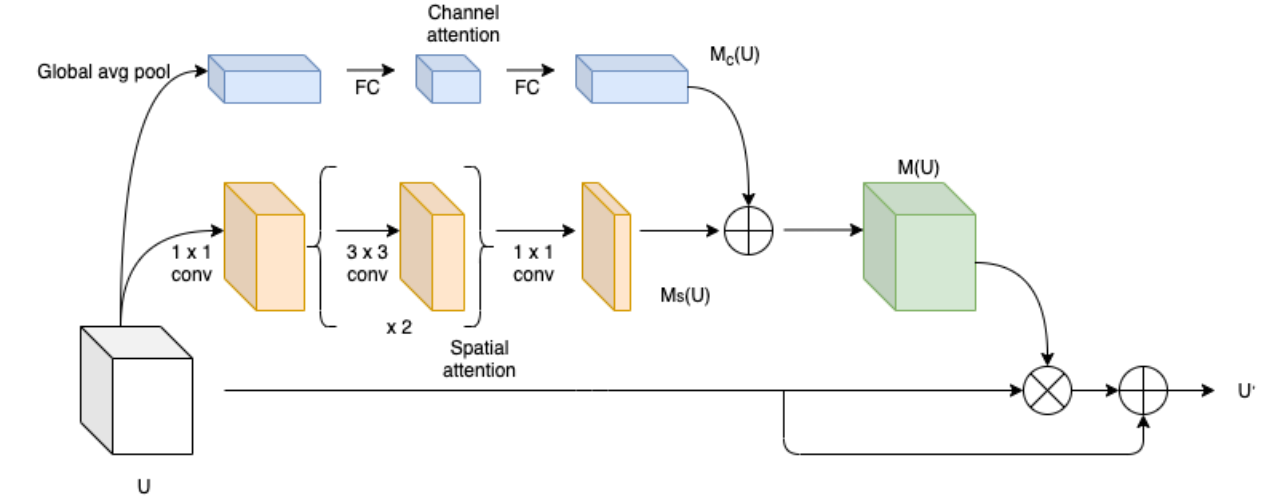
1、(通道上权重信息)输入特征图
U
U
U经过全局平均池化编码成的一维特征向量,使得每个通道都具有全局感受野;然后,经过全连接层对一维特征向量进行降维操作,并使用Relu6激活函数进行非线性处理;然后在利用全连接层进行升维操作,最后经过批量归一化得到对应权重
M
c
(
U
)
M_c(U)
Mc(U)(11C)。计算公式如下:
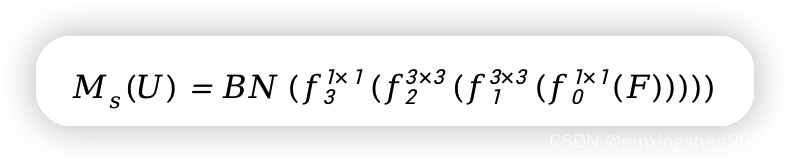
2、(空间上权重信息)利用11卷积对输入特征图
U
U
U进行降维操作;然后利用两个卷积核尺寸为33的空洞卷积提取特征信息,空洞卷积具有更大的感受野;最后,利用11卷积将特征图映射到1w*h,得到空间注意力映射
M
s
(
U
)
M_s(U)
Ms(U),其计算公式如下:
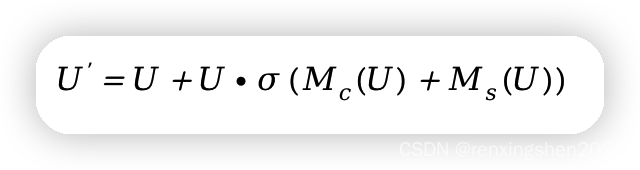
3、融合通道注意力与空间注意力:通过广播机制将
M
c
(
U
)
M_c(U)
Mc(U)和
M
s
(
U
)
M_s(U)
Ms(U)扩展到同一维度,然后权重相加,得到注意力向量
M
(
U
)
M(U)
M(U)。
4、重构特征图:输入特征图
U
U
U与
M
(
U
)
M(U)
M(U)逐元素相乘,再通过残差结构与
U
U
U相加。
整体结构图如下:
代码
代码粘贴自github。:BAM代码
地址:https://github.com/Jongchan/attention-module/blob/master/MODELS/bam.py
import torch
import math
import torch.nn as nn
import torch.nn.functional as F

class Flatten(nn.Module):
    def forward(self, x):
        return x.view(x.size(0), -1)
class ChannelGate(nn.Module):
    def __init__(self, gate_channel, reduction_ratio=16, num_layers=1):
        super(ChannelGate, self).__init__()
        self.gate_c = nn.Sequential()
        self.gate_c.add_module( 'flatten', Flatten() )
        gate_channels = [gate_channel]
        gate_channels += [gate_channel // reduction_ratio] * num_layers
        gate_channels += [gate_channel]
        for i in range( len(gate_channels) - 2 ):
            self.gate_c.add_module( 'gate_c_fc_%d'%i, nn.Linear(gate_channels[i], gate_channels[i+1]) )
            self.gate_c.add_module( 'gate_c_bn_%d'%(i+1), nn.BatchNorm1d(gate_channels[i+1]) )
            self.gate_c.add_module( 'gate_c_relu_%d'%(i+1), nn.ReLU() )
        self.gate_c.add_module( 'gate_c_fc_final', nn.Linear(gate_channels[-2], gate_channels[-1]) )
    def forward(self, in_tensor):
        avg_pool = F.avg_pool2d( in_tensor, in_tensor.size(2), stride=in_tensor.size(2) )
        return self.gate_c( avg_pool ).unsqueeze(2).unsqueeze(3).expand_as(in_tensor)

class SpatialGate(nn.Module):
    def __init__(self, gate_channel, reduction_ratio=16, dilation_conv_num=2, dilation_val=4):
        super(SpatialGate, self).__init__()
        self.gate_s = nn.Sequential()
        self.gate_s.add_module( 'gate_s_conv_reduce0', nn.Conv2d(gate_channel, gate_channel//reduction_ratio, kernel_size=1))
        self.gate_s.add_module( 'gate_s_bn_reduce0',	nn.BatchNorm2d(gate_channel//reduction_ratio) )
        self.gate_s.add_module( 'gate_s_relu_reduce0',nn.ReLU() )
        for i in range( dilation_conv_num ):
            self.gate_s.add_module( 'gate_s_conv_di_%d'%i, nn.Conv2d(gate_channel//reduction_ratio, gate_channel//reduction_ratio, kernel_size=3, \
						padding=dilation_val, dilation=dilation_val) )
            self.gate_s.add_module( 'gate_s_bn_di_%d'%i, nn.BatchNorm2d(gate_channel//reduction_ratio) )
            self.gate_s.add_module( 'gate_s_relu_di_%d'%i, nn.ReLU() )
        self.gate_s.add_module( 'gate_s_conv_final', nn.Conv2d(gate_channel//reduction_ratio, 1, kernel_size=1) )
    def forward(self, in_tensor):
        return self.gate_s( in_tensor ).expand_as(in_tensor)
class BAM(nn.Module):
    def __init__(self, gate_channel):
        super(BAM, self).__init__()
        self.channel_att = ChannelGate(gate_channel)
        self.spatial_att = SpatialGate(gate_channel)
    def forward(self,in_tensor):
        att = 1 + F.sigmoid( self.channel_att(in_tensor) + self.spatial_att(in_tensor) )
        return att * in_tensor
代码比较简洁易懂,值得注意的是代码与流程图中不一样的地方,图片中 U U U与注意力向量 M ( U ) M(U) M(U)相乘,然后再加 U U U,但是在代码中是通道注意力与空间注意力向量相加后再加1,然后与输入特征图 U U U相乘,实际是一样的。
实验
简单介绍实验记录。
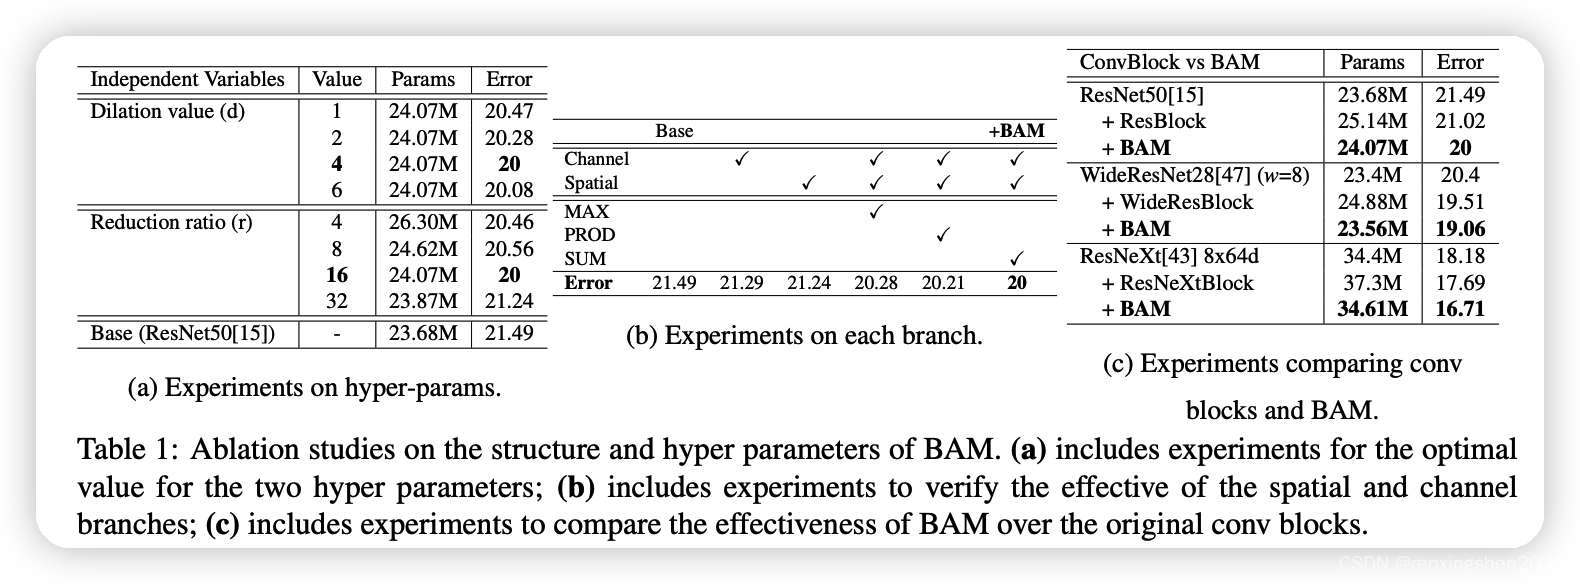
表1中(a)表示BAM中超参数的消融实验,dilation value表示空洞卷积中的扩张因子参数,论文中对比了1,2,4,6四种不同的扩展因子,通过实验结果证明dilation val = 4效果最好;还对比了所见缩减比例,用与通道注意力分支的全连接层和空间注意力机制的一维卷积,通过实验证明16时效果最好。
(b)表示是否使用通道注意力分支和空间注意力分支,怎么进行融合的消融实验,通过实验发现单独添加通道分支或空间分支时都有一定的效果,但同时使用时有显著的效果提升,表明将通道和空间结合在一起对生成最终的注意力向量起到了关键作用。

翻译:事实上,这种设计类似于人类视觉系统,它具有“什么”(通道)和“哪里”(空间)两方面,并且这两方面都有助于处理视觉信息 。
表中提供了最大元素、点乘、求和三种结合方式的实验,从结果可以看出逐元素相加取得了最好的效果。元素求和能够很好的整合和保护前面的特征信息,前向推理时能够很好的使用来了两个互补分支的信息,在反向传播时,梯度平均分配给所有的输入,从而实现有效的训练。
(c)表示BAM能够有效的提升提取特征的能力,而不是检测的通过增加网络的深度提高模型的效果。
此外:
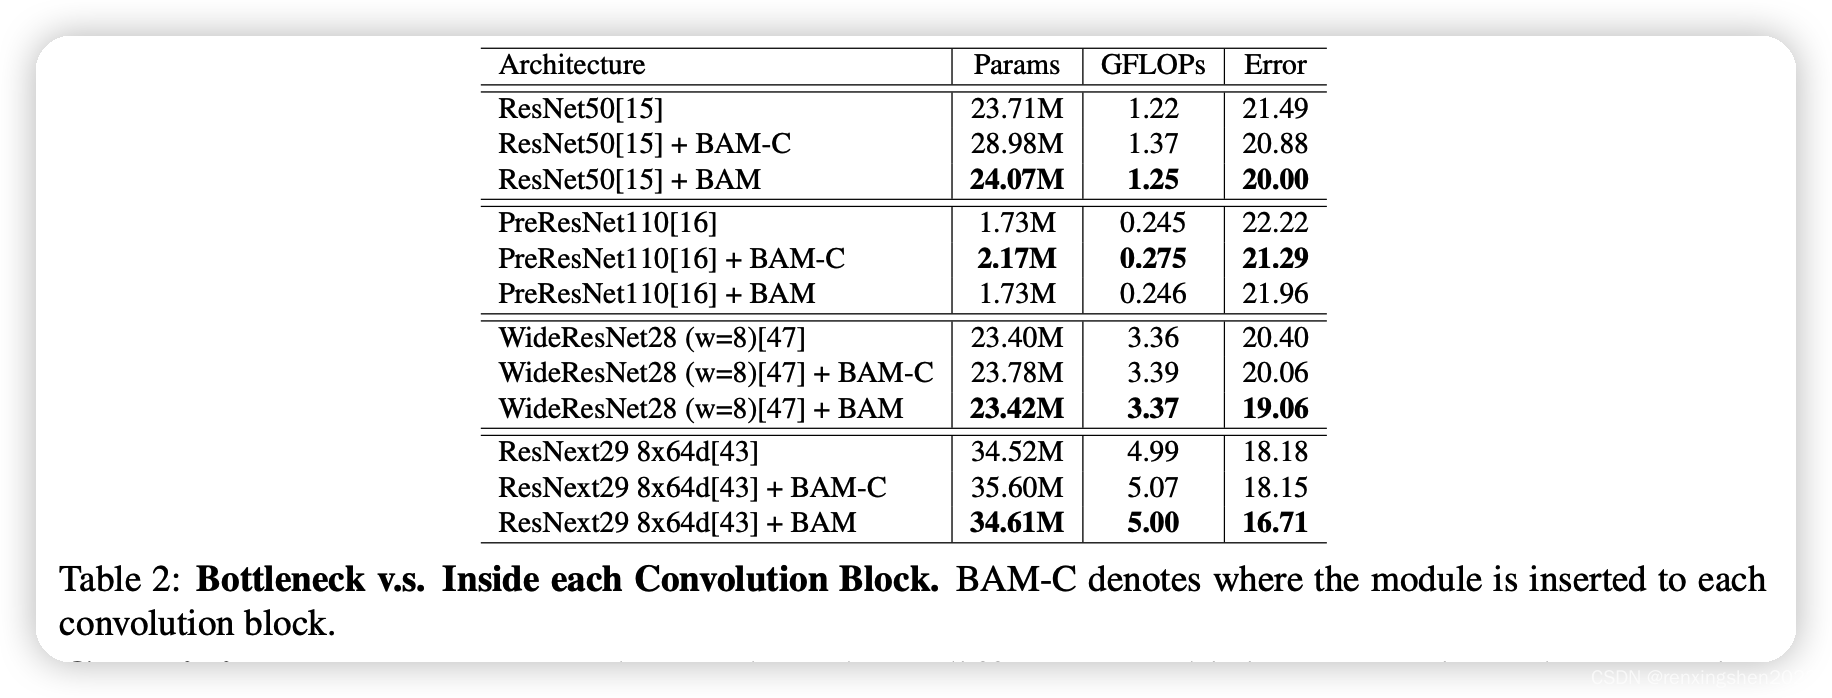
还通过实验验证了BAM添加在卷积模块内,和添加在瓶颈处对模型效果的提升,除了PreResNet110,其他的都是在瓶颈处效果提升较大。
最后
简单记录,如有问题请大家指正。


 693
693


 被折叠的 条评论
为什么被折叠?
被折叠的 条评论
为什么被折叠?
 到【灌水乐园】发言


