


在上一篇文章中 Embedding压缩之基于二进制码的Hash Embedding,提供了二进制码的tensorflow算子源码,那就顺便来讲下tensorflow自定义算子的完整实现过程。
前言
制作过程基于tensorflow官方的custom-op仓库以及官网教程,并且在Ubuntu和MacOS系统通过了测试。
官方提供的案例虽然也涵盖了整个流程,但是它过于简单,自己遇到其他需求的实现可能还得去翻阅资料。而基于上一篇文章的二进制码Hash编码的算子实现,是能够满足大部分自定义需求的,并且经过测试是支持tensorflow1.x和2.x的。
文章中的代码只是展示了核心部分,并不是完整代码,全部放出来的话会显示得十分冗长。完整代码可前往下面的任一git仓库:
目录结构
整个项目的目录结构如下,下面会对每一个文件进行讲述其作用:
├── Makefile
└── tensorflow_binary_code_hash
    ├── BUILD
    ├── __init__.py
    ├── cc
    │   ├── kernels
    │   │   ├── binary_code_hash.h
    │   │   ├── binary_code_hash_kernels.cc
    │   │   ├── binary_code_hash_kernels.cu.cc
    │   │   └── binary_code_hash_only_cpu_kernels.cc
    │   └── ops
    │       └── binary_code_hash_ops.cc
    └── python
        ├── __init__.py
        └── ops
            ├── __init__.py
            ├── binary_code_hash_ops.py
            └── binary_code_hash_test.py
前置依赖
make

g++

cuda
tensorflow
无需源码安装,pip安装的情况下已通过测试。
-
cuda与tensorflow之间版本已兼容,直接pip安装
-
cuda与tensorflow之间版本不兼容
a. 新建Python环境:
conda create -n <your_env_name> python=<x.x.x> cudatoolkit=<x.x> cudnn -c conda-forgeb. 现有Python环境:
conda install cudatoolkit=<x.x> cudnn -c conda-forge -n <your_env_name>执行以上步骤后,再进行pip安装
-
当然,你仍然可以选择源码编译安装: https://www.tensorflow.org/install/source
Step1. 定义运算接口
对应文件:tensorflow_binary_code_hash/cc/ops/binary_code_hash_ops.cc。
这里需要将接口注册到 TensorFlow 系统,通过对 REGISTER_OP 宏的调用来可以定义运算的接口。
你可以在这里定义算子所需要的输入,和设置输出的格式。接口内容如下,主要包括两个部分:
- 定义输入。Input部分为输入张量,Attr部分是其他非张量的参数,Output则是输出张量。规定了输入张量hash_id和输出张量bh_id的类型是T,T为32位和64位的整型。strategy参数则是枚举,只能是succession或者skip;
- 在Lmabdas函数体里面可以定义输出的shape。
#include "tensorflow/core/framework/op.h"
#include "tensorflow/core/framework/shape_inference.h"

using namespace tensorflow;

REGISTER_OP("BinaryCodeHash")
    .Attr("T: {int64, int32}")
    .Input("hash_id: T")
    .Attr("length: int")
    .Attr("t: int")
    .Attr("strategy: {'succession', 'skip'}")
    .Output("bh_id: T")
    .SetShapeFn([](::tensorflow::shape_inference::InferenceContext* c) {
      // 这里进行输入的校验和指定输出的shape
      return Status::OK();
    });
比如,输出的shape需要由输入的shape和其他参数决定,而不是官方样例里的输出跟输入的shape一样。
下面的代码则是如何获取参数的值:
int length;
c->GetAttr("length", &length);
再有获取输入的信息和输入的校验,最后指定输出的shape,在这里,可以定义动态shape,即有些维度可以是未知的size,用-1表示。
// 获取输入张量的形状,并检验输入的维度数>=1
shape_inference::ShapeHandle input_shape;
TF_RETURN_IF_ERROR(c->WithRankAtLeast(c->input(0), 1, &input_shape));
// 获取输入张量的维度数
int input_rank = c->Rank(input_shape);
// 创建新的形状列表
std::vector<shape_inference::DimensionHandle> output_shape;
for (int i = 0; i < input_rank; ++i) {
    output_shape.push_back(c->Dim(input_shape, i));
}
// 添加一个额外的维度
output_shape.push_back(c->MakeDim(block_num));
// 将output_shape指定为输出张量的形状,则输出比输入多一维,类似于embedding_lookup
c->set_output(0, c->MakeShape(output_shape));
Step2. 实现运算内核
Step2.1 定义计算头文件
对应文件:tensorflow_binary_code_hash/cc/kernels/binary_code_hash.h。
这里是C++的头文件,只包括计算逻辑的仿函数(函数对象)BinaryCodeHashFunctor的声明,没有具体实现。
包括输入张量in和输出张量out,其他则是一些非张量参数。这里其他参数对于到时cuda运算内核就很重要,因为cuda显存的数据其实都是从内存拷贝过去的,即这些参数对应的实参,因此仿函数的参数要齐全。
#include <string>

namespace tensorflow {
namespace functor {

template <typename Device, typename T>
struct BinaryCodeHashFunctor {
  void operator()(const Device& d, int size, const T* in, T* out, int length, int t, bool succession);
};
}  // namespace functor
}  // namespace tensorflow
Step2.2 cpu运算内核
对应文件:tensorflow_binary_code_hash/cc/kernels/binary_code_hash_kernels.cc。
这里主要包括三部分:
- 计算逻辑的仿函数具体实现
- 运算内核的实现类
- 内核注册
2.2.1 计算仿函数实现
在这里实现BinaryCodeHashFunctor具体的计算逻辑,输入张量的数据通过指针变量in来访问,然后将计算结果写入到输出张量对应的指针变量out。
这里需要注意的是输入张量和输出张量都是一维的形式,即压平的数据。
// CPU specialization of actual computation.
template <typename T>
struct BinaryCodeHashFunctor<CPUDevice, T> {
  void operator()(const CPUDevice& d, int size, const T* in, T* out, int length, int t, bool succession) {
    // 实现自己的计算逻辑
  }
};
2.2.2 内核实现类
在这里,运算内核实现类需要继承OpKernel,如下面的代码
- 在构造函数里面,可以对非张量参数进行详细的检验;
- 在Compute重载函数完成所有计算工作。
#include "binary_code_hash.h"
#include "tensorflow/core/framework/op_kernel.h"

// OpKernel definition.
// template parameter <T> is the datatype of the tensors.
template <typename Device, typename T>
class BinaryCodeHashOp : public OpKernel {
 public:
  explicit BinaryCodeHashOp(OpKernelConstruction* context) : OpKernel(context) {
    // 参数校验
  }

  void Compute(OpKernelContext* context) override {
    // 实现自己的内核逻辑
  }

  private:
    int length_;
};
构造函数。下面的代码展示了非张量参数赋值给成员变量、参数的校验。
explicit BinaryCodeHashOp(OpKernelConstruction* context) : OpKernel(context) {
  OP_REQUIRES_OK(context, context->GetAttr("length", &length_));

  OP_REQUIRES(context, length_ > 0,
              errors::InvalidArgument("Need length > 0, got ", length_));
}
Compute函数。
Compute函数中访问输入张量内容和输入张量检验。
const Tensor& input_tensor = context->input(0);

// 检验输入张量是否为一维向量
OP_REQUIRES(context, TensorShapeUtils::IsVector(input_tensor.shape()),
             errors::InvalidArgument("BinaryCodeHash expects a 1-D vector."));
Compute函数中为输出张量分配内存和定义输出的shape,在这里就不能使用动态shape,则所有维度的size都需要是明确的。
Tensor* output_tensor = NULL;
// 输出张量比输入张量多一个维度
tensorflow::TensorShape output_shape = input_tensor.shape();
output_shape.AddDim(block_num);  // Add New dimension
OP_REQUIRES_OK(context, context->allocate_output(0, output_shape, &output_tensor));
最后,Compute函数里面启动计算内核仿函数。这里留意下,这里喂给仿函数的实参,到时是会拷贝到显存的,即上面提到的,这里喂给cpu的数据跟后面喂给cuda的是一样的。
BinaryCodeHashFunctor<Device, T>()(
        context->eigen_device<Device>(),
        static_cast<int>(input_tensor.NumElements()),
        input_tensor.flat<T>().data(),
        output_tensor->flat<T>().data(),
        length_, t_, strategy_ == "succession");
2.2.3 内核注册
CPU和CPU内核都需要在这里进行注册。
这里还包括对上面运算接口定义(tensorflow_binary_code_hash/cc/ops/binary_code_hash_ops.cc)中的T进行约束,因为上面Attr中的T不属于算子函数的参数,因此需要在这里进行对应指定int32和int64。
// Register the CPU kernels.
#define REGISTER_CPU(T)                                          \
  REGISTER_KERNEL_BUILDER(                                       \
      Name("BinaryCodeHash").Device(DEVICE_CPU).TypeConstraint<T>("T"), \
      BinaryCodeHashOp<CPUDevice, T>);
REGISTER_CPU(int64);
REGISTER_CPU(int32);
// Register the GPU kernels.
#ifdef GOOGLE_CUDA
#define REGISTER_GPU(T)                                          \
  extern template struct BinaryCodeHashFunctor<GPUDevice, T>;           \
  REGISTER_KERNEL_BUILDER(                                       \
      Name("BinaryCodeHash").Device(DEVICE_GPU).TypeConstraint<T>("T"), \
      BinaryCodeHashOp<GPUDevice, T>);
REGISTER_GPU(int32);
REGISTER_GPU(int64);
Step2.3 cuda运算内核
对应文件:tensorflow_binary_code_hash/cc/kernels/binary_code_hash_kernels.cu.cc。
这里需要包括两个东西:
- CUDA计算内核
- BinaryCodeHashFunctor仿函数的具体实现
2.3.1 CUDA计算内核
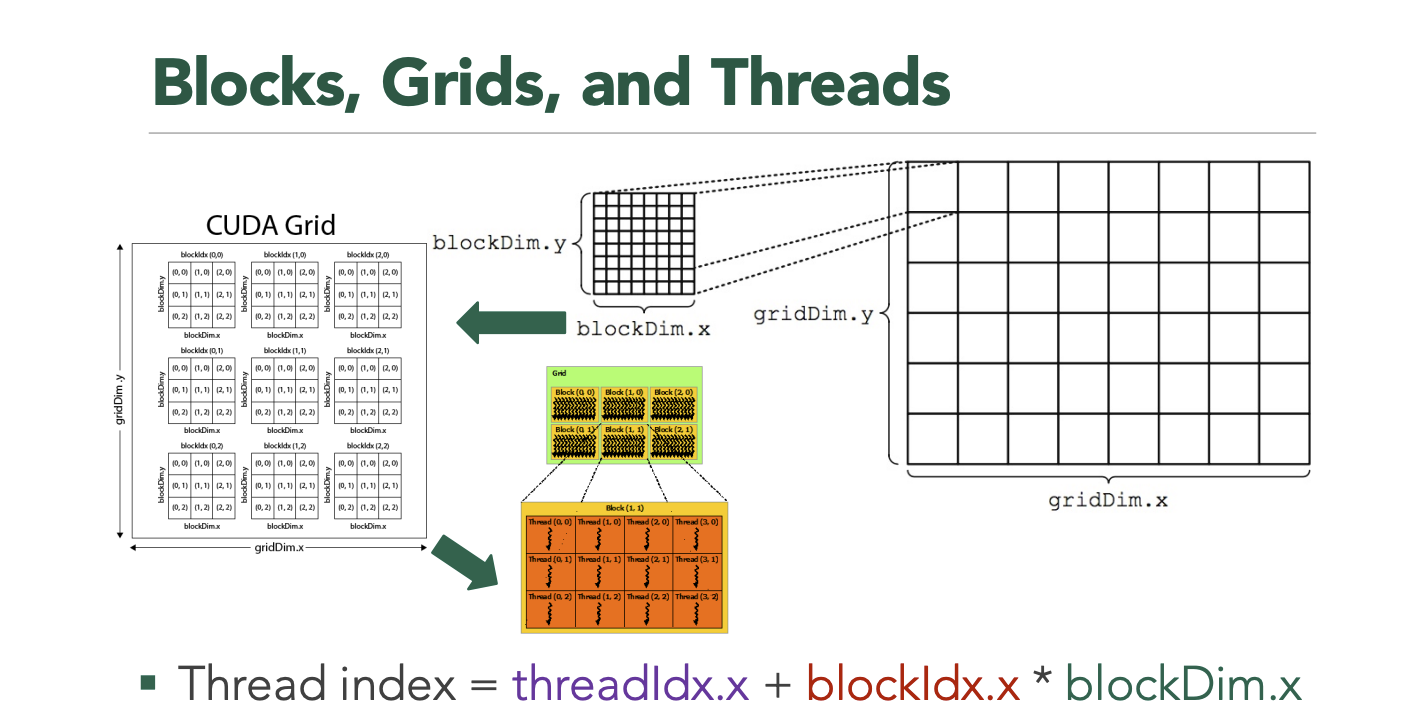
这是属于CUDA的核函数,带有声明符号__global__。与前面CPU内核中的计算仿函数类似,输入张量的数据通过指针变量in来访问,然后将计算结果写入到输出张量对应的指针变量out。但不同的是输入张量的访问涉及到CUDA中的grid、block和线程的关系,下面的代码则是简单地实现了所有数据的遍历。
// Define the CUDA kernel.
// Cann't use c++ std.
template <typename T>
__global__ void BinaryCodeHashCudaKernel(const int size, const T* in, T* out, int length, int t, bool succession) {
  for (int i = blockIdx.x * blockDim.x + threadIdx.x; i < size;
       i += blockDim.x * gridDim.x) {
    // 实现自己的计算逻辑
    // out[i] = 2 * ldg(in + i);
}
2.3.2 CUDA内核仿函数
在这里定义了CUDA计算内核的启动,其实跟上述的CPU内核实现类,即tensorflow_binary_code_hash/cc/kernels/binary_code_hash_kernels.cc中的Compute重载函数。只是不同的是这里不需要获取输入和参数,因为CUDA是直接由CPU内存拷贝过去。
// Define the GPU implementation that launches the CUDA kernel.
template <typename T>
struct BinaryCodeHashFunctor<GPUDevice, T> {
  void operator()(const GPUDevice& d, int size, const T* in, T* out, int length, int t, bool succession) {
    // std::cout << "@@@@@@ Runnin CUDA @@@@@@" << std::endl;
    // Launch the cuda kernel.
    //
    // See core/util/cuda_kernel_helper.h for example of computing
    // block count and thread_per_block count.
    int block_count = 1024;
    int thread_per_block = 20;
    BinaryCodeHashCudaKernel<T>
        <<<block_count, thread_per_block, 0, d.stream()>>>(size, in, out, length, t, succession);
  }
};
Step3. 编译
对应文件:Makefile。
CXX := g++

# 待编译的算子源码文件
BINARY_CODE_HASH_SRCS = tensorflow_binary_code_hash/cc/kernels/binary_code_hash_kernels.cc $(wildcard tensorflow_binary_code_hash/cc/kernels/*.h) $(wildcard tensorflow_binary_code_hash/cc/ops/*.cc)

# 获取tensorflow的c++源码位置
TF_CFLAGS := $(shell $(PYTHON_BIN_PATH) -c 'import tensorflow as tf; print(" ".join(tf.sysconfig.get_compile_flags()))')
TF_LFLAGS := $(shell $(PYTHON_BIN_PATH) -c 'import tensorflow as tf; print(" ".join(tf.sysconfig.get_link_flags()))')

# 对于新版本的tensorflow, 需要使用新标准, 比如tensorflow2.10则需指定-std=c++17
CFLAGS = ${TF_CFLAGS} -fPIC -O2 -std=c++11
LDFLAGS = -shared ${TF_LFLAGS}

# 编译目标so文件位置
BINARY_CODE_HASH_GPU_ONLY_TARGET_LIB = tensorflow_binary_code_hash/python/ops/_binary_code_hash_ops.cu.o
BINARY_CODE_HASH_TARGET_LIB = tensorflow_binary_code_hash/python/ops/_binary_code_hash_ops.so

# 编译命令: binary_code_hash op
binary_code_hash_op: $(BINARY_CODE_HASH_TARGET_LIB)
$(BINARY_CODE_HASH_TARGET_LIB): $(BINARY_CODE_HASH_SRCS) $(BINARY_CODE_HASH_GPU_ONLY_TARGET_LIB)
	$(CXX) $(CFLAGS) -o $@ $^ ${LDFLAGS}  -D GOOGLE_CUDA=1  -I/usr/local/cuda/targets/x86_64-linux/include -L/usr/local/cuda/targets/x86_64-linux/lib -lcudart
执行 make binary_code_hash_op 对算子源文件进行编译,就可以得到相关的so文件, tensorflow_binary_code_hash/python/ops/_binary_code_hash_ops.so、tensorflow_binary_code_hash/python/ops/_binary_code_hash_ops.cu.o。
Python调用
对应文件:tensorflow_binary_code_hash/python/ops/binary_code_hash_ops.py、tensorflow_binary_code_hash/python/ops/binary_code_hash_test.py。
经过上一步编译生成了算子的so文件之后,我们就可以在Python中引入自定义的算子函数进行使用。
在这两个Python文件中,包括了算子的调用和算子执行的测试单元。其中最为关键的算子导入代码如下:
from tensorflow.python.framework import load_library
from tensorflow.python.platform import resource_loader

binary_code_hash_ops = load_library.load_op_library(
        resource_loader.get_path_to_datafile('_binary_code_hash_ops.so'))
binary_code_hash = binary_code_hash_ops.binary_code_hash
可以直接使用make执行测试脚本:make binary_code_hash_test。也可以选择进入目录,手动执行Python脚本。
CPU版本
对于没有GPU资源的小伙伴,也提供了纯CPU版本的算子实现。
- 定义运算接口与GPU版本通用:
tensorflow_binary_code_hash/cc/ops/binary_code_hash_ops.cc。 - 实现运算内核则对应文件:
tensorflow_binary_code_hash/cc/kernels/binary_code_hash_only_cpu_kernels.cc - 其编译命令也包含在Makefile文件中,对应执行:
make binary_code_hash_cpu_only - 最终生成的so文件则是:
tensorflow_binary_code_hash/python/ops/_binary_code_hash_cpu_ops.so


 554
554


 被折叠的 条评论
为什么被折叠?
被折叠的 条评论
为什么被折叠?
 到【灌水乐园】发言


