up主 刘二大人
卷积神经网络
上一节课的MNIST 手写数据集使用的是全连接层, 将1*28*28 image 展开成(1,784)的向量
譬如,两个在image上的相邻点, 展开后两点距离变远,无法捕获到空间特征
所以, 全连接层方式无法获取图像的空间特征。
卷积层输入
黑白图像:channel = 1
彩色图像:channel =3
卷积层的输入: Channel (通道数) * Weight (图像宽度) * Height (图像高度)
卷积层过程
1) 1 input channel 卷积
3*3 卷积核与图像做数乘,input: 5*5 , kernel_size: 3*3 (中心点距离边界距离为1, 长宽则各减2), output: 3*3

2) 3 input channel 卷积
每个通道配一个卷积核, 最后输出值相加,输出通道为1

3) 卷积核维度
- 卷积核的channel = input channel
- 卷积核的个数 = output channel


import torch
in_channels, out_channels = 5, 10
# image: width, height
width, height = 100, 100
kernel_size = 3
batch_size = 1

# torch.randn: 生成随机数字, 随机数字满足标准正态分布(0-1)
input = torch.randn(batch_size, in_channels, width, height)
"""
Conv2d: 对由多个输入平面组成的输入信号进行二维卷积
Conv2d (in_channels, out_channels, kernel_size, stride=1,padding=0, dilation=1, groups=1,bias=True, padding_mode='zeros')
"""
conv_layer = torch.nn.Conv2d(in_channels, out_channels, kernel_size=kernel_size)

output = conv_layer(input)

print(input.shape)
print(output.shape)
print(conv_layer.weight.shape)  # kernel size
# torch.Size([1, 5, 100, 100])
# torch.Size([1, 10, 98, 98])
# torch.Size([10, 5, 3, 3])
4) 卷积层——padding
加上padding (填充0) 之后, input: 7*7, kernei_size: 3*3 (长宽各减2), output: 5*5

import torch

input = [3, 4, 5, 6, 7,
         2, 4, 5, 7, 10,
         3, 5, 7, 9, 5,
         0, 1, 4, 2, 7,
         4, 7, 6, 3, 2]

input = torch.Tensor(input).view(1, 1, 5, 5)
# bias=True: 给每个通道加上一个可学习的偏置量
conv_layer = torch.nn.Conv2d(1, 1, kernel_size=3, padding=1, bias=False)

kernel = torch.Tensor([1, 2, 3, 4, 5, 6, 7, 8, 9]).view(1, 1, 3, 3)
conv_layer.weight.data = kernel.data

output = conv_layer(input)
print(output.size())
# torch.Size([1, 1, 5, 5])
5) 卷积层——stride
stride: 步长,用来控制卷积核移动间隔
input:5*5, kernel_size: 3*3 and stride=2
output: 不加stride时输出size 3*3 , 再加上stride , 得出2*2(2≈3/2)

5) 下采样层——MaxPooling Layer
如图, kernel size:2*2, 则遍历input 在2*2 中选择最大值输出
input: 4*4, kernel size:2*2 , output: 2*2 (4*4/2*2)
PS: 数据经过下采样层时, 通道数(channel)不变

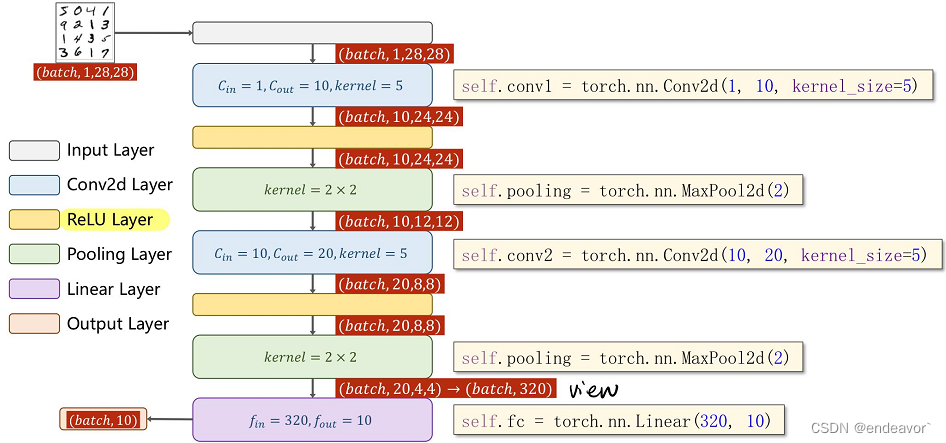
简单的卷积网络
PS: 注意卷积层的输入输出维度
对于卷积中1D 2D 3D理解, 借鉴如下博客:
理解1D、2D、3D卷积神经网络的概念_orDream的博客-CSDN博客_卷积神经网络1d

示例: MNIST 使用卷积预测
- 卷积层+激活层+下采样层(池化层) ——> 特征提取器
- 全连接层 ——> 分类器
会发现每个卷积层之后都会加个激活层,因为卷积层(数乘计算)提取的仍然是线性特征,如果不加激活函数, 几个卷积层仍然可以看做是一层。
借鉴博客:卷积神经网络——输入层、卷积层、激活函数、池化层、全连接层_yjl9122的博客-CSDN博客_卷积神经网络输入层

代码示例:
import torch
from torchvision import transforms
from torchvision import datasets
from torch.utils.data import DataLoader
import torch.optim as optim
import torch.nn.functional as F
import matplotlib.pyplot as plt


class Net(torch.nn.Module):
    def __init__(self):
        super(Net, self).__init__()
        """
        torch.nn.Conv2d(in_channels: int, out_channels: int, kernel_size,...)
        """
        self.conv1 = torch.nn.Conv2d(1, 10, kernel_size=5)
        self.conv2 = torch.nn.Conv2d(10, 20, kernel_size=5)
        self.pooling = torch.nn.MaxPool2d(2)
        self.fc = torch.nn.Linear(320, 10)

    def forward(self, x):
        # Flatten data from (n,1,28,28) to (n,784)
        batch_size = x.size(0)
        x = F.relu(self.pooling(self.conv1(x)))
        x = F.relu(self.pooling(self.conv2(x)))
        x = x.view(batch_size, -1)
        x = self.fc(x)
        return x    # 最后一层不做激活


batch_size = 64
"""
torchvision.transforms: pytorch中的图像预处理包
一般用Compose把多个步骤整合到一起, 这里采用了两步:
    1) ToTensor(): Convert a PIL Image or numpy.ndarray to tensor
    2) Normalize(mean, std[, inplace]): 使用均值, 方差对Tensor进行归一化处理
"""
transform = transforms.Compose([transforms.ToTensor(), transforms.Normalize((0.1307,), (0.3081,))])
"""
torchvision.datasets.MNIST(root, train=True, transform=None, target_transform=None, download=False)
root: 数据集存放目录
train:
    True: 导入训练数据
    False: 导入测试数据
download: 是否下载数据集
transform: 对数据进行变换(主要是对PIL image做变换)
"""
train_dataset = datasets.MNIST(root='data', train=True, download=True, transform=transform)
train_loader = DataLoader(train_dataset, shuffle=True, batch_size=batch_size)

test_dataset = datasets.MNIST(root='data', train=False, download=True, transform=transform)
test_loader = DataLoader(test_dataset, shuffle=False, batch_size=batch_size)

# print(torch.cuda.device_count()) # get GPU 数量
# print(torch.cuda.get_device_name(0))  # get 第一个GPU显卡
# 将模型放到GPU上运行
model = Net()
device = torch.device("cuda:0" if torch.cuda.is_available() else 'cpu')
model.to(device)
criterion = torch.nn.CrossEntropyLoss()
"""
momentum: 动量因子(默认0),综合考虑了梯度下降的方向和上次更新的方向
"""
optimizer = optim.SGD(model.parameters(), lr=0.01, momentum=0.5)


def train(epoch):
    running_loss = 0
    for batch_id, data in enumerate(train_loader, 0):
        inputs, target = data
        # 把输入输出数据放在同一块显卡上运行
        inputs, target = inputs.to(device), target.to(device)
        optimizer.zero_grad()

        outputs = model(inputs)
        loss = criterion(outputs, target)
        loss.backward()
        optimizer.step()

        running_loss += loss.item()
        if batch_id % 300 == 299:
            print('[epoch=%d, batch=%d] loss: %3f' % (epoch + 1, batch_id + 1, running_loss / 300))
    print(f'epoch={epoch}, total loss={running_loss}')
    return running_loss


def test():
    correct = 0
    total = 0
    with torch.no_grad():   # 以下code不生成计算图
        for data in test_loader:
            """
            images, labels = x, y
            images: torch.Size([64, 1, 28, 28]), 一张image 1*28*28 (C*W*H), batch_size=64, 一次取64张image
            labels: 64
            """
            images, labels = data
            images, labels = images.to(device), labels.to(device)
            # batch=64 -> output shape=(64,10)
            outputs = model(images)
            """
            torch.max(input_tensor): 返回input_tensor中所有元素的最大值
            max_value, max_value_index = torch.max(input_tensor, dim=0): 返回每一列的最大值,且返回索引(返回最大元素在各列的行索引)
            max_value, max_value_index = torch.max(input_tensor, dim=1): 返回每一行的最大值,且返回索引(返回最大元素在各列的行索引)
            """
            _, predict = torch.max(outputs.data, dim=1)
            total += labels.size(0)
            """
            predict==labels -> tensor (size=predict=labels)  value:True/False
            (predict == labels).sum() -> tensor, value: 等于True的个数
            (predict == labels).sum().item() -> 数值(上一步等于True的个数)
            """
            correct += (predict == labels).sum().item()
    accuracy = str(100 * correct / total) + '%'
    print(f'Accuracy on test set: {accuracy}')
    return accuracy


if __name__ == '__main__':
    epoch_list = []
    accuracy_list = []
    loss_list = []
    for epoch in range(10):
        loss = train(epoch)
        accuracy = test()
        epoch_list.append(epoch)
        loss_list.append(loss)
        accuracy_list.append(accuracy)

    # plot 1 loss:
    plt.subplot(1, 2, 1)
    plt.plot(epoch_list, loss_list)
    plt.xlabel('epoch')
    plt.ylabel('loss')
    plt.title("Loss")
    plt.tight_layout()  # 设置默认的间距

    # plot 2 accuracy:
    plt.subplot(1, 2, 2)
    plt.plot(epoch_list, accuracy_list)
    plt.xlabel('epoch')
    plt.ylabel('accuracy')
    plt.title("Accuracy")
    plt.tight_layout()  # 设置默认的间距
    plt.show()
结果显示


 3679
3679


 被折叠的 条评论
为什么被折叠?


