


🔎大家好,我是Sonhhxg_柒,希望你看完之后,能对你有所帮助,不足请指正!共同学习交流🔎
📝个人主页-Sonhhxg_柒的博客_CSDN博客 📃
🎁欢迎各位→点赞👍 + 收藏⭐️ + 留言📝
📣系列专栏 - 机器学习【ML】 自然语言处理【NLP】 深度学习【DL】
🖍foreword
✔说明⇢本人讲解主要包括Python、机器学习(ML)、深度学习(DL)、自然语言处理(NLP)等内容。
如果你对这个系列感兴趣的话,可以关注订阅哟👋
文章目录
在最后一章中,我们将开展一个顶点项目——使用强化学习来玩 Flappy Bird。我们将应用我们在本书中学到的知识来构建一个智能机器人。我们还将专注于构建深度 Q 网络( DQN )、微调模型参数和部署模型。让我们看看这只鸟能在空中停留多久。
顶点项目将按照以下方法逐节构建:
- 设置游戏环境
- 构建深度 Q 网络来玩 Flappy Bird
- 训练和调整网络
- 部署模型并玩游戏
因此,每个配方中的代码都将构建在之前的配方之上。
设置游戏环境
要使用 DQN 玩 Flappy Bird,我们首先需要设置环境。
我们将使用 Pygame 模拟 Flappy Bird 游戏。Pygame ( https://www.pygame.org ) 包含一组为创建视频游戏而开发的 Python 模块。它还包括游戏所需的图形和声音库。我们可以Pygame按如下方式安装包:
pip install pygameFlappy Bird 是一款著名的手机游戏,最初由 Dong Nguyen 开发。您可以在https://flappybird.io/上使用键盘自己尝试。游戏的目的是尽可能长时间地活着。当小鸟接触到地板或管道时,游戏结束。因此,这只鸟需要在正确的时间拍打翅膀以穿过随机的管道并避免掉到地上。可能的动作包括扑动和不扑动。在游戏环境中,每走一步的奖励都是+0.1,以下两个例外:
- -1 发生碰撞时
- +1 当鸟穿过两个管道之间的缝隙时。最初的 Flappy Bird 游戏是根据通过的间隙数来计分的。
做好准备
从https://github.com/yanpanlau/Keras-FlappyBird/tree/master/assets/sprites下载我们需要的游戏环境资源。为简单起见,我们将只使用文件夹中的图像sprites 。具体来说,我们需要以下图像:
- background-black.png: 屏幕的背景图像
- base.png: 地板的图像
- pipe-green.png: 鸟需要远离的管道的图像
- redbird-downflap.png: 鸟拍打时的图像
- redbird-midflap.png: 鸟不振翅时的图像
- redbird-upflap.png: 鸟拍打翅膀时的图像
如果您有兴趣,您还可以使用音频文件来使游戏更加有趣。
怎么做...
Pygame我们将使用以下方法开发 Flappy Bird 游戏环境:
1.我们首先开发一个实用函数来加载图像并将它们转换为正确的格式:
>>> from pygame.image import load
 >>> from pygame.surfarray import pixels_alpha
 >>> from pygame.transform import rotate
 >>> def load_images(sprites_path):
 ...     base_image = load(sprites_path +
                             'base.png').convert_alpha()
 ...     background_image = load(sprites_path +
                             'background-black.png').convert()
 ...     pipe_images = [rotate(load(sprites_path +
                        'pipe-green.png').convert_alpha(), 180),
 ...                    load(sprites_path +
                             'pipe-green.png').convert_alpha()]
 ...     bird_images = [load(sprites_path +
                           'redbird-upflap.png').convert_alpha(),
 ...                    load(sprites_path +
                         'redbird-midflap.png').convert_alpha(),
 ...                    load(sprites_path +
                         'redbird-downflap.png').convert_alpha()]
 ...     bird_hitmask = [pixels_alpha(image).astype(bool)
                             for image in bird_images]
 ...     pipe_hitmask = [pixels_alpha(image).astype(bool)
                             for image in pipe_images]
 ...     return base_image, background_image, pipe_images,
                 bird_images, bird_hitmask, pipe_hitmask
2.为环境导入所有必需的包:
>>> from itertools import cycle
>>> from random import randint
>>> import pygame
3.初始化游戏和时钟,设置30帧/秒作为屏幕刷新频率:
>>> pygame.init()
>>> fps_clock = pygame.time.Clock()
>>> fps = 30
4.指定屏幕大小并相应地创建一个屏幕,然后向屏幕添加标题:
>>> screen_width = 288
 >>> screen_height = 512
 >>> screen = pygame.display.set_mode((screen_width, screen_height))
>>> pygame.display.set_caption('Flappy Bird')
5.然后我们sprites使用以下函数加载必要的图像(在文件夹中):
>>> base_image, background_image, pipe_images, bird_images, bird_hitmask, pipe_hitmask = load_images('sprites/')6.获取游戏变量,包括小鸟和管道的大小,并将两个管道之间的垂直间隙设置为 100:
>>> bird_width = bird_images[0].get_width()
>>> bird_height = bird_images[0].get_height()
>>> pipe_width = pipe_images[0].get_width()
>>> pipe_height = pipe_images[0].get_height ()
>>> pipe_gap_size = 100
7.小鸟的拍打动作依次为上、中、下、中、上等:
>>> bird_index_gen = cycle([0, 1, 2, 1])这只是为了让比赛看起来更有趣。
8.__init__method定义完所有常量后,我们从游戏环境的类开始FlappyBird :
>>> class FlappyBird(object):
 ...     def __init__(self):
 ...         self.pipe_vel_x = -4
 ...         self.min_velocity_y = -8
 ...         self.max_velocity_y = 10
 ...         self.downward_speed = 1
 ...         self.upward_speed = -9
 ...         self.cur_velocity_y = 0
 ...         self.iter = self.bird_index = self.score = 0
 ...         self.bird_x = int(screen_width / 5)
 ...         self.bird_y = int((screen_height - bird_height) / 2)
 ...         self.base_x = 0
 ...         self.base_y = screen_height * 0.79
 ...         self.base_shift = base_image.get_width() -
                             background_image.get_width()
 ...         self.pipes = [self.gen_random_pipe(screen_width),
                         self.gen_random_pipe(screen_width * 1.5)]
 ...         self.is_flapped = False
9.我们继续定义该gen_random_pipe方法,该方法在给定的水平位置和随机垂直位置生成一对管道(一个在上,一个在下):
>>>     def gen_random_pipe(self, x):
 ...         gap_y = randint(2, 10) * 10 + int(self.base_y * 0.2)
 ...         return {"x_upper": x,
 ...                 "y_upper": gap_y - pipe_height,
 ...                 "x_lower": x,
 ...                 "y_lower": gap_y + pipe_gap_size}
上下管分别在和y的位置。gap_y - pipe_heightgap_y + pipe_gap_size
10.我们开发的下一个方法是在小鸟与底座或管道发生碰撞时check_collision,返回:True
>>>     def check_collision(self):
 ...         if bird_height + self.bird_y >= self.base_y - 1:
 ...             return True
 ...         bird_rect = pygame.Rect(self.bird_x, self.bird_y,
                                     bird_width, bird_height)
 ...         for pipe in self.pipes:
 ...             pipe_boxes = [pygame.Rect(pipe["x_upper"],
                          pipe["y_upper"], pipe_width, pipe_height),
 ...                           pygame.Rect(pipe["x_lower"],
                          pipe["y_lower"], pipe_width, pipe_height)]
 ...             # 检查小鸟的边界框是否与任何管道的边界框重叠
 ...             if bird_rect.collidelist(pipe_boxes) == -1:
 ...                 return False
 ...             for i in range(2):
 ...                 cropped_bbox = bird_rect.clip(pipe_boxes[i])
 ...                 x1 = cropped_bbox.x - bird_rect.x
 ...                 y1 = cropped_bbox.y - bird_rect.y
 ...                 x2 = cropped_bbox.x - pipe_boxes[i].x
 ...                 y2 = cropped_bbox.y - pipe_boxes[i].y
 ...                 for x in range(cropped_bbox.width):
 ...                     for y in range(cropped_bbox.height):
 ...                         if bird_hitmask[self.bird_index][x1+x,
                                    y1+y] and pipe_hitmask[i][
                                    x2+x, y2+y]:
 ...                             return True
 ...         return False
11.我们需要的最后一个也是最重要的方法是next_step,它执行一个动作并返回游戏的更新图像帧、收到的奖励以及剧集是否结束:
>>>     def next_step(self, action):
 ...         pygame.event.pump()
 ...         reward = 0.1
 ...         if action == 1:
 ...             self.cur_velocity_y = self.upward_speed
 ...             self.is_flapped = True
 ...         # 更新分数
 ...         bird_center_x = self.bird_x + bird_width / 2
 ...         for pipe in self.pipes:
 ...             pipe_center_x = pipe["x_upper"] +
                                     pipe_width / 2
 ...             if pipe_center_x < bird_center_x
                                 < pipe_center_x + 5:
 ...                 self.score += 1
 ...                 reward = 1
 ...                 break
 ...         # 更新索引和迭代
 ...         if (self.iter + 1) % 3 == 0:
 ...             self.bird_index = next(bird_index_gen)
 ...         self.iter = (self.iter + 1) % fps
 ...         self.base_x = -((-self.base_x + 100) %
                                 self.base_shift)
 ...         # 更新鸟的位置
 ...         if self.cur_velocity_y < self.max_velocity_y
                             and not self.is_flapped:
 ...             self.cur_velocity_y += self.downward_speed
 ...         self.is_flapped = False
 ...         self.bird_y += min(self.cur_velocity_y,
                 self.bird_y - self.cur_velocity_y - bird_height)
 ...         if self.bird_y < 0:
 ...             self.bird_y = 0
 ...         # 更新管道位置
 ...         for pipe in self.pipes:
 ...             pipe["x_upper"] += self.pipe_vel_x
 ...             pipe["x_lower"] += self.pipe_vel_x
 ...         # 当第一个管道即将触及屏幕左侧时添加新管道
 ...         if 0 < self.pipes[0]["x_lower"] < 5:
 ...             self.pipes.append(self.gen_random_pipe(
                                     screen_width + 10))
 ...         # 如果第一个管道超出屏幕,则将其移除
 ...         if self.pipes[0]["x_lower"] < -pipe_width:
 ...             self.pipes.pop(0)
 ...         if self.check_collision():
 ...             is_done = True
 ...             reward = -1
 ...             self.__init__()
 ...         else:
 ...             is_done = False
 ...         # 绘制精灵
 ...         screen.blit(background_image, (0, 0))
 ...         screen.blit(base_image, (self.base_x, self.base_y))
 ...         screen.blit(bird_images[self.bird_index],
                             (self.bird_x, self.bird_y))
 ...         for pipe in self.pipes:
 ...             screen.blit(pipe_images[0],
                       (pipe["x_upper"], pipe["y_upper"]))
 ...             screen.blit(pipe_images[1],
                       (pipe["x_lower"], pipe["y_lower"]))
 ...         image = pygame.surfarray.array3d(
                     pygame.display.get_surface())
 ...         pygame.display.update()
 ...         fps_clock.tick(fps)
 ...         return image, reward, is_done
这就是 Flappy Bird 环境的全部内容。
这个怎么运作...
在第 8 步中,我们定义管道的速度(随着时间的推移向左移动 4 个单位)、鸟的最小和最大垂直速度( 和 )、它的向上和-8向下10加速度(-9和1)、它的默认垂直速度( 0)、鸟图像的起始索引( 0)、初始分数、鸟的初始水平和垂直位置、底座的位置以及使用gen_random_pipe方法随机生成的管道的坐标。
在第 11 步中,默认情况下,每一步的奖励为+0.1。如果动作是拍打,我们通过向上加速度来增加鸟的垂直速度。然后,我们检查这只鸟是否碰巧穿过一对管道。如果是,则游戏分数增加 1,步骤奖励变为 + 1。我们更新鸟的位置、它的图像索引以及管道的位置。如果旧的一对管道即将离开屏幕的左侧,则会生成一对新的管道,一旦离开屏幕,旧的一对管道将被删除。如果发生碰撞,则episode结束,奖励为-1;游戏也会重置。最后,我们将在游戏屏幕上显示更新的帧。
构建深度 Q 网络来玩 Flappy Bird
现在 Flappy Bird 环境已准备就绪,我们可以开始通过构建 DQN 模型来解决它。
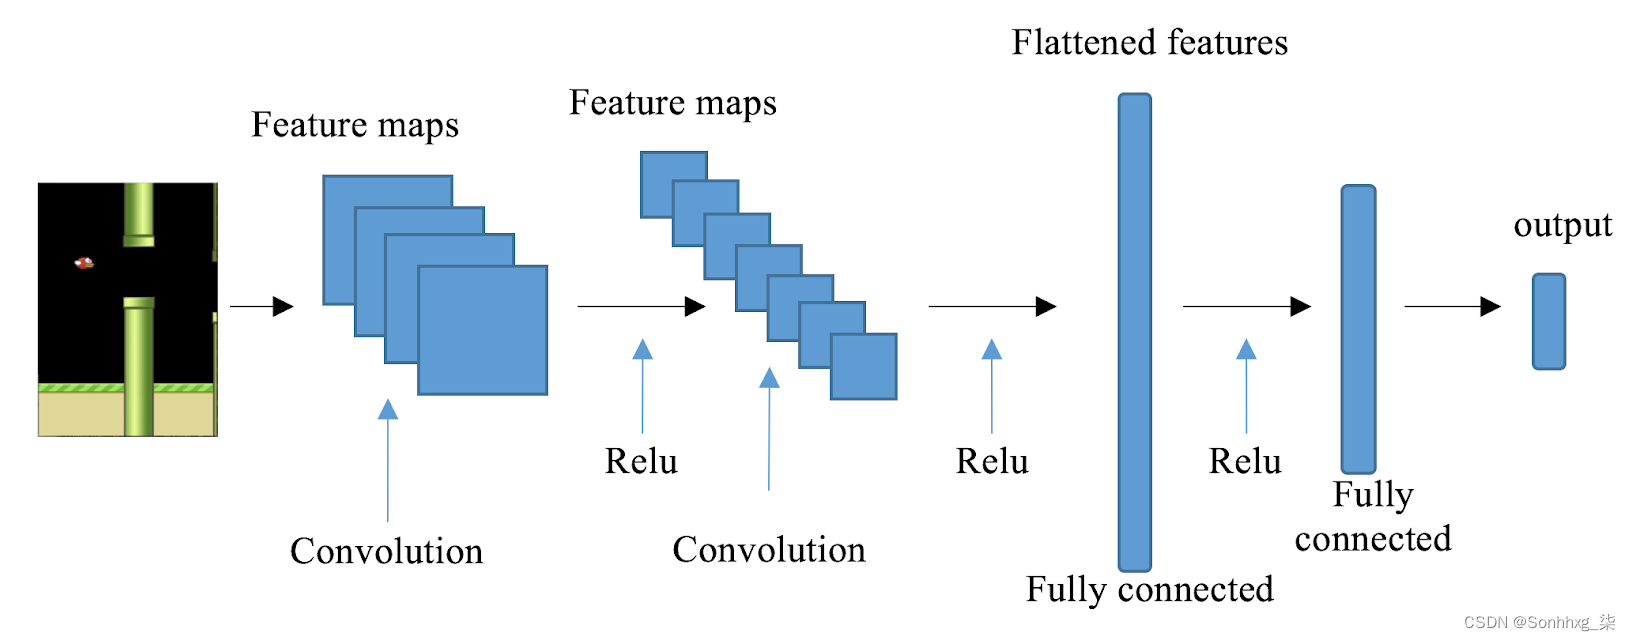
正如我们所见,在执行操作后的每一步都会返回一个屏幕图像。CNN 是处理图像输入的最佳神经网络架构之一。在 CNN 中,卷积层能够有效地从图像中提取特征,这些特征将传递到下游的全连接层。在我们的解决方案中,我们将使用具有三个卷积层和一个完全连接的隐藏层的 CNN。CNN架构的一个例子如下:
怎么做...
让我们开发一个基于 CNN 的 DQN 模型,如下所示:
1.导入必要的模块:
>>> import torch
>>> import torch.nn as nn
>>> import torch.nn.functional as F
>>> import numpy as np
>>> import random
2.我们从 CNN 模型开始:
>>> class DQNModel(nn.Module):
 ...     def __init__(self, n_action=2):
 ...         super(DQNModel, self).__init__()
 ...         self.conv1 = nn.Conv2d(4, 32,
                             kernel_size=8, stride=4)
 ...         self.conv2 = nn.Conv2d(32, 64, 4, stride=2)
 ...         self.conv3 = nn.Conv2d(64, 64, 3, stride=1)
 ...         self.fc = nn.Linear(7 * 7 * 64, 512)
 ...         self.out = nn.Linear(512, n_action)
 ...         self._create_weights()
 ...
 ...     def _create_weights(self):
 ...         for m in self.modules():
 ...             if isinstance(m, nn.Conv2d) or
                                 isinstance(m, nn.Linear):
 ...                 nn.init.uniform(m.weight, -0.01, 0.01)
 ...                 nn.init.constant_(m.bias, 0)
 ...
 ...     def forward(self, x):
 ...         x = F.relu(self.conv1(x))
 ...         x = F.relu(self.conv2(x))
 ...         x = F.relu(self.conv3(x))
 ...         x = x.view(x.size(0), -1)
 ...         x = F.relu(self.fc(x))
 ...         output = self.out(x)
 ...         return output
3.现在使用我们刚刚构建的 CNN 模型开发具有经验回放的 DQN:
>>> class DQN():
 ...     def __init__(self, n_action, lr=1e-6):
 ...         self.criterion = torch.nn.MSELoss()
 ...         self.model = DQNModel(n_action)
 ...         self.optimizer = torch.optim.Adam(
                     self.model.parameters(), lr)
4.该predict方法在给定输入状态的情况下估计输出 Q 值:
>>>     def predict(self, s):
 ...         """
 ...         使用学习模型计算所有动作的状态 Q 值
 ...         @param s: 输入状态
 ...         @return: Q所有动作的状态值
 ...         """
 ...         return self.model(torch.Tensor(s))
5.一种update方法更新神经网络的权重,给定训练样本,并返回当前损失:
>>>     def update(self, y_predict, y_target):
 ...         """
 ...         给定训练样本更新 DQN 的权重
 ...         @param y_predict:
 ...         @param y_target:
 ...         @return:
 ...         """
 ...         loss = self.criterion(y_predict, y_target)
 ...         self.optimizer.zero_grad()
 ...         loss.backward()
 ...         self.optimizer.step()
 ...         return loss
6.该类的最后一部分DQN是replay 方法,它根据过去的经验集合执行经验重放:
>>>     def replay(self, memory, replay_size, gamma):
 ...         """
 ...         经验重播
 ...         @param memory: 经验列表
 ...         @param replay_size: 我们每次更新模型使用的样本数
 ...         @param gamma: 折扣因子
 ...         @return: 损失
 ...         """
 ...         if len(memory) >= replay_size:
 ...             replay_data = random.sample(memory, replay_size)
 ...             state_batch, action_batch, next_state_batch,
                     reward_batch, done_batch = zip(*replay_data)
 ...             state_batch = torch.cat(
                         tuple(state for state in state_batch))
 ...             next_state_batch = torch.cat(
                         tuple(state for state in next_state_batch))
 ...             q_values_batch = self.predict(state_batch)
 ...             q_values_next_batch =
                         self.predict(next_state_batch)
 ...             reward_batch = torch.from_numpy(np.array(
                         reward_batch, dtype=np.float32)[:, None])
 ...             action_batch = torch.from_numpy(
 ...                 np.array([[1, 0] if action == 0 else [0, 1]
                     for action in action_batch], dtype=np.float32))
 ...             q_value = torch.sum(
                         q_values_batch * action_batch, dim=1)
 ...             td_targets = torch.cat(
 ...             tuple(reward if terminal else reward +
                         gamma * torch.max(prediction) for
                         reward, terminal, prediction
 ...                 in zip(reward_batch, done_batch,
                         q_values_next_batch)))
 ...             loss = self.update(q_value, td_targets)
 ...             return loss
这就是 DQN 类。在下一个秘籍中,我们将在多次迭代中训练 DQN 模型。
这个怎么运作...
在第 2 步中,我们将基于 CNN 的 DQN 的主干放在一起。它具有三个具有各种配置的卷积层。ReLU 激活函数跟在每个卷积层之后。然后将最后一个卷积层生成的特征图展平并馈送到具有 512 个节点的全连接隐藏层,然后是输出层。
请注意,我们还为权重的初始随机值和零偏差设置了边界,以便模型更有可能更快地收敛。
第 6 步用于通过经验回放进行逐步训练。如果我们有足够的经验,我们随机抽取一replay_size 组经验进行训练。然后,在给定输入状态的情况下,我们将每个经验转换为由预测值和输出目标值组成的训练样本。目标值计算如下:
- 使用奖励和新 Q 值更新动作的目标 Q 值,如下所示:

- 如果是终端状态,则目标 Q 值更新为r。
最后,我们使用选定的一批训练样本更新神经网络。
训练和调整网络
在这个秘籍中,我们将训练 DQN 模型来玩 Flappy Bird。
在训练的每一步中,我们都遵循 epsilon-greedy 策略采取行动:在一定的概率(epsilon)下,我们将采取随机行动,在我们的例子中是扑动还是不扑动;否则,我们选择具有最高价值的动作。我们还调整了每个步骤的 epsilon 值,因为我们倾向于在开始时进行更多探索,并在 DQN 模型变得更加成熟时进行更多利用。
正如我们所见,每一步的观察都是屏幕的二维图像。我们需要将观察图像转换为状态。简单地使用步骤中的一张图像将无法提供足够的信息来指导代理如何做出反应。因此,我们使用来自四个相邻步骤的图像形成一个状态。我们将首先将图像重塑为预期的大小,然后将当前帧的图像与前三帧的图像连接起来。
怎么做...
1.我们按如下方式训练 DQN 模型:
导入必要的模块:
>>> import random
>>> import torch
>>> from collections import deque
2.我们首先开发 epsilon-greedy 策略:
>>> def gen_epsilon_greedy_policy(estimator, epsilon, n_action):
 ...     def policy_function(state):
 ...         if random.random() < epsilon:
 ...             return random.randint(0, n_action - 1)
 ...         else:
 ...             q_values = estimator.predict(state)
 ...             return torch.argmax(q_values).item()
 ...     return policy_function
3.我们指定预处理图像的大小、批量大小、学习率、gamma、动作数、初始和最终 epsilon、迭代次数和内存大小:
>>> image_size = 84
 >>> batch_size = 32
 >>> lr = 1e-6
 >>> gamma = 0.99
 >>> init_epsilon = 0.1
 >>> final_epsilon = 1e-4
 >>> n_iter = 2000000
 >>> memory_size = 50000
 >>> n_action = 2
我们还定期保存训练好的模型,因为这将是一个非常漫长的过程:
>>> saved_path = 'trained_models'4.我们指定实验重现性的随机饲料:
>>> torch.manual_seed(123)5.我们相应地创建一个 DQN 模型:
>>> estimator = DQN(n_action)我们还创建了一个内存队列:
>>> memory = deque(maxlen=memory_size)新的样本会被追加到队列中,只要队列中的样本超过 50,000 个,旧的样本就会被移除。
6.接下来,我们初始化一个 Flappy Bird 环境:
>>> env = FlappyBird()然后我们得到初始图像:
>>> image, reward, is_done = env.next_step(0)7.如前所述,我们应该将原始图像调整为image_size * image_size:
>>> import cv2
 >>> import numpy as np
 >>> def pre_processing(image, width, height):
 ...     image = cv2.cvtColor(cv2.resize(image,
                     (width, height)), cv2.COLOR_BGR2GRAY)
 ...     _, image = cv2.threshold(image, 1, 255, cv2.THRESH_BINARY)
 ...     return image[None, :, :].astype(np.float32)
如果cv2未安装该软件包,您可以使用以下命令进行安装:
pip install opencv-python让我们相应地预处理图像:
>>> image = pre_processing(image[:screen_width, :int(env.base_y)], image_size, image_size)8.现在,我们通过连接四个图像来构建一个状态。因为我们现在只有第一帧,所以我们简单地复制它四次:
>>> image = torch.from_numpy(image)
>>> state = torch.cat(tuple(image for _ in range(4)))[None, :, :, :]
9.然后我们在训练循环上进行以下n_iter步骤:
>>> for iter in range(n_iter):
 ...     epsilon = final_epsilon + (n_iter - iter)
                 * (init_epsilon - final_epsilon) / n_iter
 ...     policy = gen_epsilon_greedy_policy(
                     estimator, epsilon, n_action)
 ...     action = policy(state)
 ...     next_image, reward, is_done = env.next_step(action)
 ...     next_image = pre_processing(next_image[
         :screen_width, :int(env.base_y)], image_size, image_size)
 ...     next_image = torch.from_numpy(next_image)
 ...     next_state = torch.cat((
                 state[0, 1:, :, :], next_image))[None, :, :, :]
 ...     memory.append([state, action, next_state, reward, is_done])
 ...     loss = estimator.replay(memory, batch_size, gamma)
 ...     state = next_state
 ...     print("Iteration: {}/{}, Action: {},
                 Loss: {}, Epsilon {}, Reward: {}".format(
 ...             iter + 1, n_iter, action, loss, epsilon, reward))
 ...     if iter+1 % 10000 == 0:
 ...         torch.save(estimator.model, "{}/{}".format(
                     saved_path, iter+1))
运行该部分代码后,我们将看到以下日志:
Iteration: 1/2000000, Action: 0, Loss: None, Epsilon 0.1, Reward: 0.1
 Iteration: 2/2000000, Action: 0, Loss: None, Epsilon 0.09999995005000001, Reward: 0.1
 Iteration: 3/2000000, Action: 0, Loss: None, Epsilon 0.0999999001, Reward: 0.1
 Iteration: 4/2000000, Action: 0, Loss: None, Epsilon 0.09999985015, Reward: 0.1
 ...
 ...
 Iteration: 201/2000000, Action: 1, Loss: 0.040504034608602524, Epsilon 0.09999001000000002, Reward: 0.1
 Iteration: 202/2000000, Action: 1, Loss: 0.010011588223278522, Epsilon 0.09998996005, Reward: 0.1
 Iteration: 203/2000000, Action: 1, Loss: 0.07097195833921432, Epsilon 0.09998991010000001, Reward: 0.1
 Iteration: 204/2000000, Action: 1, Loss: 0.040418840944767, Epsilon 0.09998986015000001, Reward: 0.1
 Iteration: 205/2000000, Action: 1, Loss: 0.00999421812593937, Epsilon 0.09998981020000001, Reward: 0.1
训练需要一段时间。当然,你可以用 GPU 加速训练。
10.最后,我们保存最后训练的模式:
>>> torch.save(estimator.model, "{}/final".format(saved_path))这个怎么运作...
在第 9 步中,对于每个训练步骤,我们执行以下任务:
- 稍微减少 epsilon,并相应地创建一个 epsilon-greedy 策略。
- 采取使用 epsilon-greedy 策略计算的操作。
- 预处理生成的图像并通过将图像附加到前三个步骤的图像来构建新状态。
- 记录这一步的经历,包括状态,动作,下一个状态,得到的奖励,是否结束。
- 使用经验回放更新模型。
- 打印出训练状态并更新状态。
- 定期保存经过训练的模型,以避免从头开始重新训练。
部署模型并玩游戏
现在我们已经训练了 DQN 模型,让我们应用它来玩 Flappy Bird 游戏。
使用训练有素的模型玩游戏很简单。我们将只采取与每一步中最高价值相关的行动。我们将播放几集,看看它的表现如何。不要忘记预处理原始屏幕图像并构建状态。
怎么做...
我们在新剧集上测试 DQN 模型如下:
1.我们首先加载最终模型:
>>> model = torch.load("{}/final".format(saved_path))2.我们运行 100 集,我们为每一集执行以下操作:
>>> n_episode = 100
>>> for episode in range(n_episode):
... env = FlappyBird()
... image, reward, is_done = env.next_step(0)
... image = pre_processing(image[:screen_width,
:int(env.base_y)], image_size, image_size)
... image = torch.from_numpy(image)
... state = torch.cat(tuple(image for _ in range(4)))[
None, :, :, :]
... while True:
... prediction = model(state)[0]
... action = torch.argmax(prediction).item()
... next_image, reward, is_done = env.next_step(action)
... if is_done:
... break
... next_image = pre_processing(next_image[:screen_width,
:int(env.base_y)], image_size, image_size)
... next_image = torch.from_numpy(next_image)
... next_state = torch.cat((state[0, 1:, :, :],
next_image))[None, :, :, :]
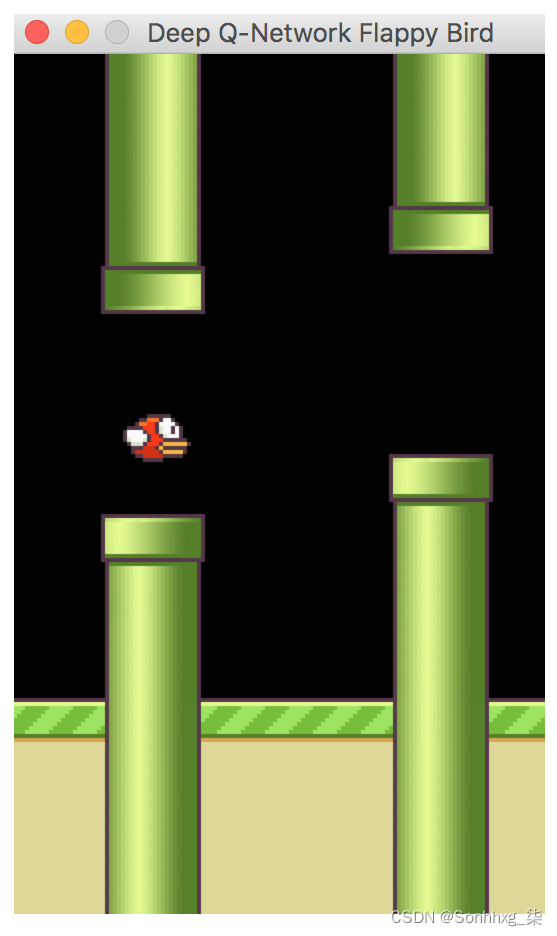
... state = next_state希望您会看到类似下图的内容,其中鸟通过一系列管道:
这个怎么运作...
在第 2 步中,我们为每一集执行以下任务:
- 初始化 Flappy Bird 环境。
- 观察初始图像并生成其状态。
- 计算 Q 值,给定状态,使用模型并采取具有最高 Q 值的操作
- 观察新图像以及剧集是否结束。
- 如果情节继续,计算下一张图像的状态并将其分配给当前状态。
- 重复直到情节结束。


 3997
3997


 被折叠的 条评论
为什么被折叠?
被折叠的 条评论
为什么被折叠?
 到【灌水乐园】发言


