


When using a GridView, it's very common to raise an event from a control inside the GridView and then handle it in the code behind file. In most cases, we need know which row that control is in and what is the row index or the values of DataKey in that row. In this article, we will look through several ways to do so. They may not be comprehensive or the best solution but should be able to deal with most situations.
The first two methods shows how to handle the Button like control (Implement IButtonControl) and deals with the events have a "Click" Nature. The last one shows how to handle any event raised by any control to retrieve the information you need.To do so, you can tick the check box for a GridView in the Design View:
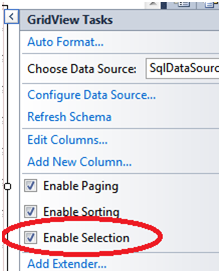
This will result the following codes in the .aspx file:
<asp:CommandField ShowSelectButton="True" />
Another way is using a button in a template field and assign "SELECT" to its CommandName:
<asp:TemplateField>
<ItemTemplate>
<asp:Button ID="btnSelect" runat="server" Text="Select" CommandName="SELECT" />
ItemTemplate>
asp:TemplateField>
And then, you need to create and handle the "SelectedIndexChanged" event for the GridView.<ItemTemplate>
<asp:Button ID="btnSelect" runat="server" Text="Select" CommandName="SELECT" />
ItemTemplate>
asp:TemplateField>
To do so, first register the event in the GridView attributes tag:
<asp:GridView /*all other attributes*/
onselectedindexchanged="GridView1_SelectedIndexChanged">
Then, handle it in the code behind file:onselectedindexchanged="GridView1_SelectedIndexChanged">
protected void GridView1_SelectedIndexChanged(object sender, EventArgs e)
{
GridView gv = (GridView)sender;
DisplayIndexAndDatakey(gv.SelectedIndex.ToString(), gv.SelectedDataKey.Value.ToString());
}
The RowIndex and DataKey can be retrieved from the SelectedIndex and SelectedDataKey properties.{
GridView gv = (GridView)sender;
DisplayIndexAndDatakey(gv.SelectedIndex.ToString(), gv.SelectedDataKey.Value.ToString());
}
Using the "SELECT" command should be your first choice, but in some case you may not want to use the "select" or you've already used it and still want to have another button click event. How to achieve that?
GridView provides another event called "RowCommand" to deal with such situation.
First, we need to register the event to the GridView. You can do this in the design view:

Or just do it like we register the "SELECT" event in method 1:
<asp:GridView /*all other attributes*/
OnRowCommand="GridView1_RowCommand"
Second, we need create a button in a template field:OnRowCommand="GridView1_RowCommand"
<asp:TemplateField>
<ItemTemplate>
<asp:Button ID="btnClick" runat="server" Text="Click" CommandName="CLICK" CommandArgument='<%# Eval("CustomerID") %>' />
ItemTemplate>
asp:TemplateField>
Please note we set the CommanName to "CLICK" and the CommandArgument to '<%# Eval("CustomerID") %>'. I will explain this soon in the code behind file.<ItemTemplate>
<asp:Button ID="btnClick" runat="server" Text="Click" CommandName="CLICK" CommandArgument='<%# Eval("CustomerID") %>' />
ItemTemplate>
asp:TemplateField>
Last, we can now handle the event in the code behind file:
protected void GridView1_RowCommand(object sender, GridViewCommandEventArgs e)
{
// Check the command name
if (e.CommandName == "CLICK")
{
// Do some thing here.
}
}
In most case, you may need the DataKey for the row where the button raised the event. The most simple way is to use the CommandArgument properties. As you've already noticed, we use Eval() to assign the "CustomerID" to CommandArgument. Then in the code, you can retrieve it like this:{
// Check the command name
if (e.CommandName == "CLICK")
{
// Do some thing here.
}
}
string id = e.CommandArgument.ToString();
Please note, the CommandArgument can be any string but usually we set DataKey to it as DataKey is the link between the row and your DataSet. To go further, you can use your own function to instead the Eval() and bind value which cannot be simply retrieved from the DataSource.But can we assign the RowIndex instead of DataKey? As Eval() only can bind the value from the DataSource, it seems there is no way to assign the RowIndex to CommandArgument. But we do have an alternative way! We can use the RowDataBound event in the GridView and then bind the RowIndex to CommandArgument.
First, register the event:
<asp:GridView /*all other attributes*/ OnRowDataBound="GridView1_RowDataBound">
Then, assign the RowIndex to CommandArgument:
protected void GridView1_RowDataBound(object sender, GridViewRowEventArgs e)
{
if (e.Row.RowType == DataControlRowType.DataRow)
{
Button btn = (Button)(e.Row.FindControl("btnClick"));
btn.CommandArgument = e.Row.RowIndex.ToString();
}
}
Finally, retrieve the RowIndex through e.CommandArgument:{
if (e.Row.RowType == DataControlRowType.DataRow)
{
Button btn = (Button)(e.Row.FindControl("btnClick"));
btn.CommandArgument = e.Row.RowIndex.ToString();
}
}
int rowIndex = int.Parse(e.CommandArgument.ToString());
GridView gv = (GridView)sender;
string dataKey = gv.DataKeys[rowIndex].Value.ToString();
Actually, you may have noticed that the DataKey can be retrieved thought the RowIndex. Yes, the DataKeys collection will keep the right sequence when you sort, page the GridView data. Thus you will be guaranteed always get the correct DataKey to the row. So you may consider always pass the RowIndex instead of DataKey.GridView gv = (GridView)sender;
string dataKey = gv.DataKeys[rowIndex].Value.ToString();
For those who think using the RowDataBound Event can be tedious, there do have a short cut. You can use the ButonField in the GridView. The CommandArgument will be automatically set as the RowIndex. For example:
<asp:ButtonField CommandName="CLICK2" Text="Use ButtonField" ButtonType="Button" />
When handling the RowCommand, if e.CommandName == "CLICK2", then e.CommandArgument will have the value of the RowIndex although we don't explicitly assign it. The drawback is you will lose the flexibility of using Template Field. 3. Handling the Event from the Control itself
The above 2 methods have a flaw by nature. Thus they require the control must implement IButtonControl interface to use the CommandName. Somehow you may need to handle the control such as checkbox, dropdonwlist and etc that don't provide you a CommandName property. Or you just want to handle the event in the Button_Click rather than the GridView Events.First we should know that all the controls in a ASP.Net page are all organized in a hierarchy so we can always go up to the parent control and in the end is the Page. Here we can either use NamingContainer or Parent property to achieve our goal. They are similar but slightly different in hierarchy.
Using NamingContainer property is simpler. The hierarchy here is the GridView contains GridViewRow and the GridViewRow contains the Button which raised the event. Bear this in mind, we have the following code:
// gets the button that raised the event
Button btn = (Button)sender;
// get the row which the button is in.
GridViewRow row = (GridViewRow)btn.NamingContainer;
// get the the gridview contains that row.
GridView gv = (GridView)row.NamingContainer;
Button btn = (Button)sender;
// get the row which the button is in.
GridViewRow row = (GridViewRow)btn.NamingContainer;
// get the the gridview contains that row.
GridView gv = (GridView)row.NamingContainer;
int rowIndex = row.RowIndex;
string dataKey = gv.DataKeys[rowIndex].Value.ToString();
So we can easily get the RowIndx and DataKey.string dataKey = gv.DataKeys[rowIndex].Value.ToString();
Using Parent property is cumbersome as the hierarchy is more complex and contains one type (ChildTable) which is only use by the .Net framework. The hierarchy is GridView->ChildTalbe->GridViewRow-> DataControlFieldCell->Button:
// gets the button that raised the event
Button btn = (Button)sender;
// gets the cell
DataControlFieldCell cell = (DataControlFieldCell)btn.Parent;
// gets the row
GridViewRow row = (GridViewRow)cell.Parent;
// gets the gridview
// please note the row.Parent will return a ChildTable which is a type supports the .Net framework infrastructure.
// It's not used by the user so we don't have a type for that.
GridView gv = (GridView)((row.Parent).Parent);
There is no need to use the Parent property as the NamingContainer property can do the job better. But to know something more is not a bad idea.Button btn = (Button)sender;
// gets the cell
DataControlFieldCell cell = (DataControlFieldCell)btn.Parent;
// gets the row
GridViewRow row = (GridViewRow)cell.Parent;
// gets the gridview
// please note the row.Parent will return a ChildTable which is a type supports the .Net framework infrastructure.
// It's not used by the user so we don't have a type for that.
GridView gv = (GridView)((row.Parent).Parent);
By using this third method, you can get the RowIndex and DataKey from any event raised by a control. E.g. you can handle a Checkbox "CheckChange" event (remember you need to set AutoPostBack="True" in the CheckBox properties). A sample codes:
<ItemTemplate>
<asp:CheckBox runat="server" AutoPostBack="True"
oncheckedchanged="cbTest_CheckedChanged" />
ItemTemplate>
<asp:CheckBox runat="server" AutoPostBack="True"
oncheckedchanged="cbTest_CheckedChanged" />
ItemTemplate>
protected void cbTest_CheckedChanged(object sender, EventArgs e)
{
// gets the control that raised the event
CheckBox cb = (CheckBox)sender;
// get the row which the control is in.
GridViewRow row = (GridViewRow)cb.NamingContainer;
// get the the gridview contains that row.
GridView gv = (GridView)row.NamingContainer;
int rowIndex = row.RowIndex;
string dataKey = gv.DataKeys[rowIndex].Value.ToString();
DisplayIndexAndDatakey(rowIndex.ToString(), dataKey);
}


 97
97

 被折叠的 条评论
为什么被折叠?
被折叠的 条评论
为什么被折叠?
 到【灌水乐园】发言


