


网上看了一堆都是图片转lmdb格式,然后测试总的准确率,我想测试每张图片的top1,top2以及对应置信度是多少,摸索了一下午+一晚上终于搞定,期间遇到不少坑!!!同时感谢实验室博士师兄一块帮我找bug
说明:数据集是上海BOT大赛的(12种动物),网上下载的vgg16权重文件,并且修改输出类别为12,对最后三层全连接网络训练了8个小时,top1准确率为80%,top5准确率95%
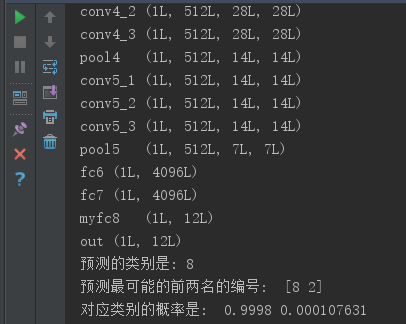
使用的测试图片是一个长颈鹿,类别编号是8,结果如下:

预测源码
#coding:utf-8
import numpy as np
import caffe

bot_data_root = 'F:/bot_data'

# 设置网络结构
net_file = bot_data_root + '/myVGG16/VGG_ILSVRC_16_layers_deploy.prototxt'
# 添加训练之后的网络权重参数
caffe_model = bot_data_root + '/myVGG16/myvggmodel__iter_80000.caffemodel'
# 均值文件
mean_file = bot_data_root + '/myVGG16/mean.npy'
# 设置使用gpu
caffe.set_mode_gpu()

# 构造一个Net
net = caffe.Net(net_file, caffe_model, caffe.TEST)
# 得到data的形状,这里的图片是默认matplotlib底层加载的
transformer = caffe.io.Transformer({'data': net.blobs['data'].data.shape})
# matplotlib加载的image是像素[0-1],图片的数据格式[weight,high,channels],RGB
# caffe加载的图片需要的是[0-255]像素,数据格式[channels,weight,high],BGR,那么就需要转换

# channel 放到前面
transformer.set_transpose('data', (2, 0, 1))
transformer.set_mean('data', np.load(mean_file).mean(1).mean(1))
# 图片像素放大到[0-255]
transformer.set_raw_scale('data', 255)
# RGB-->BGR 转换
transformer.set_channel_swap('data', (2, 1, 0))
#设置输入的图片shape,1张,3通道,长宽都是224
net.blobs['data'].reshape(1, 3, 224, 224)
# 加载图片
im = caffe.io.load_image(bot_data_root + '/test_min/Testset 1/0a3e66aea7f64597ad851bfffb929c5a.png')

# 用上面的transformer.preprocess来处理刚刚加载图片
net.blobs['data'].data[...] = transformer.preprocess('data', im)

#输出每层网络的name和shape
for layer_name, blob in net.blobs.iteritems():
    print layer_name + '\t' + str(blob.data.shape)

# 网络开始向前传播啦
output = net.forward()

# 找出最大的那个概率
output_prob = output['out'][0]
print '预测的类别是:', output_prob.argmax()

# 找出最可能的前俩名的类别和概率
top_inds = output_prob.argsort()[::-1][:2]
print "预测最可能的前两名的编号: ",top_inds
print "对应类别的概率是: ", output_prob[top_inds[0]], output_prob[top_inds[1]]
网络结构代码
name: "VGG_ILSVRC_16_layers"
input: "data"
input_dim: 1
input_dim: 3
input_dim: 224
input_dim: 224
layers {
  bottom: "data"
  top: "conv1_1"
  name: "conv1_1"
  type: CONVOLUTION
  convolution_param {
    num_output: 64
    pad: 1
    kernel_size: 3
  }
  blobs_lr: 0
  blobs_lr: 0
}
layers {
  bottom: "conv1_1"
  top: "conv1_1"
  name: "relu1_1"
  type: RELU
}
layers {
  bottom: "conv1_1"
  top: "conv1_2"
  name: "conv1_2"
  type: CONVOLUTION
  convolution_param {
    num_output: 64
    pad: 1
    kernel_size: 3
  }
  blobs_lr: 0
  blobs_lr: 0
}
layers {
  bottom: "conv1_2"
  top: "conv1_2"
  name: "relu1_2"
  type: RELU
}
layers {
  bottom: "conv1_2"
  top: "pool1"
  name: "pool1"
  type: POOLING
  pooling_param {
    pool: MAX
    kernel_size: 2
    stride: 2
  }
}
layers {
  bottom: "pool1"
  top: "conv2_1"
  name: "conv2_1"
  type: CONVOLUTION
  convolution_param {
    num_output: 128
    pad: 1
    kernel_size: 3
  }
  blobs_lr: 0
  blobs_lr: 0
}
layers {
  bottom: "conv2_1"
  top: "conv2_1"
  name: "relu2_1"
  type: RELU
}
layers {
  bottom: "conv2_1"
  top: "conv2_2"
  name: "conv2_2"
  type: CONVOLUTION
  convolution_param {
    num_output: 128
    pad: 1
    kernel_size: 3
  }
  blobs_lr: 0
  blobs_lr: 0
}
layers {
  bottom: "conv2_2"
  top: "conv2_2"
  name: "relu2_2"
  type: RELU
}
layers {
  bottom: "conv2_2"
  top: "pool2"
  name: "pool2"
  type: POOLING
  pooling_param {
    pool: MAX
    kernel_size: 2
    stride: 2
  }
}
layers {
  bottom: "pool2"
  top: "conv3_1"
  name: "conv3_1"
  type: CONVOLUTION
  convolution_param {
    num_output: 256
    pad: 1
    kernel_size: 3
  }
  blobs_lr: 0
  blobs_lr: 0
}
layers {
  bottom: "conv3_1"
  top: "conv3_1"
  name: "relu3_1"
  type: RELU
}
layers {
  bottom: "conv3_1"
  top: "conv3_2"
  name: "conv3_2"
  type: CONVOLUTION
  convolution_param {
    num_output: 256
    pad: 1
    kernel_size: 3
  }
  blobs_lr: 0
  blobs_lr: 0
}
layers {
  bottom: "conv3_2"
  top: "conv3_2"
  name: "relu3_2"
  type: RELU
}
layers {
  bottom: "conv3_2"
  top: "conv3_3"
  name: "conv3_3"
  type: CONVOLUTION
  convolution_param {
    num_output: 256
    pad: 1
    kernel_size: 3
  }
  blobs_lr: 0
  blobs_lr: 0
}
layers {
  bottom: "conv3_3"
  top: "conv3_3"
  name: "relu3_3"
  type: RELU
}
layers {
  bottom: "conv3_3"
  top: "pool3"
  name: "pool3"
  type: POOLING
  pooling_param {
    pool: MAX
    kernel_size: 2
    stride: 2
  }
}
layers {
  bottom: "pool3"
  top: "conv4_1"
  name: "conv4_1"
  type: CONVOLUTION
  convolution_param {
    num_output: 512
    pad: 1
    kernel_size: 3
  }
  blobs_lr: 0
  blobs_lr: 0
}
layers {
  bottom: "conv4_1"
  top: "conv4_1"
  name: "relu4_1"
  type: RELU
}
layers {
  bottom: "conv4_1"
  top: "conv4_2"
  name: "conv4_2"
  type: CONVOLUTION
  convolution_param {
    num_output: 512
    pad: 1
    kernel_size: 3
  }
  blobs_lr: 0
  blobs_lr: 0
}
layers {
  bottom: "conv4_2"
  top: "conv4_2"
  name: "relu4_2"
  type: RELU
}
layers {
  bottom: "conv4_2"
  top: "conv4_3"
  name: "conv4_3"
  type: CONVOLUTION
  convolution_param {
    num_output: 512
    pad: 1
    kernel_size: 3
  }
  blobs_lr: 0
  blobs_lr: 0
}
layers {
  bottom: "conv4_3"
  top: "conv4_3"
  name: "relu4_3"
  type: RELU
}
layers {
  bottom: "conv4_3"
  top: "pool4"
  name: "pool4"
  type: POOLING
  pooling_param {
    pool: MAX
    kernel_size: 2
    stride: 2
  }
}
layers {
  bottom: "pool4"
  top: "conv5_1"
  name: "conv5_1"
  type: CONVOLUTION
  convolution_param {
    num_output: 512
    pad: 1
    kernel_size: 3
  }
  blobs_lr: 0
  blobs_lr: 0
}
layers {
  bottom: "conv5_1"
  top: "conv5_1"
  name: "relu5_1"
  type: RELU
}
layers {
  bottom: "conv5_1"
  top: "conv5_2"
  name: "conv5_2"
  type: CONVOLUTION
  convolution_param {
    num_output: 512
    pad: 1
    kernel_size: 3
  }
  blobs_lr: 0
  blobs_lr: 0
}
layers {
  bottom: "conv5_2"
  top: "conv5_2"
  name: "relu5_2"
  type: RELU
}
layers {
  bottom: "conv5_2"
  top: "conv5_3"
  name: "conv5_3"
  type: CONVOLUTION
  convolution_param {
    num_output: 512
    pad: 1
    kernel_size: 3
  }
  blobs_lr: 0
  blobs_lr: 0
}
layers {
  bottom: "conv5_3"
  top: "conv5_3"
  name: "relu5_3"
  type: RELU
}
layers {
  bottom: "conv5_3"
  top: "pool5"
  name: "pool5"
  type: POOLING
  pooling_param {
    pool: MAX
    kernel_size: 2
    stride: 2
  }
}
layers {
  bottom: "pool5"
  top: "fc6"
  name: "fc6"
  type: INNER_PRODUCT
  inner_product_param {
    num_output: 4096
  }
  blobs_lr: 1
  blobs_lr: 2
}
layers {
  bottom: "fc6"
  top: "fc6"
  name: "relu6"
  type: RELU
}
layers {
  bottom: "fc6"
  top: "fc6"
  name: "drop6"
  type: DROPOUT
  dropout_param {
    dropout_ratio: 0.5
  }
}
layers {
  bottom: "fc6"
  top: "fc7"
  name: "fc7"
  type: INNER_PRODUCT
  inner_product_param {
    num_output: 4096
  }
  blobs_lr: 1
  blobs_lr: 2
}
layers {
  bottom: "fc7"
  top: "fc7"
  name: "relu7"
  type: RELU
}
layers {
  bottom: "fc7"
  top: "fc7"
  name: "drop7"
  type: DROPOUT
  dropout_param {
    dropout_ratio: 0.5
  }
}
layers {
  name: "myfc8"
  bottom: "fc7"
  top: "myfc8"
  type: INNER_PRODUCT

  inner_product_param {
    num_output: 12
    weight_filler {
      type: "gaussian"
      std: 0.01
    }
    bias_filler {
      type: "constant"
      value: 0
    }
  }
  blobs_lr: 10
  blobs_lr: 20
}
layers {
  bottom: "myfc8"
  top: "out"
  name: "out"
  type: SOFTMAX
}


 1822
1822

 被折叠的 条评论
为什么被折叠?
被折叠的 条评论
为什么被折叠?
 到【灌水乐园】发言


