


YOLO配置文件理解
[net]
batch=64                           每batch个样本更新一次参数。
subdivisions=8                     如果内存不够大,将batch分割为subdivisions个子batch,每个子batch的大小为batch/subdivisions。
                                   在darknet代码中,会将batch/subdivisions命名为batch。
height=416                         input图像的高
width=416                          Input图像的宽
channels=3                         Input图像的通道数
momentum=0.9                       动量
decay=0.0005                       权重衰减正则项,防止过拟合
angle=0                            通过旋转角度来生成更多训练样本
saturation = 1.5                   通过调整饱和度来生成更多训练样本
exposure = 1.5                     通过调整曝光量来生成更多训练样本
hue=.1                             通过调整色调来生成更多训练样本

learning_rate=0.0001               初始学习率
max_batches = 45000                训练达到max_batches后停止学习
policy=steps                       调整学习率的policy,有如下policy:CONSTANT, STEP, EXP, POLY, STEPS, SIG, RANDOM
steps=100,25000,35000              根据batch_num调整学习率
scales=10,.1,.1                    学习率变化的比例,累计相乘

[convolutional]
batch_normalize=1                  是否做BN
filters=32                         输出多少个特征图
size=3                             卷积核的尺寸
stride=1                           做卷积运算的步长
pad=1                              如果pad为0,padding由 padding参数指定。如果pad为1,padding大小为size/2
activation=leaky                   激活函数:
                                   logistic,loggy,relu,elu,relie,plse,hardtan,lhtan,linear,ramp,leaky,tanh,stair

[maxpool]
size=2                             池化层尺寸
stride=2                           池化步进

[convolutional]
batch_normalize=1
filters=64
size=3
stride=1
pad=1
activation=leaky

[maxpool]
size=2
stride=2

......
......


#######

[convolutional]
batch_normalize=1
size=3
stride=1
pad=1
filters=1024
activation=leaky

[convolutional]
batch_normalize=1
size=3
stride=1
pad=1
filters=1024
activation=leaky

[route]                            the route layer is to bring finer grained features in from earlier in the network
layers=-9

[reorg]                            the reorg layer is to make these features match the feature map size at the later layer.
                                   The end feature map is 13x13, the feature map from earlier is 26x26x512.
                                   The reorg layer maps the 26x26x512 feature map onto a 13x13x2048 feature map
                                   so that it can be concatenated with the feature maps at 13x13 resolution.
stride=2

[route]
layers=-1,-3

[convolutional]
batch_normalize=1
size=3
stride=1
pad=1
filters=1024
activation=leaky

[convolutional]
size=1
stride=1
pad=1
filters=125                        region前最后一个卷积层的filters数是特定的,计算公式为filter=num*(classes+5)
                                   5的意义是5个坐标,论文中的tx,ty,tw,th,to
activation=linear

[region]
anchors = 1.08,1.19,  3.42,4.41,  6.63,11.38,  9.42,5.11,  16.62,10.52          预选框,可以手工挑选,
                                                                                也可以通过k means 从训练样本中学出
bias_match=1
classes=20                         网络需要识别的物体种类数
coords=4                           每个box的4个坐标tx,ty,tw,th
num=5                              每个grid cell预测几个box,和anchors的数量一致。当想要使用更多anchors时需要调大num,且如果调大num后训练时Obj趋近0的话可以尝试调大object_scale
softmax=1                          使用softmax做激活函数
jitter=.2                          通过抖动增加噪声来抑制过拟合
rescore=1                          暂理解为一个开关,非0时通过重打分来调整l.delta(预测值与真实值的差)

object_scale=5                     栅格中有物体时,bbox的confidence loss对总loss计算贡献的权重
noobject_scale=1                   栅格中没有物体时,bbox的confidence loss对总loss计算贡献的权重
class_scale=1                      类别loss对总loss计算贡献的权重
coord_scale=1                      bbox坐标预测loss对总loss计算贡献的权重

absolute=1
thresh = .6
random=0                           random为1时会启用Multi-Scale Training,随机使用不同尺寸的图片进行训练。
darknet对应代码
找到cfg文件解析的代码,选择detector demo 作为入口
darknet.c文件 main 函数开始
    } else if (0 == strcmp(argv[1], "detector")){
    run_detector(argc, argv);
Detector.c文件 run_detector函数
char *prefix = find_char_arg(argc, argv, "-prefix", 0);
float thresh = find_float_arg(argc, argv, "-thresh", .24);
float hier_thresh = find_float_arg(argc, argv, "-hier", .5);
int cam_index = find_int_arg(argc, argv, "-c", 0);
int frame_skip = find_int_arg(argc, argv, "-s", 0);
if(argc < 4){
    fprintf(stderr, "usage: %s %s [train/test/valid] [cfg] [weights (optional)]\n", argv[0], argv[1]);
    return;
}
char *gpu_list = find_char_arg(argc, argv, "-gpus", 0);
char *outfile = find_char_arg(argc, argv, "-out", 0);

......
......

else if(0==strcmp(argv[2], "demo")) {
    list *options = read_data_cfg(datacfg);
    int classes = option_find_int(options, "classes", 20);
    char *name_list = option_find_str(options, "names", "data/names.list");
    char **names = get_labels(name_list);
    demo(cfg, weights, thresh, cam_index, filename, names, classes, frame_skip, prefix, hier_thresh);
}
read_data_cfg函数解析配置文件,保存到options指针。
class
int classes = option_find_int(options, "classes", 20);
classes为YOLO可识别的种类数
batch、learning_rate、momentum、decay和 subdivisions
demo.c文件demo函数
net = parse_network_cfg(cfgfile);
Parser.c文件 parse_network_cfg函数
list *sections = read_cfg(filename);
node *n = sections->front;
if(!n) error("Config file has no sections");
network net = make_network(sections->size - 1);
net.gpu_index = gpu_index;
size_params params;

section *s = (section *)n->val;
list *options = s->options;
if(!is_network(s)) error("First section must be [net] or [network]");
parse_net_options(options, &net);
parse_net_options函数
net->batch = option_find_int(options, "batch",1);
net->learning_rate = option_find_float(options, "learning_rate", .001);
net->momentum = option_find_float(options, "momentum", .9);
net->decay = option_find_float(options, "decay", .0001);
int subdivs = option_find_int(options, "subdivisions",1);
net->time_steps = option_find_int_quiet(options, "time_steps",1);
net->batch /= subdivs;
net->batch *= net->time_steps;
net->subdivisions = subdivs;
learning_rate为初始学习率,训练时的真正学习率和学习率的策略及初始学习率有关。
momentum为动量,在训练时加入动量可以帮助走出local minima 以及saddle point。
decay是权重衰减正则项,用来防止过拟合。
batch的值等于cfg文件中的batch/subdivisions 再乘以time_steps。
time_steps在yolo默认的cfg中是没有配置的,所以是默认值1。
因此batch可以认为就是cfg文件中的batch/subdivisions。
前面有提到batch的意义是每batch个样本更新一次参数。
而subdivisions的意义在于降低对GPU memory的要求。
darknet将batch分割为subdivisions个子batch,每个子batch的大小为batch/subdivisions,并将子batch命名为batch。
我们看下训练时和batch有关的代码
Detector.c文件的train_detector函数
#ifdef GPU
    if(ngpus == 1){
        loss = train_network(net, train);
    } else {
        loss = train_networks(nets, ngpus, train, 4);
    }
#else
    loss = train_network(net, train);
#endif
Network.c文件的train_network函数
int batch = net.batch;
int n = d.X.rows / batch;
float *X = calloc(batch*d.X.cols, sizeof(float));
float *y = calloc(batch*d.y.cols, sizeof(float));

int i;
float sum = 0;
for(i = 0; i < n; ++i){
    get_next_batch(d, batch, i*batch, X, y);
    float err = train_network_datum(net, X, y);
    sum += err;
}
train_network_datum函数
*net.seen += net.batch;
......
......
forward_network(net, state);
backward_network(net, state);
float error = get_network_cost(net);
if(((*net.seen)/net.batch)%net.subdivisions == 0) update_network(net);
我们看到,只有((*net.seen)/net.batch)%net.subdivisions == 0时才会更新网络参数。
*net.seen是已经训练过的子batch数,((*net.seen)/net.batch)%net.subdivisions的意义正是已经训练过了多少个真正的batch。
policy、steps和scales
Parser.c文件 parse_network_cfg函数
char *policy_s = option_find_str(options, "policy", "constant");
net->policy = get_policy(policy_s);
net->burn_in = option_find_int_quiet(options, "burn_in", 0);
if(net->policy == STEP){
    net->step = option_find_int(options, "step", 1);
    net->scale = option_find_float(options, "scale", 1);
} else if (net->policy == STEPS){
    char *l = option_find(options, "steps");
    char *p = option_find(options, "scales");
    if(!l || !p) error("STEPS policy must have steps and scales in cfg file");

    int len = strlen(l);
    int n = 1;
    int i;
    for(i = 0; i < len; ++i){
        if (l[i] == ',') ++n;
    }
    int *steps = calloc(n, sizeof(int));
    float *scales = calloc(n, sizeof(float));
    for(i = 0; i < n; ++i){
        int step    = atoi(l);
        float scale = atof(p);
        l = strchr(l, ',')+1;
        p = strchr(p, ',')+1;
        steps[i] = step;
        scales[i] = scale;
    }
    net->scales = scales;
    net->steps = steps;
    net->num_steps = n;
} else if (net->policy == EXP){
    net->gamma = option_find_float(options, "gamma", 1);
} else if (net->policy == SIG){
    net->gamma = option_find_float(options, "gamma", 1);
    net->step = option_find_int(options, "step", 1);
} else if (net->policy == POLY || net->policy == RANDOM){
    net->power = option_find_float(options, "power", 1);
}
get_policy函数
if (strcmp(s, "random")==0) return RANDOM;
if (strcmp(s, "poly")==0) return POLY;
if (strcmp(s, "constant")==0) return CONSTANT;
if (strcmp(s, "step")==0) return STEP;
if (strcmp(s, "exp")==0) return EXP;
if (strcmp(s, "sigmoid")==0) return SIG;
if (strcmp(s, "steps")==0) return STEPS;
fprintf(stderr, "Couldn't find policy %s, going with constant\n", s);
return CONSTANT;
学习率动态调整的策略有多种,YOLO默认使用的是steps。
yolo-voc.cfg文件:
steps=100,25000,35000
scales=10,.1,.1
Network.c文件get_current_rate函数
int batch_num = get_current_batch(net);
int i;
float rate;
switch (net.policy) {
    case CONSTANT:
        return net.learning_rate;
    case STEP:
        return net.learning_rate * pow(net.scale, batch_num/net.step);
    case STEPS:
        rate = net.learning_rate;
        for(i = 0; i < net.num_steps; ++i){
            if(net.steps[i] > batch_num) return rate;
            rate *= net.scales[i];
            //if(net.steps[i] > batch_num - 1 && net.scales[i] > 1) reset_momentum(net);
        }
        return rate;
get_current_batch获取的是(*net.seen)/(net.batch*net.subdivisions),即真正的batch。
steps的每个阶段是根据batch_num划分的,根据配置文件,学习率会在batch_num达到100、25000、35000时发生改变。
当前的学习率是初始学习率与当前阶段及之前所有阶段对应的scale的总乘积。
convolutional超参数加载
Parser.c文件parse_network_cfg函数
LAYER_TYPE lt = string_to_layer_type(s->type);
        if(lt == CONVOLUTIONAL){
            l = parse_convolutional(options, params);
parse_convolutional函数
int n = option_find_int(options, "filters",1);
int size = option_find_int(options, "size",1);
int stride = option_find_int(options, "stride",1);
int pad = option_find_int_quiet(options, "pad",0);
int padding = option_find_int_quiet(options, "padding",0);
if(pad) padding = size/2;

char *activation_s = option_find_str(options, "activation", "logistic");
ACTIVATION activation = get_activation(activation_s);

int batch,h,w,c;
h = params.h;
w = params.w;
c = params.c;
batch=params.batch;
if(!(h && w && c)) error("Layer before convolutional layer must output image.");
int batch_normalize = option_find_int_quiet(options, "batch_normalize", 0);
需要注意的是如果enable了pad,cfg文件中的padding不会生效,实际的padding值为size/2。
random
YOLOv2新增了一些训练技巧,Multi-Scale Training就是其中之一,如果random置为1,会启用Multi-Scale Training。
启用Multi-Scale Training时每10个Batch,网络会随机地选择一个新的图片尺寸,由于使用的down samples是32,所以不同的尺寸大小也选择为32的倍数{320,352…..608},最小320*320,最大608*608,网络会自动改变尺寸,并继续训练的过程。
这一策略让网络在不同的输入尺寸上都能达到一个很好的预测效果,同一网络能在不同分辨率上进行检测。当输入图片尺寸比较小的时候跑的比较快,输入图片尺寸比较大的时候精度高。
route 和 reorg
YOLOv2新增了Fine-Grained Features技巧,参考特征金字塔和ResNet,把高分辨率特征与低分辨率特征联系在一起,从而增加对小物体的识别精度。
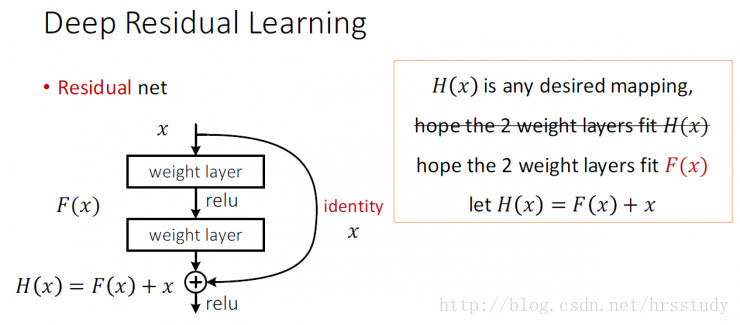
借用一下ResNet的identity mappings示意图
YOLOv2加上了一个Passthrough Layer来取得之前的某个26*26分辨率的层的特征。这个Passthrough layer把26 * 26的特征图与13 * 13的特征图联系在一起,把相邻的特征堆积在不同的Channel之中,类似与Resnet的Identity Mapping,从而把26*26*512变成13*13*2048。
route层起连接作用,reorg层来match特征图尺寸。


 5614
5614


 被折叠的 条评论
为什么被折叠?
被折叠的 条评论
为什么被折叠?
 到【灌水乐园】发言


