


最近写个小应用,在保存数据时因为数据不是很多所以选择了存取沙箱文件的方法,在写完后写篇博客总结一下该方法的使用。
iPhone应用程序采用沙箱机制,应用程序位于文件系统的限制部分,其它程序不能访问沙盒中的内容,从而更好地保持程序的安全性和程序与程序之间的相互独立性。
沙箱(Sandbox)位于/user/applications目录下,其目录结构举例如下:

Documents目录一般用于存放文档数据。
Library用于保存程序的配置数据,例如该目录下的Preferences文件夹中的plist文件就保存了NSUserDefaults的首选项设置。
tmp目录用于保存一些程序临时生成的数据。
WebViewServive表示该程序执行文件的快捷方式。
这一次说一说怎样使用writeToFile:atomically:方法将要保存的数据写入Documents目录下的文件当中。
首先要注意该方法的使用对象范围仅适用于:NSString,NSDate,NSNumber,NSArray,NSDictionary,NSData(以Base-64编码)等类。因此若要进行大规模的数据存取该方法并不适合。
其实该方法的使用非常简单,可以将其写成一个类并提供保存数据的接口,代码如下:
看看接口部分:
@interface FilePersistence : NSObject
-(BOOL)saveMutableDictionary:(NSMutableDictionary *)mdic toFile:(NSString *)fileName;
-(BOOL)saveMutableArray:(NSMutableArray *)marray toFile:(NSString *)fileName;
-(NSMutableDictionary *)loadMutableDictionaryFromFile:(NSString *)fileName;
-(NSMutableArray *)loadMutableArrayFromFile:(NSString *)fileName;
@end
数据保存方法:
/* 保存可变字典对象到文件中 */
-(BOOL)saveMutableDictionary:(NSMutableDictionary *)mdic toFile:(NSString *)fileName {
    NSString *filePath = [self getFileDirectoryWithName:fileName];
    NSLog(@"%@", filePath);
    if (filePath) {
        BOOL succeed = [mdic writeToFile:filePath atomically:YES]; // 将数据写入文件中
        if (succeed == NO) {
            NSLog(@"Failed to write");
        }
        return succeed;
    }
    else {
        NSLog(@"Save MutableDictionary Error!");
        return NO;
    }
}

/* 保存可变数组对象到文件中 */
-(BOOL)saveMutableArray:(NSMutableArray *)marray toFile:(NSString *)fileName {
    NSString *filePath = [self getFileDirectoryWithName:fileName];
    NSLog(@"%@", filePath);
    if (filePath) {
        BOOL succeed = [marray writeToFile:filePath atomically:YES]; // 将数据写入文件中
        if (succeed == NO) {
            NSLog(@"Failed to write");
        }
        return succeed;
    }
    else {
        NSLog(@"Save MutableArray Error!");
        return NO;
    }
}
在这里我只写了保存NSMutableDictionary和NSArray两种对象的写入方法,其它数据类型类似。
在上面的代码中首先要获取文件路径,调用了以下方法:
/* 获取文件存放的路径 */
-(NSString *)getFileDirectoryWithName:(NSString *)fileName {
    NSArray *paths = NSSearchPathForDirectoriesInDomains(NSDocumentDirectory, NSUserDomainMask, YES); // 获取所有Document文件夹路径
    NSString *documentsDirectory = paths[0]; // 搜索目标文件所在Document文件夹的路径,通常为第一个
    if (!documentsDirectory) {
        NSLog(@"Documents directory not found!");
        return nil;
    }
    return [documentsDirectory stringByAppendingPathComponent:fileName]; // 获取用于存取的目标文件的完整路径
}
写入文件保存数据的思路非常简单:通过文件名获取文件路径 —— 写入该路径下的指定文件当中(系统自动建立文件)。
虽然说是沙箱,那么沙箱和其目录下的文件到底在iOS设备系统的哪个位置呢,个人觉得应该是在磁盘当中,所以这种方法也可以说是将数据写入磁盘中的文件保存。
获取数据的方法:
/* 从文件中加载可变字典对象 */
-(NSMutableDictionary *)loadMutableDictionaryFromFile:(NSString *)fileName {
    NSString *filePath = [self getFileDirectoryWithName:fileName];
    NSLog(@"%@", filePath);
    if ([[NSFileManager defaultManager] fileExistsAtPath:filePath]) {
        NSMutableDictionary *mdic = [[NSMutableDictionary alloc] initWithContentsOfFile:filePath]; // 从文件中获取数据
        if (mdic) {
            return mdic;
        }
        else {
            NSLog(@"mdic == nil");
            return nil;
        }
    }
    else {
        NSLog(@"File not found");
        return nil;
    }
}

/* 从文件中加载可变数组对象 */
-(NSMutableArray *)loadMutableArrayFromFile:(NSString *)fileName {
    NSString *filePath = [self getFileDirectoryWithName:fileName];
    if ([[NSFileManager defaultManager] fileExistsAtPath:filePath]) {
        NSMutableArray *marray = [[NSMutableArray alloc] initWithContentsOfFile:filePath]; // 从文件中获取数据
        if (marray) {
            return marray;
        }
        else {
            NSLog(@"marray == nil");
            return nil;
        }
    }
    else {
        NSLog(@"File not found");
        return nil;
    }
}
思路是一样的,先获取文件路径,如果该路径下的文件存在,那么从该文件中加载对应的数据。
在完成以上接口以后,就可以在程序中直接使用FilePersistence类的接口来存取数据了。
接口部分:
#import <UIKit/UIKit.h>
@class FilePersistence;
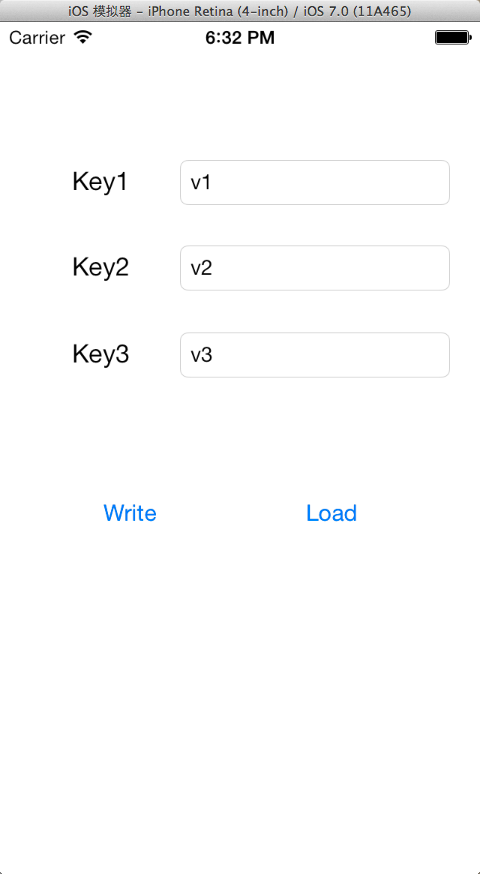
@interface ViewController : UIViewController
@property (weak, nonatomic) IBOutlet UITextField *tf1;
@property (weak, nonatomic) IBOutlet UITextField *tf2;
@property (weak, nonatomic) IBOutlet UITextField *tf3;
- (IBAction)write:(id)sender;
- (IBAction)load:(id)sender;
@property (strong, nonatomic) FilePersistence *filePersistence;
@property (strong, nonatomic) NSMutableDictionary *mdic;
@property (strong, nonatomic) UITapGestureRecognizer *tapInView;
@end读写数据的方法实现:
/* 往沙箱文件内写入数据 */
- (IBAction)write:(id)sender {
    [mdic setObject:tf1.text forKey:@"key1"];
    [mdic setObject:tf2.text forKey:@"key2"];
    [mdic setObject:tf3.text forKey:@"key3"];

    if (!filePersistence) {
        filePersistence = [[FilePersistence alloc] init];
    }

    if ([filePersistence saveMutableDictionary:mdic toFile:kFile]) {
        NSLog(@"Writing succeed");
    }
    else {
        NSLog(@"Writing failed");
    }

}


/* 从沙箱文件中加载数据 */
- (IBAction)load:(id)sender {
    if (!filePersistence) {
        filePersistence = [[FilePersistence alloc] init];
    }

    NSMutableDictionary *tempDic = [filePersistence loadMutableDictionaryFromFile:kFile];
    if (tempDic) {
        NSString *value1 = tempDic[@"key1"];
        NSString *value2 = tempDic[@"key2"];
        NSString *value3 = tempDic[@"key3"];
        NSLog(@"Loading succeed:");
        NSLog(@"value1 = %@", value1);
        NSLog(@"value2 = %@", value2);
        NSLog(@"value3 = %@", value3);
    }
    else {
        NSLog(@"Loading failed");
    }
}
Run一下:
先Write,再Load后控制台输出如下:
2013-09-17 18:26:17.095 filePersistence_Demo[741:a0b] /Users/one/Library/Application Support/iPhone Simulator/7.0/Applications/6646F01A-9160-4332-A075-5484B715F578/Documents/mdic.plist
2013-09-17 18:26:17.096 filePersistence_Demo[741:a0b] Writing succeed
2013-09-17 18:27:05.671 filePersistence_Demo[741:a0b] /Users/one/Library/Application Support/iPhone Simulator/7.0/Applications/6646F01A-9160-4332-A075-5484B715F578/Documents/mdic.plist
2013-09-17 18:27:05.672 filePersistence_Demo[741:a0b] Loading succeed:
2013-09-17 18:27:05.672 filePersistence_Demo[741:a0b] value1 = v1
2013-09-17 18:27:05.672 filePersistence_Demo[741:a0b] value2 = v2
2013-09-17 18:27:05.672 filePersistence_Demo[741:a0b] value3 = v3
为了验证结果,可以打开对应路径下的plist文件看看。
其中可能要显示一些Mac系统的隐藏文件,方法如下:
先打开终端,输入下列命令:
显示Mac隐藏文件的命令:defaults write com.apple.finder AppleShowAllFiles YES
隐藏Mac隐藏文件的命令:defaults write com.apple.finder AppleShowAllFiles NO
之后单击Enter键,退出终端。重新启动Finder就可以了。
重启Finder的方法:
鼠标单击窗口左上角的苹果标志-->强制退出-->Finder-->重新开启
或者
按Command + Option + Esc快捷键,点击Finder,强制退出。
先找到该文件路径:
/Users/one/Library/Application Support/iPhone Simulator/7.0/Applications/6646F01A-9160-4332-A075-5484B715F578/Documents/mdic.plist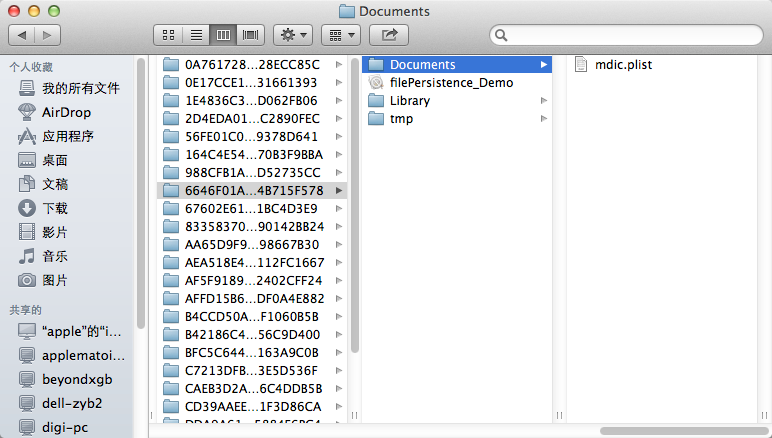
打开mdic.plist文件:
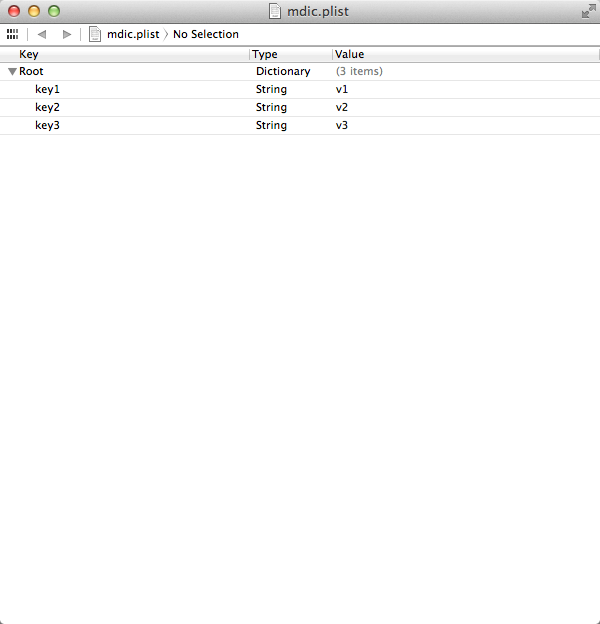
和写入的数据一致,没有问题。
本来是一个很简单的东西,结果搞了很久,原因是:
NSArray *paths = NSSearchPathForDirectoriesInDomains(NSDocumentDirectory, NSUserDomainMask, YES); // 获取所有Document文件夹路径在获取Document文件夹路径的语句中,居然把NSDocumentDirectory打成了NSDocumentationDirectory,结果writeToFile:的方法一直返回NO。
Xcode的代码补全功能很好用,但是过分的依赖也不好,输入代码时一定要看准看准。


 1万+
1万+

 被折叠的 条评论
为什么被折叠?
被折叠的 条评论
为什么被折叠?
 到【灌水乐园】发言


