


使用docker的好处不用多言,一次build,ship everywhere。而且环境搭建好,移植部署时不会因环境的改变而使算法出现异常。另一种场景是服务器硬件资源优秀,同时可以通过内网向服务器拷东西,唯一的问题就是服务器端没有连接接外网,在搭建深度学习模型训练环境时,很困难,因此可以通过构建容器来解决。
开发深度学习要用到显卡和各种深度学习框架,对于显卡的支持,必然用到nvidia container toolkit;对于深度学习框架,各自官方都有提供相应版本。而本文,将搭建一个Cuda和cuDNN生效的环境,其它深度学习框架或依赖可以像在本地host主机安装一样。
本文开始之前,要保证硬件有Nvidia显卡,并且安装有显卡驱动、docker、Nvidia Contaioner Toolkit。可以参考 本博客来安装这些环境。定制镜像有两种方法,一是通过dockerfile,另一种是通过修改容器,由于网络原因,我们使用第二种。
1、选择基础镜像
构建深度学习环境时,主要考虑要选择的CUDA和cuDNN版本,选择的依据就是我们要安装的深度学习框架所依赖的要求,最好是安装大多数框架都能支持的版本。本节将对当前(2020年11月30日)主流深度学习框架对CUDA和cuDNN的要求。
1.1 不同深度学习框架对CUDA和cuDNN的要求
Tensorflow要求如下:

可以看到,tensorflow 在CUDA10.1和cuDNN7.6及以上支持较好。
Pytorch要求如下:

可以看到对CUDA的版本有9.2、10.1、10.2、11.0,对cuDNN没有要求。
MXNET要求如下:

| CUDA版本 | MXNET版本 |
|---|---|
| 10.2 | v1.7.0,v1.6.0 |
| 10.1 | v1.5.1,v1.4.1 |
| 9.2 | v1.3.1,v1.2.1 |
| older | older |

可以看到CUDA要求版本为9、10.0、10.1、10.2
TensorRT要求如下:
下图为TensorRT7.2.1的要求

下图为TensorRT7.1.3的要求:

下图为TensorRT6.0.1的要求:

不同TensorRT版本 选cuda 10.2最佳,可适用不同的TensorRT版本,也可以根据实际需求来选择。
所以从以上多个框架对CUDA的要求来看,可以选择CUDA10.2或10.1,cuDNN选择配套的即可,由于tensorflow对cuda10.2不支持,所以可以选用cuda10.1.
1.2 显卡驱动对CUDA的要求
官网有CUDA版本与显卡驱动版本的要求,如下图:

随着cuda版本的更新,使用前要查看当前最新版,可以到cuda官方文档来查看,比如当前(20210831):

可以看到CUDA版本对Driver是有要求的。那么来简单介绍一下cuda driver version和cuda runtime version版本。安装显卡驱动会安装cuda driver version,安装cuda可以安装cuda runtime version和选择安装cuda driver version。安装cuda前可以安装合适的显卡驱动,然后通过命令nvidia-smi来查看:

可以看到driver version 和cuda version:11.3,这个值是表明当前driver版本所能支持的最高版本的CUDA版本。
总结一下,CUDA不同深度学习框架有不同要求,目前只有cuda10.1可以是共用的,本文将以CUDA10.1,cuDNN7为例进行。要解决不同版本要求的问题可以查看本文1.3节,进行了补充。
#cuda10.1
docker pull nvidia/cuda:10.1-cudnn7-devel-ubuntu18.04
#cuda10.2
docker pull nvidia/cuda:10.2-cudnn7-devel-ubuntu18.04


从上图中可以看到镜像名称以及大小。开发环境使用devel,本文用到的镜像是nvidia/cuda:10.1-cudnn7-devel-ubuntu18.04,对于cuda10.2同理。
1.3 深度学习框架对CUDA不同版本要求冲突的解决
梳理了一遍不同深度学习框架对于cuda版本的要求,目前对所有深度学习框架都支持的cuda版本是cuda10.1,所以我们基于cuda10.1可以构建一个完美的深度学习开发环境,但是cuda版本逐渐更新,会带来速度的提升,如何使用更高不同版本的cuda来搭建深度学习环境呢?还有就是不同深度学习要求不同版本CUDA该如何解决?如tensorflow要cuda11.2,pytorch只有cuda11.1。那么总的来说有三种方法:
- 第一种就是所有深度学习框架从源码来安装;
- 第二种方法是 从nvidia ngc下载基础镜像,然后再进行定制。比如cuda11.2下安装tensorflow和pytorch,但是pytorch不支持cuda11.2,具体可以参看nvidia 官方文档,所有框架的镜像都是经过优化的,所以实际,ngc 中的镜像是我更加推荐的。有时确实很难做到一个容器中安装所有深度学习框架,使用中也可以用什么框架选择什么镜像。
- 第三种方法就是在容器中使用conda,conda支持安装cuda,又linux系统的本质是一切皆文件,所以conda的环境没有任何问题,而且还可以使用不同版本python,对不同算法配置特定的环境。
以上三种方法,第二种和第三种方法是可以结合的,用ngc中的镜像,再安装conda.事实上,ngc中pytorch的镜像中pytorch就是安装在conda base环境中的。
【2021年12月13日更新】
目前pytorch最新版本1.10和tensorflow2.7目前都支持cuda11.3,准确的说是pytorch支持11.3,tensorflow支持cuda>=11.2 ,所以可以共同使用cuda11.3来完装。目前本人只试了tensorflow和pytorch这两个深度学习框架,其它没试。
2、创建容器并进行基础配置
2.1 创建容器并查看CUDA和cuDNN
docker run -it —-gpus=all -v /home/username:/workspace -w /workspace --name base nvidia/cuda:10.1-cudnn7-devel-ubuntu18.04 /bin/bash
创建一个名称是base的容器,通过-v来指定容器和host的互访路径,-w指定工作空间。
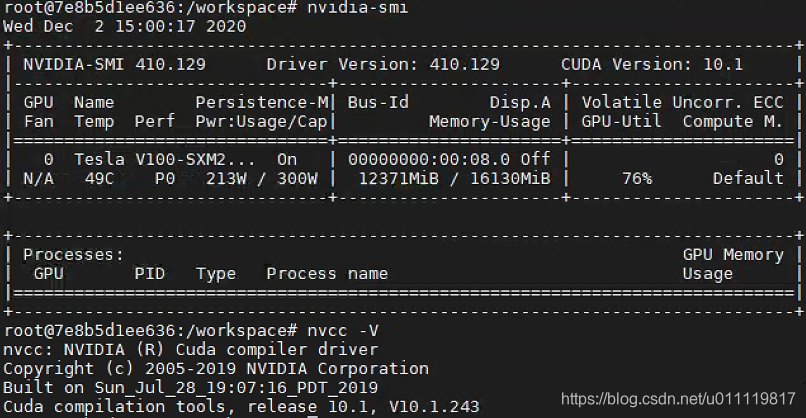
进入容器后输入以下命令:
nvidia-smi
nvcc -V
显示结果如下图:
同样的命令在host主机上显示内容为:

查看容器中cuDNN版本:

对于cuDNN8以上命令无效,可以使如下命令查看:
find /usr -name libcudnn*
下图为查看cudnn7的图,cudnn8同理:

2.2 安装基础工具软件
网络要好一些,安装的内容如下:
rm -rf /var/lib/apt/lists/* \
           /etc/apt/sources.list.d/cuda.list \
           /etc/apt/sources.list.d/nvidia-ml.list

apt-get update

apt-get install -y --no-install-recommends build-essential \
        dialog \
        apt-utils \
        ca-certificates \
        wget \
        git \
        vim \
        libssl-dev \
        curl \
        unzip \
        unrar \
        ssh \
        pkg-config \
        net-tools \
        locales
git clone --depth 10 https://github.com/Kitware/CMake ~/cmake
cd ~/cmake
./bootstrap
make -j"$(nproc)"
sudo make install
2.3 安装Python及常用包
根据需要可以选择安装python3.6、3.7、3.8或更高,我们选择比较新的3.7,再新的话有些安装包可能不支持。安装方法如下
apt-get install -y --no-install-recommends  software-properties-common
add-apt-repository ppa:deadsnakes/ppa
apt-get remove -y python3 python
apt-get autoremove -y
apt-get update
apt-get install -y --no-install-recommends \
        python3.7 \
        python3.7-dev \
        python3-distutils-extra
python完成安装后,接着进行pip的安装:
wget -O ~/get-pip.py https://bootstrap.pypa.io/get-pip.py
python3.7 ~/get-pip.py
进行配置,如果要选不同的python版本,只要改变软链接就可以,同样的pip也要改。
ln -s /usr/bin/python3.7 /usr/local/bin/python3
ln -s /usr/bin/python3.7 /usr/local/bin/python
接着进行简单配置并安装常用python软件包:
python -m pip --no-cache-dir install --upgrade setuptools
python -m pip --no-cache-dir install --upgrade \
         numpy \
         scipy \
         pandas \
         cloudpickle \
         scikit-image>=0.14.2 \
         scikit-learn \
         matplotlib \
         Cython \
         opencv-python \
         tqdm
完成以上步骤后,一个装有CUDA、cuDNN和python的基础环境就准备好了,此时,可以将容器保存成镜像,做为一个基础的镜像来供后期扩展使用。
3、安装深度学习框架
本节将主流深度学习框架的安装方法进行汇总,可以根据需求来选择安装。这种安装方法类似在ubuntu系统中直接安装,可以到相应框架的官网查看安装指定进行安装。部分深度学习框架也提供有官方的镜像,可以按需选取。
注意:安装过程中如果下载太慢,可以更apt和pip源为国内源
3.1 Tensorflow安装
python -m pip --no-cache-dir install --upgrade tensorflow-gpu
另外,对于cuda10.1时,tensorflow最高支持版本2.3,所以可以使用以下命令:
python -m pip --no-cache-dir install --upgrade tensorflow-gpu==2.3
tensorflow对cuda10.2支持不好,在tensorflow版本为2.4时,需要cuda 成为11.0,更多参考官网。
3.2 Pytorch安装
python -m pip --no-cache-dir install --upgrade \
        future \
        protobuf \
        enum34 \
        pyyaml \
        typing \
        htop \
        pycocotools
#安装方法可以pytorch官网查看不同安装方法
#cuda10.1安装
python -m pip --no-cache-dir install --upgrade \
        torch==1.7.0+cu101 \
        torchvision==0.8.1+cu101 \
        torchaudio==0.7.0 \
        -f https://download.pytorch.org/whl/torch_stable.html
#cuda10.2安装
python -m pip --no-cache-dir install --upgrade \
        torch \
        torchvision
3.3 Mxnet安装
apt-get update
apt-get install -y --no-install-recommends libatlas-base-dev graphviz
#cuda10.1
python -m pip --no-cache-dir install --upgrade \
        mxnet-cu101 \
        graphviz
#cuda10.2
python -m pip --no-cache-dir install --upgrade \
        mxnet-cu102 \
        graphviz
3.4 Keras安装
使用keras,要以tensorflow为后端,所以还要安装tensorflow
python -m pip --no-cache-dir install --upgrade tensorflow-gpu
python -m pip --no-cache-dir install --upgrade keras h5py
3.5 Darknet安装
Darknet是YOLO系列目标检测的框架,安装很有必要。
更详细说明,请参考博客.可以使用opencv这个选项。
最早Darknet版本安装:
git clone --depth 10 https://github.com/pjreddie/darknet.git ~/darknet
cd ~/darknet
sed -i 's/GPU=0/GPU=1/g' ~/darknet/Makefile
sed -i 's/CUDNN=0/CUDNN=1/g' ~/darknet/Makefile
make -j"$(nproc)"
cp ~/darknet/include/* /usr/local/include
cp ~/darknet/*.a /usr/local/lib
cp ~/darknet/*.so /usr/local/lib #libdarknet.so
cp ~/darknet/darknet /usr/local/bin
YOLOV4以后,AlexeyAB接棒,详细说明参考github,安装方法如下:
git clone --depth 10 https://github.com/AlexeyAB/darknet.git ~/darknet
cd ~/darknet
sed -i 's/GPU=0/GPU=1/g' ~/darknet/Makefile
sed -i 's/CUDNN=0/CUDNN=1/g' ~/darknet/Makefile
sed -i 's/LIBSO=0/LIBSO=1/g' ~/darknet/Makefile
make -j"$(nproc)"
cp ~/darknet/include/* /usr/local/include
cp ~/darknet/*.so /usr/local/lib #libdarknet.so
cp ~/darknet/darknet /usr/local/bin
| 编译前文件结构 | 编译后文件结构 |
|---|---|
 |  |
| 安装darknet前,建议先从源码安装opencv,然后安装darknet时,将opencv选项也选上。opencv源码安装方法参见我的博客.darknet选AlexeyAB的版本,同时要保留一下libdarknet.so这个文件,python darknet接口只用到这个文件。 | |
| 另外,必竟有时会受硬件影响,将容器换一个机器后,如果不工作,可以make clean,然后再make. |
3.6 Paddle安装
#paddlepaddle1.x 参看官网
#paddlepaddle2 cuda10.1
python -m pip install paddlepaddle-gpu==2.0.0rc0.post101 -f https://paddlepaddle.org.cn/whl/stable.html
#paddlepaddle2 cuda10.2
python -m pip install paddlepaddle-gpu==2.0.0rc0 -i https://mirror.baidu.com/pypi/simple
3.7 ONNX安装
apt-get install -y --no-install-recommends \
        protobuf-compiler \
        libprotoc-dev
#python -m pip --no-cache-dir install --upgrade --no-binary onnx onnx
python -m pip --no-cache-dir install --upgrade  onnx
python -m pip --no-cache-dir install --upgrade onnxruntime
3.8 TensorRT安装
在启动容器时,通过-v将主机目录挂载到容器中,先下载TensorRT并放到挂载目录下,然后在容器中进行安装。
对于CUDA10.1,TensorRT需下载6.0.1版本;对于CUDA10.2,可以下载当前更新的版本7.2.1.
同时下载deb包和tar包,用deb来安装c++接口,tar包来安装python接口.

dpkg -i nv-tensorrt-repo-ubuntu1804-cuda10.1-trt6.0.1.5-ga-20190913_1-1_amd64.deb
apt-key add /var/nv-tensorrt-repo-cuda10.1-trt6.0.1.5-ga-20190913/7fa2af80.pub
apt-get update
apt-get install tensorrt
apt-get install python3-libnvinfer-dev
apt-get install uff-converter-tf
这样就完成安装c++接口。接着安装python接口:
tar -xzf TensorRT-6.0.1.5.Ubuntu-18.04.x86_64-gnu.cuda-10.1.cudnn7.6.tar.gz
cd TensorRT-6.0.1.5
cd python
python -m pip install tensorrt-6.0.1.5-cp37-none-linux_x86_64.whl
cd ../uff
python -m pip install uff-0.6.5-py2.py3-none-any.whl
cd ../graphsurgeon
python -m pip install graphsurgeon-0.4.1-py2.py3-none-any.whl
python -m pip --no-cache-dir install pycuda
#如果是7.2.1,还要执行以下代码
cd ../onnx_graphsurgeon
python -m pip install onnx_graphsurgeon-0.2.6-py2.py3-none-any.whl
有其它需求,可以安装其它包,参见参考4。本安装参考以下5个参考。
对于tar包,所有TensorRT都在安装包中,对于deb包安装后,同样有相同文件,其位置为:
| Element | Path |
|---|---|
| sample | /usr/src/sample |
| dynamic/static | /usr/lib/x86_64-linux-gnu/libnv* |
| doc | /usr/share/doc/libnvinfer* |
3.9 Jupyterlab安装
jupyterlab不是深度学习框架,但是使用python进行数据分析必不可少的
python -m pip --no-cache-dir install --upgrade jupyterlab
4、对安装框架进行验证
安装后需要验证安装是否成功,验证方法如下:
import tensorflow as tf
print(tf.__version__)
print(tf.test.is_built_with_cuda())
import torch
print(torch.__version__)
print(torch.cuda.is_available())
import mxnet as mx
print(mx.__version__)
print(mx.test_utils.list_gpus())
import paddle
print(paddle.__version__)
print(paddle.fluid.is_compiled_with_cuda())
print(paddle.utils.run_check())
import onnx
import keras
import tensorrt
#import uff 要使用的话需要安装tensorflow1.x
import pycuda
对于darknet,终端中输入darknet:

2022年8月更新,已经将最新的tensorflow,paddle,pytorch装到一起来,cudatoolkit=11.2 cudnn=7.6.5
特别的,对于所有框架安装到同一个环境中,真实使用如做一个卷积啥的,可能不工作,这与导入顺序有关。亲测先导入paddle,接着pytorch,最后是tensorflow,这样三个框架同时能工作,其它框的情况还没有确定,自己可以在工作中尝试。tensorflow算是比较特别的,很多需要自己设定,如显存使用等,是个更灵活的也就更复杂的框架了。
来一小段检测代码:
import tensorflow as tf
print('tf.version:',tf.__version__)
print('list devices')
print(tf.config.list_physical_devices())
print("test lstm:")
a = tf.random.normal([1,6,3])
l = tf.keras.layers.LSTM(9)
o = l(a)
print("test cnn")
b = tf.random.normal([1,9,9,3])
c = tf.keras.layers.Conv2D(10,3)
d=c(b)
import paddle
print("paddle version:",paddle.__version__)
print("test paddle:")
print(paddle.utils.run_check())
paddle.set_device('gpu:0')
p = paddle.randn([1,2])
print("p.device:",p.place)
import torch
print("test torch:")
print("torch version",torch.__version__)
print(torch.cuda.is_available())
t = torch.randn([1,2]).to("cuda:1")
print("t.device:",t.device)
输出是这样的:
tf.version: 2.8.0
list devices
2022-08-10 12:31:03.302057: I tensorflow/stream_executor/cuda/cuda_gpu_executor.cc:936] successful NUMA node read from SysFS had negative value (-1), but there must be at least one NUMA node, so returning NUMA node zero
2022-08-10 12:31:03.302406: I tensorflow/stream_executor/cuda/cuda_gpu_executor.cc:936] successful NUMA node read from SysFS had negative value (-1), but there must be at least one NUMA node, so returning NUMA node zero
2022-08-10 12:31:03.308966: I tensorflow/stream_executor/cuda/cuda_gpu_executor.cc:936] successful NUMA node read from SysFS had negative value (-1), but there must be at least one NUMA node, so returning NUMA node zero
2022-08-10 12:31:03.309323: I tensorflow/stream_executor/cuda/cuda_gpu_executor.cc:936] successful NUMA node read from SysFS had negative value (-1), but there must be at least one NUMA node, so returning NUMA node zero
2022-08-10 12:31:03.309631: I tensorflow/stream_executor/cuda/cuda_gpu_executor.cc:936] successful NUMA node read from SysFS had negative value (-1), but there must be at least one NUMA node, so returning NUMA node zero
2022-08-10 12:31:03.309928: I tensorflow/stream_executor/cuda/cuda_gpu_executor.cc:936] successful NUMA node read from SysFS had negative value (-1), but there must be at least one NUMA node, so returning NUMA node zero
[PhysicalDevice(name='/physical_device:CPU:0', device_type='CPU'), PhysicalDevice(name='/physical_device:GPU:0', device_type='GPU'), PhysicalDevice(name='/physical_device:GPU:1', device_type='GPU')]
test lstm:
2022-08-10 12:31:03.310674: I tensorflow/core/platform/cpu_feature_guard.cc:151] This TensorFlow binary is optimized with oneAPI Deep Neural Network Library (oneDNN) to use the following CPU instructions in performance-critical operations:  SSE4.1 SSE4.2 AVX AVX2 FMA
To enable them in other operations, rebuild TensorFlow with the appropriate compiler flags.
2022-08-10 12:31:03.443625: I tensorflow/stream_executor/cuda/cuda_gpu_executor.cc:936] successful NUMA node read from SysFS had negative value (-1), but there must be at least one NUMA node, so returning NUMA node zero
2022-08-10 12:31:03.443946: I tensorflow/stream_executor/cuda/cuda_gpu_executor.cc:936] successful NUMA node read from SysFS had negative value (-1), but there must be at least one NUMA node, so returning NUMA node zero
2022-08-10 12:31:03.444215: I tensorflow/stream_executor/cuda/cuda_gpu_executor.cc:936] successful NUMA node read from SysFS had negative value (-1), but there must be at least one NUMA node, so returning NUMA node zero
2022-08-10 12:31:03.444469: I tensorflow/stream_executor/cuda/cuda_gpu_executor.cc:936] successful NUMA node read from SysFS had negative value (-1), but there must be at least one NUMA node, so returning NUMA node zero
2022-08-10 12:31:03.444727: I tensorflow/stream_executor/cuda/cuda_gpu_executor.cc:936] successful NUMA node read from SysFS had negative value (-1), but there must be at least one NUMA node, so returning NUMA node zero
2022-08-10 12:31:03.444981: I tensorflow/stream_executor/cuda/cuda_gpu_executor.cc:936] successful NUMA node read from SysFS had negative value (-1), but there must be at least one NUMA node, so returning NUMA node zero
2022-08-10 12:31:04.247765: I tensorflow/stream_executor/cuda/cuda_gpu_executor.cc:936] successful NUMA node read from SysFS had negative value (-1), but there must be at least one NUMA node, so returning NUMA node zero
2022-08-10 12:31:04.248109: I tensorflow/stream_executor/cuda/cuda_gpu_executor.cc:936] successful NUMA node read from SysFS had negative value (-1), but there must be at least one NUMA node, so returning NUMA node zero
2022-08-10 12:31:04.248376: I tensorflow/stream_executor/cuda/cuda_gpu_executor.cc:936] successful NUMA node read from SysFS had negative value (-1), but there must be at least one NUMA node, so returning NUMA node zero
2022-08-10 12:31:04.248635: I tensorflow/stream_executor/cuda/cuda_gpu_executor.cc:936] successful NUMA node read from SysFS had negative value (-1), but there must be at least one NUMA node, so returning NUMA node zero
2022-08-10 12:31:04.248894: I tensorflow/stream_executor/cuda/cuda_gpu_executor.cc:936] successful NUMA node read from SysFS had negative value (-1), but there must be at least one NUMA node, so returning NUMA node zero
2022-08-10 12:31:04.249151: I tensorflow/core/common_runtime/gpu/gpu_device.cc:1525] Created device /job:localhost/replica:0/task:0/device:GPU:0 with 4636 MB memory:  -> device: 0, name: NVIDIA GeForce GTX 1660, pci bus id: 0000:01:00.0, compute capability: 7.5
2022-08-10 12:31:04.249369: I tensorflow/stream_executor/cuda/cuda_gpu_executor.cc:936] successful NUMA node read from SysFS had negative value (-1), but there must be at least one NUMA node, so returning NUMA node zero
2022-08-10 12:31:04.249706: I tensorflow/core/common_runtime/gpu/gpu_device.cc:1525] Created device /job:localhost/replica:0/task:0/device:GPU:1 with 4653 MB memory:  -> device: 1, name: NVIDIA GeForce GTX 1660, pci bus id: 0000:03:00.0, compute capability: 7.5
2022-08-10 12:31:04.888467: I tensorflow/stream_executor/cuda/cuda_dnn.cc:368] Loaded cuDNN version 7605
test cnn
2022-08-10 12:31:04.894438: I tensorflow/core/platform/default/subprocess.cc:304] Start cannot spawn child process: No such file or directory
paddle version: 2.3.1
test paddle:
Running verify PaddlePaddle program ...
W0810 12:31:05.586941 29317 gpu_resources.cc:61] Please NOTE: device: 0, GPU Compute Capability: 7.5, Driver API Version: 11.4, Runtime API Version: 10.2
W0810 12:31:05.587051 29317 gpu_resources.cc:91] device: 0, cuDNN Version: 7.6.
PaddlePaddle works well on 1 GPU.
W0810 12:31:05.985208 29317 parallel_executor.cc:642] Cannot enable P2P access from 0 to 1
W0810 12:31:05.985221 29317 parallel_executor.cc:642] Cannot enable P2P access from 1 to 0
W0810 12:31:06.640089 29317 fuse_all_reduce_op_pass.cc:76] Find all_reduce operators: 2. To make the speed faster, some all_reduce ops are fused during training, after fusion, the number of all_reduce ops is 2.
PaddlePaddle works well on 2 GPUs.
PaddlePaddle is installed successfully! Let's start deep learning with PaddlePaddle now.
None
p.device: Place(gpu:0)
test torch:
torch version 1.12.1
True
t.device: cuda:1
5、镜像的保存
经过以上步骤,制成合适的容器,可以将容器保存成镜像,达到build once ,run every where的目的。同时该容器也可以做为继续开发的基础镜像。
#查看要保存容器
docker ps -a
#找到容器号,提交容器为镜像
docker commit -a "作者名称" -m "说明内容" 容器号  repository:tag
比如我构建的docker镜像:

可以看到,镜像大小约15个G.
如图,我创建的镜像是CUDA10.1,cuDNN7.6.5,python3.7,包含上文中所有的深度学习框架。
还可以对镜像名进行重命名:
docker tag IMAGEID(镜像id) REPOSITORY:TAG(仓库:标签)
对于镜像文件,也可以保存成文件,然后拷备到不同机器上使用:
#save命令
docker save -o  自定义文件名.tar  已存在的镜像名或镜像ID
docker save >  自定义文件名.tar  已存在的镜像名
#load命令
docker load -i 文件名
docker load < 文件名
有时镜像文件会很大,所以需要进行保存并压缩,然后能过解压并导入来使用:
#导出
docker save <myimage>:<tag> | gzip > <myimage>_<tag>.tar.gz
#导入
gunzip -c <myimage>_<tag>.tar.gz | docker load
到此,本文完成基于docker的深度学习平台构建。
有个问题要说明,即使是经过压缩的镜像也是会有10G+,所以要保存到优盘中时,可以把大文件切分,使用时再组合,使用命令如下:
#分开
cat myimage_tag.tar.gz | split -b 3G - myimage_tag.tar.gz
#组合
cat myimage_tag.tar.gz.* > myimage_tag.tar.gz
6、创建容器的命令
#docker 19.03以后版本使用所有GPU
docker run --gpus all -itd -v mydir:/workspace -w /workspace -p 8888:8888 --restart always --name containername imagename /bin/bash
#或者
docker run --runtime=nvidia -e NVIDIA_VISIBLE_DEVICES=all -itd -v mydir:/workspace -w /workspace -p 8888:8888 --restart always --name containername imagename /bin/bash
#docker 19.03以后版本使用2个GPU
docker run --gpus 2 -itd -v mydir:/workspace -w /workspace -p 8888:8888 --restart always --name imagename /bin/bash
#docker 19.03以后版本指定2个GPU
docker run --gpus '"device=1,2"' -itd -v mydir:/workspace -w /workspace -p 8888:8888 --restart always --name containername imagename /bin/bash
#或者
docker run --runtime=nvidia -e NVIDIA_VISIBLE_DEVICES=0,1 -itd -v mydir:/workspace -w /workspace -p 8888:8888 --restart always --name containername imagename /bin/bash
#对于19.03以前的版本
nvidia-docker run --runtime=nvidia -e NVIDIA_VISIBLE_DEVICES=0,1 -itd -v mydir:/workspace -w /workspace -p 8888:8888 --restart always --name containername imagename /bin/bash
#或者
NV_GPU=0,1 nvidia-docker run --runtime=nvidia  -itd -v mydir:/workspace -w /workspace -p 8888:8888 --restart always --name containername imagename /bin/bash
另外,有其它参数可选能使主机显示容器中的图,也就是说容器中代码支持可视化代码执行,具体参考,详细的参考为:
-v /tmp/.X11-unix:/tmp/.X11-unix
-e DISPLAY=$DISPLAY
还有是如果容器要访问主机的硬件,比如外插的摄像头还要加上如下命令:
--privileged=true -v /dev:/dev
对于网络要求:
--net=host
#进入执行的容器后,可以执行以下命令进入容器
docker exec -it containername bash
再引用一段话:Please note that some frameworks (e.g. PyTorch) use shared memory to share data between processes, so if multiprocessing is used the default shared memory segment size that container runs with is not enough, and you should increase shared memory size either with --ipc=host or --shm-size command line options to docker run.
附录
1 使用dockerfile构建
深度学习平台Dockerfile的实现,以tensorflow为例 ,dockerfile的写法为:
# ==================================================================
# module list
# ------------------------------------------------------------------
# python        3.7    (apt)
# tensorflow    latest (pip)
# ==================================================================

FROM nvidia/cuda:10.1-cudnn7-devel-ubuntu18.04
ENV LANG C.UTF-8
RUN APT_INSTALL="apt-get install -y --no-install-recommends" && \
    PIP_INSTALL="python -m pip --no-cache-dir install --upgrade" && \
    GIT_CLONE="git clone --depth 10" && \

    rm -rf /var/lib/apt/lists/* \
           /etc/apt/sources.list.d/cuda.list \
           /etc/apt/sources.list.d/nvidia-ml.list && \

    apt-get update && \

# ==================================================================
# tools
# ------------------------------------------------------------------

    DEBIAN_FRONTEND=noninteractive $APT_INSTALL \
        build-essential \
        apt-utils \
        ca-certificates \
        wget \
        git \
        vim \
        libssl-dev \
        curl \
        unzip \
        unrar \
        && \

    $GIT_CLONE https://github.com/Kitware/CMake ~/cmake && \
    cd ~/cmake && \
    ./bootstrap && \
    make -j"$(nproc)" install && \

# ==================================================================
# python
# ------------------------------------------------------------------

    DEBIAN_FRONTEND=noninteractive $APT_INSTALL \
        software-properties-common \
        && \
    add-apt-repository ppa:deadsnakes/ppa && \
    apt-get update && \
    DEBIAN_FRONTEND=noninteractive $APT_INSTALL \
        python3.7 \
        python3.7-dev \
        python3-distutils-extra \
        && \
    wget -O ~/get-pip.py \
        https://bootstrap.pypa.io/get-pip.py && \
    python3.7 ~/get-pip.py && \
    ln -s /usr/bin/python3.7 /usr/local/bin/python3 && \
    ln -s /usr/bin/python3.7 /usr/local/bin/python && \
    $PIP_INSTALL \
        setuptools \
        && \
    $PIP_INSTALL \
        numpy \
        scipy \
        pandas \
        cloudpickle \
        scikit-image>=0.14.2 \
        scikit-learn \
        matplotlib \
        Cython \
        tqdm \
        && \

# ==================================================================
# tensorflow
# ------------------------------------------------------------------

    $PIP_INSTALL \
        tensorflow-gpu \
        && \

# ==================================================================
# config & cleanup
# ------------------------------------------------------------------

    ldconfig && \
    apt-get clean && \
    apt-get autoremove && \
    rm -rf /var/lib/apt/lists/* /tmp/* ~/*

EXPOSE 6006
对于dockerfile,可以通过docker build命令完成镜像定制:
docker build -t myimg:v1 -f /path/to/a/Dockerfile .
#或者Dockerfile在当前目录
docker build -t myimg:v1 .
-t是tag的意思。
更多内容,请参考 https://github.com/ufoym/deepo
2 容器内中文的支持
2.1 基于dockerfile
要在dockerfile中加入相应的环境变量就可以
本文,基于容器定制镜像时,对于中文会是乱码,解决办法是先生成一个支持中文的最小的基础镜像,而支持中文镜像最好使用dockerfile来生成,Dockerfile内容是:
FROM nvidia/cuda:10.1-cudnn7-devel-ubuntu18.04

RUN APT_INSTALL="apt-get install -y --no-install-recommends" && \
    PIP_INSTALL="python -m pip --no-cache-dir install --upgrade" && \
    GIT_CLONE="git clone --depth 10" && \

    rm -rf /var/lib/apt/lists/* \
           /etc/apt/sources.list.d/cuda.list \
           /etc/apt/sources.list.d/nvidia-ml.list && \

    apt-get update && \

# ==================================================================
# tools
# ------------------------------------------------------------------

    DEBIAN_FRONTEND=noninteractive $APT_INSTALL \
        build-essential \
        apt-utils \
        ca-certificates \
        wget \
        git \
        vim \
        libssl-dev \
        curl \
        unzip \
        unrar \
        locales

RUN locale-gen zh_CN.UTF-8

ENV LANG zh_CN.UTF-8
ENV LANGUAGE zh_CN.UTF-8
ENV LC_ALL zh_CN.UTF-8
ENV LANG C.UTF-8
这样,我们可以构建一个拥有基础环境的容器,可以供我们后续定制使用。
2.2 在容器中增加中文支持
很多情况下,我们会在容器使用过程中发现,不支持中文,加增加这个功能
sudo apt-get install locales
locale -a # 查看当前支持的编码格式
locale-gen zh_CN
locale-gen zh_CN.UTF-8
locale -a # 再次查看当前支持的编码格式
cd ~
vim .bashrc
在.bashrc文件中添加以下内容来设置默认字符集:
export LANG=zh_CN.UTF-8
export LC_ALL=zh_CN.UTF-8
export LANGUAGE=zh_CN.UTF-8
更详细内容请参考https://zhuanlan.zhihu.com/p/31078295
更新
20230810更新
把不同的框架装到同一个环境中,不是很容易,最近刚发布keras-core,再次回归到多框架做backend的时代,使用多backend就要安装不同的框架,现在主要支技tensorflow,jax,pytorch,其安装方支参考google colab安装方法,我们也可以借鉴,不只docker,conda环境也同时可以安装这三个框架,安装requirements.txt如下:
# Tensorflow.
# Cuda via pip is only on nightly right now.
# We will pin a known working version to avoid breakages (nightly breaks often).
tf-nightly[and-cuda]==2.14.0.dev20230712

# Torch.
# Pin the version used in colab currently (works with tf cuda version).
--extra-index-url https://download.pytorch.org/whl/cu118
torch==2.0.1+cu118
torchvision==0.15.2+cu118

# Jax.
# Pin the version used in colab currently (works with tf cuda version).
--find-links https://storage.googleapis.com/jax-releases/jax_cuda_releases.html
jax[cuda11_pip]==0.4.10
pip install -r requirements.txt
20231129更新
今天keras3发布了,官网推荐backend jax tensorflow pytorch 要分开装三个conda 环境,否则可能会有冲突,https://keras.io/getting_started/;想要所有框架一起安装,只能参考colab安装:

执行代码的顺序可以参考上次更新。


 4237
4237

 被折叠的 条评论
为什么被折叠?
被折叠的 条评论
为什么被折叠?
 到【灌水乐园】发言


