图像处理之霍夫变换圆检测算法

- created by gloomyfish

图像处理之霍夫变换圆检测算法

之前写过一篇文章讲述霍夫变换原理与利用霍夫变换检测直线, 结果发现访问量还是蛮

多,有点超出我的意料,很多人都留言说代码写得不好,没有注释,结构也不是很清晰,所以

我萌发了再写一篇,介绍霍夫变换圆检测算法,同时也尽量的加上详细的注释,介绍代码

结构.让更多的人能够读懂与理解.

一:霍夫变换检测圆的数学原理


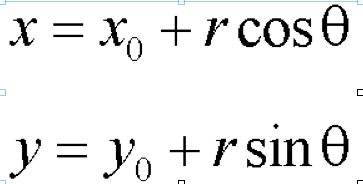
根据极坐标,圆上任意一点的坐标可以表示为如上形式, 所以对于任意一个圆, 假设

中心像素点p(x0, y0)像素点已知, 圆半径已知,则旋转360由极坐标方程可以得到每

个点上得坐标同样,如果只是知道图像上像素点, 圆半径,旋转360°则中心点处的坐

标值必定最强.这正是霍夫变换检测圆的数学原理.

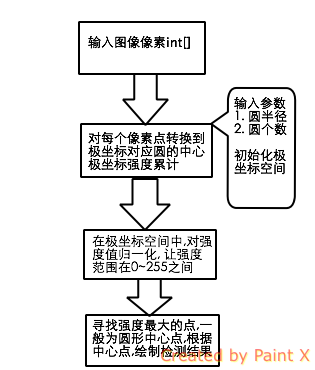
二:算法流程

该算法大致可以分为以下几个步骤

三:运行效果

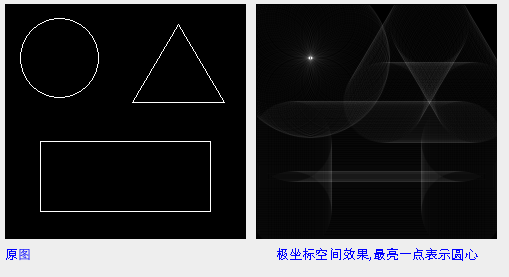
图像从空间坐标变换到极坐标效果, 最亮一点为圆心.


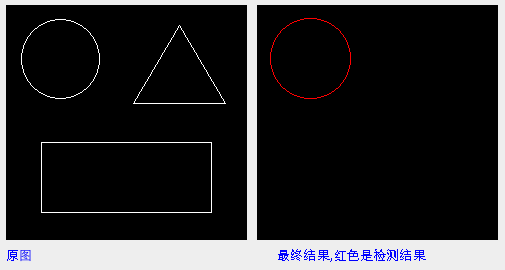
图像从极坐标变换回到空间坐标,检测结果显示:


四:关键代码解析

个人觉得这次注释已经是非常的详细啦,而且我写的还是中文注释

/** 
 * 霍夫变换处理 - 检测半径大小符合的圆的个数 
 * 1. 将图像像素从2D空间坐标转换到极坐标空间 
 * 2. 在极坐标空间中归一化各个点强度,使之在0〜255之间 
 * 3. 根据极坐标的R值与输入参数(圆的半径)相等,寻找2D空间的像素点 
 * 4. 对找出的空间像素点赋予结果颜色(红色) 
 * 5. 返回结果2D空间像素集合 
 * @return int [] 
 */  
public int[] process() {  
  
    // 对于圆的极坐标变换来说,我们需要360度的空间梯度叠加值  
    acc = new int[width * height];  
    for (int y = 0; y < height; y++) {  
        for (int x = 0; x < width; x++) {  
            acc[y * width + x] = 0;  
        }  
    }  
    int x0, y0;  
    double t;  
    for (int x = 0; x < width; x++) {  
        for (int y = 0; y < height; y++) {  
  
            if ((input[y * width + x] & 0xff) == 255) {  
  
                for (int theta = 0; theta < 360; theta++) {  
                    t = (theta * 3.14159265) / 180; // 角度值0 ~ 2*PI  
                    x0 = (int) Math.round(x - r * Math.cos(t));  
                    y0 = (int) Math.round(y - r * Math.sin(t));  
                    if (x0 < width && x0 > 0 && y0 < height && y0 > 0) {  
                        acc[x0 + (y0 * width)] += 1;  
                    }  
                }  
            }  
        }  
    }  
  
    // now normalise to 255 and put in format for a pixel array  
    int max = 0;  
  
    // Find max acc value  
    for (int x = 0; x < width; x++) {  
        for (int y = 0; y < height; y++) {  
  
            if (acc[x + (y * width)] > max) {  
                max = acc[x + (y * width)];  
            }  
        }  
    }  
  
    // 根据最大值,实现极坐标空间的灰度值归一化处理  
    int value;  
    for (int x = 0; x < width; x++) {  
        for (int y = 0; y < height; y++) {  
            value = (int) (((double) acc[x + (y * width)] / (double) max) * 255.0);  
            acc[x + (y * width)] = 0xff000000 | (value << 16 | value << 8 | value);  
        }  
    }  
      
    // 绘制发现的圆  
    findMaxima();  
    System.out.println("done");  
    return output;  
}  
完整的算法源代码, 已经全部的加上注释
package com.gloomyfish.image.transform.hough;  
/*** 
 *  
 * 传入的图像为二值图像,背景为黑色,目标前景颜色为为白色 
 * @author gloomyfish 
 *  
 */  
public class CircleHough {  
  
    private int[] input;  
    private int[] output;  
    private int width;  
    private int height;  
    private int[] acc;  
    private int accSize = 1;  
    private int[] results;  
    private int r; // 圆周的半径大小  
  
    public CircleHough() {  
        System.out.println("Hough Circle Detection...");  
    }  
  
    public void init(int[] inputIn, int widthIn, int heightIn, int radius) {  
        r = radius;  
        width = widthIn;  
        height = heightIn;  
        input = new int[width * height];  
        output = new int[width * height];  
        input = inputIn;  
        for (int y = 0; y < height; y++) {  
            for (int x = 0; x < width; x++) {  
                output[x + (width * y)] = 0xff000000; //默认图像背景颜色为黑色  
            }  
        }  
    }  
  
    public void setCircles(int circles) {  
        accSize = circles; // 检测的个数  
    }  
      
    /** 
     * 霍夫变换处理 - 检测半径大小符合的圆的个数 
     * 1. 将图像像素从2D空间坐标转换到极坐标空间 
     * 2. 在极坐标空间中归一化各个点强度,使之在0〜255之间 
     * 3. 根据极坐标的R值与输入参数(圆的半径)相等,寻找2D空间的像素点 
     * 4. 对找出的空间像素点赋予结果颜色(红色) 
     * 5. 返回结果2D空间像素集合 
     * @return int [] 
     */  
    public int[] process() {  
  
        // 对于圆的极坐标变换来说,我们需要360度的空间梯度叠加值  
        acc = new int[width * height];  
        for (int y = 0; y < height; y++) {  
            for (int x = 0; x < width; x++) {  
                acc[y * width + x] = 0;  
            }  
        }  
        int x0, y0;  
        double t;  
        for (int x = 0; x < width; x++) {  
            for (int y = 0; y < height; y++) {  
  
                if ((input[y * width + x] & 0xff) == 255) {  
  
                    for (int theta = 0; theta < 360; theta++) {  
                        t = (theta * 3.14159265) / 180; // 角度值0 ~ 2*PI  
                        x0 = (int) Math.round(x - r * Math.cos(t));  
                        y0 = (int) Math.round(y - r * Math.sin(t));  
                        if (x0 < width && x0 > 0 && y0 < height && y0 > 0) {  
                            acc[x0 + (y0 * width)] += 1;  
                        }  
                    }  
                }  
            }  
        }  
  
        // now normalise to 255 and put in format for a pixel array  
        int max = 0;  
  
        // Find max acc value  
        for (int x = 0; x < width; x++) {  
            for (int y = 0; y < height; y++) {  
  
                if (acc[x + (y * width)] > max) {  
                    max = acc[x + (y * width)];  
                }  
            }  
        }  
  
        // 根据最大值,实现极坐标空间的灰度值归一化处理  
        int value;  
        for (int x = 0; x < width; x++) {  
            for (int y = 0; y < height; y++) {  
                value = (int) (((double) acc[x + (y * width)] / (double) max) * 255.0);  
                acc[x + (y * width)] = 0xff000000 | (value << 16 | value << 8 | value);  
            }  
        }  
          
        // 绘制发现的圆  
        findMaxima();  
        System.out.println("done");  
        return output;  
    }  
  
    private int[] findMaxima() {  
        results = new int[accSize * 3];  
        int[] output = new int[width * height];  
          
        // 获取最大的前accSize个值  
        for (int x = 0; x < width; x++) {  
            for (int y = 0; y < height; y++) {  
                int value = (acc[x + (y * width)] & 0xff);  
  
                // if its higher than lowest value add it and then sort  
                if (value > results[(accSize - 1) * 3]) {  
  
                    // add to bottom of array  
                    results[(accSize - 1) * 3] = value; //像素值  
                    results[(accSize - 1) * 3 + 1] = x; // 坐标X  
                    results[(accSize - 1) * 3 + 2] = y; // 坐标Y  
  
                    // shift up until its in right place  
                    int i = (accSize - 2) * 3;  
                    while ((i >= 0) && (results[i + 3] > results[i])) {  
                        for (int j = 0; j < 3; j++) {  
                            int temp = results[i + j];  
                            results[i + j] = results[i + 3 + j];  
                            results[i + 3 + j] = temp;  
                        }  
                        i = i - 3;  
                        if (i < 0)  
                            break;  
                    }  
                }  
            }  
        }  
  
        // 根据找到的半径R,中心点像素坐标p(x, y),绘制圆在原图像上  
        System.out.println("top " + accSize + " matches:");  
        for (int i = accSize - 1; i >= 0; i--) {  
            drawCircle(results[i * 3], results[i * 3 + 1], results[i * 3 + 2]);  
        }  
        return output;  
    }  
  
    private void setPixel(int value, int xPos, int yPos) {  
        /// output[(yPos * width) + xPos] = 0xff000000 | (value << 16 | value << 8 | value);  
        output[(yPos * width) + xPos] = 0xffff0000;  
    }  
  
    // draw circle at x y  
    private void drawCircle(int pix, int xCenter, int yCenter) {  
        pix = 250; // 颜色值,默认为白色  
  
        int x, y, r2;  
        int radius = r;  
        r2 = r * r;  
          
        // 绘制圆的上下左右四个点  
        setPixel(pix, xCenter, yCenter + radius);  
        setPixel(pix, xCenter, yCenter - radius);  
        setPixel(pix, xCenter + radius, yCenter);  
        setPixel(pix, xCenter - radius, yCenter);  
  
        y = radius;  
        x = 1;  
        y = (int) (Math.sqrt(r2 - 1) + 0.5);  
          
        // 边缘填充算法, 其实可以直接对循环所有像素,计算到做中心点距离来做  
        // 这个方法是别人写的,发现超赞,超好!  
        while (x < y) {  
            setPixel(pix, xCenter + x, yCenter + y);  
            setPixel(pix, xCenter + x, yCenter - y);  
            setPixel(pix, xCenter - x, yCenter + y);  
            setPixel(pix, xCenter - x, yCenter - y);  
            setPixel(pix, xCenter + y, yCenter + x);  
            setPixel(pix, xCenter + y, yCenter - x);  
            setPixel(pix, xCenter - y, yCenter + x);  
            setPixel(pix, xCenter - y, yCenter - x);  
            x += 1;  
            y = (int) (Math.sqrt(r2 - x * x) + 0.5);  
        }  
        if (x == y) {  
            setPixel(pix, xCenter + x, yCenter + y);  
            setPixel(pix, xCenter + x, yCenter - y);  
            setPixel(pix, xCenter - x, yCenter + y);  
            setPixel(pix, xCenter - x, yCenter - y);  
        }  
    }  
  
    public int[] getAcc() {  
        return acc;  
    }  
  
}  


import cv2 as cv import numpy as np def hough_circle(image): #因为霍夫检测对噪声很明显,所以需要先滤波一下。 dst =cv.pyrMeanShiftFiltering(image,10,100) cimage=cv.cvtColor(dst,cv.COLOR_BGR2GRAY) circles = cv.HoughCircles(cimage,cv.HOUGH_GRADIENT,1,40,param1=40,param2=29,minRadius=30,maxRadius=0) #把circles包含的心和半径的值变为整数 circles = np.uint16(np.around(circles)) for i in circles[0]: cv.circle(image,(i[0],i[1]),i[2],(0,255,0),3) cv.imshow("circle",image) src = cv.imread("E:/opencv/picture/coins.jpg") cv.imshow("inital_window",src) hough_circle(src) cv.waitKey(0) cv.destroyAllWindows() 霍夫变换的基本思路是认为图像上每一个非零像素点都有可能是一个潜在的上的一点, 跟霍夫线变换一样,也是通过投票,生成累积坐标平面,设置一个累积权重来定位。 在笛卡尔坐标系中的方程为: 其中(a,b)是心,r是半径,也可以表述为: 即 在笛卡尔的xy坐标系中经过某一点的所有映射到abr坐标系中就是一条三维的曲线: 经过xy坐标系中所有的非零像素点的所有就构成了abr坐标系中很多条三维的曲线。 在xy坐标系中同一个上的所有点的方程是一样的,它们映射到abr坐标系中的是同一个点,所以在abr坐标系中该点就应该有的总像素N0个曲线相交。 通过判断abr中每一点的相交(累积)数量,大于一定阈值的点就认为是。 以上是标准霍夫变换实现算法。 问题是它的累加到一个三维的空间,意味着比霍夫线变换需要更多的计算消耗。 Opencv霍夫变换对标准霍夫变换做了运算上的优化。 它采用的是“霍夫梯度法”。它的检测思路是去遍历累加所有非零点对应的心,对心进行考量。 如何定位心呢?心一定是在上的每个点的模向量上,即在垂直于该点并且经过该点的切线的垂直线上,这些上的模向量的交点就是心。 霍夫梯度法就是要去查找这些心,根据该“心”上模向量相交数量的多少,根据阈值进行最终的判断。 bilibili: 注意: 1.OpenCV的霍夫变换函数原型为:HoughCircles(image, method, dp, minDist[, circles[, param1[, param2[, minRadius[, maxRadius]]]]]) -> circles image参数表示8位单通道灰度输入图像矩阵。 method参数表示检测方法,目前唯一实现的方法是HOUGH_GRADIENT。 dp参数表示累加器与原始图像相比的分辨率的反比参数。例如,如果dp = 1,则累加器具有与输入图像相同的分辨率。如果dp=2,累加器分辨率是元素图像的一半,宽度和高度也缩减为原来的一半。 minDist参数表示检测到的两个心之间的最小距离。如果参数太小,除了真实的一个圈之外,可能错误地检测到多个相邻的圈。如果太大,可能会遗漏一些圈。 circles参数表示检测到的的输出向量,向量内第一个元素是的横坐标,第二个是纵坐标,第三个是半径大小。 param1参数表示Canny边缘检测的高阈值,低阈值会被自动置为高阈值的一半。 param2参数表示检测的累加阈值,参数值越小,可以检测越多的假圈,但返回的是与较大累加器值对应的圈。 minRadius参数表示检测到的的最小半径。 maxRadius参数表示检测到的的最大半径。 2.OpenCV画的circle函数原型:circle(img, center, radius, color[, thickness[, lineType[, shift]]]) -> img img参数表示源图像。 center参数表示心坐标。 radius参数表示的半径。 color参数表示设定的颜色。 thickness参数:如果是正数,表示轮廓的粗细程度。如果是负数,表示要绘制实心。 lineType参数表示线条的类型。 shift参数表示心坐标和半径值中的小数位数。
霍夫检测是一种用于检测图像中形的算法。在OpenCV中,霍夫检测是基于图像梯度的实现。具体原理如下: 1. 首先,对图像进行中值滤波,以减少噪声的影响\[1\]。 2. 接下来,通过检测边缘来发现可能的心。这一步使用图像梯度的方法来计算边缘\[1\]。 3. 在第一步的基础上,从候选心开始计算最佳半径大小。这一步使用霍夫变换的方法来确定的半径\[1\]。 在OpenCV中,可以使用cv::HoughCircles函数来实现霍夫检测。该函数的参数包括输入图像、输出结果、方法、尺度因子、最短距离、Canny边缘检测的低阈值、中心点累加器阈值、最小半径和最大半径\[3\]。 总结来说,霍夫检测通过对图像进行中值滤波和边缘检测,然后使用霍夫变换来确定的位置和半径。这种方法可以有效地检测图像中的形物体。 #### 引用[.reference_title] - *1* [OpenCvSharp 学习笔记21-- 霍夫变换 - 检测 (Hough Circle transform)](https://blog.csdn.net/weixin_41049188/article/details/92422241)[target="_blank" data-report-click={"spm":"1018.2226.3001.9630","extra":{"utm_source":"vip_chatgpt_common_search_pc_result","utm_medium":"distribute.pc_search_result.none-task-cask-2~all~insert_cask~default-1-null.142^v91^control_2,239^v3^insert_chatgpt"}} ] [.reference_item] - *2* [OpenCV 霍夫检测](https://blog.csdn.net/qq_44989881/article/details/116135750)[target="_blank" data-report-click={"spm":"1018.2226.3001.9630","extra":{"utm_source":"vip_chatgpt_common_search_pc_result","utm_medium":"distribute.pc_search_result.none-task-cask-2~all~insert_cask~default-1-null.142^v91^control_2,239^v3^insert_chatgpt"}} ] [.reference_item] - *3* [OpenCV20---霍夫检测](https://blog.csdn.net/qq_45646174/article/details/105086711)[target="_blank" data-report-click={"spm":"1018.2226.3001.9630","extra":{"utm_source":"vip_chatgpt_common_search_pc_result","utm_medium":"distribute.pc_search_result.none-task-cask-2~all~insert_cask~default-1-null.142^v91^control_2,239^v3^insert_chatgpt"}} ] [.reference_item] [ .reference_list ]
评论
添加红包

请填写红包祝福语或标题

红包个数最小为10个

红包金额最低5元

当前余额3.43前往充值 >
需支付:10.00
成就一亿技术人!
领取后你会自动成为博主和红包主的粉丝 规则
hope_wisdom
发出的红包
实付
使用余额支付
点击重新获取
扫码支付
钱包余额 0

抵扣说明:

1.余额是钱包充值的虚拟货币,按照1:1的比例进行支付金额的抵扣。
2.余额无法直接购买下载,可以购买VIP、付费专栏及课程。

余额充值