


转自:http://blog.csdn.net/hejianhua/article/details/12910409
我在poco官网上下载了其支持windows平台的源代码,编译完成后,它就自动和vs挂钩了,在vs系列的IDE上都很容易用。但是现在我想用codeblocks(windows下用),我在工程中bin,lib,.h的的路径都添加好了,可是编译不能通过,而使用同样的方法在vs中就完全没有问题,为什么呢?郁闷!
我在windows下都用不起,更别说linux了,所以请大家先帮我解决下这个问题吧。这个问题,同问ace,ice,它们都能在vs下搞,但是放在codeblocks上就要现怪相!我有点白,大家说详细点,感谢~
------解决方案--------------------------------------------------------
第一步:编译第三方库,得到头文件和库,例如路径关系:
D:\MyLib\include
D:\MyLib\lib
在include中放头文件,在lib中放置库文件。
第二步:创建全局变量,菜单:Settings > Global variables, New一个新的,选名字,例如MYLIB
Base: /usr/local/ACE/ACE_wrappers
include: $(BASE)\ace
lib: $(BASE)\lib
第三步:设置工程搜索路径,菜单:Project > build options > Search directories
Compiler: $(#MYLIB) // 解释:因为文件中包含的是 #include "ace/tas.h",所以搜索路径不需要Compiler: $(#MYLIB.ace)
Linker: $(#MYLIB.lib)
即可使用。
如果不想添加全局变量,则第三步时,使用绝对路径,来分别设置头文件和库文件的查找路径。
------解决方案--------------------------------------------------------
-------------------------------------------------------------------------------------------------------------------------------
作者:朱金灿
来源:http://blog.csdn.net/clever101
首先请先编译或安装boost库,使用CodeBlocks编译boost库具体见:Boost库在CodeBlocks环境下的编译。
以下内容主要翻译自:BoostWindows Quick Ref,我所用的编译环境为Win 7家庭版,CodeBlocks V10.05, mingw32 v4.4.1,boostv1.42
1. 为boost库创建一个CodeBlocks全局变量
1)打开“Settings”菜单——>"Global variables..."菜单项,弹出如下对话框,单击下图的对话框上的New按钮,
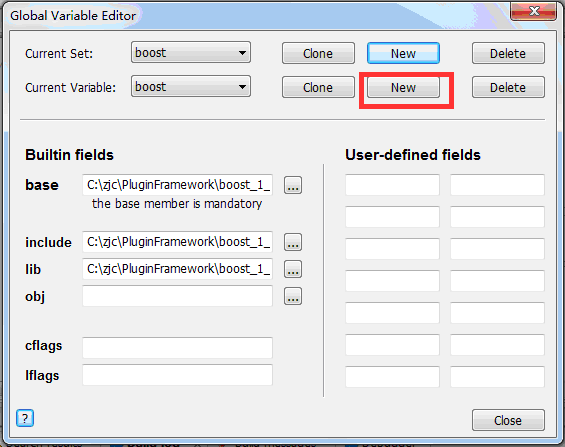
2) 在弹出的对话框上输入你要新建的全部变量名,例如boost,如下图:

3)设置全局变量的base目录、lib目录和include目录,具体如下图:

Base目录为你的boost安装目录,也是你在编译boost库的—prefix选项的参数值,如:
你的bjam命令为:
bjam install--toolset=gcc--prefix="C:\zjc\PluginFramework\boost_1_42_0"--build-type=complete
那么base目录为C:\zjc\PluginFramework\boost_1_42_0
Include和lib目录很容易理解,就是boost库的头文件和库文件所在的目录。
现在我们使用一下这个全局变量,
1. CodeBlocks新建一个控制台工程TestConsole,敲入如下代码:
- <SPAN style="FONT-SIZE: 18px"> #include <stdlib.h>
- #include <iostream>
- using std::cout;
- using std::wcout;
- using std::endl;
- #include <string>
- using std::string;
- using std::wstring;
- #include <boost/algorithm/string.hpp>
- #include <boost/filesystem/path.hpp>
- #include "boost/filesystem/operations.hpp"
- #include <boost/format.hpp>
- int main()
- {
- // ANSI字符的格式化
- cout << boost::format( "%1% %2%" ) % "Hell" % "Low" <<endl;
- string s1 = boost::str( boost::format( "%2% %1%" ) % "Hell" % "Low" );
- cout << s1 << endl;
- // UNICODE字符的格式化
- wcout << boost::wformat( L"%s %X" ) % L"-1 is" % -1 << endl;
- wstring s2 = boost::str( boost::wformat( L"%2$s %1$.2f" ) % 3.141592 % L"Version" );
- wcout << s2 << endl;
- // 获取应用程序所在目录(ANSI字符),注意是boost::filesystem::path
- string AnsiPath = boost::filesystem::initial_path<boost::filesystem::path>().string();
- cout<<AnsiPath<<endl;
- // 获取应用程序所在目录(UNICODE字符),注意是boost::filesystem::wpath
- wstring UnicodePath = boost::filesystem::initial_path<boost::filesystem::wpath>().string();
- wcout<<UnicodePath<<endl;
- system("PAUSE");
- return 0;
- }
- </SPAN>
- <span style="font-size:18px"> #include <stdlib.h>
- #include <iostream>
- using std::cout;
- using std::wcout;
- using std::endl;
- #include <string>
- using std::string;
- using std::wstring;
- #include <boost/algorithm/string.hpp>
- #include <boost/filesystem/path.hpp>
- #include "boost/filesystem/operations.hpp"
- #include <boost/format.hpp>
- int main()
- {
- // ANSI字符的格式化
- cout << boost::format( "%1% %2%" ) % "Hell" % "Low" <<endl;
- string s1 = boost::str( boost::format( "%2% %1%" ) % "Hell" % "Low" );
- cout << s1 << endl;
- // UNICODE字符的格式化
- wcout << boost::wformat( L"%s %X" ) % L"-1 is" % -1 << endl;
- wstring s2 = boost::str( boost::wformat( L"%2$s %1$.2f" ) % 3.141592 % L"Version" );
- wcout << s2 << endl;
- // 获取应用程序所在目录(ANSI字符),注意是boost::filesystem::path
- string AnsiPath = boost::filesystem::initial_path<boost::filesystem::path>().string();
- cout<<AnsiPath<<endl;
- // 获取应用程序所在目录(UNICODE字符),注意是boost::filesystem::wpath
- wstring UnicodePath = boost::filesystem::initial_path<boost::filesystem::wpath>().string();
- wcout<<UnicodePath<<endl;
- system("PAUSE");
- return 0;
- }
- </span>
2. 在工程树节点上右键单击,在弹出的右键菜单上单击Build Option…菜单项,如下图:

3.在弹出的对话框中选择Search directories选项卡,然后单击对话框中的add按钮,在弹出的对话框中输入:$(#boost),具体如下图:

看到这,你可能觉得比较熟悉,这个CodeBlocks全局变量不相当于一个操作系统环境变量吗?是的,它起的正是这个作用。
4.选择“Linker setting”选项卡,填入你的工程要链接到到的具体的boost库,具体如下图:
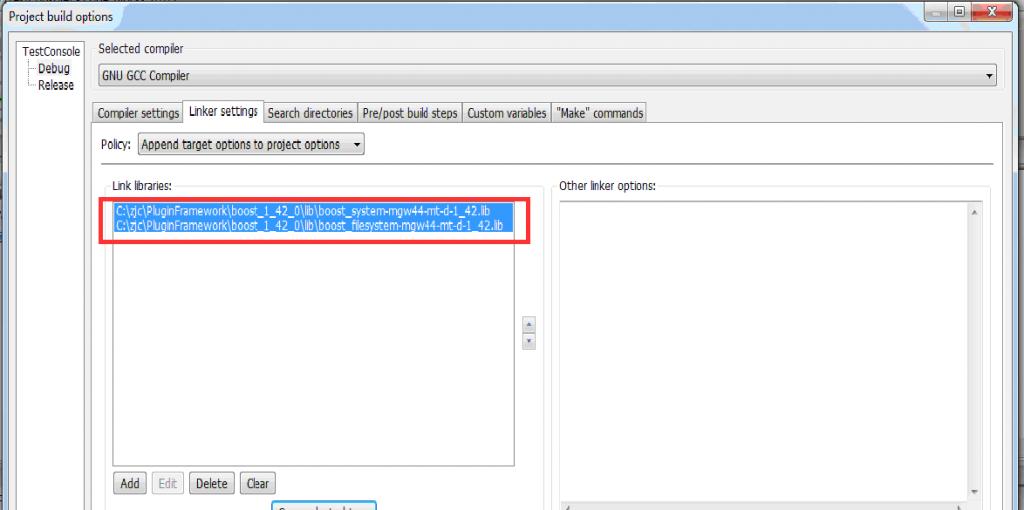
一个小小的问题,在使用boost库时只需在定义了BOOST_ALL_DYN_LINK宏,同时指定了库文件所在的文件夹就能实现自动链接而不必指定要链接到的具体库,这个我在VS环境下已经多次使用过,但我在CodeBlocks下定义了BOOST_ALL_DYN_LINK,如下图:

但是还是得指定链接到的具体库,这是为什么呢?知道的大侠请具体指点下。
参考文献:


 131
131

 被折叠的 条评论
为什么被折叠?
被折叠的 条评论
为什么被折叠?
 到【灌水乐园】发言


