


文章目录
本篇文章主要介绍 torch.nn.Module、torch.nn.Sequential()、torch.nn.ModuleList 的使用方法与区别。
1. nn.Module
1.1 基本使用
在PyTorch中,nn.Module 类扮演着核心角色,它是构建任何自定义神经网络层、复杂模块或完整神经网络架构的基础构建块。通过继承 nn.Module 并在其子类中定义模型结构和前向传播逻辑(forward() 方法),开发者能够方便地搭建并训练深度学习模型。
在自定义一个新的模型类时,通常需要:
- 继承
nn.Module类 - 重新实现
__init__构造函数 - 重新实现
forward方法
实现代码如下:
import torch.nn as nn
import torch.nn.functional as F

class Model(nn.Module):
    # nn.Module的子类函数必须在构造函数中执行父类的构造函数
    def __init__(self):
        super(Model, self).__init__()   # 等价与nn.Module.__init__()
        self.conv1 = nn.Conv2d(1, 20, 5)
        self.conv2 = nn.Conv2d(20, 20, 5)
	def forward(self, x):
		x = F.relu(self.conv1(x))
		return F.relu(self.conv2(x))


model=Model()
print(model)
输出如下:

注意:
- 一般把网络中具有可学习参数的层(如全连接层、卷积层)放在构造函数
__init__()中 - forward() 方法必须重写,它是实现模型的功能,实现各个层之间连接关系的核心
nn.Module类中的关键属性和方法包括:
-
初始化 (init):在类的初始化方法中定义并实例化所有需要的层、参数和其他组件。
在实现自己的MyModel类时继承了nn.Module,在构造函数中要调用Module的构造函数super(MyModel,self).init() -
前向传播 (forward):实现前向传播函数来描述输入数据如何通过网络产生输出结果。
因为parameters是自动求导,所以调用forward()后,不用自己写和调用backward()函数。而且一般不是显式的调用forward(layer.farword),而是layer(input),会自执行forward()。 -
管理参数和模块:
- 使用 .parameters() 访问模型的所有可学习参数。
- 使用 add_module() 添加子模块,并给它们命名以便于访问。
- 使用 register_buffer() 为模型注册非可学习的缓冲区变量。
- 训练与评估模式切换:
- 使用 model.train() 将模型设置为训练模式,这会影响某些层的行为,如批量归一化层和丢弃层。
- 使用 model.eval() 将模型设置为评估模式,此时会禁用这些依赖于训练阶段的行为。
- 保存和加载模型状态:
- 调用 model.state_dict() 获取模型权重和优化器状态的字典形式。
- 使用 torch.save() 和 torch.load() 来保存和恢复整个模型或者仅其状态字典。
- 通过 model.load_state_dict(state_dict) 加载先前保存的状态字典到模型中。
此外,nn.Module 还提供了诸如移动模型至不同设备(CPU或GPU)、零化梯度等实用功能,这些功能在整个模型训练过程中起到重要作用。
1.2 常用函数
torch.nn.Module 这个类的内部有多达 48 个函数,下面就一些比较常用的函数进行讲解。
1.2.1 核心函数
-
__init__函数 和forward()函数
__init__中主要是初始化一些内部需要用到的state;forward在这里没有具体实现,是需要在各个子类中实现的,如果子类中没有实现就会报错raise NotImplementedError。 -
apply(fn)函数
将Module及其所有的SubModule传进给定的fn函数操作一遍。我们可以用这个函数来对Module的网络模型参数用指定的方法初始化。下边这个例子就是将网络模型net中的子模型Linear的参数全部赋值为 1 。
def init_weight(m):
    if type(m) == nn.Linear:
        m.weight.data.fill_(1.0)
        m.bias.data.fill_(0)


net = nn.Sequential(nn.Linear(2, 2))
net.apply(init_weight)
输出如下:

state_dict()函数
返回一个包含module的所有state的dictionary,而这个字典的Keys对应的就是parameter和buffer的名字names。该函数的源码部分有一个循环可以递归遍历Module中所有的SubModule。
net = torch.nn.Linear(2, 2)
print(net.state_dict())
输出如下:

print(net.state_dict().keys())

add_module()函数
将子模块加入当前模块中,被添加的模块可以用name来获取
1.2.2 查看函数
使用 nn.Module 中的查看类函数可以对网络中的参数进行有效管理,常用的查看类参数如下:
parameters()  #返回一个包含模型所有参数的迭代器
buffers()
children()  # 返回当前模型子模块的迭代器
modules()  # 返回一个包含当前模型所有模块的迭代器

与之对应的四个函数:

named_parameters()
named_buffers()
namde_children()
named_modules()
parameters()函数
可以使用for param in model.parameters()来遍历网络模型中的参数,因为该函数返回的是一个迭代器iterator。我们在使用优化算法的时候就是将model.parameters()传给优化器Optimizer。
net = nn.Sequential(nn.Linear(2, 2))
params = list(net.parameters())
print(params)
输出如下:

-
buffers函数、children函数 和modules函数
与parameters()函数类似。 -
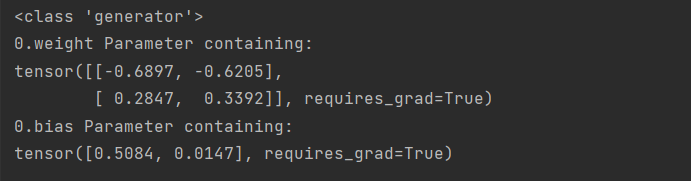
named_parameters()函数
net = nn.Sequential(nn.Linear(2, 2))
print(type(net.named_parameters()))
for name, params in net.named_parameters():
    print(name, params)
输出如下:
named_buffers函数、named_children函数 和named_modules函数
与named_parameters()函数类似。
1.2.3 设置函数
设置类包含包括设置模型的训练/测试状态、梯度设置、设备设置等。
train()函数 和eval()函数- train(): 将Module及其SubModule设置为training mode
- eval(): 将Module及其SubModule设置为evaluation mode
这两个函数只对特定的Module有影响,例如Class Dropout、Class BatchNorm。
-
requires_grad()函数 和zero_grad()函数- 设置self.parameters()是否需要record梯度,默认情况下是True。
- 函数zero_grad 用于设置self.parameters()的gradients为零。
-
cuda()函数 和cpu()函数- cuda(): Moves all model parameters and buffers to the GPU.
- cpu(): Moves all model parameters and buffers to the CPU.
两者返回的都是Module本身且都调用了_apply函数。
to()函数
函数to的作用是原地 ( in-place ) 修改Module,它可以当成三种函数来使用:- to(device=None, dtype=None, non_blocking=False):设备
- to(dtype, non_blocking=False):类型
- to(tensor, non_blocking=False): 张量
基于nn.Modeule构建Linear层:
linear = nn.Linear(2, 2)
print(linear.weight)
# Parameter containing:
# tensor([[ 0.4331,  0.6347],
#         [ 0.5735, -0.0210]], requires_grad=True)
修改参数类型:
linear.to(torch.double)
print(linear.weight)
# Parameter containing:
# tensor([[ 0.4331,  0.6347],
#         [ 0.5735, -0.0210]], dtype=torch.float64, requires_grad=True)
修改设备类型:
gpu1 = torch.device("cuda:1")
linear.to(gpu1, dtype=torch.half, non_blocking=True)
# Linear(in_features=2, out_features=2, bias=True)

print(linear.weight)
# Parameter containing:
# tensor([[ 0.4331, 0.6347],
#         [ 0.5735, -0.0210]], dtype=torch.float16, device='cuda:1')
cpu = torch.device("cpu")
linear.to(cpu)
# Linear(in_features=2, out_features=2, bias=True)

print(linear.weight)
# Parameter containing:
# tensor([[ 0.4331, 0.6347],
#         [0.5735, -0.0210]], dtype=torch.float16)
1.2.4 注册函数
register_parameter   # 向self._parameters注册新元素
register_buffer      # 向self._buffers注册新元素

register_backward_hook   # 向self._backward_hook注册新元素
register_forward_pre_hook   # 向self._forward_pre_hook注册新元素
register_forward_hook   # 向self._forward_hook注册新元素
1.2.5 转换函数
to()  # 转换为张量,设置类型、设备等
type()  # 将parameters和buffers的数据类型转换为目标类型dst_type
double()  # 将parameters和buffers的数据类型转换为double
float() # 将parameters和buffers的数据类型转换为float
half()  # 将parameters和buffers的数据类型转换为half
1.2.6 加载函数
可以很方便的进行 save 和 load,以防止突然发生的断点和系统崩溃现象
load_state_dict(state_dict, strict=True)
# 将state_dict中的参数和缓冲区复制到此模块及其后代中。如果strict为真,则state_dict的键必须与该模块的state_dict()函数返回的键完全匹配。

"""
state_dict (dict) – 保存parameters和persistent buffers的字典。
将state_dict中的parameters和buffers复制到此module和它的后代中。

state_dict中的key必须和 model.state_dict()返回的key一致。
"""
2. nn.Sequential()
nn.Sequential()是一个序列容器,用于搭建神经网络的模块按照被传入构造器的顺序添加到nn.Sequential()容器中。除此之外,一个包含神经网络模块的OrderedDict也可以被传入nn.Sequential()容器中。利用nn.Sequential()搭建好模型架构,模型前向传播时调用forward()方法,模型接收的输入首先被传入nn.Sequential()包含的第一个网络模块中。然后,第一个网络模块的输出传入第二个网络模块作为输入,按照顺序依次计算并传播,直到nn.Sequential()里的最后一个模块输出结果。
2.1 基本定义
先简单看一下它的定义:
class Sequential(Module): # 继承Module
    def __init__(self, *args):  # 重写了构造函数
    def _get_item_by_idx(self, iterator, idx):
    def __getitem__(self, idx):
    def __setitem__(self, idx, module):
    def __delitem__(self, idx):
    def __len__(self):
    def __dir__(self):
    def forward(self, input):  # 重写关键方法forward
2.2 Sequential类不同的实现
方法一:最简单的序列模型
import torch.nn as nn

model = nn.Sequential(
          nn.Conv2d(1, 20, 5),
          nn.ReLU(),
          nn.Conv2d(20, 64, 5),
          nn.ReLU()
        )
# 采用第一种方式,默认命名方式为  [0,1,2,3,4,...]
print(model, '\n')
print(model[2]) # 通过索引获取第几个层
输出如下:
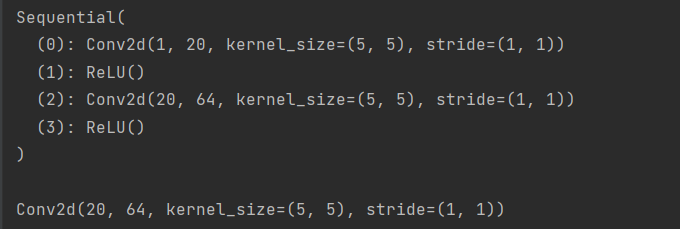
在每一个包装块里面,各个层是没有名称的,层的索引默认按照0、1、2、3、4来排名。
方法二:有序字典(给每一个层添加名称)
import torch.nn as nn
from collections import OrderedDict

model = nn.Sequential(OrderedDict([
          ('conv1', nn.Conv2d(1,20,5)),
          ('relu1', nn.ReLU()),
          ('conv2', nn.Conv2d(20,64,5)),
          ('relu2', nn.ReLU())
        ]))
print(model, '\n')
print(model[2]) # 通过索引获取第几个层
输出如下:
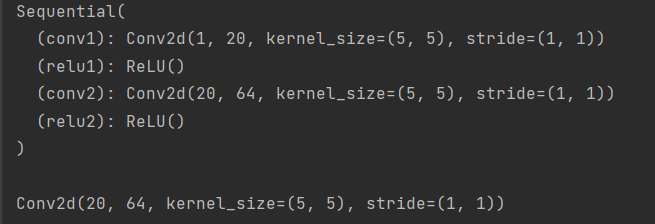
很多人认为python中的字典是无序的,因为它是按照hash来存储的,但是python中有个模块collections(英文,收集、集合),里面自带了一个子类OrderedDict,实现了对字典对象中元素的排序。
从上面的结果中可以看出,这个时候每一个层都有了自己的名称,但是此时需要注意,并不能够通过名称直接获取层,依然只能通过索引index,即model[2] 是正确的,model[“conv2”] 是错误的,这其实是由它的定义实现的,看上面的Sequenrial定义可知,只支持index访问。
方法三:add_module()
import torch.nn as nn
from collections import OrderedDict

model = nn.Sequential()

model.add_module("conv1", nn.Conv2d(1, 20, 5))
model.add_module('relu1', nn.ReLU())
model.add_module('conv2', nn.Conv2d(20, 64, 5))
model.add_module('relu2', nn.ReLU())

print(model, '\n')
print(model[2])  # 通过索引获取第几个层
输出如下:
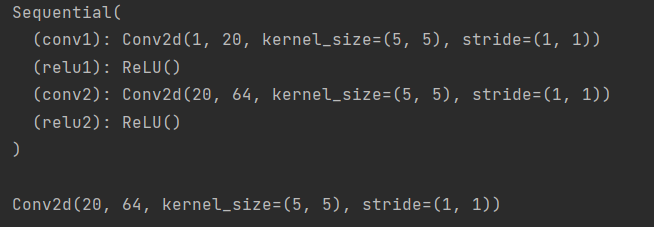
这里,add_module()这个方法是定义在它的父类Module里面的,Sequential继承了该方法。
2.3 nn.Sequential()的本质作用
与一层一层的单独调用模块组成序列相比,nn.Sequential() 可以允许将整个容器视为单个模块(即相当于把多个模块封装成一个模块),forward()方法接收输入之后,nn.Sequential()按照内部模块的顺序自动依次计算并输出结果。
这就意味着我们可以利用nn.Sequential() 自定义自己的网络层,示例如下:
import torch.nn as nn


class Model(nn.Module):
    def __init__(self, in_channel, out_channel):
        super(Model, self).__init__()
        self.layer1 = nn.Sequential(nn.Conv2d(in_channel, in_channel / 4, kernel_size=1),
                                    nn.BatchNorm2d(in_channel / 4),
                                    nn.ReLU())
        self.layer2 = nn.Sequential(nn.Conv2d(in_channel / 4, in_channel / 4),
                                    nn.BatchNorm2d(in_channel / 4),
                                    nn.ReLU())
        self.layer3 = nn.Sequential(nn.Conv2d(in_channel / 4, out_channel, kernel_size=1),
                                    nn.BatchNorm2d(out_channel),
                                    nn.ReLU())

    def forward(self, x):
        x = self.layer1(x)
        x = self.layer2(x)
        x = self.layer3(x)

        return x
上边的代码,我们通过nn.Sequential()将卷积层,BN层和激活函数层封装在一个层中,输入x经过卷积、BN和ReLU后直接输出激活函数作用之后的结果。
3. nn.ModuleList
nn.ModuleList就像一个普通的Python的List,我们可以使用下标来访问它。好处是传入的ModuleList的所有Module都会注册到PyTorch里,这样Optimizer就能找到其中的参数,从而用梯度下降进行更新。但是nn.ModuleList并不是Module(的子类),因此它没有forward等方法,通常会被放到某个Module里。
- nn.ModuleList()
ModuleList 具有和List 相似的用法,实际上可以把它视作是 Module 和 list 的结合。
# 输入参数  modules (list, optional) – 将要被添加到MuduleList中的 modules 列表

class Model(nn.Module):
    def __init__(self):
        super().__init__()
        self.layers=nn.ModuleList([
            nn.Linear(1,10), nn.ReLU(),
            nn.Linear(10,1)])
    def forward(self,x):
        out = x
        for layer in self.layers:
            out = layer(out)
        return out

model = Model()
print(model)
输出如下:

- append(module)
class Model(nn.Module):
    def __init__(self):
        super().__init__()
        self.layers=nn.ModuleList([
            nn.Linear(1,10), nn.ReLU(),
            nn.Linear(10,1)])
        self.layers.append(nn.Linear(1, 5))
    def forward(self,x):
        out = x
        for layer in self.layers:
            out = layer(out)
        return out
- extend(modules)
extend(),必须也为一个list
self.layers.extend([nn.Linear(size1, size2) for i in range(1, num_layers)])
nn.Sequential()和nn.ModuleList的区别:
- nn.Sequential()定义的网络中各层会按照定义的顺序进行级联,因此需要保证各层的输入和输出之间要衔接。
- nn.Sequential()实现了farward()方法,因此可以直接通过类似于x=self.combine(x)实现 forward()。
- nn.ModuleList则没有顺序性要求,并且也没有实现forward()方法。


 1万+
1万+


 被折叠的 条评论
为什么被折叠?
被折叠的 条评论
为什么被折叠?
 到【灌水乐园】发言


