一、配置基础环境
1,shaderView实现
/**
 * Shader渲染控件 2017/12/7.
 */

public class ShaderView extends View {
    private static final int RECT_SIZE = 400;// 矩形尺寸的一半

    private Paint paint;// 画笔

    private int left, top, right, bottom;// 矩形坐上右下坐标

    public ShaderView(Context context) {
        super(context);
    }

    public ShaderView(Context context, @Nullable AttributeSet attrs) {
        super(context, attrs);
        // 获取屏幕中点坐标
        int screenX = MainApplication.getApplication().getWidth() / 2;
        int screenY = MainApplication.getApplication().getHeight() / 2;

        // 计算矩形左上右下坐标值
        left = screenX - RECT_SIZE;
        top = screenY - RECT_SIZE;
        right = screenX + RECT_SIZE;
        bottom = screenY + RECT_SIZE;

        // 实例化画笔
        paint = new Paint(Paint.ANTI_ALIAS_FLAG | Paint.DITHER_FLAG);

        // 获取位图
        Bitmap bitmap = BitmapFactory.decodeResource(getResources(), R.mipmap.panda);

        // 设置着色器
        paint.setShader(new BitmapShader(bitmap, Shader.TileMode.CLAMP, Shader.TileMode.CLAMP));//图片边界为透明时,整个页面全白

    }

    public ShaderView(Context context, @Nullable AttributeSet attrs, int defStyleAttr) {
        super(context, attrs, defStyleAttr);
    }

    @Override
    protected void onDraw(Canvas canvas) {
        // 绘制矩形
        canvas.drawRect(left, top, right, bottom, paint);
    }
}
2,使用
<?xml version="1.0" encoding="utf-8"?>
<android.support.constraint.ConstraintLayout xmlns:android="http://schemas.android.com/apk/res/android"
    xmlns:app="http://schemas.android.com/apk/res-auto"
    xmlns:tools="http://schemas.android.com/tools"
    android:layout_width="match_parent"
    android:layout_height="match_parent"
    tools:context="com.future.bitmapshaderdemo.MainActivity">

    <com.future.bitmapshaderdemo.view.ShaderView
        android:layout_width="wrap_content"
        android:layout_height="wrap_content" />

</android.support.constraint.ConstraintLayout>
当使用原图片周边为空时,使用shader时,页面渲染为白色。并没有效果。切换图片:
Bitmap bitmap = BitmapFactory.decodeResource(getResources(), R.mipmap.cat);
MIrror模式:
paint.setShader(new BitmapShader(bitmap, Shader.TileMode.MIRROR, Shader.TileMode.MIRROR));展示效果:
Repeat模式:
paint.setShader(new BitmapShader(bitmap, Shader.TileMode.REPEAT, Shader.TileMode.REPEAT));展示效果:
组合使用模式,Repeat和Mirror模式:
paint.setShader(new BitmapShader(bitmap, Shader.TileMode.MIRROR, Shader.TileMode.REPEAT));展示效果:
二、渐变使用
1,线性渐变
paint.setShader(new LinearGradient(left, top, right - RECT_SIZE, bottom - RECT_SIZE, Color.RED, Color.GREEN, Shader.TileMode.REPEAT));
多颜色数组:
       paint.setShader(new LinearGradient(left, top, right, bottom,
                new int[]{Color.RED, Color.YELLOW, Color.GREEN, Color.CYAN, Color.BLUE},
                new float[]{0, 0.1F, 0.5F, 0.7F, 0.8F}, Shader.TileMode.MIRROR));//从第一个点到第二个点之间的区域
2,SweepGradient 梯度线性渐变
paint.setShader(new SweepGradient(screenX, screenY, Color.GREEN, Color.YELLOW));
3,径向渐变
//        RadialGradient (float centerX, float centerY, float radius, int centerColor, int edgeColor, Shader.TileMode tileMode)
        paint.setShader(new RadialGradient(screenX, screenY, RECT_SIZE, Color.YELLOW, Color.CYAN, Shader.TileMode.MIRROR));
4,组合渐变
        BitmapShader bitmapShader = new BitmapShader(bitmap, Shader.TileMode.CLAMP, Shader.TileMode.MIRROR);
        LinearGradient linearGradient = new LinearGradient(left, top, right - RECT_SIZE, bottom - RECT_SIZE, Color.RED, Color.GREEN, Shader.TileMode.MIRROR);
        ComposeShader composeShader = new ComposeShader(bitmapShader, linearGradient, PorterDuff.Mode.ADD);

        paint.setShader(composeShader);
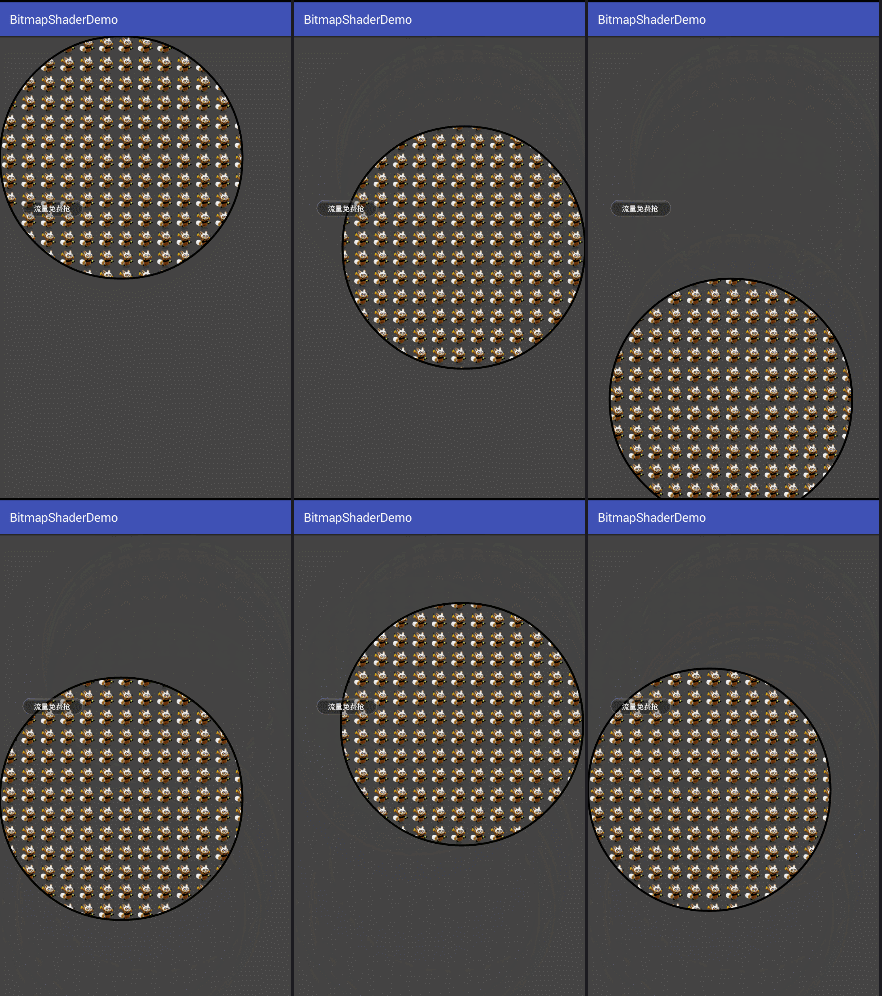
三、自定义控件使用
1,自定义控件
/**
 * 重复渲染之后运动  2017/12/7.
 */

public class MoveView extends View {
    private static final int RECT_SIZE = 600;// 矩形尺寸的一半
    private Paint strokePaint, fillPaint;// 画笔
    private BitmapShader bitmapShader;
    private float posX, posY;//现在位置
    /**
     * 半径
     */
    private int radius = 300;
    /**
     * 整个屏幕的宽高
     */
    private int width, height;

    public MoveView(Context context) {
        super(context);
    }

    public MoveView(Context context, @Nullable AttributeSet attrs) {
        super(context, attrs);
        initPaint();
    }

    public MoveView(Context context, @Nullable AttributeSet attrs, int defStyleAttr) {
        super(context, attrs, defStyleAttr);
    }


    /**
     * 初始化画笔
     */
    private void initPaint() {
        width = MainApplication.getApplication().getWidth();
        height = MainApplication.getApplication().getHeight();

        posX = radius;
        posY = radius;
        /*
         * 实例化描边画笔并设置参数
         */
        strokePaint = new Paint(Paint.ANTI_ALIAS_FLAG | Paint.DITHER_FLAG);
        strokePaint.setColor(0xFF000000);
        strokePaint.setStyle(Paint.Style.STROKE);
        strokePaint.setStrokeWidth(5);

        // 实例化填充画笔
        fillPaint = new Paint();

        /*
         * 生成BitmapShader
         */
        Bitmap mBitmap = BitmapFactory.decodeResource(getResources(), R.mipmap.master);
        bitmapShader = new BitmapShader(mBitmap, Shader.TileMode.REPEAT, Shader.TileMode.REPEAT);
        fillPaint.setShader(bitmapShader);
    }


    @Override
    public boolean onTouchEvent(MotionEvent event) {
        if (event.getAction() == MotionEvent.ACTION_MOVE) {
            posX = event.getX();
            posY = event.getY();

            /**
             * 临界值处理
             */
            if (posX < radius) {
                posX = radius;
            }

            if (width - posX < radius) {
                posX = width - radius;
            }

            if (posY < radius) {
                posY = radius;
            }

            if (height - posY < radius) {
                posY = height - radius;
            }

            invalidate();
        }
        return true;

//        return super.onTouchEvent(event);
    }


    @Override
    protected void onDraw(Canvas canvas) {
        super.onDraw(canvas);
        canvas.drawColor(Color.DKGRAY);

        canvas.drawCircle(posX, posY, radius, fillPaint);
        canvas.drawCircle(posX, posY, radius, strokePaint);
    }
}
2,使用
<?xml version="1.0" encoding="utf-8"?>
<android.support.constraint.ConstraintLayout xmlns:android="http://schemas.android.com/apk/res/android"
    xmlns:app="http://schemas.android.com/apk/res-auto"
    xmlns:tools="http://schemas.android.com/tools"
    android:layout_width="match_parent"
    android:layout_height="match_parent"
    tools:context="com.future.bitmapshaderdemo.MainActivity">

    <com.future.bitmapshaderdemo.view.MoveView
        android:layout_width="wrap_content"
        android:layout_height="wrap_content"
         />

</android.support.constraint.ConstraintLayout>
太多人,近在眼前,却看不清。有些人,隔着一片又一片人海,却不停地向你挥手。


 2756
2756

 被折叠的 条评论
为什么被折叠?


