


Index:.../Applications/Measuring-2D/inspect_gasket_local_deformable.hdev
猛一看就是一个deformable的模板匹配,但里面还有些不同。
首先就是这个变分?模型的建立
* Create variation model
sobel_amp (ModelImage, EdgeAmplitude, 'thin_max_abs', 5)
create_variation_model (425, 410, 'byte', 'direct', VariationModelID)
prepare_direct_variation_model (ModelImage, EdgeAmplitude, VariationModelID, 30, 1.5)
*
从帮助文档看到,create_variation_model一般都是训练一堆图像的,但选择 'direct'时,可以In this case, the variation model can only be trained by specifying the ideal image and the variation image directly with prepare_direct_variation_model.
并且文档最后一句说,为了减小变分模型的大小,先用sobel算子提取下边缘。
prepare_direct_variation_model 这个函数就是让模板和变分模型的句柄建立联系的函数。
然后往下是建立 deformable model。看来又是老一套
* Create locally deformable model
create_local_deformable_model (ModelImage, 'auto', rad(-10), rad(20), 'auto', 0.9, 1.1, 'auto', 0.9, 1.1, 'auto', 'none', 'use_polarity', 'auto', 'auto', [], [], ModelID)
get_deformable_model_contours (ModelContours, ModelID, 1)
area_center (ModelImage, Area, Row, Column)
hom_mat2d_identity (HomMat2DIdentity)
hom_mat2d_translate (HomMat2DIdentity, Row, Column, HomMat2DTranslate)
affine_trans_contour_xld (ModelContours, ContoursAffinTrans, HomMat2DTranslate)
*
create_local_deformable_model 参数选择都差不多
然后下面是画出来deformable model的样子,用仿射变换。
NumImages := 7
for Index := 1 to NumImages by 1
read_image (Image, 'gasket/gasket_' + Index$'02')
dev_set_window (WindowHandle2)
dev_display (Image)
disp_message (WindowHandle2, 'Search ...', 'window', 12, 12, 'black', 'true')
* Find the model in the search image.
* As result, the rectified image, the respective
* vector field, and the found contours are queried.
count_seconds (S1)
find_local_deformable_model (Image, ImageRectified, VectorField, DeformedContours, ModelID, rad(-10), rad(20), 1, 1, 1, 1, 0.93, 1, 0.7, 0, 0.4, ['image_rectified','vector_field','deformed_contours'], ['deformation_smoothness','expand_border','subpixel'], [Smoothness,0,1], Score, Row, Column)
count_seconds (S2)
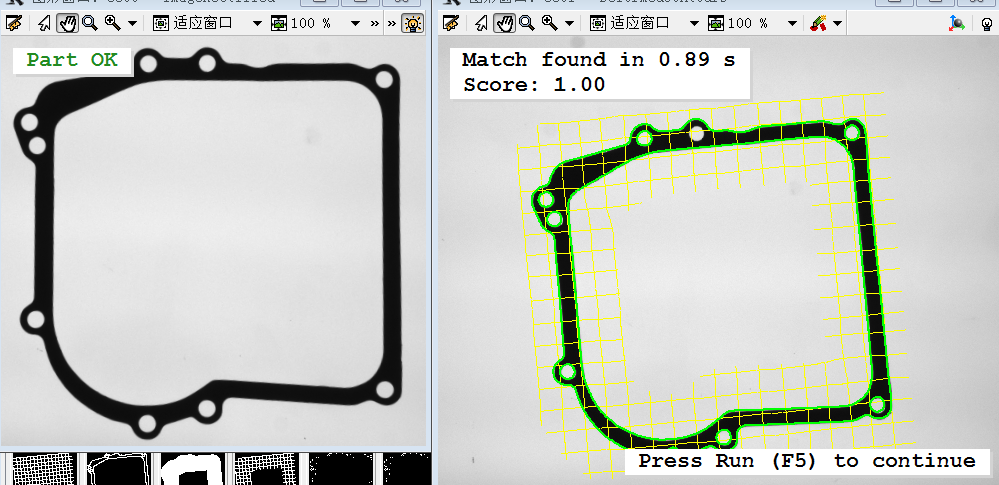
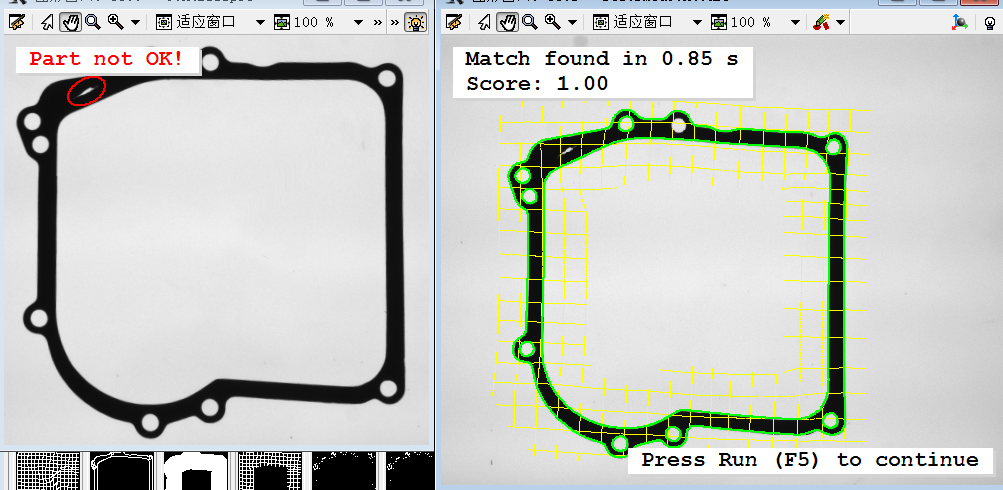
接下来就是检测,读取新的图片,然后find_local_deformable_model
再往下又是老东西,gen_warped_mesh_region (VectorField, MeshRegion, Smoothness)画那个全是格的函数
gen_region_contour_xld (DeformedContours, EdgeRegion, 'margin')
dilation_circle (EdgeRegion, RegionDilation, 2 * Smoothness)
intersection (RegionDilation, MeshRegion, RegionIntersection)
*
这就开始不同了,把匹配物品的XLD膨胀然后与生成的格做与运算。其实这些都是为了美观
然后 compare_variation_model (ImageRectified, Region, VariationModelID)
connection (Region, ConnectedRegions)
select_shape (ConnectedRegions, SelectedRegions, 'area', 'and', 30, 99999)
count_obj (SelectedRegions, Number)
compare_variation_model 这个是用来找之前用find找到的模板匹配出来的图像与一开始创建的变分模型句柄来比较。
比较结果放在Region里面。(草草草,我忽然发现变分模型比较和一个东西很像,那个东西叫差影法,用来提取仪表刻度的,用变分模型的话,是不是也可以提取刻度呢,比如先做deformable匹配,刻度匹配上了然后把不对的地方变分消去,然后就剩下刻度了可以用来与指针做运算。以后可以试试。)
比较结果做了一些形态学检测,也就是不同面积多于多少的就判定为不ok


 8814
8814


 被折叠的 条评论
为什么被折叠?
被折叠的 条评论
为什么被折叠?
 到【灌水乐园】发言


