


Android提供的系统服务之--LayoutInflater(布局服务)
——转载请注明出处:coder-pig
本节引言:
本节我们只要是介绍Android系统服务中的——LayoutInflater(布局服务),
相信大家已经习惯了通过Activity.setContentView( )方法来我们的布局文件,
底层的底层还是通过这个系统的LayoutInflater来完成的!
工作原理就是使用Android内置的pull解析器来解析布局~
而在前几天写的blog中用到的动态布局,就是用到这个东东,有兴趣的可以看看
纯Java代码加载布局:http://blog.csdn.net/coder_pig/article/details/43983709
Java代码动态添加组件或布局:http://blog.csdn.net/coder_pig/article/details/43988511
其实基本的用法示例就在上面这两篇blog中,本节就是一些概念的唠叨~
本节正文:
1.LayoutInflater是什么鬼?
答:一个用于加载布局的系统服务!就是实例化与Layout XML文件对应的View对象,不能直接使用,
需要通过getLayoutInflater( )方法或者getSystemService( )方法来获得与当前Context绑定的
LayoutInflater实例!
2.LayoutInflater的用法:
①获取LayoutInflater的三种方法:
- //方法一
- LayoutInflater inflater1 = LayoutInflater.from(this);
- //方法二
- LayoutInflater inflater2 = getLayoutInflater();
- //方法三
- LayoutInflater inflater3 = (LayoutInflater) getSystemService(LAYOUT_INFLATER_SERVICE);
ps:其实前两个方法底层的代码都是调用的第三个东东~
②加载布局的方法:
public View inflate (int resource, ViewGroup root, boolean attachToRoot)
该方法的三个参数依次为:
①要加载的布局Id
②为该布局的外部再嵌套一层父布局,如果不需要的话,写null就可以了!
③是否为加载的布局文件的最外层套一层root布局,不设置该参数的话,如果
root不为null的话,默认为true,另外,如果root为null的话,attachToRoot就没有作用了!
root不为null,attachToRoot为true的话,会在加载的布局文件最外层嵌套一层root布局;
为false的话,则root失去作用!
简单点理解:是否为加载的布局添加一个root的外层容器~!
③通过LayoutInflater.LayoutParams来设置相关的属性:
比如RelativeLayout还可以通过addRule方法添加规则,就是设置位置,是参考父容器呢,
还是参考子控件,又或者设置margin等等,这个由你决定~
这里写个简单的例子吧:
activity_main.xml:
- <RelativeLayout xmlns:android="http://schemas.android.com/apk/res/android"
- xmlns:tools="http://schemas.android.com/tools"
- android:layout_width="match_parent"
- android:layout_height="match_parent"
- tools:context="com.example.test.MainActivity"
- android:id="@+id/rly">
- <Button
- android:id="@+id/btnOne"
- android:layout_width="wrap_content"
- android:layout_height="wrap_content"
- android:text="我是setContentView( )加载的Button" />
- </RelativeLayout>
MainActivity.java:
- package com.example.test;
- import android.app.Activity;
- import android.os.Bundle;
- import android.view.LayoutInflater;
- import android.widget.Button;
- import android.widget.RelativeLayout;
- import android.widget.RelativeLayout.LayoutParams;
- public class MainActivity extends Activity {
- @Override
- protected void onCreate(Bundle savedInstanceState) {
- super.onCreate(savedInstanceState);
- setContentView(R.layout.activity_main);
- Button btnTwo = new Button(this);
- btnTwo.setText("我是动态加载的Button");
- RelativeLayout rly = (RelativeLayout) findViewById(R.id.rly);
- LayoutInflater inflater = (LayoutInflater) getSystemService(LAYOUT_INFLATER_SERVICE);
- RelativeLayout.LayoutParams lp = new LayoutParams(
- RelativeLayout.LayoutParams.MATCH_PARENT,
- RelativeLayout.LayoutParams.WRAP_CONTENT);
- lp.addRule(RelativeLayout.BELOW,R.id.btnOne);
- lp.setMargins(10, 10, 10, 10);
- //addView( )方法可以设置不同参数哦~
- rly.addView(btnTwo, lp);
- }
- }
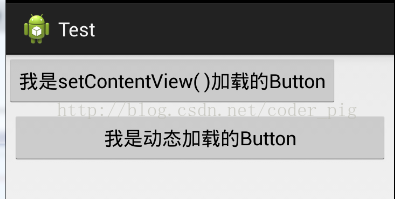
运行效果图:
代码是比较简单的,就不多解释了~,最后提供下LayoutInflater的inflate( )方法的源码,
有兴趣的可以研究下:
- public View inflate(XmlPullParser parser, ViewGroup root, boolean attachToRoot) {
- synchronized (mConstructorArgs) {
- final AttributeSet attrs = Xml.asAttributeSet(parser);
- mConstructorArgs[0] = mContext;
- View result = root;
- try {
- int type;
- while ((type = parser.next()) != XmlPullParser.START_TAG &&
- type != XmlPullParser.END_DOCUMENT) {
- }
- if (type != XmlPullParser.START_TAG) {
- throw new InflateException(parser.getPositionDescription()
- + ": No start tag found!");
- }
- final String name = parser.getName();
- if (TAG_MERGE.equals(name)) {
- if (root == null || !attachToRoot) {
- throw new InflateException("merge can be used only with a valid "
- + "ViewGroup root and attachToRoot=true");
- }
- rInflate(parser, root, attrs);
- } else {
- View temp = createViewFromTag(name, attrs);
- ViewGroup.LayoutParams params = null;
- if (root != null) {
- params = root.generateLayoutParams(attrs);
- if (!attachToRoot) {
- temp.setLayoutParams(params);
- }
- }
- rInflate(parser, temp, attrs);
- if (root != null && attachToRoot) {
- root.addView(temp, params);
- }
- if (root == null || !attachToRoot) {
- result = temp;
- }
- }
- } catch (XmlPullParserException e) {
- InflateException ex = new InflateException(e.getMessage());
- ex.initCause(e);
- throw ex;
- } catch (IOException e) {
- InflateException ex = new InflateException(
- parser.getPositionDescription()
- + ": " + e.getMessage());
- ex.initCause(e);
- throw ex;
- }
- return result;
- }
- }
那么,本节就到这里,如果你有什么补充的话欢迎提出~O(∩_∩)O谢谢~
参考资料:
郭大叔的blog:http://blog.csdn.net/guolin_blog/article/details/12921889


 289
289


 被折叠的 条评论
为什么被折叠?
被折叠的 条评论
为什么被折叠?
 到【灌水乐园】发言


