


1.之前注册字符设备用的如下函数注册字符设备驱动:
register_chrdev(unsigned int major, const char *name,const struct file_operations *fops);
但其实这个函数是linux版本2.4之前的注册方式,它的原理是:
(1)确定一个主设备号,如果major=0,则会自动分配设备号
(2)构造一个file_operations结构体, 然后放在chrdevs数组中
(3)注册:register_chrdev,cat /proc/devices查看内核中已经注册过的字符设备驱动(和块设备驱动),注意这里并不是驱动文件设备节点!
然后当读写字符设备的时候,就会根据主设备号从chrdevs数组中取出相应的结构体,并调用相应的处理函数。
它会有个很大的缺点:
每注册一个字符设备,还会连续注册0~255个次设备号,使它们绑定在同一个file_operations操作方法结构体上,在大多数情况下,都只用极少的次设备号,所以会浪费很多资源。在 2.4 的内核我们使用 register_chrdev(0, "hello", &hello_fops) 来进行字符设备设备节点的分配,这种方式每一个主设备号只能存放一种设备,它们使用相同的 file_operation 结构体,也就是说内核最多支持 256 个字符设备驱动程序。
之前写的字符类设备驱动,没有自动创建设备节点,因为只使用了register_chrdev()函数,只是注册了这个设备。然后在系统启动后,就要自己创建设备节点mknod,这样虽然是可行的,但是比较麻烦。于是想在__init函数里面,自动创建设备节点。
2.所以在2.4版本后,内核里就加入了以下几个函数也可以来实现注册字符设备:
分为了静态注册(指定设备编号来注册)、动态分配(不指定设备编号来注册),以及有连续注册的次设备编号范围区间,避免了register_chrdev()浪费资源的缺点
2.1: register_chrdev_region
/*指定设备编号来静态注册一个字符设备*/
int register_chrdev_region(dev_t from, unsigned count, const char *name);
from: 注册的指定起始设备编号,比如:MKDEV(100, 0),表示起始主设备号100, 起始次设备号为0
count:需要连续注册的次设备编号个数,比如: 起始次设备号为0,count=100,表示0~99的次设备号都要绑定在同一个file_operations操作方法结构体上
*name:字符设备名称
当返回值小于0,表示注册失败
2.2: alloc_chrdev_region
/*动态分配一个字符设备,注册成功并将分配到的主次设备号放入*dev里*/
int alloc_chrdev_region(dev_t *dev, unsigned baseminor, unsigned count,const char *name);
*dev: 存放起始设备编号的指针,当注册成功, *dev就会等于分配到的起始设备编号,可以通过MAJOR()和MINNOR()函数来提取主次设备号
baseminor:次设备号基地址,也就是起始次设备号
count:需要连续注册的次设备编号个数,比如: 起始次设备号(baseminor)为0,baseminor=2,表示0~1的此设备号都要绑定在同一个file_operations操作方法结构体上
*name:字符设备名称
当返回值小于0,表示注册失败
2.3: cdev_init
/*初始化cdev结构体,并将file_operations结构体放入cdev-> ops 里*/
void cdev_init(struct cdev *cdev, const struct file_operations *fops);
其中cdev结构体的成员,如下所示:
struct cdev {
struct kobject kobj; // 内嵌的kobject对象
struct module *owner; //所属模块
const struct file_operations *ops; //操作方法结构体
struct list_head list; //与 cdev 对应的字符设备文件inode->i_devices 的链表头
dev_t dev; //起始设备编号,可以通过MAJOR(),MINOR()来提取主次设备号
unsigned int count; //连续注册的次设备号个数
};
2.4: cdev_add
/*将cdev结构体添加到系统中,并将dev(注册好的设备编号)放入cdev-> dev里, count(次设备编号个数)放入cdev->count里*/
int cdev_add(struct cdev *p, dev_t dev, unsigned count);
2.5: cdev_del
/*将系统中的cdev结构体删除掉*/
void cdev_del(struct cdev *p);
2.6: unregister_chrdev_region
/*注销字符设备*/
void unregister_chrdev_region(dev_t from, unsigned count);
from: 注销的指定起始设备编号,比如:MKDEV(100, 0),表示起始主设备号100, 起始次设备号为0
count:需要连续注销的次设备编号个数,比如: 起始次设备号为0,baseminor=100,表示注销掉0~99的次设备号
3.接下来,我们便来写一个字符设备驱动
里面调用两次上面的函数,构造两个不同的file_operations操作结构体,
次设备号0~1对应第一个file_operations,
次设备号2~3对应第二个file_operations,
然后在/dev/下,通过次设备号(0~4)创建5个设备节点, 利用应用程序打开这5个文件,看有什么现象
3.1 驱动代码如下:
#include <linux/module.h>
#include <linux/kernel.h>
#include <linux/fs.h>
#include <linux/init.h>
#include <linux/delay.h>
#include <asm/irq.h>
#include <asm/arch/regs-gpio.h>
#include <asm/hardware.h>
#include <asm/uaccess.h>
#include <asm/io.h>
#include <linux/list.h>
#include <linux/cdev.h>
static int hello_fops1_open(struct inode *inode, struct file *file)
{
printk("open_hello1!!!\n");
return 0;
}
static int hello_fops2_open (struct inode *inode, struct file *file)
{
printk("open_hello2!!!\n");
return 0;
}
/* 操作结构体1 */
static struct file_operations hello1_fops={
.owner=THIS_MODULE,
.open =hello_fops1_open,
};
/* 操作结构体2 */
static struct file_operations hello2_fops={
.owner=THIS_MODULE,
.open =hello_fops2_open,
};
static int major; //主设备
static struct cdev hello1_cdev; //保存 hello1_fops操作结构体的字符设备
static struct cdev hello2_cdev; //保存 hello2_fops操作结构体的字符设备
static struct class *cls;
static int chrdev_ragion_init(void)
{
dev_t devid;
alloc_chrdev_region(&devid, 0, 4,"hello"); //动态分配字符设备: (major,0) (major,1) (major,2) (major,3)
major=MAJOR(devid);
cdev_init(&hello1_cdev, &hello1_fops);
cdev_add(&hello1_cdev, MKDEV(major,0), 2); //(major,0) (major,1)
cdev_init(&hello2_cdev, &hello2_fops);
cdev_add(&hello2_cdev,MKDEV(major,2), 2); //(major,2) (major,3)
cls=class_create(THIS_MODULE, "hello");
/*创建字符设备节点*/
class_device_create(cls,0, MKDEV(major,0), 0, "hello0"); //对应hello_fops1操作结构体
class_device_create(cls,0, MKDEV(major,1), 0, "hello1"); //对应hello_fops1操作结构体
class_device_create(cls,0, MKDEV(major,2), 0, "hello2"); //对应hello_fops2操作结构体
class_device_create(cls,0, MKDEV(major,3), 0, "hello3"); //对应hello_fops2操作结构体
return 0;
}
void chrdev_ragion_exit(void)
{
class_device_destroy(cls, MKDEV(major,4));
class_device_destroy(cls, MKDEV(major,3));
class_device_destroy(cls, MKDEV(major,2));
class_device_destroy(cls, MKDEV(major,1));
class_device_destroy(cls, MKDEV(major,0));
class_destroy(cls);
cdev_del(&hello1_cdev);
cdev_del(&hello2_cdev);
unregister_chrdev_region(MKDEV(major,0), 4); //注销(major,0)~(major,3)
}
module_init(chrdev_ragion_init);
module_exit(chrdev_ragion_exit);
MODULE_LICENSE("GPL");
3.2 测试代码如下所示:
#include <stdio.h>
#include <stdlib.h>
#include <string.h>
#include <sys/types.h>
#include <sys/stat.h>
#include <fcntl.h>
void print_useg(char arg[]) //打印使用帮助信息
{
printf("useg: \n");
printf("%s [dev]\n",arg);
}
int main(int argc,char **argv)
{
int fd;
if(argc!=2)
{
print_useg(argv[0]);
return -1;
}
fd=open(argv[1],O_RDWR);
if(fd<0)
printf("can't open %s \n",argv[1]);
else
printf("can open %s \n",argv[1]);
return 0;
}
4.运行测试:
如下图,挂载驱动后,通过 ls /dev/hello* -l ,看到创建了5个字符设备节点

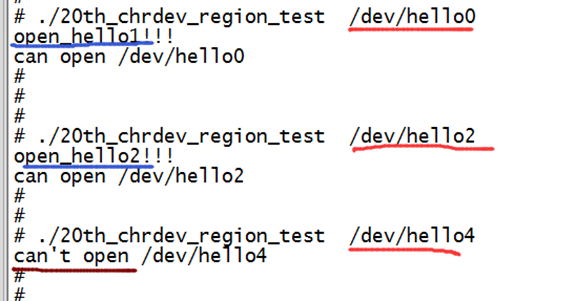
接下来开始测试驱动,如下图所示,
打开/dev/hello0时,调用的是驱动代码的操作结构体hello1_fops里的.open(),
打开/dev/hello2时,调用的是驱动代码的操作结构体hello1_fops里的.open(),
打开/dev/hello4时,打开无效,因为在驱动代码里没有分配次设备号4的操作结构体,
总结:
使用register_chrdev_region()等函数来注册字符设备,里面可以存放多个不同的file_oprations操作结构体,实现各种不同的功能


 55
55


 被折叠的 条评论
为什么被折叠?
被折叠的 条评论
为什么被折叠?
 到【灌水乐园】发言


