


文章目录
00 写在前面
该系列的文章,源自于担任过PIC单片机课程的助教,主要向学弟们讲解了几节实验课的内容。在此记录上课的一些知识。
本系列文章主要介绍的内容:
实验1–介绍和基本I/O–按钮和LED(学习嵌入式的第一步就是点一个灯,就像学习编程语言的第一步都是写一个“hello world”代码)
实验2–MPLAB+PICkit 3+LCD+I/O(这次主要是介绍液晶显示屏的使用,很多时候我们系统的调试都需要用到,比如做一个测温系统,那我们就可以通过液晶显示屏,显示传感器采集的数值,然后再通过软件来做进一步的处理)
实验3–ADC(这个是模数转化实验,就是之前模数电学习那些知识的一个综合运用)
实验4–串行通信–UART
实验5–串行通信–I2C
实验6–计时器和中断(这一部分也是很重要的知识点,在很多的嵌入式系统中都会用到,比如用单片机再加几个传感器就可以搭出智能车,智能车就会用到计时器、中断这些内容)
01 LCD有什么用途
这次主要是介绍液晶显示屏的使用,很多时候我们系统的调试都需要用到,比如做一个测温系统,那我们就可以通过液晶显示屏,显示传感器采集的数值,然后再通过软件来做进一步的处理。
02 我们直接根据LCD demo 这个代码来讲一下LCD的原理以及操作?
//
 /**
* Title:		LCD DEMO for use in Lab 2 tutorial
* C File        lcddemo.c
* Platform:     PICmicro PIC16F877A @ 4 Mhz
* Written by:	GBM
*
* Date:			01/10/2018
*
* Function:		A sample c file to show how to use the LCD display onboard
*               the PIC DIP-40 board.
*
*/


// CONFIG
#pragma config FOSC = XT        // Oscillator Selection bits (XT oscillator)
#pragma config WDTE = OFF       // Watchdog Timer Enable bit (WDT disabled)
#pragma config PWRTE = OFF      // Power-up Timer Enable bit (PWRT disabled)
#pragma config BOREN = OFF      // Brown-out Reset Enable bit (BOR disabled)
#pragma config LVP = OFF        // Low-Voltage (Single-Supply) In-Circuit Serial Programming Enable bit (RB3 is digital I/O, HV on MCLR must be used for programming)
#pragma config CPD = OFF        // Data EEPROM Memory Code Protection bit (Data EEPROM code protection off)
#pragma config WRT = OFF        // Flash Program Memory Write Enable bits (Write protection off; all program memory may be written to by EECON control)
#pragma config CP = OFF         // Flash Program Memory Code Protection bit (Code protection off)

// #pragma config statements should precede project file includes.
// Use project enums instead of #define for ON and OFF.

#include <xc.h>
#include <stdio.h>      // Include Standard I/O header file
#include "ee302lcd.h"	// Include LCD header file. This file must be in same
                        // directory as source main source file.

#ifndef _XTAL_FREQ
 // Unless already defined assume 4MHz system frequency
 // This definition is required to calibrate the delay functions, __delay_us() and __delay_ms()
 #define _XTAL_FREQ 4000000
#endif


// Definitions____________________________________________________________

#define CLOSED 0		// Define switch action "Closed" as 0
#define SW1 RB0			// Assign Label SW1 to PortB bit 0 (RB0)
#define SW2 RB1			// Assign Label SW2 to PortB bit 1 (RB1)
#define VALUE1 123
#define VALUE2 456


// globals _____________________________________________________

	unsigned char gOutString[16];	//


// Prototypes_____________________________________________________________

void setup(void);		// Declare setup function
void loop(void);        // Declare loop function
void data2LCD(void);	// Declare data to LCD function
void lcdTitle(void);	// Declare title to LCD function
void clear_outString(void);  // Declare outString clear function


//Main program
void main(void)
{

	setup();				// Call initialisation

	lcdTitle();			// Call LCDTitle


//Superloop
	for(;;)
	{
		loop();		// Write data to LCD
	}
}

void setup(void)
	{
	Lcd8_Init();		// Required initialisation of LCD to 8-bit mode
	TRISB=0x03;			// Set PORTB bit 0 and 1 as inputs
	}

void loop(void)
    {
    data2LCD();
    }


void data2LCD(void)
	{

		if (SW1 == CLOSED)						// If SW1 closed then
		{
			Lcd8_Clear();						//clear LCD display
            clear_outString();                  //clear outString array
			sprintf(gOutString,"Int Value1 is");	//define string as "Int Value is"
			Lcd8_Write_String(gOutString);		//print string to LCD
			Lcd8_Set_Cursor(2,1);				//select line 2 of LCD
			sprintf(gOutString,"      %d",VALUE1);	//define intvalue as a char in outString
			Lcd8_Write_String(gOutString);		//print string to LCD
		}

        if (SW2 == CLOSED)						// If SW2 closed then
		{
		// Modulus used to help convert integer to ASCII character
			Lcd8_Clear();                       //clear LCD display
            clear_outString();                  //clear outString array
            sprintf(gOutString,"Int Value2 is");	//define string as "Int Value is"
			Lcd8_Write_String(gOutString);		//print string to LCD
			Lcd8_Set_Cursor(2,7);				//select line 2 of LCD
            clear_outString();                  //clear outString array
			gOutString[0] = (VALUE2/100)%10 + 48;	// add 48 (0x30) to remainder to offset to character in Ascii table.
			gOutString[1] = (VALUE2/10)%10 + 48;
			gOutString[2] = (VALUE2/1)%10 + 48;

			Lcd8_Write_String(gOutString);

		}
	}

void lcdTitle(void)
	{
	Lcd8_Write_String("LCD demo");		// print "LCD Demo" on line 1 of LCD
	Lcd8_Set_Cursor(2,1);				// select line 2
	Lcd8_Write_String("LCD demo");		// print "LCD Demo" on line 2 of LCD
	}

void clear_outString(void)
{
    int i;
    for (i=0; i<16; i++)
    {
        gOutString[i] = 0x00;
    }
}
首先就是要对压缩包进行解压,然后就可以看到有两个文件,一个是.c另一个是.h,这两个文件都要包含进入项目中,然后再编译就不会有问题。接着按我们第一个实验的操作,把它下载进入PIC单片机中,就可以看到LCD上两行都亮lcd demo。
那接下来的重点就是给大家,讲解一下代码如何来理解,理解完了之后,你们就会对lcd进行操作了。
首先,前面这些跟之前实验一样,接着就进入到main函数中。进入main函数之后,就是setup函数,setup函数中包含初始化函数,初始化函数就是设置相关寄存器。
首先看一下原理图,包含RE(主要是控制信号)、RD(主要是数据口)、电源端口
所以我们寄存器就设置TRISD、TRISE;
接着再看一下原理图我们会发现,RE端口是跟几个模拟信号的引脚复用,而我们需要的是数字信号,所以我们肯定要设置某一个寄存器。这个寄存器是ADCON1(可以通过芯片手册查看),然后只要AN5–AN7是数字信号就可以。
所以,我们总共设置TRISD、TRISE、ADCON1三个寄存器;

Lcd8_Port这个函数的功能就是用来给RD引脚赋值,就是进行一些与运算,将16进制转化成为2进制的八位数就是PORTD八个引脚的值。(也就是传给LCD的数据;)
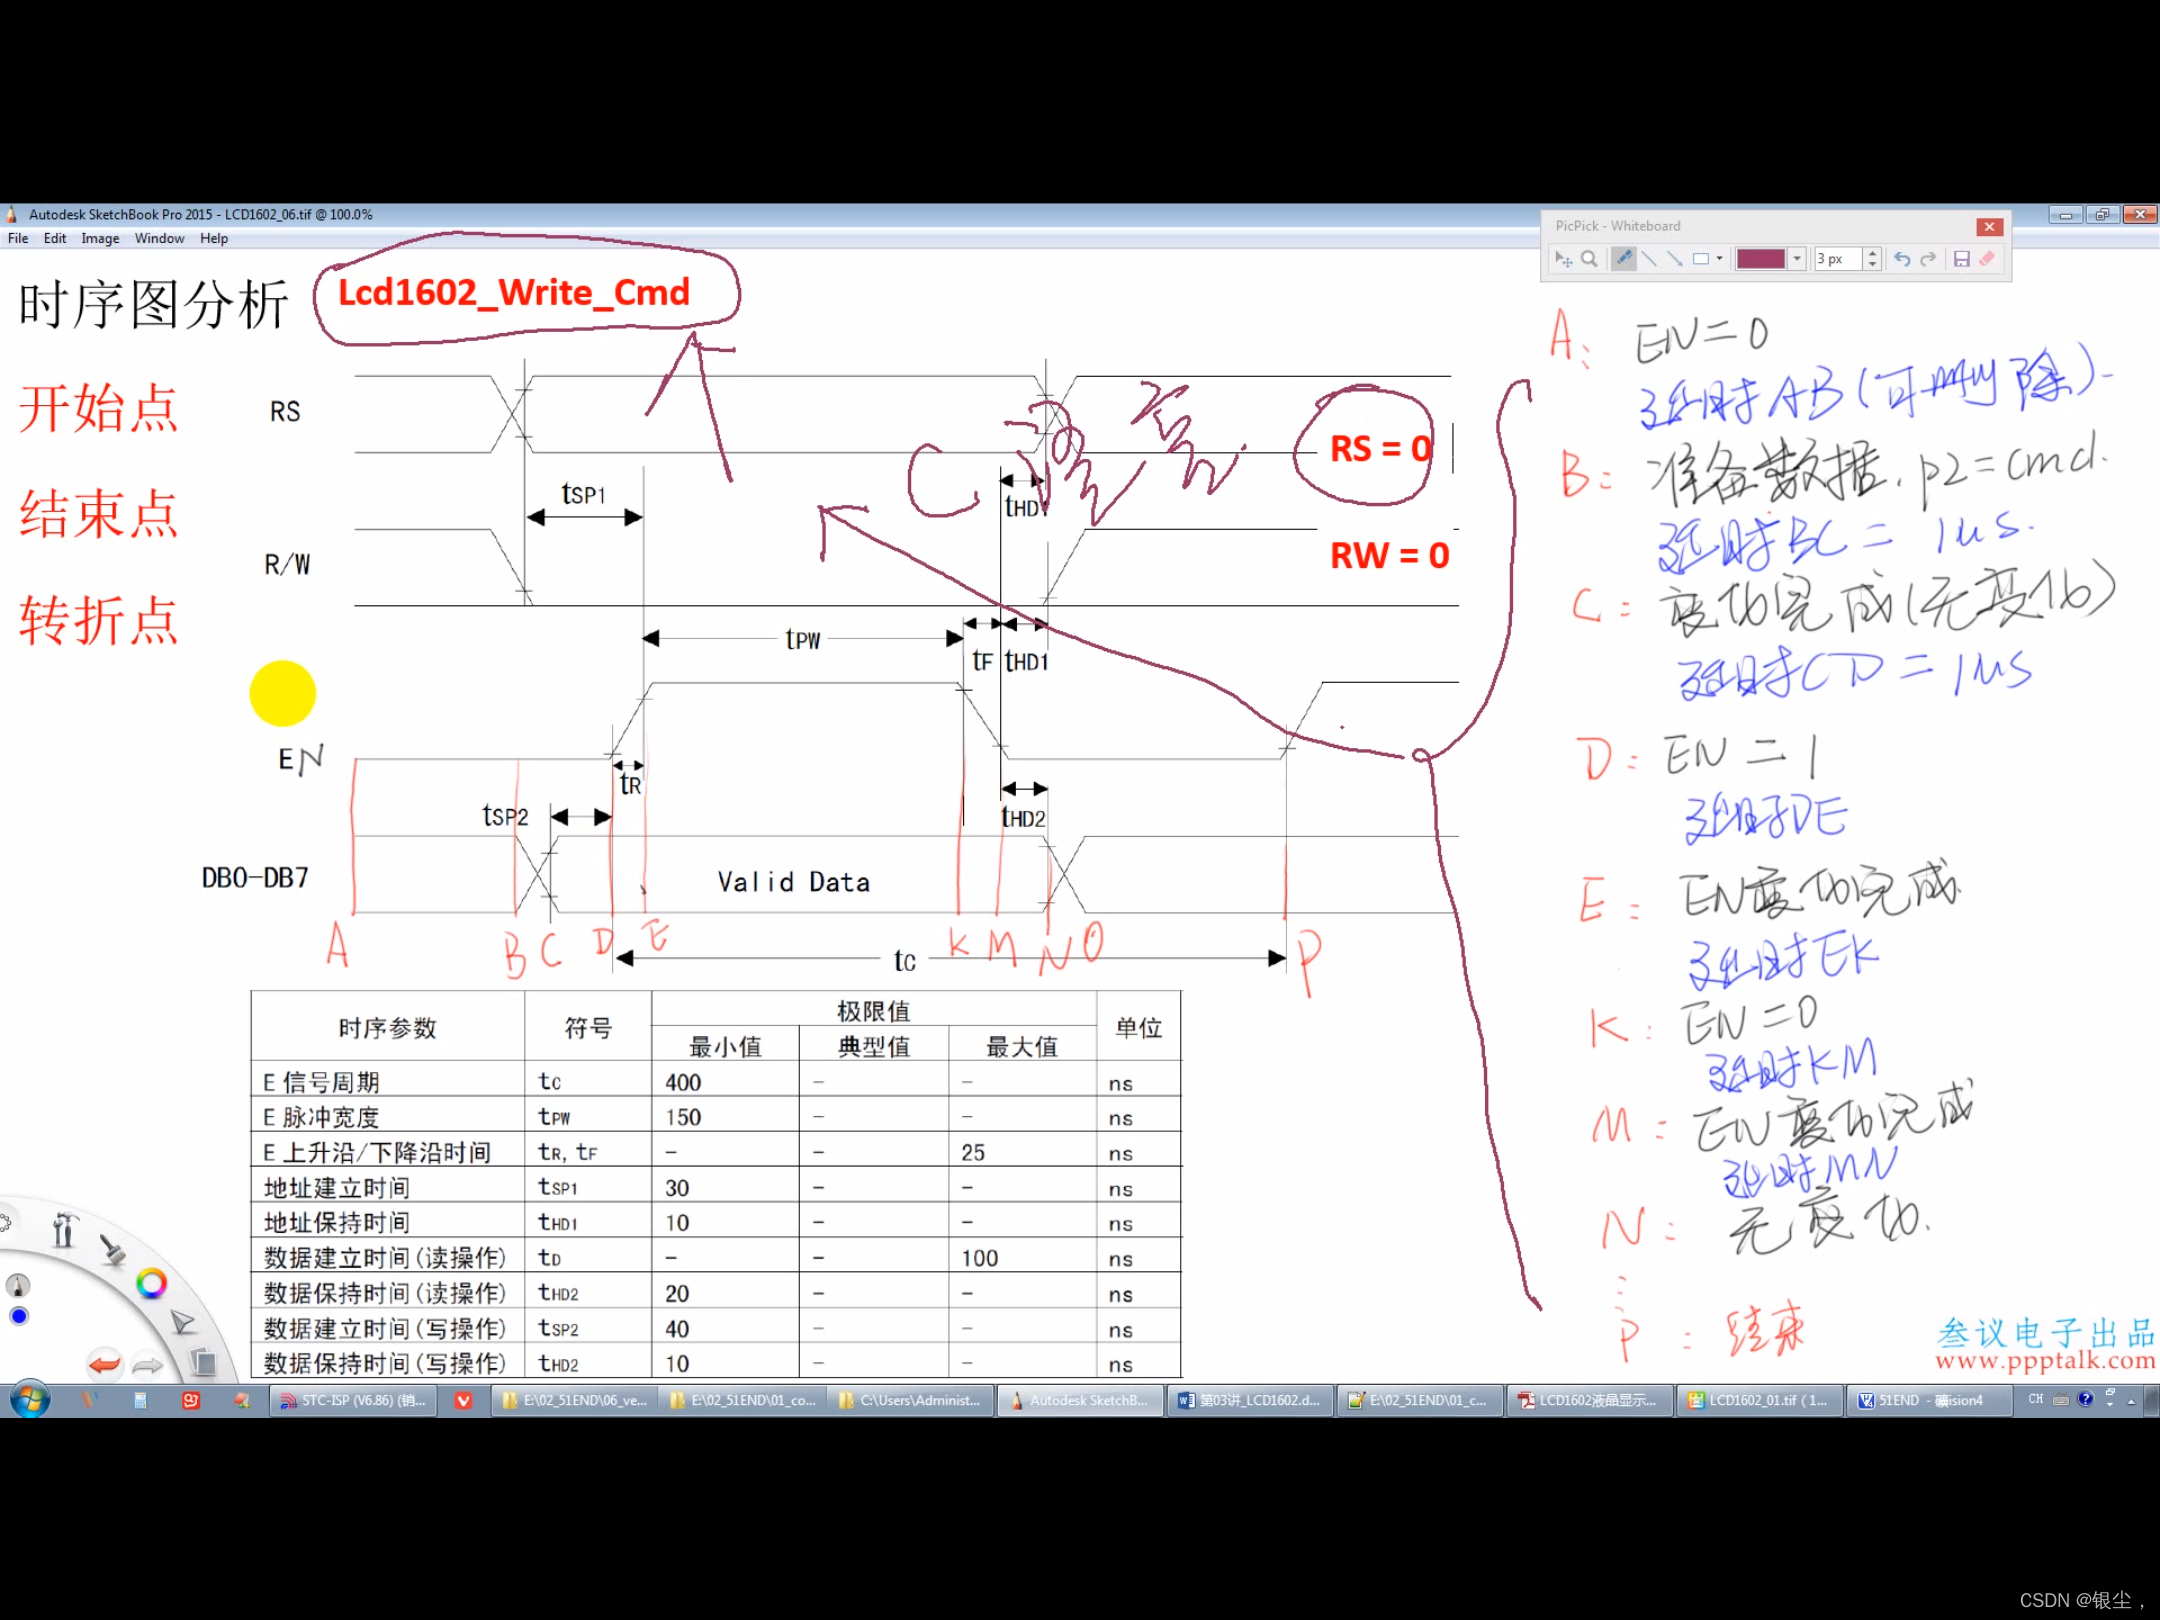
03 时序
(这里给大家强调一个点:单片机就是设置寄存器,然后它就可以有相应的功能;那今天我们开始讲外设,就是除了单片机之外的其他模块,比如今天的LCD;那外设通常都包含有芯片(比如LCD、IIC通信等等),那对芯片的操作就是写相应的时序。)
比如LCD有下面这四个基本时序:(今天用到写指令、写数据)

如何读懂时序?
https://blog.csdn.net/special00/article/details/80928684


04 显示相关


05 结尾

大家记得点赞收藏!!!


 4241
4241

 被折叠的 条评论
为什么被折叠?
被折叠的 条评论
为什么被折叠?
 到【灌水乐园】发言


