


诉求/目的:FPGA实现算法硬件加速,Vitis编码--程序调试、性能分析、固化--导出到SD卡--开发板运行算法。
我们买的是下面这一款:好像很久以前也搞过,不过不是这一款,翻了下之前的笔记,居然是2018年记录的:
ubuntu16.04,zed7020,sdsoc,xfOpenCV,arm-linux,OpenCV3.4.1_元气少女缘结神的博客-CSDN博客 about sdsoc.pdf_元气少女缘结神的博客-CSDN博客
~~~~~~~~~~~~~~~~~~~~~~~开机测试~~~~~~~~~~~~~~~~~~~~~~~~~~~~~~~~~~~~~
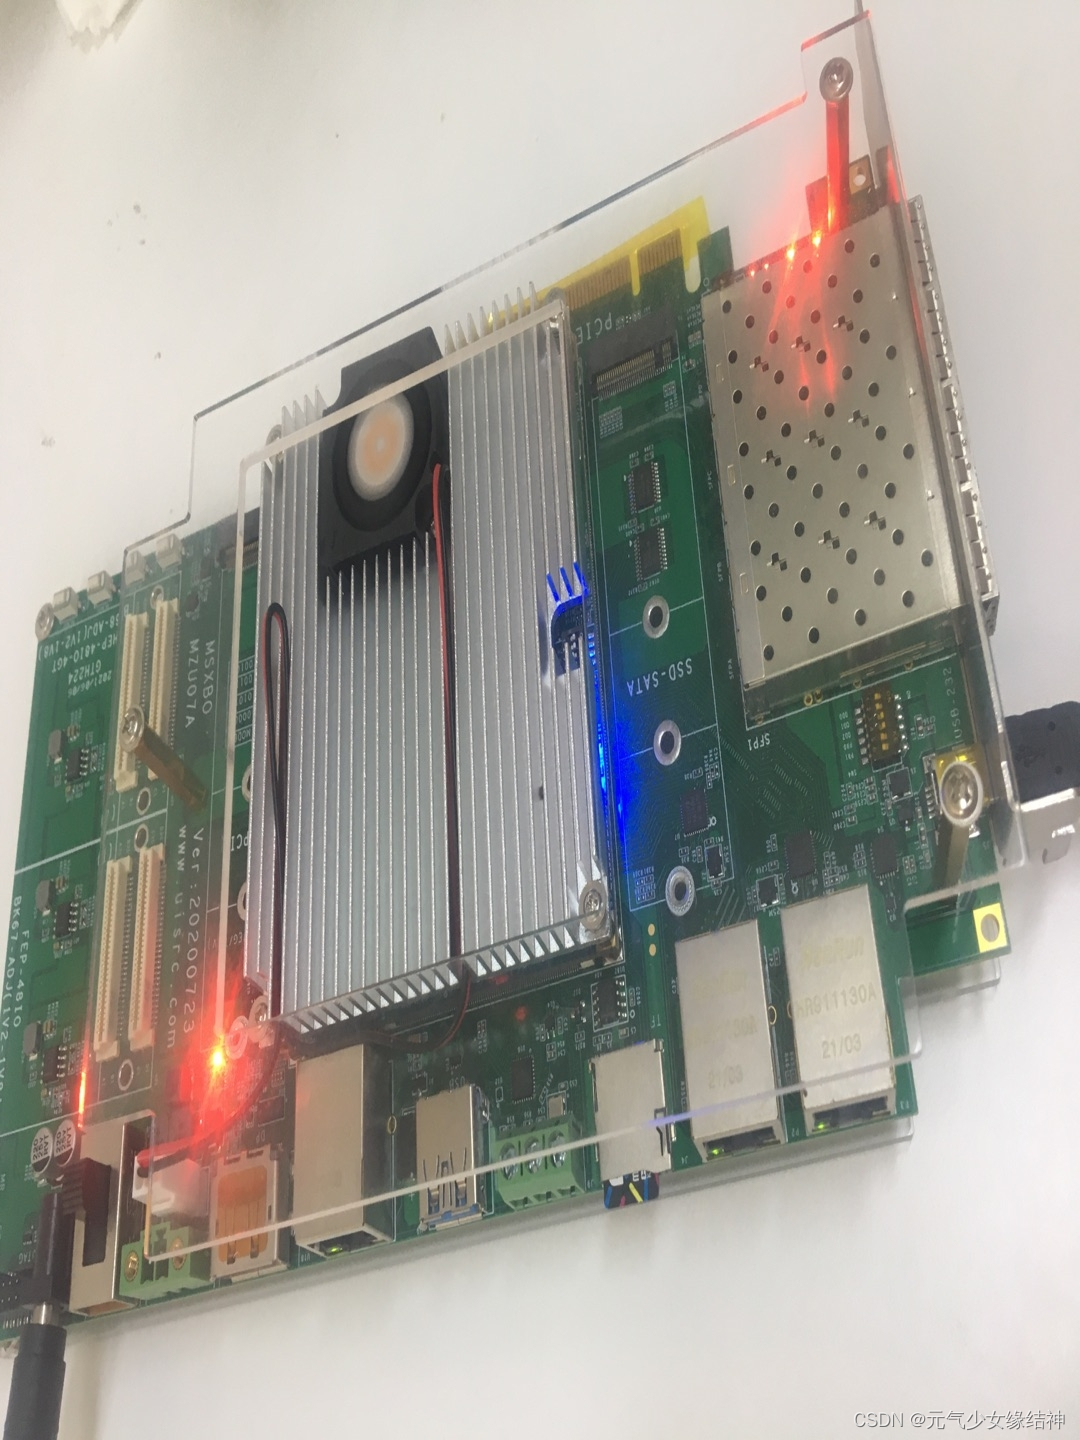
我们用的这款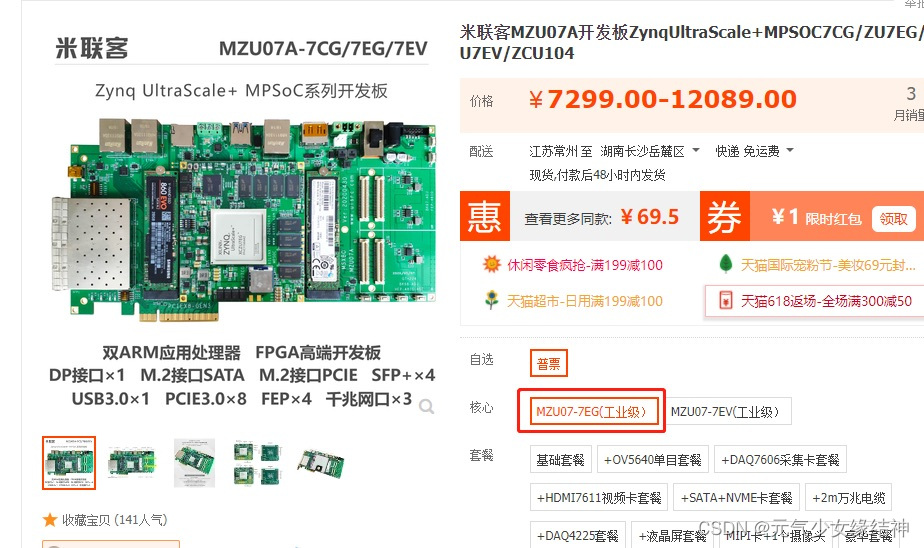 且开机完好
且开机完好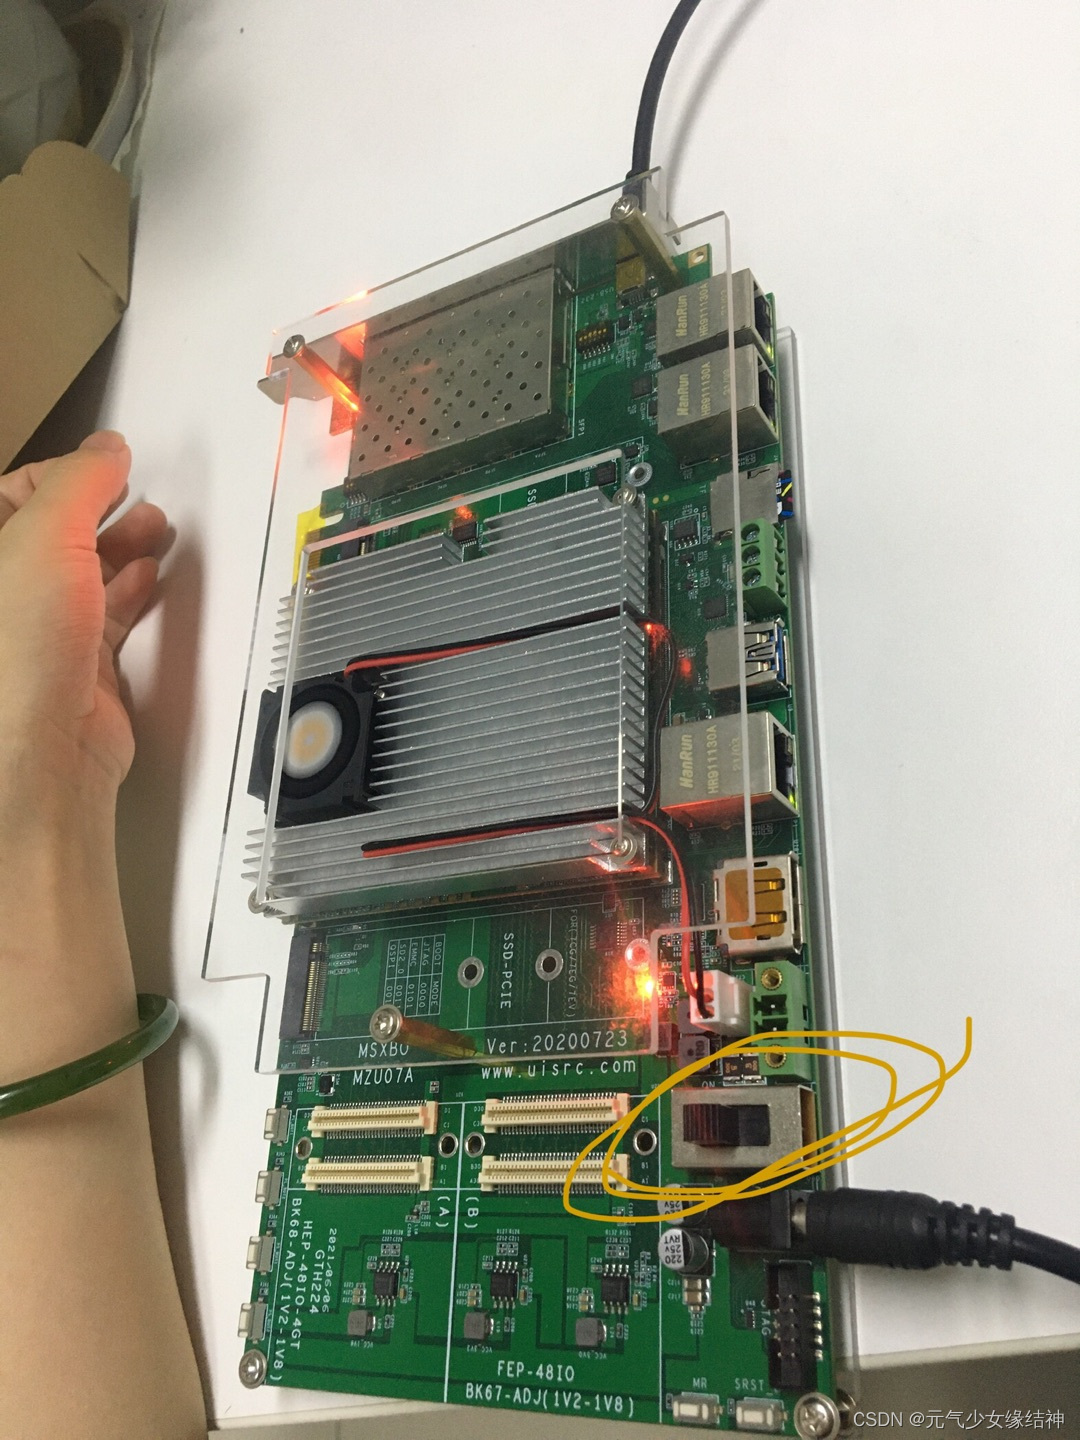 记得打开这个电源开关。
准备工作:
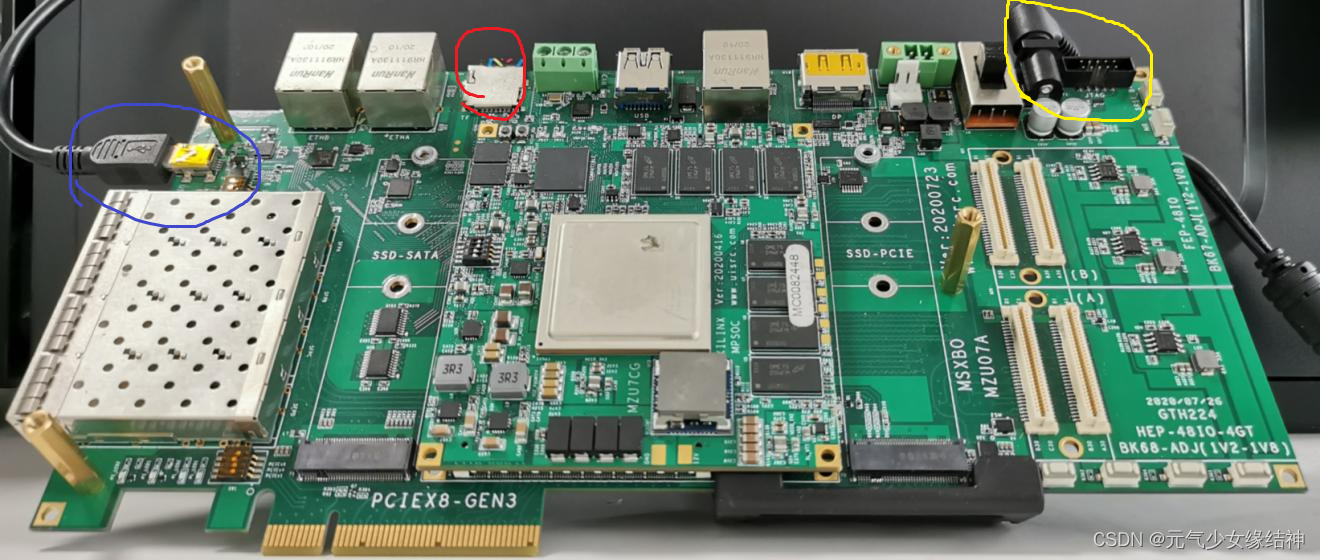
按照 https://download.csdn.net/download/wd1603926823/86506415 链接中的步骤下载putty并完成链接中的开机测试,即将链接中的boot.bin拷贝进SD卡插入TF卡座下图红色部分,记得连接PS串口线(蓝色部分)和开关电源线(黄线部分):
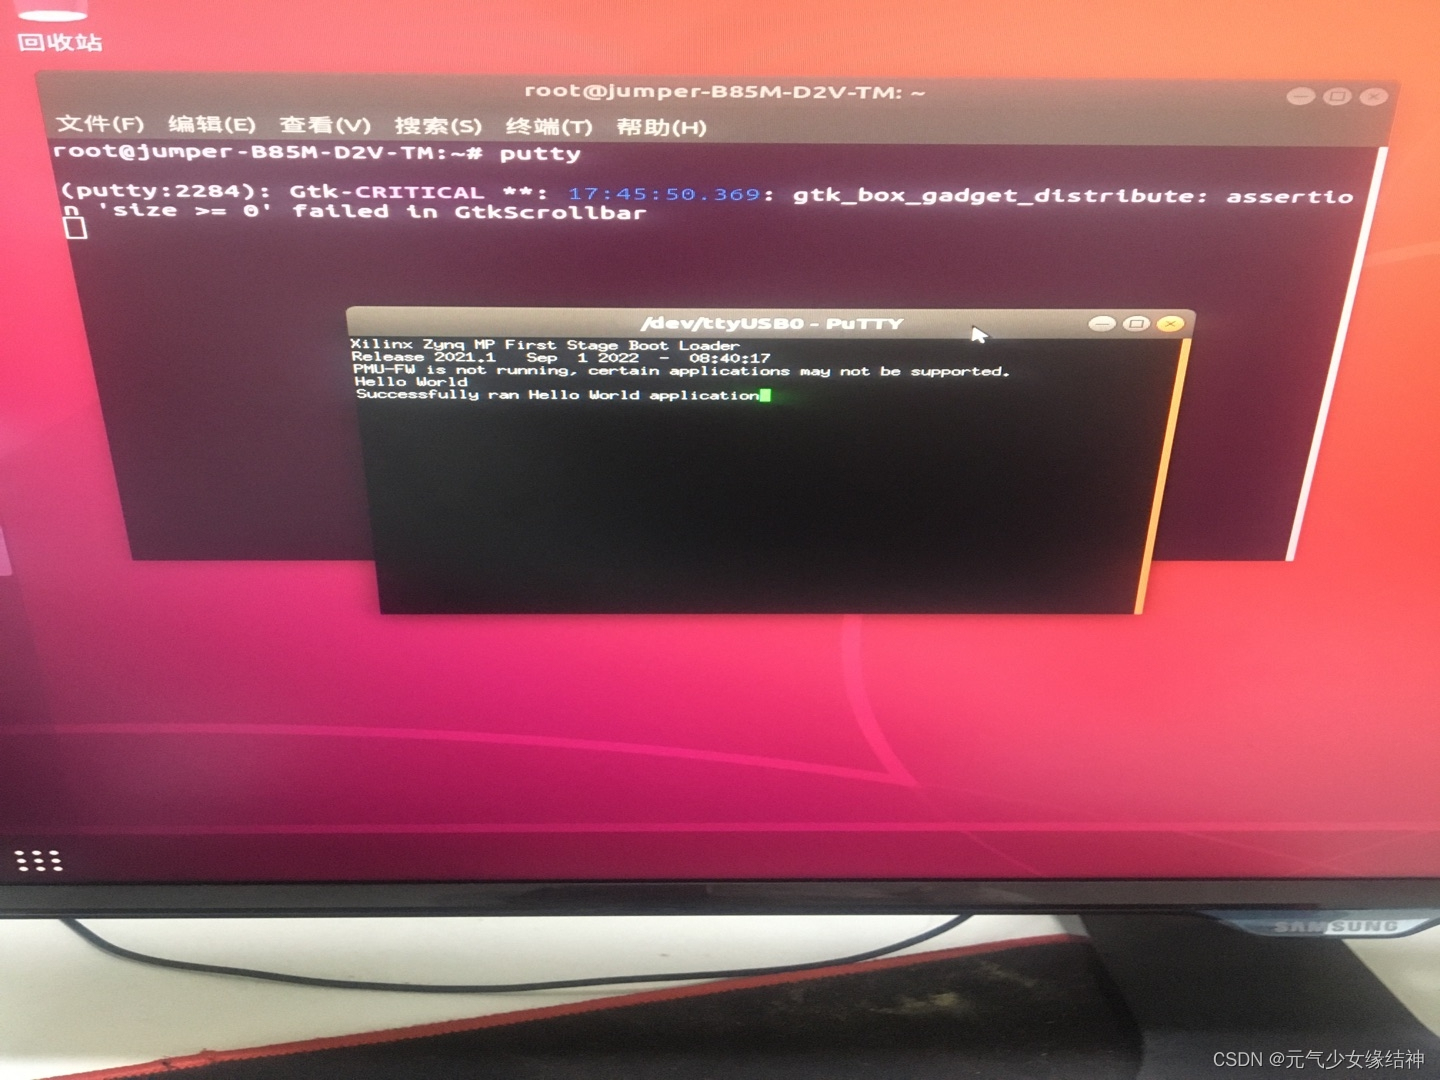
然后打开电源开关即可看到输出:
 输出中说PMU没有启动是因为boot.bin文件中未加入PMU,没关系,后续会加入然后重新固化程序后再试一次的。
~~~~~~~~~~~~~~~~~~~~~~~~~~~~~安装Vitis 2021.1~~~~~~~~~~~~~~~~~~~~
因为重新开始学Vitis了,即Xilinx Vitis学习-ug1393_元气少女缘结神的博客-CSDN博客 初略看了一下ug1393,然后跟着【全网唯一】从零开始的Vitis教程 第一集: 软件环境的安装到编译和运行第一个ZCU104加速应用_哔哩哔哩_bilibili一步步开始做,我安装的是Vitis 2021.1,我的系统是ubuntu18.04.4(不是虚拟机):
一、按照上面的视频安装 Xilinx Unified Installer 2021.1: Linux Self Extracting Web Installer
 可能是我这网不好,安装了巨巨巨久。然后安装必要的包:
add-apt-repository ppa:xorg-edgers/ppa
apt-get update
apt-get install libgl1-mesa-glx
apt-get install libgl1-mesa-dri
apt-get install libgl1-mesa-dev
add-apt-repository --remove ppa:xorg-edgers/ppa
apt install net-tools
apt-get install -y unzip
apt install gcc
apt install g++
apt install python
ln -s /usr/bin/python2 /usr/bin/python
二、安装Xilinx Runtime即XRT
apt-get install cmake-gui
download XRT  you need: https://codeload.github.com/Xilinx/XRT/tar.gz/refs/tags/202110.2.11.634 and build it as the following shows according to https://xilinx.github.io/XRT/master/html/build.html

cd <your_XRT>/src/runtime_src/tools/scripts and then ./xrtdeps.sh
cd <your_XRT>/build and then ./build.sh

cd <your_XRT>/build/Release and then make package
cd <your_XRT>/build/Debug and then make package,you can skip the step if you will not use 'Debug'
cd <your_XRT>/build and then ./build.sh docs , WARNING occured but ignore it.
cd <your_XRT>/build and then xdg-open Release/runtime_src/doc/html/index.html

cd <your_XRT>/build/Release and then dpkg -i xrt_202110.2.11.0_18.04-amd64-xrt.deb
cd <your_XRT>/build/Debug and then dpkg -i xrt_202110.2.11.0_18.04-amd64-xrt.deb ,you can skip the step if you will not use 'Debug'
cd <your_XRT>/build and then ./run.sh
cd <your_XRT>/build and then ./board.sh ,but Error occured here,ignore it
三、安装Common Images for Embedded Vitis Platforms - 2021.1
cd /opt/xilinx and then mkdir platforms and then download xilinx_zcu104_base_202110_1.zip from https://www.xilinx.com/support/download/index.html/content/xilinx/en/downloadNav/embedded-platforms/2021-1.html and then extract it in /opt/xilinx/platforms
launch Vitis you will see it.

cd /opt/xilinx and then mkdir commons and then download zynqmp common image from https://xilinx-ax-dl.entitlenow.com/dl/ul/2021/06/14/R210430316/xilinx-zynqmp-common-v2021.1.tar.gz?hash=g9LgEikChIBj7kC80-W4sw&expires=1661515810&filename=xilinx-zynqmp-common-v2021.1.tar.gz  and then extract it in /opt/xilinx/commons
cd /opt/xilinx/commons/xilinx-zynqmp-common-v2021.1 and then ./sdk.sh -y -dir -p
可以直接看到红色所示部分。
四、创建一个小例子,按视频中所示选择Vector addition例子
Sysroot path:/opt/xilinx/commons/xilinx-zynqmp-common-v2021.1/ir/sysroots/cortexa72-cortexa53-xilinx-linux
Root FS:/opt/xilinx/commons/xilinx-zynqmp-common-v2021.1/rootfs.ext4
Kernel Image:/opt/xilinx/commons/xilinx-zynqmp-common-v2021.1/Image
可以看到我的Sysroot和视频中不一样,视频中是aarch64-xilinx-linux、x86_64-petalinux-linux,而我安装完没有这个,我的是cortexa72-cortexa53-xilinx-linux、x86_64-petalinux-linux 不知道大家是不是也是这样?!接下来选择Vector addition例子:
 这个界面也和视频中不一样,然后先按下面编译,
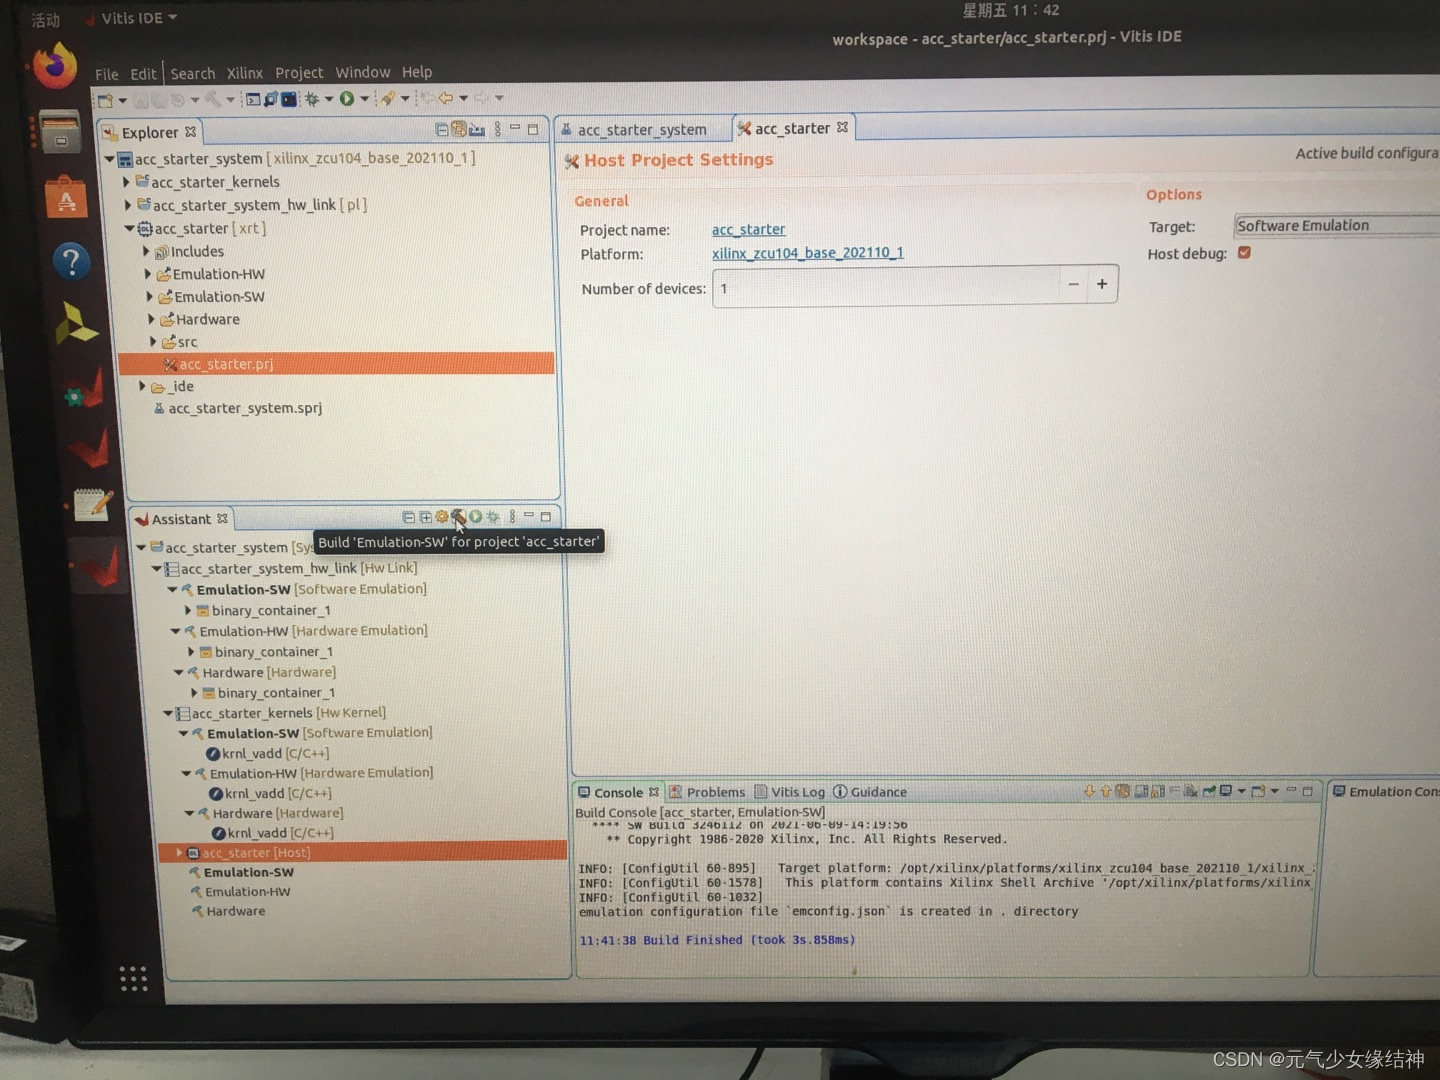
 看我蓝色画圈圈部分,如果右键Emulation-SW进行Build,那么上面的所有Emulation-SW都会进行编译。我先只编译了Emulation-SW这部分。当然也可以像下图一样,只单独编译某个Emulation-SW:
 编译完会产生sd_card文件夹以及sd_card.img位置在大约下图所示:
 然后我试了一下Run刚刚编译好的部分:
 可以看到结果显示“TEST PASSED”。接着我以为按着视频中所示将生成的sd_card.img拷贝进SD卡?但这个文件太大了啊好几个G。我安装了putty,其实不安装也行,因为Vitis界面有这个功能。然后我要找开发板串口号:
参考这个来找串口号:

https://zhuanlan.zhihu.com/p/350641410
https://help.aliyun.com/document_detail/426943.html


dmesg | grep ttyS*  来查看自己开发板连接的是USB转串口设备ttyUSB0
[    0.098121] printk: console [tty0] enabled
[    0.677878] 00:05: ttyS0 at I/O 0x3f8 (irq = 4, base_baud = 115200) is a 16550A
[    2.481174] usb 3-1: cp210x converter now attached to ttyUSB0
[  534.709268] cp210x ttyUSB0: cp210x converter now disconnected from ttyUSB0
[  562.415248] usb 3-1: cp210x converter now attached to ttyUSB0
可以看到我的是ttyUSB0,然后连接上后将开发板电源打开,却没有任何输出?!难道是因为我拷贝sd_card.img太大拷不进SD,所以我换成拷贝镜像文件,不能这样是吗?!
于是我又试着将Emulation-HW以及Hardware全部都Build,结果会报错:
Error occurred when Hardware building:
ERROR: [v++ 213-28] Failed to generate IP.
ERROR: [v++ 60-300] Failed to build kernel(ip) krnl_vadd, see log for details: /root/workspace/example2/vectorAddition_kernels/Emulation-HW/build/krnl_vadd/krnl_vadd/vitis_hls.log
ERROR: [v++ 60-773] In '/root/workspace/example2/vectorAddition_kernels/Emulation-HW/build/krnl_vadd/krnl_vadd/vitis_hls.log', caught Tcl error: ERROR: '2209011144' is an invalid argument. Please specify an integer value.
ERROR: [v++ 60-773] In '/root/workspace/example2/vectorAddition_kernels/Emulation-HW/build/krnl_vadd/krnl_vadd/vitis_hls.log', caught Tcl error: ERROR: [IMPL 213-28] Failed to generate IP.
ERROR: [v++ 60-599] Kernel compilation failed to complete
ERROR: [v++ 60-592] Failed to finish compilation
INFO: [v++ 60-1653] Closing dispatch client.
makefile:55: recipe for target 'build/krnl_vadd.xo' failed
make: *** [build/krnl_vadd.xo] Error 1
于是我又按照 FPGAの部屋 Vivado HLS, Vitis HLS の 2022 年問題にパッチを当てる Xilinx Customer Community 下载y2k22补丁包并设置环境变量,每个版本可能略有差别,直接看这两个链接即可,我的是:
root@jumper-B85M-D2V-TM:/tools/Xilinx# export LD_LIBRARY_PATH=/tools/Xilinx/Vivado/2021.1/tps/lnx64/python-3.8.3/lib
root@jumper-B85M-D2V-TM:/tools/Xilinx# Vivado/2021.1/tps/lnx64/python-3.8.3/bin/python3 y2k22_patch/patch.py
[2022-09-01] INFO: This script (version: 1.2) patches Xilinx Tools for HLS Y2k22 bug for the following release:
		2014.*, 2015.*, 2016.*, 2017.*, 2018.*, 2019.*, 2020.* and 2021.*
[2022-09-01] UPDATE: /tools/Xilinx/Vitis_HLS/2021.1/common/scripts
[2022-09-01] COPY: /tools/Xilinx/y2k22_patch/automg_patch_20220104.tcl  to /tools/Xilinx/Vitis_HLS/2021.1/common/scripts/automg_patch_20220104.tcl
[2022-09-01] UPDATE: /tools/Xilinx/Vivado/2021.1/common/scripts
[2022-09-01] COPY: /tools/Xilinx/y2k22_patch/automg_patch_20220104.tcl  to /tools/Xilinx/Vivado/2021.1/common/scripts/automg_patch_20220104.tcl
root@jumper-B85M-D2V-TM:/tools/Xilinx#然后再试一次,发现已经全部可以正常Build,不会再报错了且左下角助手栏都变成了绿色的勾勾,然后在Hardware下终于发现了Boot.bin文件!!!!
 然后我将这个boot.bin拷贝进SD卡,然后在debug界面打开串口(之前我说过不用特意安装putty就是因为这里有)
 然后连接,但是却没有任何输出?!哦我知道原因了,原来是平台选择错误!!!我们这款不适xilinx官方的开发板,只是用了xilinx ultrascale+ mpsoc芯片后国产的开发板,所以我们得自定义platform,重新按照https://download.csdn.net/download/wd1603926823/86506415 链接中第三步“step3-Vitis示例HelloWorld”去操作即可:
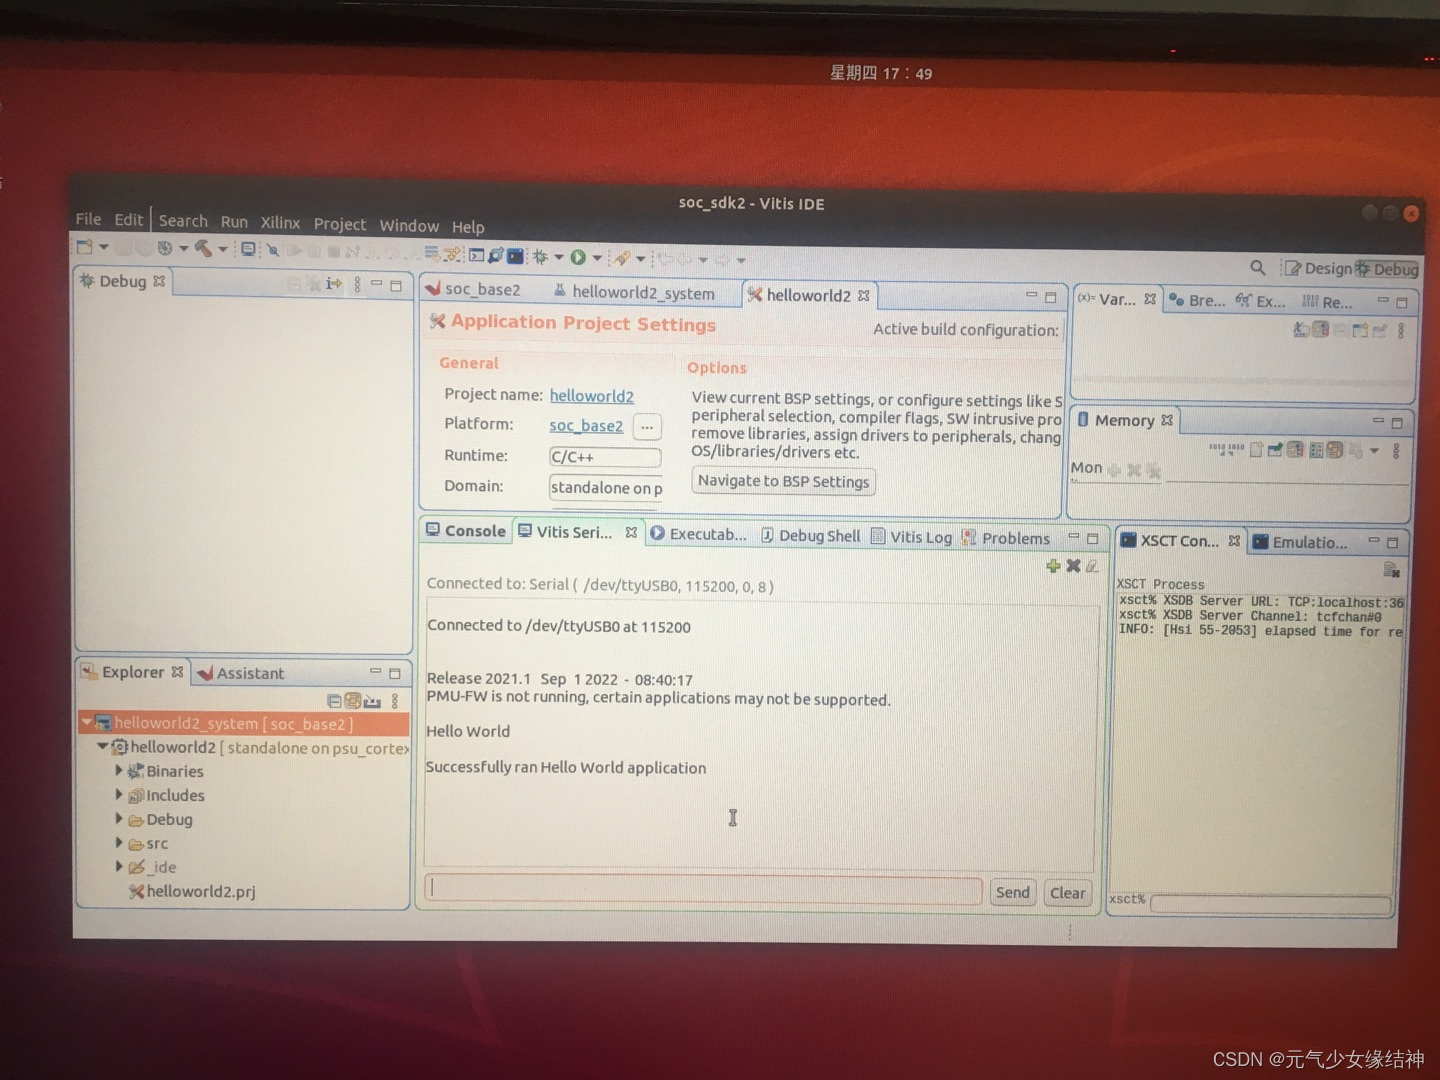
 注意开发板上这个蓝色的灯一定会亮,连接putty,打开电源开关,会看到无任何输出。然后关闭电源开关再打开一次,然后正常输出。之前说过即使不安装putty,在Vitis界面debug下也可以连接开发板,一样会有正常的正确的输出如下所示:
 总结下来,步骤如下:
一、Vivado搭建硬件平台
	1,创建系统工程(并不是软件中所说的工程,而是硬件平台的一些设置)
	2,选择芯片型号xczu7ev-ffvc1156-2-i
	3,创建Block Design,添加IP:ZYNQ Ultrascale+ MPSoC 作为PS端IP核
	4,对IP核进行配置:输入时钟、输出时钟、PS DDR参数、外设MIO
	5,导出硬件平台文件 Export Hardware为.xsa(这个文件给软件工程师),其中包含了(FPGA部分和SOC部分)。
二、搭建Vitis-sdk工程(终于轮到软件工程师了)
	1,打开Xilinx Vitis sdk,创建基于平台的工程 Create Platform Project (from XSA即选中之前的硬件平台文件.xsa)
	2,创建一个应用工程New-Application Project,并选中刚刚创建的基于平台的工程。表示应用工程(也是真正的软件工程)是基于我们自己创建的这个平台上的。
	3,给应用工程添加自己的代码或直接使用Vitis中已有的示例代码如“Hello world”
	4,分别编译平台工程、应用工程
	5,插上开发板电源,并连接串口线到主机,查看串口号并通过Vitis Serial Terminal连接上开发板
	6,可以直接开始调试Single Application Debug,可以直接在Vitis IDE看到调试界面
	7,也可以直接运行,会在Vitis Serial Terminal下看到软件工程的运行结果
	8,工程也可脱离Vitis运行,即将工程固化。因为第4步编译结束会有BOOT.bin文件,直接将BOOT.bin拷贝到TF/SD卡中
	9,将SD卡插回开发板,打开putty连接开发板串口,关闭开发板电源按钮再重新打开,即在putty下看到软件输出结果
~~~~~~~~~~~~~~~~~~~~~~~~~~~~~~~~~~~分界线~~~~~~~~~~~~~~~~~~~~~~~~~~~~~~~~
大家也可参考这两个博主 ZYNQ 串口打印输出——FPGA Vitis篇_BIGMAC_1017的博客-CSDN博客_zynq 串口打印 开发者分享 | AXI 基础第 7 讲 - 使用 AXI4-Lite 将 Vitis HLS 创建的 IP 连接到 PS | 电子创新网赛灵思社区去参考他们的所有FPGA有关的博文,特别是第二个链接的博主judy,我准备也全部学一遍。不过这个应该是转载的,确切的出处不知道是否在 FPGA开发圈专栏-面包芯语-面包板社区 Vitis-HLS | 电子创新网赛灵思社区 https://mp.weixin.qq.com/mp/appmsgalbum?__biz=Mzg3NDAxNzU1MA==&action=getalbum&album_id=1471618535444512769&subscene=159&subscene=&scenenote=https%3A%2F%2Fmp.weixin.qq.com%2Fs%2FC1TPImZfOBbhwbynt_pLMw&nolastread=1#wechat_redirect
居然看到米联客官方有博客:米联客 - 博客园 大家可以多看看,或者有问题在他们博客下评论。
~~~~~~~~~~~~~~~~~~~~~~~~~~~~~~~~~小疑惑~~~~~~~~~~~~~~~~~~~~~~~~~~~~~
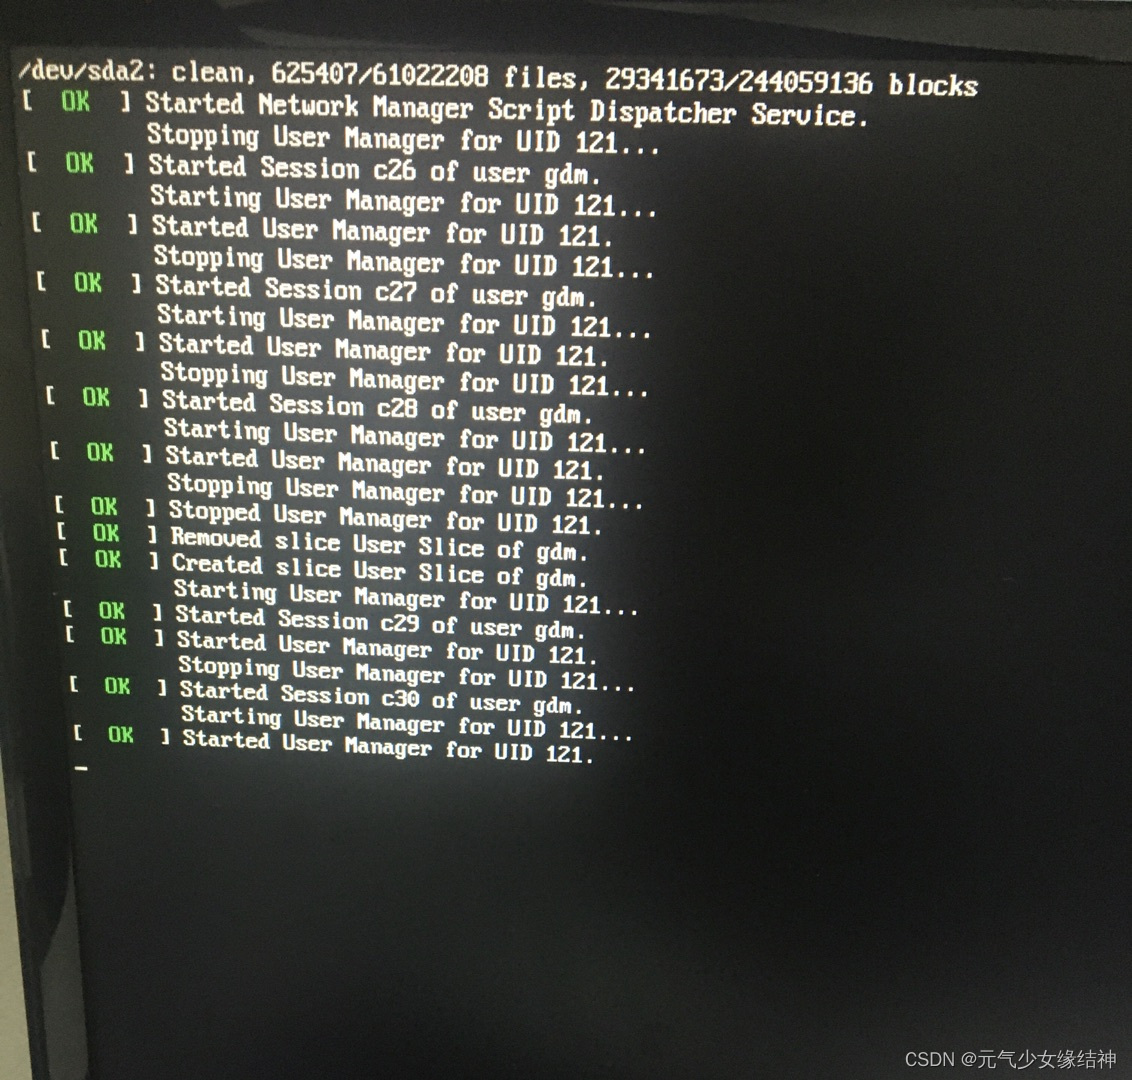
大家偶尔重启系统时有没遇到过下图这样:我没装什么驱动,这次开机唯一的不同就是上次关机之前我编译了Vector addition工程。
Failed to start User Manager for UID 121
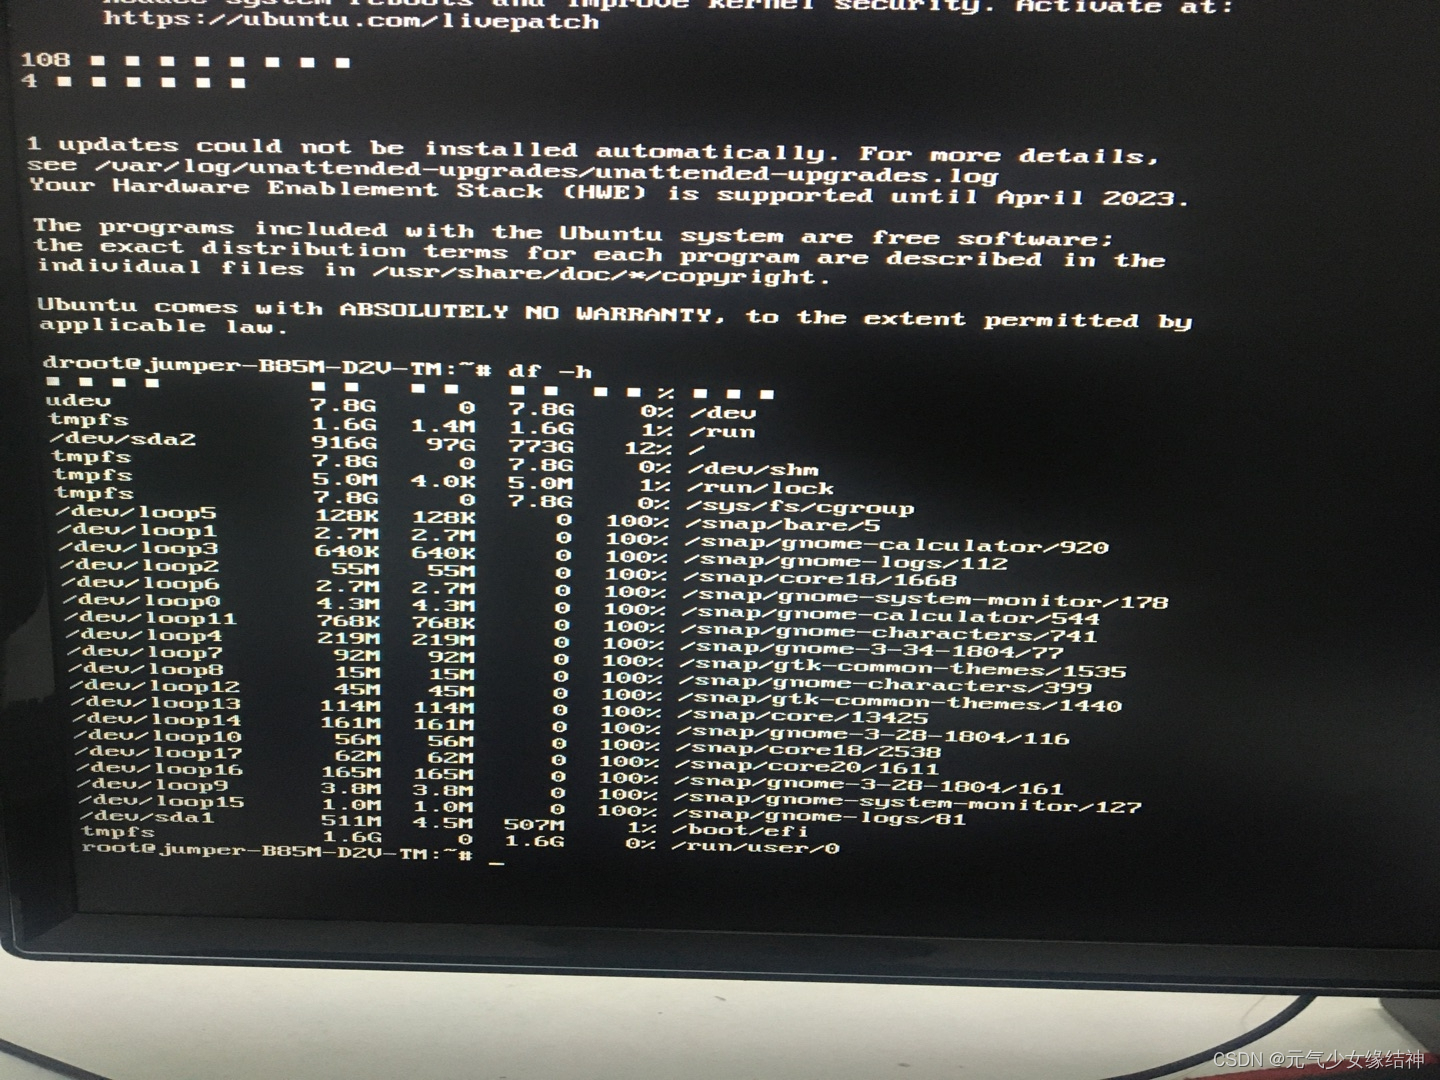
See 'systemctl status user@121.service' for details.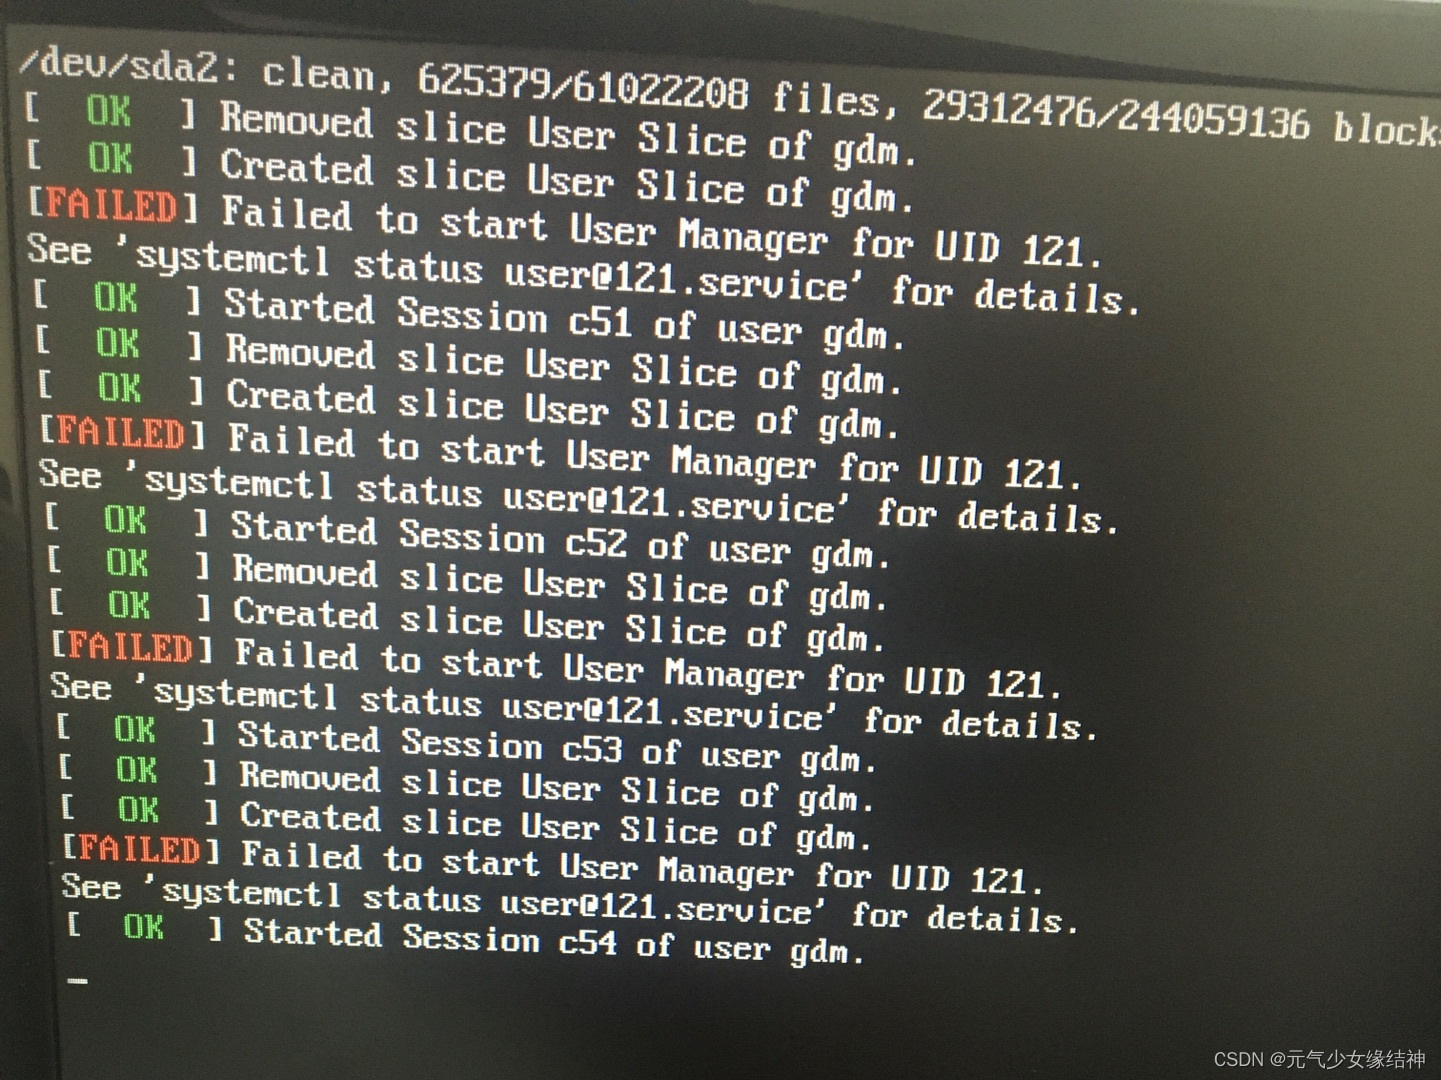 我查了下并非是sda1或sda2空间不够:
我按照下面的做:
cd /etc/gdm3
vi custom.conf
将#WaylandEnable=false前面的#符号删掉保存
sudo dpkg-reconfigure gdm3
reboot
然而并没有效果,重启后直接卡住在这个界面:
 然后我又按照下面的做:
sudo systemctl start graphical.target
sudo apt install lightdm
sudo dpkg-reconfigure lightdm
sudo reboot
依旧不行,又回到图1报错界面!!!难道是Vector addition工程编译太占空间了?!反正试了各种方法,还是不行,于是悲愤重装ubuntu18.04.4以及设置root登录Ubuntu系统设置默认用户为root并自动登录(详解)_偷心的小白的博客-CSDN博客_ubuntu默认root登录 以及Vitis各组件都重新再装一次。
~~~~~~~~~~~~~~~~~~~~~~~~~~~~~~~~~~~分界线~~~~~~~~~~~~~~~~~~~~~~~~~~~~~~
Vitis有时会卡,只能强制关闭相关线程再打开:
ps -ef | grep java

kill -9 [PID]


 347
347

 被折叠的 条评论
为什么被折叠?
被折叠的 条评论
为什么被折叠?
 到【灌水乐园】发言


