


ios小部件
Widgets have existed in iOS for a long time, but iOS 14 completely revamped them. With the new widget APIs, you’re now able to add widgets directly to your home screen, but they are also completely written in SwiftUI. iOS 14’s widgets come in a variety of shapes (literally), ranging from simple information squares to widgets that can retrieve and display information from its parent app’s Siri Intents.
小部件在iOS中已经存在很长时间了,但是iOS 14完全对其进行了改进。 使用新的小部件API,您现在可以将小部件直接添加到主屏幕,但它们也完全用SwiftUI编写。 iOS 14的小部件有多种形状(字面上),范围从简单的信息方块到可以从其父应用程序的Siri Intents检索和显示信息的小部件。
One trick that has drawn my attention the most, however, is that having widgets directly in your home means that technically you’re now able to make visual “mini-apps.” If you find yourself doing the same tasks over and over in your job, such as checking the number of crashes in a release or the latest release supported by one of your apps, you can create a widget in iOS 14 that essentially behaves like a super-charged, UI-enabled Siri Shortcut.
但是,吸引我最多注意力的一个窍门是,直接在家里放置小部件意味着从技术上讲,您现在可以制作可视化的“微型应用程序”。 如果您发现自己在工作中一遍又一遍地执行相同的任务,例如检查某个版本中的崩溃次数或其中一个应用程序支持的最新版本,则可以在iOS 14中创建一个小部件,其本质上类似于超级部件。收费,启用了UI的Siri快捷方式。
Although you can’t interact with a widget beyond touching it (which triggers a deeplinked app launch), there aren’t many limitations to what you can display in them, so you can use them to develop read-only visual apps. In this article, we’ll develop a widget that shows us the latest commit in the Swift repository.
尽管除了触摸小部件(它会触发深层链接的应用程序启动)之外,您无法与其进行交互,但是您在其中显示的内容并没有太多限制,因此您可以使用它们来开发只读的可视化应用程序。 在本文中,我们将开发一个小部件,向我们显示Swift存储库中的最新提交。
开发“ Swift Commit Tracker”小部件 (Developing a “Swift Commit Tracker” Widget)
I find myself going to the Swift repo once in a while to see what the community is up to. To make my life easier, how about displaying this information directly on my home screen?
我发现自己偶尔会去Swift仓库,看看社区在做什么。 为了让我的生活更轻松,直接在主屏幕上显示此信息怎么样?
To do something like this, we can make a request to GitHub’s public APIs, parse the information, and render it to our widget.
为此,我们可以向GitHub的公共API发出请求,解析信息,然后将其呈现给我们的小部件。
We can start by creating a new iOS project — the details of the project don’t matter, as in all the code in this tutorial will be inside the widget’s module.
我们可以从创建一个新的iOS项目开始-该项目的细节无关紧要,因为本教程中的所有代码都位于小部件的模块中。
With your project created, add a Widget module by going to File -> New -> Target and selecting the Widget Extension target:
创建项目后,通过转到File-> New-> Target并选择Widget Extension目标来添加Widget模块:

Make sure to uncheck the Include Configuration Intent checkbox, as this involves a feature that will be presented only later in this article! After generating the target, make sure to erase the example code so we can inspect it step by step.
确保取消选中“包括配置意图”复选框,因为这涉及一项仅在本文稍后介绍的功能! 生成目标后,请确保删除示例代码,以便我们可以逐步检查它。
To define a widget, all you have to do is create a struct that inherits from Widget and configures its capabilities:
要定义小部件,您要做的就是创建一个从小Widget继承并配置其功能的结构:
This code will not compile before we define such capabilities, but this is important as a first step because this is the widget itself. The WidgetConfiguration return value describes what this widget is, how it's built, and — most importantly — how it fetches its content.
在定义此类功能之前,不会编译此代码,但这对于第一步很重要,因为这是小部件本身。 WidgetConfiguration返回值描述此窗口小部件是什么,它的构建方式,以及最重要的是,它如何获取其内容。
小部件类型 (Types of Widgets)
The StaticConfiguration WidgetConfiguration defines a widget that can resolve itself without any input from the user. You could fetch any relevant data in the widget's parent app and send the result to the Widget module as a "user input," but as you are allowed to make API calls when configuring your widget, there's no need to do so if there's no contextual information involved in the request.
StaticConfiguration WidgetConfiguration定义了无需用户任何输入即可自行解决的小部件。 您可以在窗口小部件的父应用程序中获取任何相关数据,并将结果作为“用户输入”发送到Widget模块,但是由于允许您在配置窗口小部件时进行API调用,因此如果没有上下文,则无需这样做请求中涉及的信息。
On the other hand, you can use the IntentConfiguration WidgetConfiguration to define a widget that depends on a Siri Intent from the parent app, which allows you to build configurable dynamic widgets. For example, when using intents, a food delivery app can create a widget that displays the delivery status for the user's latest order. This is done by having the app dispatch a Siri Intent (just like when developing Siri Shortcuts), which are automatically picked up by IntentConfiguration and used to update a widget.
另一方面,您可以使用IntentConfiguration WidgetConfiguration定义一个依赖于父应用程序中Siri Intent的窗口小部件,从而允许您构建可配置的动态窗口小部件。 例如,当使用意图时,食品配送应用可以创建显示用户最新订单的配送状态的小部件。 这是通过让应用程序分派一个Siri Intent(就像开发Siri快捷方式时一样)来完成的,这些IntentConfiguration会自动将它们拾取并用于更新小部件。
You can create a base IntentConfiguration widget by checking the intents box when creating the widget extension, but since all we need to do is parse GitHub's public API, we can use a StaticConfiguration widget and avoid interacting with the app itself.
您可以通过在创建窗口小部件扩展名时选中IntentConfiguration框来创建基本的IntentConfiguration小部件,但是由于我们要做的只是解析GitHub的公共API,因此我们可以使用StaticConfiguration小部件并避免与应用程序本身进行交互。
时间线提供者 (TimelineProvider)
The content displayed by iOS 14’s widgets works similarly to watchOS’s complications in the sense that instead of having an extension that is running all the time, you provide at once a “timeline” of events that the OS should display throughout the hours, days, or even weeks. This is useful for apps like Weather and Calendar where you can “predict” what is going to be displayed in the future, as you already have that information.
iOS 14的小部件显示的内容类似于watchOS的复杂性,在某种意义上,您无需提供一直在运行的扩展程序,而是立即提供OS应在整个小时,几天或几天内显示的事件的“时间表”甚至几个星期。 这对于“天气”和“日历”等应用程序非常有用,因为您已经有了这些信息,因此您可以“预测”将来将要显示的内容。
In our case, since we are unable to predict Swift’s commits, we’ll provide a timeline that contains only a single event — making iOS refresh our widget on a more regular basis.
在我们的案例中,由于我们无法预测Swift的提交,因此我们将提供一个仅包含单个事件的时间表-使iOS更加定期地刷新小部件。
To create a Timeline, we first need to define a TimelineEntry. A TimelineEntry only requires the Date when this entry is expected to be rendered in the widget, but it can also contain any additional information that you require. In our case, our entries will contain the Commit that we want to display in the widget:
要创建Timeline ,我们首先需要定义一个TimelineEntry 。 当预期在小部件中呈现此条目时, TimelineEntry仅需要Date ,但是它也可以包含您需要的任何其他信息。 在我们的例子中,我们的条目将包含我们要在小部件中显示的Commit :
But before creating the timeline, we need to be able to fetch such commits. Let’s create a CommitLoader class that fetches and parses Swift's latest commit:
但是在创建时间轴之前,我们需要能够获取此类提交。 让我们创建一个CommitLoader类,该类获取并解析Swift的最新提交:
When fetch is called, this loader type sends a request to GitHub's public API and parses the latest commit, giving us the message, author, and its timestamp. We can now create a Timeline that fetches the latest commit, adds it as an entry, and schedules itself to be updated after a while:
调用fetch ,此加载程序类型向GitHub的公共API发送请求,并解析最新的提交,从而为我们提供消息,作者及其时间戳。 现在,我们可以创建一个Timeline ,以获取最新的提交,将其添加为条目,并计划在一段时间后进行更新:
struct CommitTimeline: TimelineProvider {
    typealias Entry = LastCommitEntry
    /* protocol methods implemented below! */
}
The TimelineProvider protocol has two methods that we need to implement.
TimelineProvider协议有两种我们需要实现的方法。
1. snapshot() -小部件的伪造信息 (1. snapshot() - the fake information of the widget)
The required snapshot() method of the TimelineProvider protocol defines how your widget should be configured when it appears in transient situations, such as the widget selection screen. This configuration will be used when showing correct information doesn't matter:
TimelineProvider协议所需的snapshot()方法定义了在短暂情况下(例如,小部件选择屏幕)出现时,应如何配置小部件。 当显示正确的信息无关紧要时,将使用此配置:

To create a snapshot configuration, all you have to do is create and return a fake entry of your TimelineEntry object:
要创建快照配置,您要做的就是创建并返回TimelineEntry对象的假条目:
timeline() -小部件的真实信息 (timeline() - the true information of the widget)
The timeline() method, however, defines the real information that should be used by your widget. The objective is for you to return a Timeline instance that contains all the entries you want to display when they are expected to be displayed (the date of the entry) and when the timeline "expires."
但是, timeline()方法定义了窗口小部件应使用的真实信息。 目的是让您返回一个Timeline实例,该实例包含您希望在预期显示的所有条目(条目的date )和时间轴“到期”时要显示的所有条目。
Because our app can’t “predict” its future state like a Weather app, creating a timeline with a single entry that should be displayed immediately will suffice. This can be done by setting the entry’s date to the current Date():
因为我们的应用程序无法像Weather应用程序那样“预测”其未来状态,所以创建一个具有单个条目的时间轴应立即显示就足够了。 这可以通过将条目的date设置为当前的Date() :
The policy property of the timeline is what defines when iOS should attempt to discard this timeline and fetch a new one. Currently, they can be .never (widgets displaying a static content that never changes), .atEnd (when the last entry in the timeline is displayed), or .after(Date) (a specific amount of time after displaying the timeline for the first time). Since our timeline only has one entry, I decided to use .after to tell iOS that this widget should be reloaded every five minutes.
时间轴的policy属性定义了iOS何时应尝试放弃此时间轴并获取新的时间轴。 当前,它们可以是.never (显示静态内容的小部件,这些内容永远不变) .atEnd (显示时间线的最后一个条目)或.after(Date) (显示时间轴的特定时间后第一次)。 由于我们的时间轴只有一个条目,因此我决定使用.after告诉iOS该小部件应每五分钟重新加载一次。
Note, however, that the widget API’s documentation states that you can’t predict when the widget will be updated. Even though the timeline itself will indeed be fetched again after five minutes, there’s no guarantee that the iOS will update the view at the same time. From my personal experience, the view actually took around 20 minutes to update by itself. The update time is based on a few factors, which include how often the widget is seen by the user. If you need to force a widget to update, you can use the WidgetCenter APIs from your main app to reload all timelines (or a specific one):
但是请注意,小部件API的文档指出您无法预测何时更新小部件。 即使确实会在五分钟后再次获取时间轴本身,也无法保证iOS会同时更新视图。 根据我的个人经验,该视图实际上需要大约20分钟的时间来更新。 更新时间基于几个因素,其中包括用户看到窗口小部件的频率。 如果需要强制更新小部件,则可以使用主应用程序中的WidgetCenter API重新加载所有时间轴(或特定时间轴):
WidgetCenter.shared.reloadAllTimelines()While not necessary for our widget, it’s important to mention that timelines and entries have other interesting capabilities. For example, it’s possible to set a relevance value to an entry, which will allow iOS to determine how important your widget is. This is used, for example, to determine the order of widgets inside a stack:
尽管对于我们的小部件而言不是必需的,但重要的是要提到时间线和条目具有其他有趣的功能。 例如,可以为条目设置relevance值,这将使iOS可以确定小部件的重要性。 例如,这用于确定堆栈内小部件的顺序:
创建小部件视图 (Creating a Widget View)
Now that our timeline is configured, we can create the widget’s visual components. We need to create two views: a placeholder that is displayed while the timeline is loading and the actual widget view that is capable of rendering our timeline entry:
现在我们已经配置了时间轴,我们可以创建小部件的可视组件。 我们需要创建两个视图:一个在时间线加载时显示的占位符,以及一个能够呈现时间线条目的实际小部件视图:
与小部件视图交互 (Interacting with a Widget View)
Optionally, you can detect taps in your Widget and redirect them to a deeplink. This is unfortunately the only interaction you’re allowed to have in your widget, so no scrolling or other forms of interaction are possible.
(可选)您可以在窗口小部件中检测点击并将其重定向到深度链接。 不幸的是,这是唯一允许您在窗口小部件中进行的交互,因此无法进行滚动或其他形式的交互。
You can configure which deeplink is triggered when your Widget is tapped through the .widgetURL(myDeeplink) method, but you can also make different parts of the widget trigger different deeplinks by using a Link. Note that since widgets are small, you shouldn't pack a ton of actions into a single Widget.
您可以配置通过.widgetURL(myDeeplink)方法点击窗口小部件时触发的.widgetURL(myDeeplink) ,但也可以使用Link使窗口小部件的不同部分触发不同的深度Link 。 请注意,由于小部件很小,因此您不应将大量操作打包到单个小部件中。
Here’s an example of a Widget View that redirects to the app’s home screen when tapped, but also contains two labels that redirect to different parts of the app when tapped.
这是一个Widget视图的示例,该视图在点击时重定向到应用程序的主屏幕,但还包含两个标签,在点击时重定向到应用程序的不同部分。
var body: some View {
    VStack {
        Link(destination: homeDeepLink) {
            Text("Home")
        }
        Link(destination: settingsDeepLink) {
            Text("Settings")
        }
    }.widgetURL(homeDeeplink)
}
If you don’t provide a widgetURL, your app will simply open when tapped.
如果您不提供widgetURL ,则只需轻按一下即可打开您的应用程序。
看到小部件的实际操作 (Seeing the Widget in action)
You should be able to compile your code, and now that all components were provided, we can take a second look at our configuration method to see how this is all wrapped together:
您应该能够编译您的代码,并且现在已经提供了所有组件,我们可以再次查看我们的配置方法,以了解如何将它们全部包装在一起:
We’ve created a static widget that fetches its content from our CommitTimeline, has a PlaceholderView as a placeholder, and generates a CommitCheckerWidgetView when an entry is ready to be displayed.
我们创建了一个静态小部件,该小部件可从CommitTimeline获取其内容,具有PlaceholderView作为占位符,并在准备显示条目时生成CommitCheckerWidgetView 。
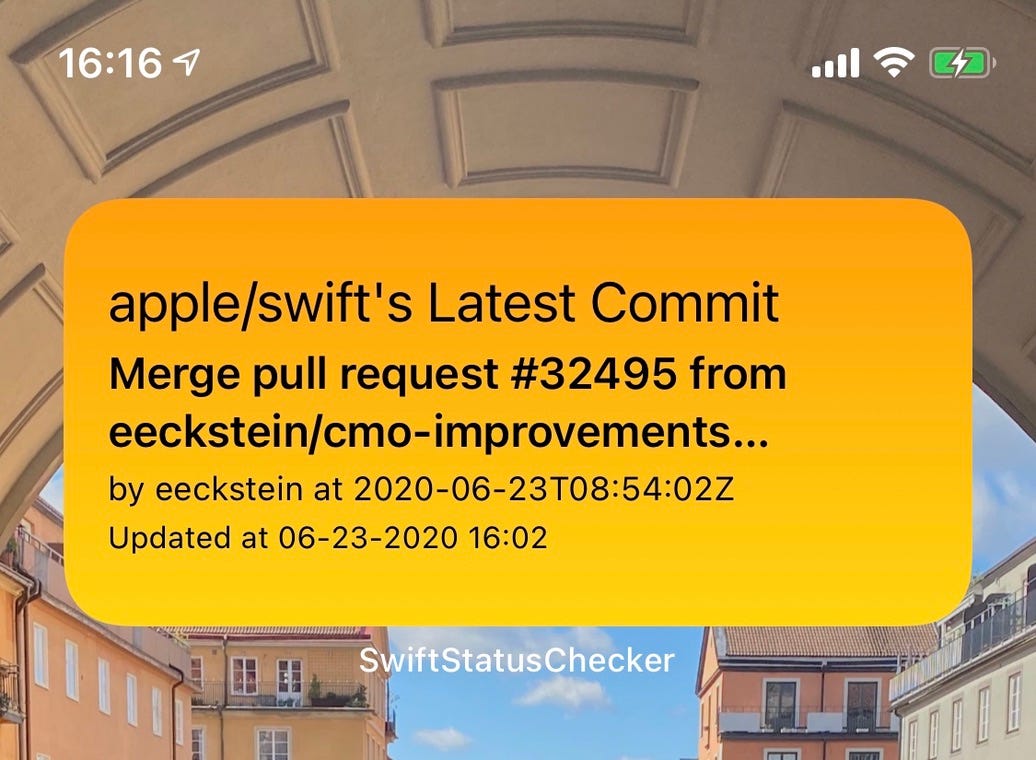
After running our app and adding the widget to our home, we’re now able to see an auto-updating Swift commit displayed!
在运行我们的应用程序并将小部件添加到我们的家之后,我们现在可以看到显示了自动更新的Swift提交!

允许用户配置要可视化的仓库/分支 (Allowing the User to Configure Which Repo/Branch to Visualize)
As mentioned before, iOS 14’s new APIs also support widgets that are tied to Siri Intents, allowing you to create dynamic widgets that are configurable by your users. We can have an intent-based widget that allows the user to configure which repo to watch directly from the widget itself.
如前所述,iOS 14的新API还支持与Siri Intent绑定的窗口小部件,从而使您可以创建可由用户配置的动态窗口小部件。 我们可以有一个基于意图的小部件,它允许用户配置要从小部件本身直接观看的仓库。
To create an intent-based widget, we first need a Siri Intent. Inside your widget extensions, add a SiriKit Intent Definition File.
要创建基于意图的小部件,我们首先需要一个Siri Intent。 在您的小部件扩展中,添加一个SiriKit Intent Definition File。
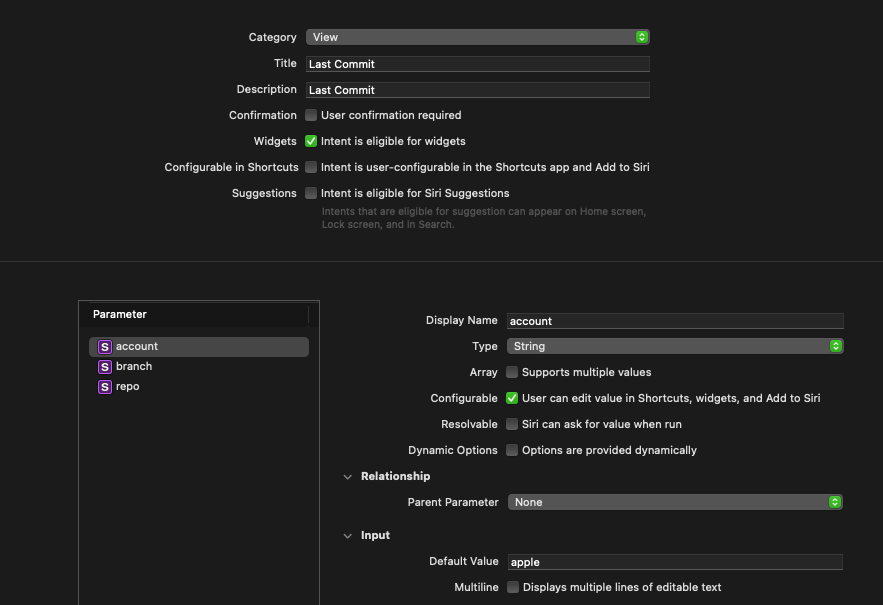
To allow the user to see the commits of any repo or branch, let’s create a LastCommitIntent that supports the account, repo, and branch properties. Make sure to also tick the “Intent is eligible for widgets” box.
为了允许用户查看任何回购或分支的提交,让我们创建一个支持account , repo和branch属性的LastCommitIntent 。 确保同时选中“意图适用于窗口小部件”框。
It’s possible to use widgets with the data of any donated Siri Intent, but the magic lies in not needing to. If the intent has widget capabilities, like the one we created, you’re able to set the parameters directly on the widget, as we’ll see later on.
可以将窗口小部件与任何捐赠的Siri Intent的数据一起使用,但是魔术之处在于不需要这样做。 如果该意图具有窗口小部件功能(如我们创建的那样),则您可以直接在窗口小部件上设置参数,稍后我们将看到。
Before upgrading our widget, let’s make sure our code supports fetching commits from other repos. Let’s upgrade our timeline entry to support a repo configuration:
在升级小部件之前,请确保我们的代码支持从其他存储库中获取提交。 让我们升级时间线条目以支持仓库配置:
From here, we can upgrade our fetcher’s fetch() method to download any branch from any repo:
从这里,我们可以升级fetcher的fetch()方法以从任何存储库下载任何分支:
As mentioned before, intent-based widgets require the usage of IntentConfiguration. The only major difference from our previous static approach is that we have to provide the intent that this widget is linked to. Let's update our widget to use IntentConfiguration and LastCommitIntent:
如前所述,基于意图的窗口小部件需要使用IntentConfiguration 。 与以前的静态方法唯一的主要区别是,我们必须提供此小部件链接到的意图。 让我们更新小部件以使用IntentConfiguration和LastCommitIntent :
One additional modification we have to make is updating our timeline to inherit from IntentTimelineProvider instead of TimelineProvider. They work mostly the same way, with the difference being that the intent variant provides access to an instance of our intent, allowing us to grab a hold of any customizations made by our users. In this case, we'll update snapshot() to additionally return a fake repo and our timeline method to fetch the user's repo configuration and fetch the commit using those parameters:
我们必须进行的另一项修改是更新时间轴以从IntentTimelineProvider继承,而不是从TimelineProvider继承。 它们的工作方式大致相同,不同之处在于intent变体提供了对我们intent实例的访问,从而使我们能够掌握用户所做的任何自定义。 在这种情况下,我们将更新snapshot()以另外返回伪造的仓库和我们的时间轴方法以获取用户的仓库配置并使用这些参数来获取提交:
While this code works, our view still has apple/swift hardcoded into it. Let’s update it to use the new parameters the entry now possesses:
尽管此代码有效,但我们的视图仍将apple/swift硬编码到其中。 让我们对其进行更新以使用条目现在拥有的新参数:
Now, run your app and check the widget. The repo configuration you see will be determined by the default value you added in the Intents file, but if you long-press your widget and click the Edit button, you will now be able to customize the intent’s parameters and change the repo that is fetched!
现在,运行您的应用程序并检查小部件。 您看到的回购配置将由您在Intents文件中添加的默认值确定,但是如果您长按小部件并单击“编辑”按钮,现在将能够自定义Intent的参数并更改获取的回购!

支持多个小部件 (Supporting Multiple Widgets)
It’s possible to make your app provide multiple choices of Widgets by creating a WidgetBundle that returns the WidgetConfiguration of one or move Widgets. To do so, you need to remove the @main declaration of your main Widget's configuration and instead add it to a new bundle struct:
通过创建一个WidgetBundle来返回一个或移动Widget的WidgetConfiguration ,可以使您的应用提供多种 Widget选择。 为此,您需要删除主@main小部件配置的@main声明,而是将其添加到新的bundle结构中:
@main
struct SwiftWidgetsBundle: WidgetBundle {
    @WidgetBundleBuilder
    var body: some Widget {
        RepoBranchChecker()
    }
}
You can then support multiple Widgets by simply adding more configurations to this bundle:
然后,您可以通过简单地向此捆绑包添加更多配置来支持多个Widget:
@main
struct SwiftWidgetsBundle: WidgetBundle {
    @WidgetBundleBuilder
    var body: some Widget {
        RepoBranchChecker()
        CommitNumberChecker()
        AppleOpenSourceProjectsChecker()
    }
}
With this in place, when trying to add a Widget from your app, you’ll be able to see the additional Widget options by swiping.
有了此设置,当尝试从您的应用程序添加窗口小部件时,您将可以通过滑动查看其他窗口小部件选项。
从这往哪儿走 (Where to Go From Here)
There are further customizations you can do with widgets, including rendering different info depending on the container size of the widget, locking the possible widget sizes, and more.
您可以对窗口小部件进行进一步的自定义,包括根据窗口小部件的容器大小呈现不同的信息,锁定可能的窗口小部件大小等等。
Check WWDC 2020’s sessions for more information on widgets.
有关小部件的更多信息,请查看WWDC 2020的会话 。
翻译自: https://medium.com/better-programming/how-to-create-widgets-in-ios-14-8cf58d34ce89
ios小部件


 1494
1494

 被折叠的 条评论
为什么被折叠?
被折叠的 条评论
为什么被折叠?
 到【灌水乐园】发言


