


SwiftUI和Firebase的应用架构 (Application Architecture for SwiftUI & Firebase)
Previously in this series of articles about SwiftUI and Firebase, we talked about fetching data from Cloud Firestore and how to map from Firestore documents to Swift structs using Swift’s Codable API.
在本系列中有关SwiftUI和Firebase的系列文章之前,我们曾讨论过如何从Cloud Firestore获取数据以及如何使用Swift的Codable API 从Firestore文档映射到Swift结构 。
You might recall that we also introduced a way to add new books to our collection of books in Firestore. To do so, we added a method addBook(book:) to our view model. However, we didn't actually use it, as we didn't have a UI in place for entering the details about the new book.
您可能还记得,我们还引入了一种将新书添加到Firestore中的书集中的方法。 为此,我们向视图模型添加了方法addBook(book:) 。 但是,我们实际上并未使用它,因为我们没有用于输入有关新书详细信息的UI。
So today, let’s look at how to build UI for adding a new book and how to update our view models to support this use case.
因此,今天让我们看一下如何构建用于添加新书的UI,以及如何更新视图模型以支持此用例。
不要凭封面判断书 (Don’t judge a book by its cover)
Before we jump into the implementation details, let’s consider for a moment how the UI for our application will look like. You will notice that the overall structure is pretty similar to the iOS Contacts app.
在进入实现细节之前,让我们先考虑一下应用程序的UI外观。 您会注意到,总体结构与iOS Contacts应用程序非常相似。
Take a look at the following diagram which shows all the screens of our application.
查看下图,该图显示了我们应用程序的所有屏幕。
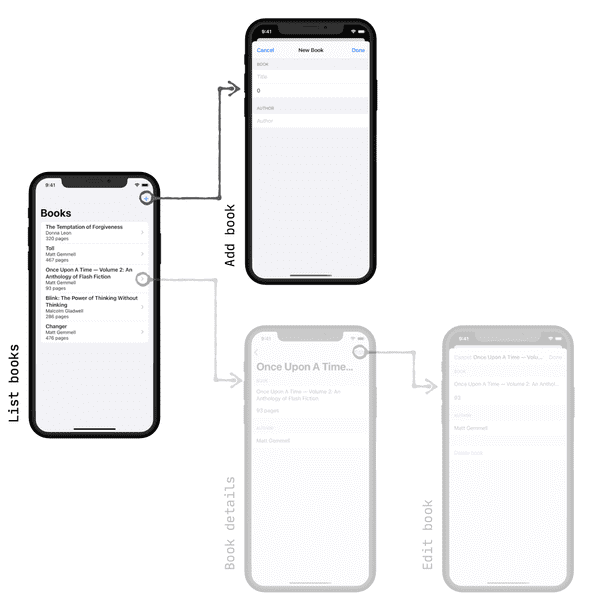
(The greyed-out parts of the diagram will be covered in the following episodes of this series, when we work on completing the app by implementing all the other CRUD (Create, Read, Update, Delete) features).
(当我们通过实现所有其他CRUD(创建,读取,更新,删除)功能来完成该应用程序时,本系列的以下几集中将覆盖该图的灰色部分)。
The books list screen is the centerpiece of the application — it shows a list of all the user’s books. Tapping on a list item will take the user to a screen that will display the details of the respective book. We will implement the book details screen in one of the next episodes, re-using some of the code we’re going to build today.
书籍列表屏幕是应用程序的核心-它显示了所有用户书籍的列表。 点击列表项会将用户带到一个屏幕,该屏幕将显示相应书籍的详细信息。 我们将在接下来的几集中实现图书详细信息屏幕,重新使用我们今天要构建的一些代码。
By tapping on the + button in the navigation bar, the user can add a new book. This will take them to a screen that will allow them to enter the details of a new book, such as the title or the number of pages. Tapping Done will add the book to the collection of books and dismiss the screen. If the user decides they don't want to add a new book after all, they can tap the Cancel button which will just dismiss the dialog. We will use SwiftUI's Forms API along with a number of TextField s to implement this screen.
通过点击导航栏中的+按钮,用户可以添加一本新书。 这会将他们带到一个屏幕,使他们可以输入新书的详细信息,例如书名或页数。 点击完成会将书籍添加到书籍集中并关闭屏幕。 如果用户认为自己根本不想添加新书,则可以点击“ 取消”按钮,这将关闭该对话框。 我们将使用SwiftUI的Forms API以及许多TextField来实现此屏幕。
To implement the Add a new book use case, we will need the following:
要实现“ 添加新书”用例,我们将需要以下内容:
- The UI for the screen. This will be a SwiftUI view. 屏幕的UI。 这将是一个SwiftUI视图。
- A view model for handling the new screen’s state. 用于处理新屏幕状态的视图模型。
A button in the navigation bar of the book list screen to allow the user to open the New Book screen
图书清单屏幕导航栏中的按钮,允许用户打开“新书”屏幕
建立使用者介面 (Building the UI)
Let’s start by sketching out the UI. Here is the bare bones version of our Add a new book screen:
让我们从绘制UI开始。 这是“ 添加新书”屏幕的基本内容:
A few notes on how this code works:
有关此代码如何工作的一些注意事项:
As the screen is going to be displayed modally, we’ll want to be able to dismiss it when the user taps on the Done or Cancel button. The presentation state is managed via the
presentationModeenvironment variable, which we bind in (1). We introduce a helper methoddismiss()(11) to make it a little bit easier to dismiss the screen from the action handler methodshandleCancelTapped()(9) andhandleDoneTapped()(10).由于屏幕将以模态显示,因此我们希望能够在用户点击“ 完成”或“ 取消”按钮时将其关闭。 演示状态是通过
presentationMode环境变量管理的,我们在(1)中绑定了该变量。 我们引入了一个辅助方法dismiss()(11),使从操作处理程序方法handleCancelTapped()(9)和handleDoneTapped()(10)中消除屏幕更加容易。We instantiate the view model (2) so we can bind the individual UI elements to it. Note that we’re using
@StateObjectproperty wrapper here, which is new in iOS 14 / Xcode 12b1.我们实例化视图模型(2),以便可以将各个UI元素绑定到该视图模型。 请注意,我们在这里使用
@StateObject属性包装器,这是iOS 14 / Xcode 12b1中的新增功能。- The main part of the screen is taken up by a form with two sections: one for the book details (3), the other for the name of the author (6). 屏幕的主要部分由具有两个部分的表单占据:一个用于书籍详细信息(3),另一个用于作者的姓名(6)。
- The individual text fields are bound to the view model (4, 5, 7) 各个文本字段绑定到视图模型(4、5、7)
You will notice that the text field for the number of pages looks slightly different: as the underlying data type is a number, we’re using a
NumberFormatterto convert the user input (which is a string) into a number, and vice versa. Invalid input (anything other than a number) will be rejected. Please note that, as of now, you need to press [Enter] to commit any input in aTextFieldthat uses aFormattersubclass. This likely is Apple's attempt to minimize the number of times the formatter needs to run.您会注意到,页面数的文本字段看起来略有不同:由于基础数据类型是数字,因此我们使用
NumberFormatter将用户输入(字符串)转换为数字,反之亦然。 无效的输入(数字以外的任何东西)将被拒绝。 请注意,到目前为止,您需要按[Enter]来提交使用Formatter子类的TextField中的任何输入。 苹果可能试图将格式化程序需要运行的次数减至最少。Since it only makes sense to save the book in Firestore once the user has entered some text, we only enable the Done button if the view model is modified (8)
由于只有在用户输入了一些文本之后才将书保存在Firestore中才有意义,因此我们仅在修改视图模型后才启用“ 完成”按钮(8)
视图模型 (The View Model)
The BookViewModel manages the state of our Add a new book screen. Its responsibilities are:
BookViewModel管理“ 添加新书”屏幕的状态。 其职责是:
- Providing access to the book the user is editing 提供对用户正在编辑的书的访问
Keeping book of the book’s state, so we can enable / disable the Done button on the UI
保持书籍的状态,因此我们可以在UI上启用/禁用“ 完成”按钮
- Saving the new book to Firestore 将新书保存到Firestore
Let’s take a closer look at the following code:
让我们仔细看看下面的代码:
The view model has two published properties, which we subscribed to in the UI:
视图模型具有两个已发布的属性,我们已在UI中订阅了这些属性:
book(1) is the book that the user is currently editing / adding. If you look back at the code for the UI, you will notice that the individualTextViews bind to the respective attributes of theBookinstance. Any change in the UI will be reflected in thebookinstance, and vice versa.book(1)是用户当前正在编辑/添加的书。 如果回头看UI的代码,您会注意到各个TextView绑定到Book实例的相应属性。 用户界面的任何更改都将反映在book实例中,反之亦然。We provide an empty
Bookinstance as the default parameter for the constructor (2) to make creating the view model a little bit less verbose.我们提供一个空的
Book实例作为构造函数(2)的默认参数,以减少创建视图模型的麻烦。To keep track of the modification state of the
bookattribute, we set up a simple Combine pipeline (3) that will setmodifiedto true (4) as soon as thebookmodel is modified. To prevent the view model from being marked as modified when initially setting thebookinstance, we drop the first event (5). Side note: this code doesn't mark the view model as unmodified if the user undoes all modifications, which is an obvious shortcoming. I'll leave the implementation of a more robust change detection to the keen reader :-)要跟踪的修改状态的
book属性,我们建立了一个简单的合并管线(3),将设置modified尽快为真(4)book模型被修改。 为了防止在最初设置book实例时将视图模型标记为已修改,我们删除了第一个事件(5)。 旁注:如果用户撤消所有修改,此代码不会将视图模型标记为未修改,这是一个明显的缺点。 我会将敏锐的更改检测的实现留给敏锐的读者:-)
The view model not only holds the state for our UI, but also provides action handlers that can be called by the UI. The only action handler in this case is handleDoneTapped(), which will store the book instance into Firestore.
视图模型不仅保存我们UI的状态,还提供可由UI调用的动作处理程序。 在这种情况下,唯一的动作处理程序是handleDoneTapped() ,它将book实例存储到Firestore中。
And finally, addBook will store the book attribute into the books collection in our Firestore instance. If you've read the previous episode, you will recognise this method.
最后, addBook将book属性存储到我们的Firestore实例的books集合中。 如果您已阅读上一集 ,则将识别此方法。
全部放在一起 (Putting it all together)
Now that we’ve got the UI for editing a new book and the view model for managing the view state, all that’s missing is a button to open the Add a new book screen.
现在我们有了用于编辑新书的UI和用于管理视图状态的视图模型,所缺少的只是一个按钮,用于打开“ 添加新书”屏幕。
First, let’s define the button itself:
首先,让我们定义按钮本身:
And then use it in the BookListView we built in the previous episode:
然后在上一集中构建的BookListView使用它:
Here’s how it works:
运作方式如下:
The Add new book screen will be displayed in a modal sheet (5) which will only be shown if the boolean
presentAddBookSheetis true (1, 4)“ 添加新书”屏幕将显示在模式表(5)中,该模式表仅在布尔值
presentAddBookSheet为true(1、4)时显示。- The button we defined above is added to the navigation bar (2) 我们上面定义的按钮已添加到导航栏(2)
When the user presses the button, the boolean
presentAddBookSheetis toggled (3), and the Add a new book screen will be shown当用户按下按钮时,布尔值
presentAddBookSheet被切换(3),并且将显示Add a new book屏幕。
演示版 (Demo)
With all these pieces in place, we can now run the application. Any book we add using BookEditView will be added to Firestore (use the Firebase console to watch this)), and will instantly show up in the list of books in BooksListView.
在所有这些步骤就绪之后,我们现在可以运行该应用程序。 我们使用BookEditView添加的所有书籍都将添加到Firestore(使用Firebase控制台观看),并将立即显示在BooksListView的书籍列表中。

结论 (Conclusion)
In this episode, we looked at how to add new data to Cloud Firestore, and how to integrate this in a SwiftUI app that follows the MVVM approach.
在本集中,我们研究了如何向Cloud Firestore添加新数据,以及如何将其集成到遵循MVVM方法的SwiftUI应用程序中。
You learned:
您了解到:
- How to map data from a Swift struct to a Cloud Firestore document by using Swift’s Codable protocol 如何使用Swift的Codable协议将数据从Swift结构映射到Cloud Firestore文档
- How to use a View Model to encapsulate data access and make managing our view state easier, resulting in a cleaner and more maintainable code base 如何使用视图模型封装数据访问并简化视图状态的管理,从而使代码库更干净,更可维护
- How to tie this all together to make sure our application state is always in sync both with our backend and within the frontend 如何将所有这些结合在一起以确保我们的应用程序状态始终与后端和前端同步
In the next episode, we will work on completing the main functionality of our application by implementing functionality to update and delete books. In addition to implementing a details screen and integrating it with our navigation structure, we will also look at the flow of data and talk about refactoring our code to keep all data access code in one place.
在下一集中,我们将通过实现更新和删除书籍的功能来完成应用程序的主要功能。 除了实现详细信息屏幕并将其与我们的导航结构集成之外,我们还将查看数据流,并讨论重构代码以将所有数据访问代码保留在一个地方。
Thanks for reading!
谢谢阅读!
If you’ve got any questions or comments, feel free to post an issue on the GitHub repo for this project, or reach out to me on Twitter at @peterfriese.
如果您有任何疑问或意见,请随时在此项目的GitHub存储库上发布问题,或通过@peterfriese在Twitter上与我联系 。
Originally published at https://peterfriese.dev.
最初发布在 https://peterfriese.dev 。
翻译自: https://medium.com/firebase-developers/adding-data-to-firestore-from-a-swiftui-app-c2bb55690072


 28
28

 被折叠的 条评论
为什么被折叠?
被折叠的 条评论
为什么被折叠?
 到【灌水乐园】发言


