


firebase ios
Adding Firebase to your iOS App in the first step before start using Firebase products such as Authentication, Database, Cloud Functions etc.
在开始使用Firebase产品(例如身份验证,数据库,云功能等)之前,请先将Firebase添加到iOS应用中。
In this Firebase iOS tutorial, I will be walking you through how to connect Firebase to your iOS app using Swift Language with STEP by STEP instructions.
在此Firebase iOS教程中,我将指导您如何使用Swift语言和STEP by STEP指令将Firebase连接到iOS应用。
创建一个新的Xcode项目 (Create a New Xcode Project)
Go ahead and open up Xcode and choose File → New → Project.
继续并打开Xcode,然后选择“ 文件” →“ 新建” →“ 项目”。

Then, Choose a Single View Application from the template pop-up window and click next.
然后,从模板弹出窗口中选择一个单一视图应用程序,然后单击下一步。

Give it a project name of your choice and mine is FirebaseiOSDemo and make sure that the Language is set to Swift and Click Next,
给它一个您选择的项目名称,我的名称是FirebaseiOSDemo并确保将Language设置为Swift并单击Next,
Xcode will ask where to save the project and you can choose any location from your computer and Click Create.
Xcode会询问保存项目的位置,您可以从计算机中选择任何位置,然后单击“创建”。
Done!
做完了!
The next step would be to create a Firebase Project.
下一步将是创建Firebase项目。
创建Firebase项目 (Create a Firebase Project)
Go to Firebase and log in with your Google account if you have it already, otherwise create a Gmail account.
转到Firebase并使用您的Google帐户登录(如果已经拥有),否则创建一个Gmail帐户。
Once you’ve logged in, create a new project by clicking + Add Project button from the Firebase Console.
登录后,通过从Firebase控制台中单击+添加项目按钮来创建一个新项目。

If you have a few projects created already, you can see them along with + Add Project button on your Firebase Console page.
如果您已经创建了一些项目,则可以在Firebase控制台页面上看到它们以及+添加项目按钮。
Firebase will bring a pop-up window when you hit the + Add Project button.
当您点击+添加项目按钮时,Firebase会弹出一个窗口。
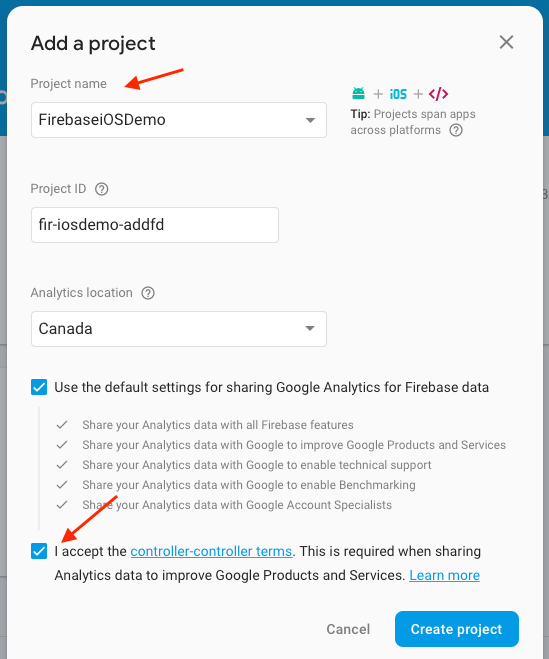
Make sure to add a Project Name and select the checkbox of terms and click Create Project.
确保添加项目名称,并选中术语复选框,然后单击创建项目。
It will take a few seconds to finish creating a new project. Once it’s done, click Continue to the Project Console.
完成创建新项目将需要几秒钟。 完成后,单击“继续”到“项目控制台”。
Click the iOS icon that will be on the middle of the page.
点击页面中间的iOS图标。
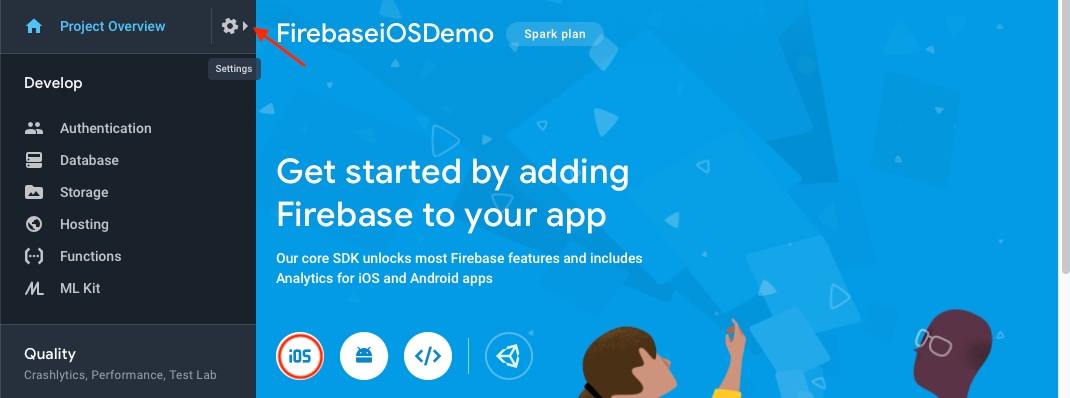
If you do not see the iOS icon for some reason, you can go to the Firebase dashboard → Project Overview (at the top left) → click the gear icon → click Project Settings
如果由于某种原因看不到iOS图标,则可以转到Firebase仪表板 → 项目概述 (位于左上角)→单击齿轮图标→单击项目设置
If you scroll down, at the bottom, you can see the iOS icon.
如果向下滚动,则可以在底部看到iOS图标。
Once you have clicked the iOS icon, you will be directed to the Add Firebase to Your iOS App page which has five steps to complete.
单击iOS图标后,您将被定向到“将Firebase添加到您的iOS应用”页面,该页面需要完成五个步骤。
The first one is the Register App.
第一个是Register App。
注册应用 (Register App)
To set the iOS Bundle ID input field, hop over to your Xcode project and select the root of the project folder from the Project Navigator panel at the top left.
要设置iOS Bundle ID输入字段,请跳至您的Xcode项目,然后从左上方的Project Navigator面板中选择项目文件夹的根。

Then, choose General → Identity → Bundle Identifier. Copy it.
然后,选择常规 → 身份 → 捆绑包标识符 。 复制它。
Head back over to Firebase and paste it in there. In my case com.softauthor.FirebaseiOSDemo.
回到Firebase,然后将其粘贴到其中。 就我而言,是com.softauthor.FirebaseiOSDemo。
App nickname and App Store ID input fields are optional, so I am going to leave them blank.
应用程序昵称和应用程序商店ID输入字段是可选的,因此我将其保留为空白。
Click Register App.
点击注册应用。
下载配置文件 (Download Config File)
At this stage, Firebase created .plist file. Go ahead download the Download GoogleService-Info.plist file to your computer. In my case, it will be downloaded into my Downloads folder.
在此阶段,Firebase创建了.plist文件。 继续将Download GoogleService-Info.plist文件Download GoogleService-Info.plist到您的计算机上。 就我而言,它将下载到“下载”文件夹中。
Move the .plist file that you’ve downloaded from the downloads folder to Xcode Project Navigator at the root level.
将您已从下载文件夹中下载的.plist文件移到根级别的Xcode Project Navigator。
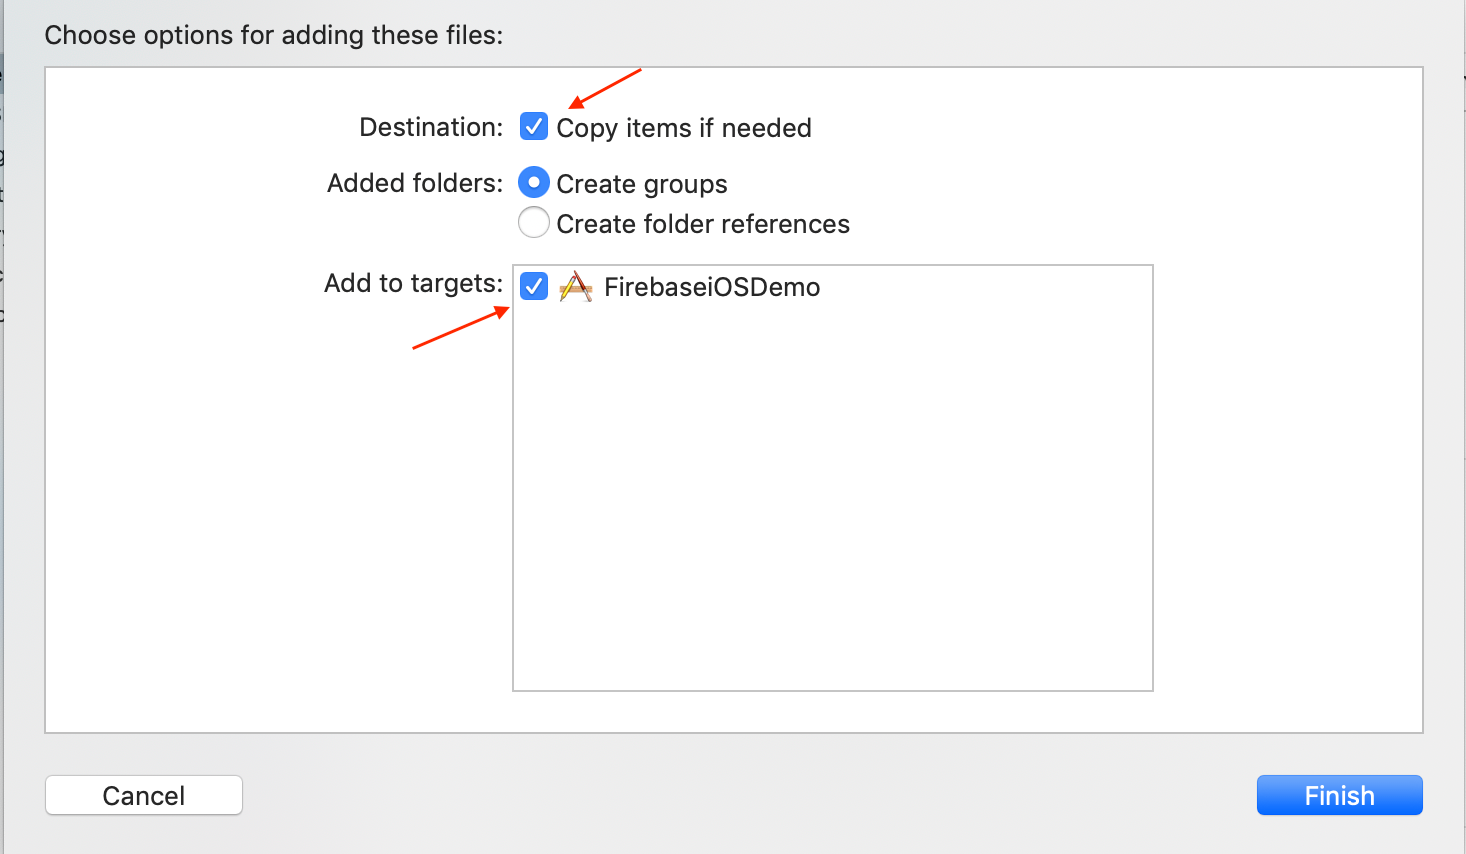
When you let go, you will get a pop-up window and make sure to copy items if needed and Add to targets are checked.
放开时,您将弹出一个窗口,并确保在需要时复制项目,并选中添加到目标。
Then, click Finish.
然后,单击完成。
At this stage, you can see the .plist file added to the project navigator.
在此阶段,您可以看到.plist文件已添加到项目导航器中。
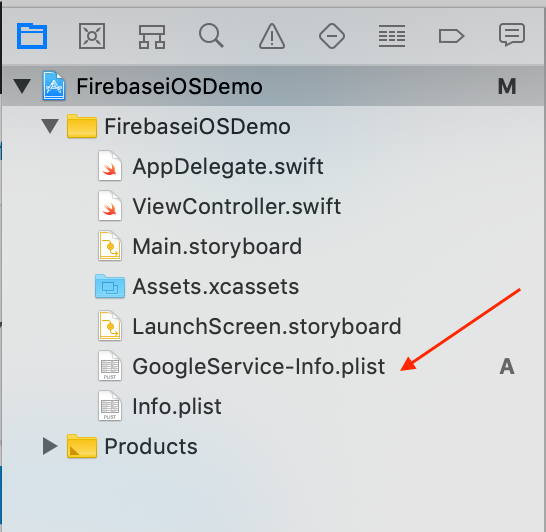
Make sure that the GoogleService-Info.plist file added the sibling to info.plist file.
确保GoogleService-Info.plist文件将同级添加到info.plist文件中。
Head back to the Firebase Console, to your iOS page, and click next, which will bring you to the second step, Add FirebaseSDK.
回到Firebase控制台,回到您的iOS页面,然后单击“下一步”,这将使您进入第二步,添加FirebaseSDK。
添加Firebase SDK (Add Firebase SDK)
To do that, you need to install CocoaPods if you haven’t already. Open up your Terminal → Run sudo gem install cocoapods command to install CocoaPods.
为此,如果尚未安装,则需要安装CocoaPods。 打开终端 →运行sudo gem install cocoapods命令安装CocoaPods。
CocoaPods is a dependency manager for Swift and Objective-C which will help you to install third-party packages like Firebase to your Xcode project.
CocoaPods是Swift和Objective-C的依赖项管理器,它将帮助您将Firebase之类的第三方软件包安装到Xcode项目中。
Once you have cocoa pods installed, the next step would be to create a Podfile.
一旦安装了可可豆荚,下一步就是创建一个Podfile。
To create that, open up a terminal window and navigate to the location of your Xcode project folder.
要创建它,请打开一个终端窗口,然后导航到Xcode项目文件夹的位置。
pod init
If you navigate to your Xcode project folder in Finder, you will be able to see the new file called PodFile added to the project.
如果您在Finder中导航到Xcode项目文件夹,则将能够看到添加到项目中的名为PodFile的新文件。
Next, add Firebase Pod to the PodFile.
接下来,将Firebase Pod添加到PodFile。
To add that, open up the PodFile and add the code below under # Pods for FirebaseiOSDemo and save the file.
要添加该文件,请打开PodFile,然后在#Pods for FirebaseiOSDemo下添加以下代码,然后保存文件。
pod 'Firebase/Core'
Finally, go to Terminal and locate the Xcode project folder and run:
最后,转到终端并找到Xcode项目文件夹并运行:
pod installThis will take a few seconds to download Firebase dependencies and integrate it into your Xcode project.
下载Firebase依赖关系并将其集成到您的Xcode项目中将花费几秒钟。
Once it’s done, you can see a few files added to the project when looking at the project folder in Finder.
完成后,在Finder中查看项目文件夹时,您会看到一些文件已添加到项目中。

From now onwards, you will need to use .xcworkspace to open up the project instead of using .xcodeproj.
从现在开始,您将需要使用.xcworkspace来打开项目,而不是使用.xcodeproj。
Go ahead and close the Xcode project if you haven’t already done so, and open up .xcworkspace file to launch the project.
继续关闭Xcode项目(如果尚未关闭),然后打开.xcworkspace文件以启动该项目。
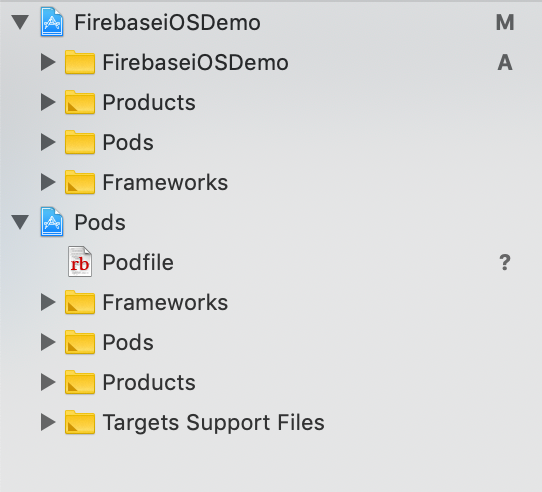
As you can see, on the project navigator, there are two sections: one is an actual project file and the other one is pod files.
如您所见,在项目导航器上有两个部分:一个是实际的项目文件,另一个是pod文件。
The next step is to add the initialization code from Firebase to Xcode.
下一步是将初始化代码从Firebase添加到Xcode。
添加初始化代码 (Add Initialization Code)
Open up FirebaseiOSDemo folder from the project navigator → choose AppDelegate.swift file in which I will be adding two lines of code.
从项目导航器中打开FirebaseiOSDemo文件夹→选择AppDelegate.swift文件,我将在其中添加两行代码。
One is at the top:
一个在顶部:
import FirebaseAnother one is inside didFinishLaunchingWithOptions() method but before the return true line in the AppDelegate.file.
另一个是在didFinishLaunchingWithOptions()方法内部,但在AppDelegate.file中的return true行之前。
FirebaseApp.configure()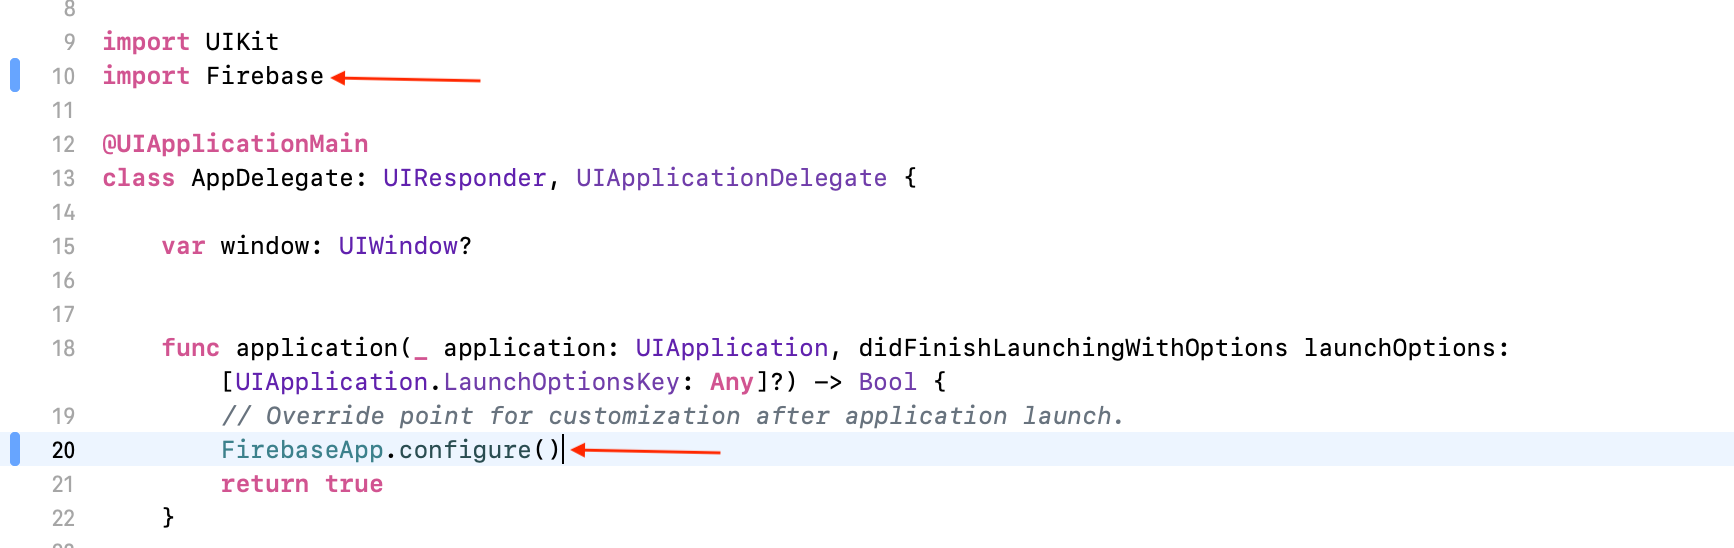
运行您的应用以验证安装 (Run Your App to Verify the Installation)
Run your Xcode project by clicking the ► icon at the top or Cmd + R.
通过单击顶部的►图标或Cmd + R运行Xcode项目。
Then, go to Firebase and wait for a few seconds and you can see it! Congratulations, you’ve successfully added Firebase to your app!
然后,转到Firebase并等待几秒钟,您可以看到它! 恭喜,您已成功将Firebase添加到您的应用程序中 !
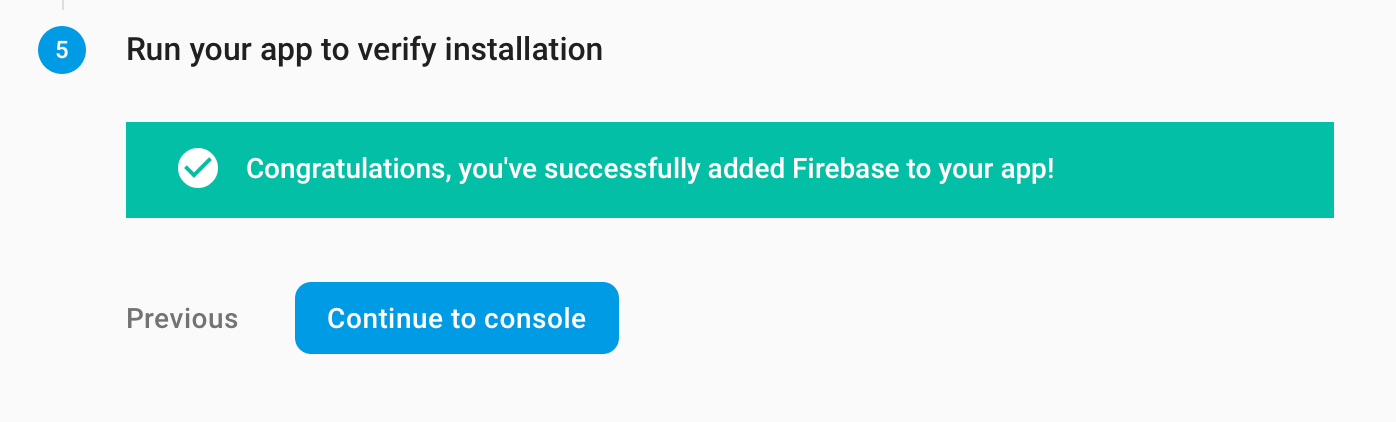
At this stage, Firebase has been added to your Xcode project.
在此阶段,Firebase已添加到您的Xcode项目中。
There you have it 🙂
那里有have
翻译自: https://medium.com/swlh/add-firebase-to-your-ios-app-quickly-updated-2020-d673ea96552e
firebase ios


 748
748

 被折叠的 条评论
为什么被折叠?
被折叠的 条评论
为什么被折叠?
 到【灌水乐园】发言


