


docker部署flask
A brief guide to building an app to serve a natural language processing model, containerizing it and deploying it.
构建用于服务自然语言处理模型,将其容器化和部署的应用程序的简要指南。
By: Edward Krueger and Douglas Franklin.
作者: 爱德华·克鲁格 ( Edward Krueger)和道格拉斯·富兰克林 ( Douglas Franklin) 。
If you need help building an NLP pipeline or evaluating models check out our last article. We covered some NLP basics and how to build an NLP pipeline with Scikit-Learn. Then we evaluated some model metrics and decided on the best model for our problem and data.
如果您需要建立NLP管道或评估模型的帮助,请查看我们的上一篇文章 。 我们介绍了一些NLP基础知识,以及如何使用Scikit-Learn构建NLP管道。 然后,我们评估了一些模型指标,并为我们的问题和数据确定了最佳模型。
Be sure to check out the README and code in our GitHub repository instructions on setting up this app locally with Docker!
请务必查看自述文件和GitHub存储库中的代码,以了解如何使用Docker在本地设置此应用程序!
Before deploying our model to the cloud, we need to build an app to serve our model.
在将我们的模型部署到云之前,我们需要构建一个应用程序来服务我们的模型。
构建应用 (Building the App)
The application to serve this model is simple. We just need to import our model into the app, receive a POST request and return the model’s response to that POST.
服务于该模型的应用程序很简单。 我们只需要将模型导入应用程序,接收POST请求,然后将模型的响应返回给该POST。
Here is the app code.
这是应用程序代码。
Notice that the data_dict is the Python dictionary corresponding to the payload sent via the POST request. From this dictionary we can extract the text to be categorized. This means our POSTs need the same key. So we are going to send JSONs with the {key: value} being {"text": "message") .
请注意, data_dict是与通过POST请求发送的有效负载相对应的Python字典。 从这本字典中,我们可以提取要分类的文本。 这意味着我们的POST需要相同的密钥。 因此,我们将发送{key: value}为{"text": "message") JSON。
Since the Scikit-Learn pipeline expects a list of strings we have to wrap the text as a list. Also, when receiving the result from the model’s .predict method, we receive a list with a single element and unpack it to access the prediction.
由于Scikit-Learn管道需要字符串列表,因此我们必须将文本包装为列表。 另外,从模型的.predict方法接收结果时,我们会收到一个包含单个元素的列表,并将其解包以访问预测。
Once we have the app running locally without bugs, we are ready to make some changes to our repository to prepare for deployment.
一旦我们使应用程序在本地运行且没有错误,就可以对存储库进行一些更改以准备部署。
Keep in mind we are using the package and environment manager pipenv to handle our app’s dependencies. If you are not familiar with virtual environment and package management, you may need to install this and set up a virtual environment using the Pipfile in the Github repository. Check out this article for help doing that!
请记住,我们正在使用程序包和环境管理器pipenv处理我们应用程序的依赖项。 如果您不熟悉虚拟环境和软件包管理,则可能需要安装此文件并使用Github存储库中的Pipfile设置虚拟环境。 请查看本文以获取帮助!
容器化应用 (Containerizing the App)
We need to make some final changes to our project files in preparation for deployment. In our project, we’ve used pipenv and pipenv-to-requirements to handle dependencies and generate a requirements.txt. All you'll need for your Docker container is the requirements.txt file.
我们需要对我们的项目文件进行一些最终更改,以准备进行部署。 在我们的项目中,我们使用pipenv和pipenv-to-requirements来处理依赖关系并生成requirements.txt 。 您的Docker容器所需的全部是requirements.txt文件。
Be sure to git add the Dockerfile you made earlier to your repository.
确保将之前创建的Dockerfile添加到仓库中。
Here is the link to our Pipfile for dependencies on this project.
这是指向该项目依赖项的Pipfile的链接。
Docker和Dockerfiles (Docker and Dockerfiles)
Before we get the app running in the cloud, we must first Dockerize it. Check out our README in the GitHub repository for instructions on setting up this app locally with Docker.
在使应用程序在云中运行之前,我们必须首先对其进行Dockerize。 请查看GitHub存储库中的自述文件,以获取有关使用Docker在本地设置此应用程序的说明。
Docker is the best way to put apps into production. Docker uses a Dockerfile to build a container. The built container is stored in Google Container Registry were it can be deployed. Docker containers can be built locally and will run on any system running Docker.
Docker是将应用程序投入生产的最佳方式。 Docker使用Dockerfile来构建容器。 构建的容器可以存储在Google Container Registry中。 Docker容器可以在本地构建,并且可以在运行Docker的任何系统上运行。
Here is the Dockerfile we used for this project:
这是我们用于该项目的Dockerfile:
The first line of every Dockerfile begins with FROM. This is where we import our OS or programming language. The next line, starting with ENV, sets our environment variable ENV to APP_HOME / app . This mimics the structure of our project directories, letting Docker know where our app is.
每个Dockerfile的第一行都以FROM.开头FROM. 这是我们导入操作系统或编程语言的地方。 从ENV开始的下一行将环境变量ENV设置为APP_HOME / app 。 这模仿了项目目录的结构,让Docker知道我们的应用程序在哪里。
These lines are part of the Python cloud platform structure and you can read more about them in Google’s cloud documentation.
这些行是Python云平台结构的一部分,您可以在Google的云文档中了解有关它们的更多信息。
The WORKDIR line sets our working directory to $APP_HOME. Then, the Copy line makes local files available in the docker container.
WORKDIR行将我们的工作目录设置为$APP_HOME 。 然后,复制行使本地文件在Docker容器中可用。
The next two lines involve setting up the environment and executing it on the server. The RUN command can be followed with any bash code you would like executed. We use RUN to pip install our requirements. Then CMD to run our HTTP server gunicorn. The arguments in this last line bind our container to$PORT, assign the port a worker, specify the number of threads to use at that port and state the path to the app asapp.main:app.
接下来的两行涉及设置环境并在服务器上执行环境。 您可以在RUN命令后跟随您要执行的任何bash代码。 我们使用RUN点子安装我们的要求。 然后CMD运行我们的HTTP服务器gunicorn。 最后一行中的参数将我们的容器绑定到$PORT , $PORT分配一个工作线程,指定在该端口上使用的线程数,并将应用程序的路径声明为app.main:app 。
You can add a .dockerignore file to exclude files from your container image. The .dockerignore is used to keep files out of your container. For example, you likely do not want to include your test suite in your container.
您可以添加.dockerignore文件以从容器映像中排除文件。 .dockerignore用于将文件保留在容器之外。 例如,您可能不想在容器中包含测试套件。
To exclude files from being uploaded to Cloud Build, add a.gcloudignore file. Since Cloud Build copies your files to the cloud, you may want to omit images or data to cut down on storage costs.
要排除文件无法上传到Cloud Build,请添加.gcloudignore文件。 由于Cloud Build将文件复制到云中,因此您可能希望省略图像或数据以降低存储成本。
If you would like to use these, be sure to check out the documentation for .dockerignore and .gcloudignorefiles, however, know that the pattern is the same as a.gitignore !
如果您想使用这些文件,请务必查看.dockerignore和.gcloudignore文件的文档,但是,请知道该模式与.gitignore相同!
在本地构建和启动Docker容器 (Building and Starting the Docker Container Locally)
Name and build the container with this line. We are calling our container spam-detector.
用此行命名并构建容器。 我们称我们的容器为spam-detector 。
docker build . -t spam-detectorTo start our container we must use this line to specify what ports the container will use. We set the internal port to 8000 and the external port to 5000. We also set the environment variable PORT to 8000 and enter the container name.
要启动我们的容器,我们必须使用此行来指定容器将使用的端口。 我们将内部端口设置为8000,将外部端口设置为5000。我们还将环境变量PORT设置为8000,然后输入容器名称。
PORT=8000 && docker run -p 5000:${PORT} -e PORT=${PORT} spam-detectorNow our app should be up and running in our local Docker container.
现在,我们的应用程序应该已经在本地Docker容器中启动并运行了。
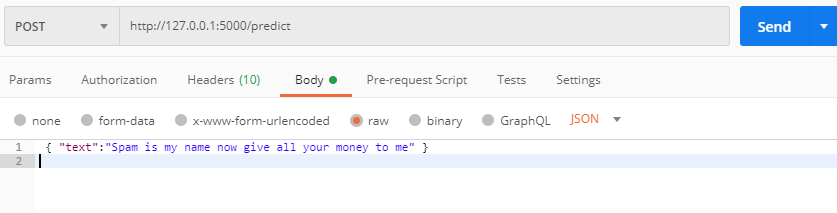
Let’s send some JSONs to the app at the localhost address provided in the terminal where you’ve run the build.
让我们通过运行构建的终端中提供的localhost地址向应用发送一些JSON。
使用Postman测试应用 (Testing the app with Postman)
Postman is a software development tool that enables people to test calls to APIs. Postman users enter data. The data is sent to a web server address. Information is returned as a response or an error, which Postman presents to the user.
Postman是一种软件开发工具,使人们可以测试对API的调用。 邮递员用户输入数据。 数据被发送到Web服务器地址。 信息作为响应或错误返回,邮递员将其呈现给用户。
Postman makes it easy to test our route. Open up the GUI and
邮递员可以轻松测试我们的路线。 打开GUI,然后
- Select POST and paste the URL, adding the route as needed 选择POST并粘贴URL,根据需要添加路由
- Click Body and then raw 单击主体,然后单击原始
- Select JSON from the dropdown to the right 从右侧的下拉列表中选择JSON
Be sure to use “text” as the key in your JSON, or the app will throw an error. Place any text you would like the model to process as the value. Now hit send!
确保在JSON中使用“文本”作为键,否则应用程序将引发错误。 将您希望模型处理的任何文本作为值。 现在点击发送!
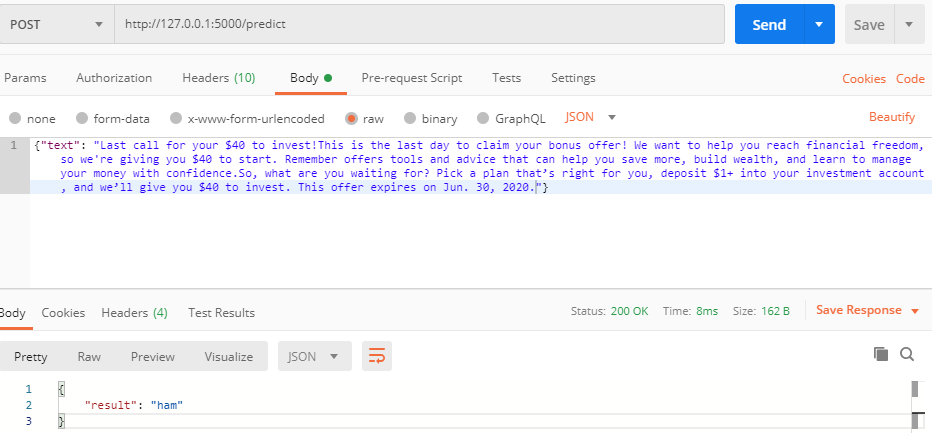
Then view the result in Postman! It looks like our email was categorized as ham. If you receive an error be sure you’ve used the correct key and have the route extension /predict in the POST URL.
然后在邮递员中查看结果! 看来我们的电子邮件被归类为火腿。 如果收到错误,请确保您使用了正确的密钥,并且在POST URL中具有路由扩展名/predict 。

Let’s try an email from my Gmail spam folder.
让我们尝试从我的Gmail垃圾邮件文件夹发送一封电子邮件。
Hmm, it looks like we are running a different model than Google.
嗯,看来我们运行的模型与Google不同。
Now let’s test the app without Postman using just the command line.
现在,让我们仅使用命令行在没有Postman的情况下测试应用程序。
使用curl测试应用 (Testing the app with curl)
Curl can be a simple tool for testing that allows us to remain in a CLI. I had to do some tweaking to get the command to work with the app, but adding the flags below resolved the errors.
Curl可以是一个简单的测试工具,可以让我们保留在CLI中。 我必须进行一些调整才能使命令与应用程序一起使用,但是在下面添加标志可以解决错误。
Open the terminal and insert the following. Change the text value to see what the model classifies as spam and ham.
打开终端并插入以下内容。 更改文本值以查看模型归类为垃圾邮件和火腿的内容。
curl -H "Content-Type: application/json" --request POST -d '{"text": "Spam is my name now give all your money to me"}' http://127.0.0.1:5000/predictThe result, or an error, will populate in the terminal!
结果或错误将在终端中填充!
{"result":"ham"}Now let’s get the app deployed to Google Cloud Platform so anyone can use it.
现在,让我们将应用程序部署到Google Cloud Platform,以便任何人都可以使用它。
Docker Images和Google Cloud Registry (Docker Images and Google Cloud Registry)
GCP Cloud Build allows you to build containers remotely using the instructions contained in Dockerfiles. Remote builds are easy to integrate into CI/CD pipelines. They also save local computational time and energy as Docker uses lots of RAM.
GCP Cloud Build允许您使用Dockerfiles中包含的说明远程构建容器。 远程构建易于集成到CI / CD管道中。 由于Docker使用大量RAM,它们还节省了本地计算时间和精力。
Once we have our Dockerfile ready, we can build our container image using Cloud Build.
一旦我们准备好Dockerfile,就可以使用Cloud Build构建我们的容器映像。
Run the following command from the directory containing the Dockerfile:
从包含Dockerfile的目录中运行以下命令:
gcloud builds submit --tag gcr.io/PROJECT-ID/container-nameNote: Replace PROJECT-ID with your GCP project ID and container-name with your container name. You can view your project ID by running the command gcloud config get-value project.
注意:将PROJECT-ID替换为GCP项目ID,并将container-name替换为容器名称。 您可以通过运行命令gcloud config get-value project来查看您的项目ID。
This Docker image now accessible at the GCP container registry or GCR and can be accessed via URL with Cloud Run.
现在,可以在GCP容器注册表或GCR上访问此Docker映像,并且可以通过Cloud Run通过URL访问。
使用CLI部署容器映像 (Deploy the container image using the CLI)
- Deploy using the following command: 使用以下命令进行部署:
gcloud run deploy --image gcr.io/PROJECT-ID/container-name --platform managedNote: Replace PROJECT-ID with your GCP project ID and container-name with your containers’ name. You can view your project ID by running the command gcloud config get-value project.
注意:将PROJECT-ID替换为GCP项目ID,并将container-name替换为容器的名称。 您可以通过运行命令gcloud config get-value project来查看您的项目ID。
2. You will be prompted for service name and region: select the service name and region of your choice.
2.系统将提示您输入服务名称和区域:选择所需的服务名称和区域。
3. You will be prompted to allow unauthenticated invocations: respond y if you want public access, and n to limit IP access to resources in the same google project.
3.系统将提示您允许未经授权的调用 :响应y如果你想公共访问, n限制IP访问的资源在同谷歌项目。
4. Wait a few moments until the deployment is complete. On success, the command line displays the service URL.
4.等待片刻,直到完成部署。 成功后,命令行将显示服务URL。
5. Visit your deployed container by opening the service URL in a web browser.
5.通过在Web浏览器中打开服务URL,访问已部署的容器。
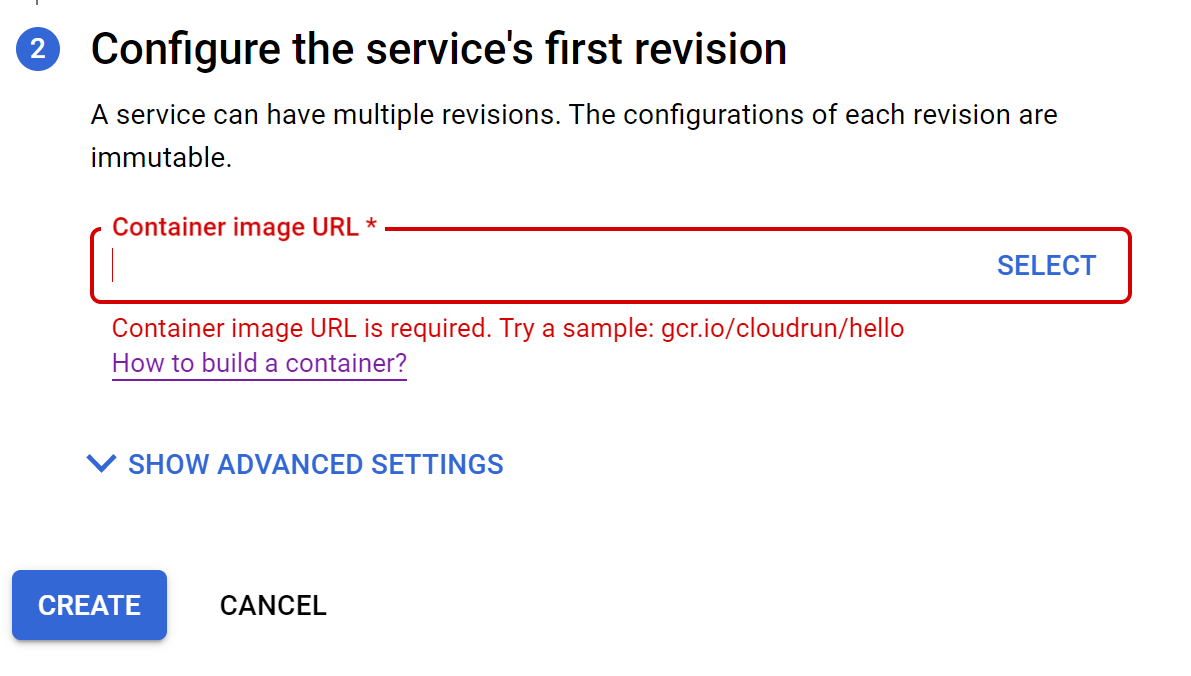
使用GUI部署容器映像 (Deploy the container image using the GUI)
Now that we have a container image stored in GCR, we are ready to deploy our application. Visit GCP cloud run and click create service, be sure to set up billing as required.
现在我们已经在GCR中存储了一个容器映像,现在可以部署我们的应用程序了。 访问GCP云运行并点击创建服务,请确保根据需要设置结算信息。

Select the region you would like to serve and specify a unique service name. Then choose between public or private access to your application by choosing unauthenticated or authenticated, respectively.
选择您要提供服务的区域并指定唯一的服务名称。 然后,分别通过选择未认证或已认证来选择对应用程序的公共或私人访问。
Now we use our GCR container image URL from above. Paste in the URL or click select and find it using a dropdown list. Check out the advanced settings to specify server hardware, container port and additional commands, maximum requests and scaling behaviors.
现在,我们从上方使用GCR容器图片网址。 粘贴在URL中,或单击“选择”并使用下拉列表找到它。 检查高级设置以指定服务器硬件,容器端口和其他命令,最大请求数和扩展行为。
Click create when you’re ready to build and deploy!
准备好构建和部署时,请单击创建!
You’ll be brought to the GCP Cloud Run service details page where you can manage the service and view metrics and build logs.
您将被带到GCP Cloud Run服务详细信息页面,您可以在其中管理服务并查看指标和构建日志。
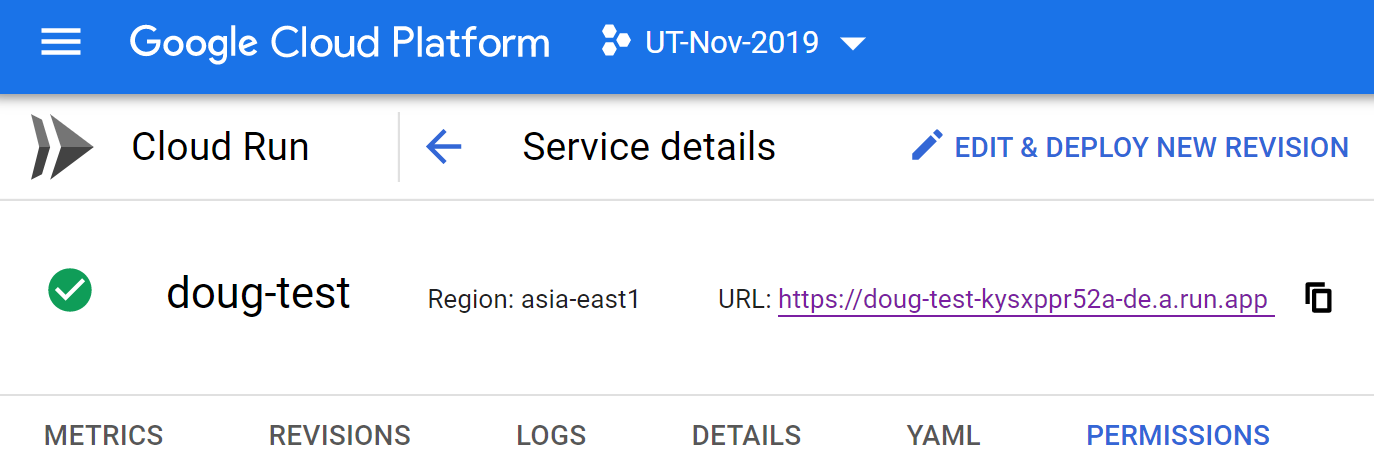
Click the URL to view your deployed application!
单击URL查看已部署的应用程序!

Congratulations! You have just deployed an application packaged in a container to Cloud Run.
恭喜你! 您刚刚将打包在容器中的应用程序部署到了Cloud Run。
You only pay for the CPU, memory, and networking consumed during request handling. That being said, be sure to shut down your services when you do not want to pay for them!
您只需为请求处理期间消耗的CPU,内存和网络付费。 话虽如此,当您不想为服务付费时,请务必将其关闭!
结论 (Conclusion)
We’ve covered setting up an app to serve a model and building docker containers locally. Then we dockerized our app and tested it locally. Next, we stored our docker image in the cloud and used it to build an app on Google Cloud Run.
我们已经介绍了设置应用程序以提供模型并在本地构建Docker容器的内容。 然后,我们对应用程序进行了docker化并在本地进行了测试。 接下来,我们将docker映像存储在云中,并使用它在Google Cloud Run上构建应用程序。
Getting any decently good model out quickly can have significant business and tech value. Value from having something people can immediately use and from having software deployed that a data scientist can tune later.
快速推出任何体面的好的模型可以具有巨大的业务和技术价值。 拥有人们可以立即使用的东西以及部署数据科学家可以稍后进行调整的软件的价值。
We hope this content is informative and helpful, let us know what you are looking to learn more about in the software, development and machine learning space!
我们希望该内容能为您提供有用的信息,让我们知道您想在软件,开发和机器学习领域中进一步学习的内容!
docker部署flask


 2816
2816

 被折叠的 条评论
为什么被折叠?
被折叠的 条评论
为什么被折叠?
 到【灌水乐园】发言


