


我将对iOS中的表格进行简要介绍和演示,以及如何创建自定义TableView单元格。 (I’m going to give a brief introduction and demo into tables in iOS, and how to create custom TableView Cells.)
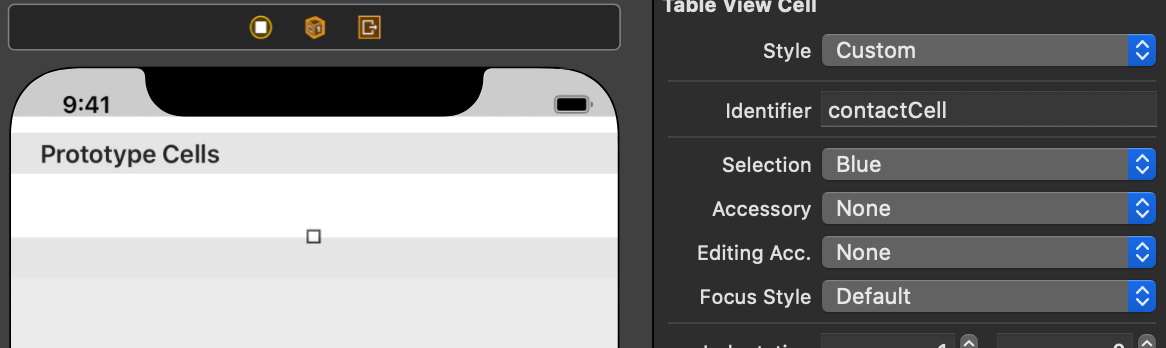
In XCode open Main.storyboard. Next drag and drop a TableView Controller onto the screen, click on the TableView Controller and open the Attributes Selector menu. You’ll notice that just by adding a TableView Controller, a Dynamic prototype cell has been added for you. Next click on the actual TableView Cell and you should see that the style of that cell is set to Custom, expand the menu option and you’ll see a list of default styles that are available for a TableView Cell. There is Basic, Right Detail, Left Detail, and Subtitle. Try each style out to see what happens in the TableView Cell.
在XCode中打开Main.storyboard。 接下来,将TableView Controller拖放到屏幕上,单击TableView Controller并打开Attributes Selector菜单。 您会注意到,仅通过添加TableView Controller,就为您添加了Dynamic原型单元。 接下来,单击实际的TableView单元格,您应该看到该单元格的样式设置为“自定义”,展开菜单选项,您将看到可用于TableView Cell的默认样式的列表。 有基本,右详细信息,左详细信息和字幕。 尝试每种样式以查看TableView单元中会发生什么。
The default TableView Cell styles offer a quick way to get a table view up and running and displaying data. However, the defaults are extremely limiting when it comes to creativity and the ability to change the layout of the cell. It’s time to go ahead and create a custom cell model.
默认的TableView Cell样式提供了一种快速的方法来建立表格视图并运行和显示数据。 但是,在创造力和更改单元布局的能力方面,默认设置极为有限。 现在该继续创建自定义单元格模型了。
Make sure you still have the table view cell selected, next select Custom as the style. You now have an empty cell in the table view to create your own style.
确保仍然选择了表格视图单元格,然后选择“自定义”作为样式。 现在,表视图中有一个空单元格来创建自己的样式。
We’re going to build a contact table. The table cell will display a persons profile picture, name, email, and phone number.
我们将建立一个联系表。 表格单元格将显示人员个人资料图片,姓名,电子邮件和电话号码。
第1步-创建联系人模型 (Step 1 — Create a Contact Model)
In the projects directory add a new Swift File and name it ContactModel.
在项目目录中添加一个新的Swift文件,并将其命名为ContactModel。

Once you’ve created that file, we’ll need some information to it that defines a persons contact information should entail. For now, we’ll go with a user image, first name, last name, and a phone number. Let’s create our model below!
创建该文件后,我们将需要一些信息来定义一个人的联系信息。 现在,我们将提供用户图像,名字,姓氏和电话号码。 让我们在下面创建我们的模型!

We created a Contact model and initialized each element of a contact.
我们创建了一个Contact模型并初始化了联系人的每个元素。
步骤2 —创建联系人单元文件 (Step 2 — Create a Contact Cell File)
Back in your projects directory let’s go ahead and create a new file → Select Cocoa Touch Class.
回到您的项目目录,让我们继续创建一个新文件→选择Cocoa Touch Class。
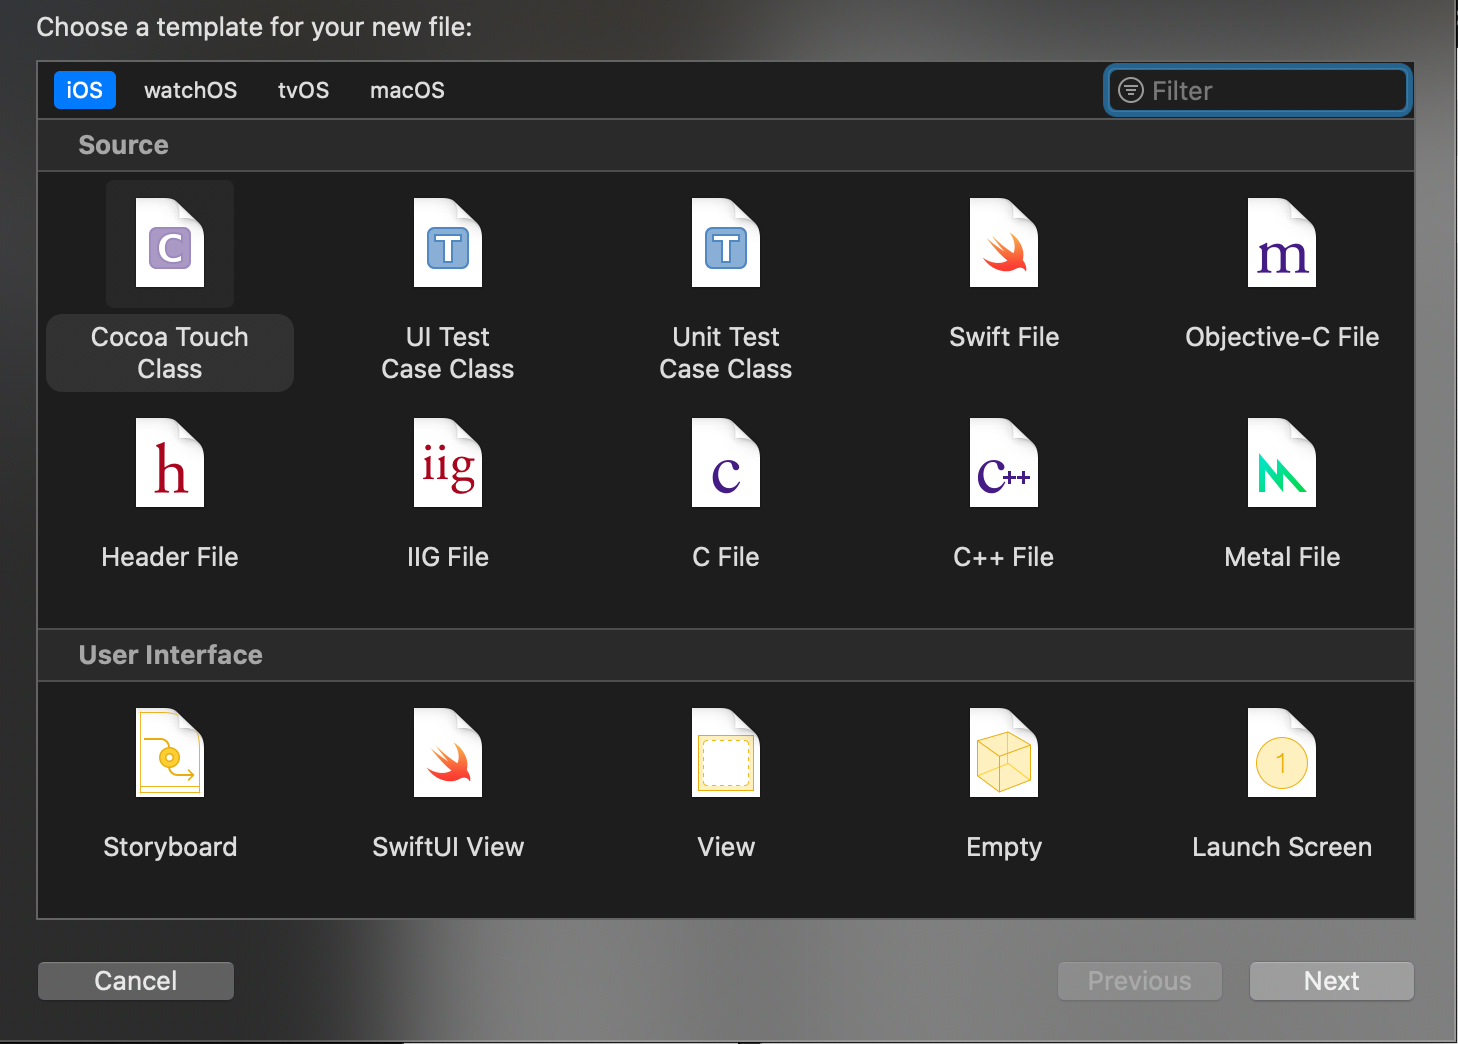
Name the file ContactCell and make sure (very important) that you select the correct subclass. Select UITableViewCell and press create.
将文件命名为ContactCell并确保(非常重要)您选择了正确的子类。 选择UITableViewCell并按创建。

Great! We’re starting to build a nice foundation for our table view.
大! 我们开始为表格视图打下良好的基础。
步骤3 —填充ContactCell类 (Step 3 — Populate the ContactCell class)
In the ContactCell file that you’ve just created we’re going to have to create some IBOutlets to populate the table cells with the contact information. We have a Contact icon, first name, last name and phone number so we’ll need to create four IBOutlets for those properties.
在您刚创建的ContactCell文件中,我们将必须创建一些IBOutlet来用联系信息填充表格单元格。 我们有一个联系人图标,名字,姓氏和电话号码,因此我们需要为这些属性创建四个IBOutlet。

Next, we need to connect the ContactModel class to update the outlets that we just created. For this step we are going to create a new function in the ContactCell class. Let’s call it UpdateCellView and pass in a contact object as a parameter. Inside the function we have to use the contact objects elements to populate the outlets for the table view cell.
接下来,我们需要连接ContactModel类以更新刚创建的插座。 对于这一步,我们将在ContactCell类中创建一个新函数。 让我们将其称为UpdateCellView并传入联系人对象作为参数。 在函数内部,我们必须使用联系人对象元素来填充表格视图单元的出口。

Great! We’re almost there.
大! 我们快到了。
步骤4 —创建一些联系人 (Step 4 — Create some Contacts)
Navigate to the ViewController.swift file and go ahead and create an array that uses the ContactModel struct. I went ahead and creating three contacts to start, you can add as many as you like.
导航到ViewController.swift文件,然后继续创建使用ContactModel结构的数组。 我继续并创建了三个联系人以开始,您可以添加任意数量的联系人。

A very important step when working with table views is to create an IBOutlet for the TableView. It’s an easy step to forget and one that can leave you scratching your head as to what is wrong with table, why is it not working. Make sure to add that at the top of the ViewController.swift file
使用表视图时,非常重要的一步是为TableView创建IBOutlet。 这是一个容易忘记的步骤,并且可能使您抓不住桌子的问题,为什么它不起作用。 确保将其添加到ViewController.swift文件的顶部

第5步-将数据源分配并委托给已创建的TableView (Step 5 —Assign DataSource and Delegate to the TableView that has been created)
Assigning data source and delegate to the table view is a very important step. Without these next two lines of code, the table would not load/show any data on startup and you would be sitting there thinking, umm that’s not what was supposed to happen. Let’s add data source and delegate to the table view.
将数据源和委托分配给表视图是非常重要的一步。 如果没有以下两行代码,该表将不会在启动时加载/显示任何数据,您将坐在那里思考,这不是应该发生的事情。 让我们添加数据源并将其委托给表视图。

步骤6 —实现UITableViewDelegate和UITableViewDataSource协议功能 (Step 6 — Implement the UITableViewDelegate and UITableViewDataSource protocol functions)
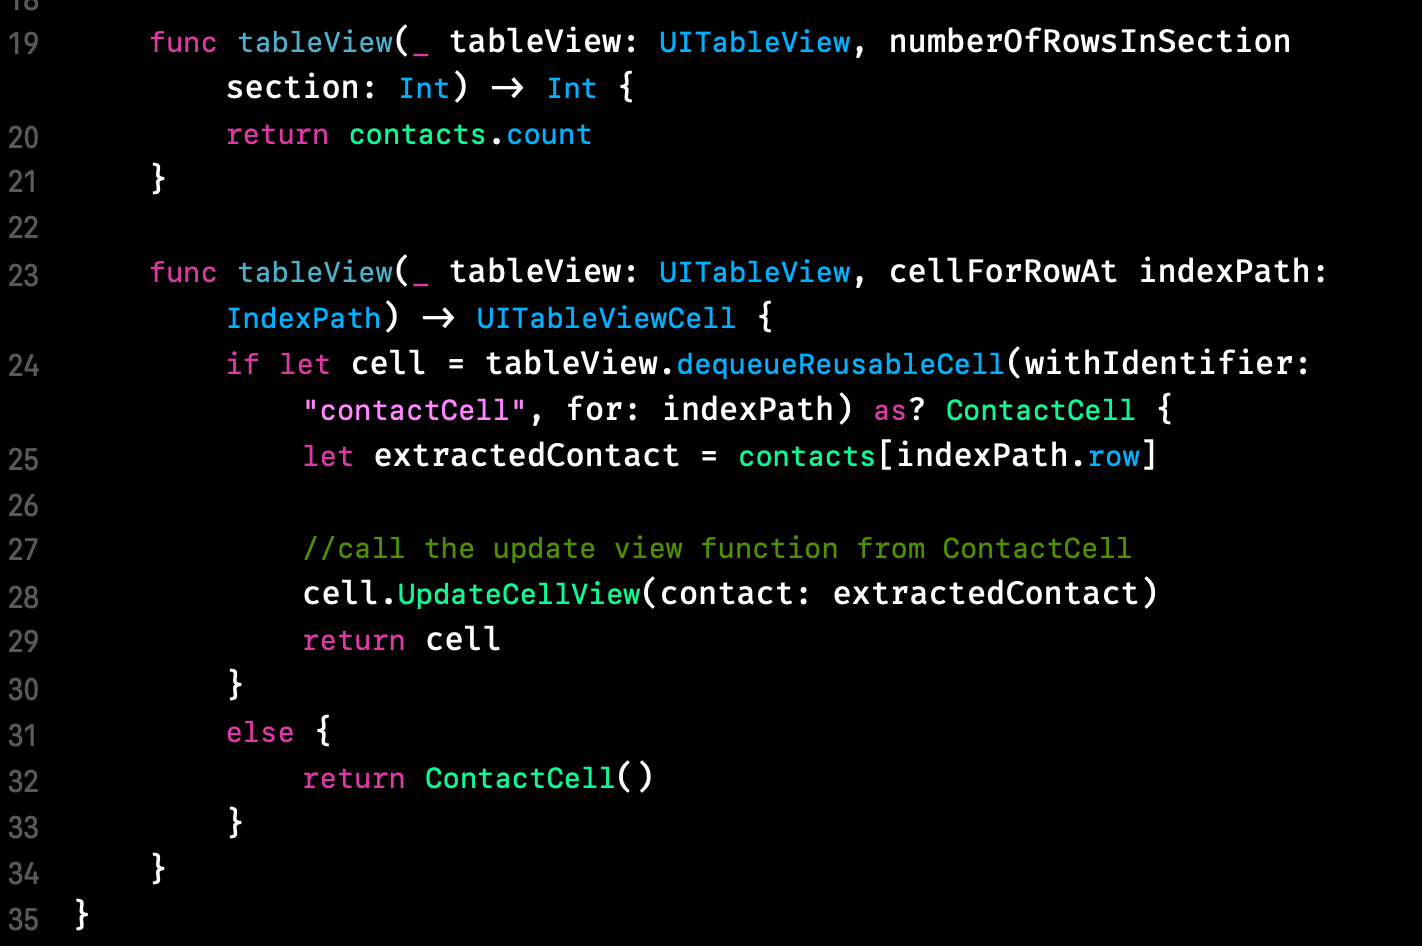
As you might be thinking, each of these steps is important for the table to function properly, without adding these next two functions the project would never successfully build. We have to implement numberOfRowsInSection and cellForRowAt. I went ahead and populated the functions using data we created earlier. Lets start with the first function — numberOfRowsInSection requires an Int as it’s return, it only makes sense that we take the number of contacts that are stored in the array we previously created and use that number as our count.
您可能会想,这些步骤中的每一个步骤对于表的正常运行都很重要,而无需添加项目永远无法成功构建的下两个功能。 我们必须实现numberOfRowsInSection和cellForRowAt。 我继续并使用我们之前创建的数据填充了函数。 让我们开始第一个功能- numberOfRowsInSection需要一个Int,因为它的回报,它才有意义,我们采取的是存储先前创建的数组中,并使用该号码作为我们的计数触点的数量。
In the function — cellForRowAt we first have to create a cell in the form of the ContactCell and pass in an identifier to create a connection with the actual table view cell. Then we create a new variable extractedContact (you can name this anything you like) that gets assigned each contact from the contacts array and is then passed into the UpdateCellView. This is how the table view cell IBOutlets are populated.
在函数— cellForRowAt中,我们首先必须以ContactCell的形式创建一个单元格,并传入一个标识符以创建与实际表格视图单元格的连接。 然后,我们创建一个新的变量ExtractedContact(您可以根据自己的喜好命名),将其从联系人数组分配给每个联系人,然后传递到UpdateCellView。 这就是表格视图单元IBOutlets的填充方式。
第7步-将所有内容连接到情节提要 (Step 7 — Connect Everything to the Storyboard)
First things first, navigate to the storyboard and select the table view cell. In the Identity Inspector, we have to add our custom ContactCell class as the class of this cell. Also, you need to add in an image view and three labels that will act as the foundation of the contact cell. You can create your own layout or use the one that I created like below.
首先,导航到情节提要,然后选择表格视图单元格。 在Identity Inspector中,我们必须添加自定义ContactCell类作为此单元格的类。 另外,您需要在图像视图中添加三个标签,这些标签将作为联系单元的基础。 您可以创建自己的布局,也可以使用我创建的布局,如下所示。

Next while the table view cell is still selected, navigate to the Attributes Selector. Remember that contactCell identifier that we used when creating the cell in the table view protocol function? Yea that one. Well here is where we need to use it again. Add the same identifier to the Identifier property (case matters!).
接下来,在仍然选择表视图单元格的情况下,导航到“属性选择器”。 还记得我们在表视图协议功能中创建单元格时使用的contactCell标识符吗? 是的。 好了,这是我们需要再次使用它的地方。 将相同的标识符添加到Identifier属性(大小写很重要!)。
Next in the View Controller Scene on the left, right click on the contactCell and you should see the four IBOutlets that we created for our custom cell. Click and drag the icon, first name, last name, phone number to the appropriate view controller elements.
接下来,在左侧的View Controller Scene中,右键单击contactCell,您应该看到我们为自定义单元创建的四个IBOutlet。 单击并将图标,名字,姓氏,电话号码拖到相应的视图控制器元素中。

大! 一切看起来都可以连接并且可以使用。 让我们尝试一下我们的自定义表格视图单元格。 (Great! Everything looks to be connected and ready to go. Let’s give our custom table view cell a try.)
You should see these results if you’ve followed along correctly.
如果正确遵循,应该会看到这些结果。

这是一个Github链接,指向该演示的源代码。 随时下载并自己进行测试。 (Here is a Github link to the source code for this demo. Feel free to download it and test it out yourself.)
请继续关注更多iOS内容! (Stay tuned for more iOS content!)

翻译自: https://medium.com/@avg5074/how-to-create-custom-cells-to-enhance-a-tableview-in-ios-ce848f3b6157


 7361
7361


 被折叠的 条评论
为什么被折叠?
被折叠的 条评论
为什么被折叠?
 到【灌水乐园】发言


