


We know that image augmentation is a key factor for computer vision tasks. It helps the algorithm to avoid overfitting, as well as it limits the need for huge training datasets [1]. Most deep learning frameworks have a vision module that implements augmentation “out-of-the-box”, as it is the case of Keras, PyTorch and Fastai libraries. The problem starts to rise when we need to feed the model with images that don’t match the 3-channel standard (RGB). That’s the case of most remote sensing applications (ex. Figure 1) and a number of other areas.
我们知道图像增强是计算机视觉任务的关键因素。 它有助于算法避免过度拟合,并限制了对庞大训练数据集的需求[1]。 像Keras,PyTorch和Fastai库一样,大多数深度学习框架都有一个视觉模块,可以实现“开箱即用”的增强。 当我们需要为模型提供与3通道标准(RGB)不匹配的图像时,问题开始出现。 大多数遥感应用(例如图1)和许多其他领域就是这种情况。
To overcome this limitation, I will show how to implement a multispectral augmentation using the Albumentations library [2] and plug it into a Fastai v2 DataBlock for further training. The principles about how to create a DataBlock for satellite images can be found in my previous story “How to create a DataBlock for Multispectral Satellite Image Segmentation with the Fastai-v2”.
为了克服这个限制,我将展示如何使用Albumentations库[2]来实现多光谱增强并将其插入Fastai v2 DataBlock中以进行进一步的培训。 关于如何为卫星图像创建数据块的原理可以在我以前的故事“如何为Fastai-v2创建多光谱卫星图像分割的数据块”中找到。
1-数据集 (1- The dataset)
The data we will be using is a public dataset available at Kaggle, called “95-Cloud: Cloud Segmentation on Satellite Images” , that contains training patches extracted from 57 Landsat 8 scenes. This dataset is, in fact, an extension of a previous Kaggle dataset that has been used to train a very simple Fastai v1 model (here). The patches are 384x384 size and contains 4 bands — Red, Green, Blue and Near Infrared. Additionally, there is a patch with the ground truth that mark the clouds. As our objective is just to show how to implement the augmentation, without further considerations about accuracy, we will stay with the latest version only.
我们将使用的数据是Kaggle可用的公共数据集,称为“ 95-Cloud:卫星图像上的云分割” ,其中包含从57个Landsat 8场景中提取的训练补丁。 实际上,此数据集是先前Kaggle数据集的扩展,该数据集已用于训练非常简单的Fastai v1模型(此处)。 补丁的大小为384x384,包含4个波段-红色,绿色,蓝色和近红外。 此外,还有一个带有地面真相的补丁标记了云层。 由于我们的目的只是展示如何实现增强功能,而无需进一步考虑准确性,因此我们将仅使用最新版本。
To make life easier, all the code shown here is ready to be used in a Kaggle notebook (here), so we will start by installing the necessary dependencies:
为了使生活更轻松,此处显示的所有代码都可以在Kaggle笔记本(此处)中使用,因此我们将从安装必要的依赖项开始:
# update torch and torch vision
!pip install -q torch==1.6.0+cu101 torchvision==0.7.0+cu101 -f https://download.pytorch.org/whl/torch_stable.html# install kornia, we will give it a try to accelarate our preprocessing
!pip install -q --upgrade kornia
!pip install -q allennlp==1.1.0.rc4# and install fastai2
!pip install -q --upgrade fastai
2-打开图像 (2- Opening the Images)
Besides the problem that the vision libraries don’t support multichannel images, this dataset keeps each band into a separate folder. So, in order to open an image, we first need to correct the paths for each band and then collate them into a single 4-channel image. Instead of subclassing the TensorImage class, as we did in the previous story, I will try to make things easier here and open the image as a tensor. The drawback of this approach is that we will not be able to use internal visualization functions of Fastai like DataLoader.showbatch(), as it doesn’t know how to display the 4 bands.
除了视觉库不支持多通道图像的问题外,该数据集还将每个波段保存在单独的文件夹中。 因此,为了打开图像,我们首先需要校正每个波段的路径,然后将它们整理为单个4通道图像。 与其像在上一个故事中所做的那样,不是继承TensorImage类,我将在这里使事情变得更容易,并以张量打开图像。 这种方法的缺点是我们将无法使用Fastai的内部可视化功能,例如DataLoader.showbatch() ,因为它不知道如何显示这四个波段。
The first step will be to create three base functions:
第一步将是创建三个基本功能:
- Open a TIF file and return it as a PyTorch’s Tensor; 打开一个TIF文件,并将其作为PyTorch的张量返回;
- Given a filename (suppose it is the Red band), return the names of the other three bands (Green, Blue and Nir); 给定一个文件名(假设它是红色波段),返回其他三个波段的名称(绿色,蓝色和Nir);
- Open the 4 bands at once and collate them into a single image. To do this, we will concatenate the images using the first dimension (or axis) 一次打开4个波段,然后将它们整理为单个图像。 为此,我们将使用第一维(或轴)将图像连接起来
import torch
import fastai
import numpy as np
import matplotlib.pyplot as plt
from pathlib import Path
from PIL import Image


from fastai.vision.all import *


def open_tif(fn, chnls=None, cls=torch.Tensor):
    im = (np.array(Image.open(fn))).astype('float32')
    return cls(im)


# The map_filename function makes it easier to map from one folder to another by replacing strings
def map_filename(base_fn, str1, str2):
    return Path(str(base_fn).replace(str1, str2))


def get_filenames(red_filename):
    return [red_filename,
            map_filename(red_filename, str1='red', str2='green'),
            map_filename(red_filename, str1='red', str2='blue'),
            map_filename(red_filename, str1='red', str2='nir'),
           ]


# the open multi-spectral tif function will be in charge of opening the separate tifs and collate them
def open_ms_tif(files):
    ms_img = None

    for path in files:
        img = open_tif(path)

        if ms_img is None:
            ms_img = img[None]
        else:
            ms_img = np.concatenate([ms_img, img[None]], axis=0)

    return TensorImage(ms_img)
Once our functions are defined, we will test them by passing one item into a Pipeline. The Pipeline is a sequence of functions that are applied to the one item to transform it the way we want.
定义函数后,我们将通过将一项传递给管道来对其进行测试。 管道是一系列功能,可应用于一个项目以将其转换为所需的方式。
To load the items, we will consider that our base images are in the red folder, and we will then get the other bands automatically. So, our pipeline will be composed with two functions: 1- get_filenames and 2- open_ms_tif. Our final image will have shape (4, 384, 384). To display it with matplotlib will do a final permutation in the dimensions to put the channels in the last axis to be (384, 384, 4), and also slice out the Nir band using […, :3].
要加载项目,我们将认为我们的基础图像位于红色文件夹中,然后我们将自动获得其他波段。 因此,我们的管道将由两个函数组成:1- get_filenames和2- open_ms_tif 。 我们的最终图像将具有形状(4, 384, 384) 。 要使用matplotlib显示它,将在尺寸上进行最终置换,以将通道的最后一个轴放置为(384, 384, 4) ,并使用[…, :3]切出Nir带。
Considering that our final objective is to segment the clouds in the image, we have to apply the same augmentations to the ground truth. So, a similar procedure will be done to open the mask.
考虑到我们的最终目标是分割图像中的云,我们必须对地面真相应用相同的增强。 因此,将执行类似的步骤以打开面罩。
img_pipe = Pipeline([get_filenames, open_ms_tif])
img = img_pipe(items[111])


mask_pipe = Pipeline([partial(map_filename, str1='red', str2='gt'),
                      partial(open_tif, cls=TensorMask)])


mask = mask_pipe(items[111])
print(img.shape, mask.shape)


_, ax = plt.subplots(1, 2, figsize=(12,5))
ax[0].imshow(img.permute(1, 2, 0)[..., :3]/20000)
mask.show(ctx=ax[1])
torch.Size([4, 384, 384]) torch.Size([384, 384])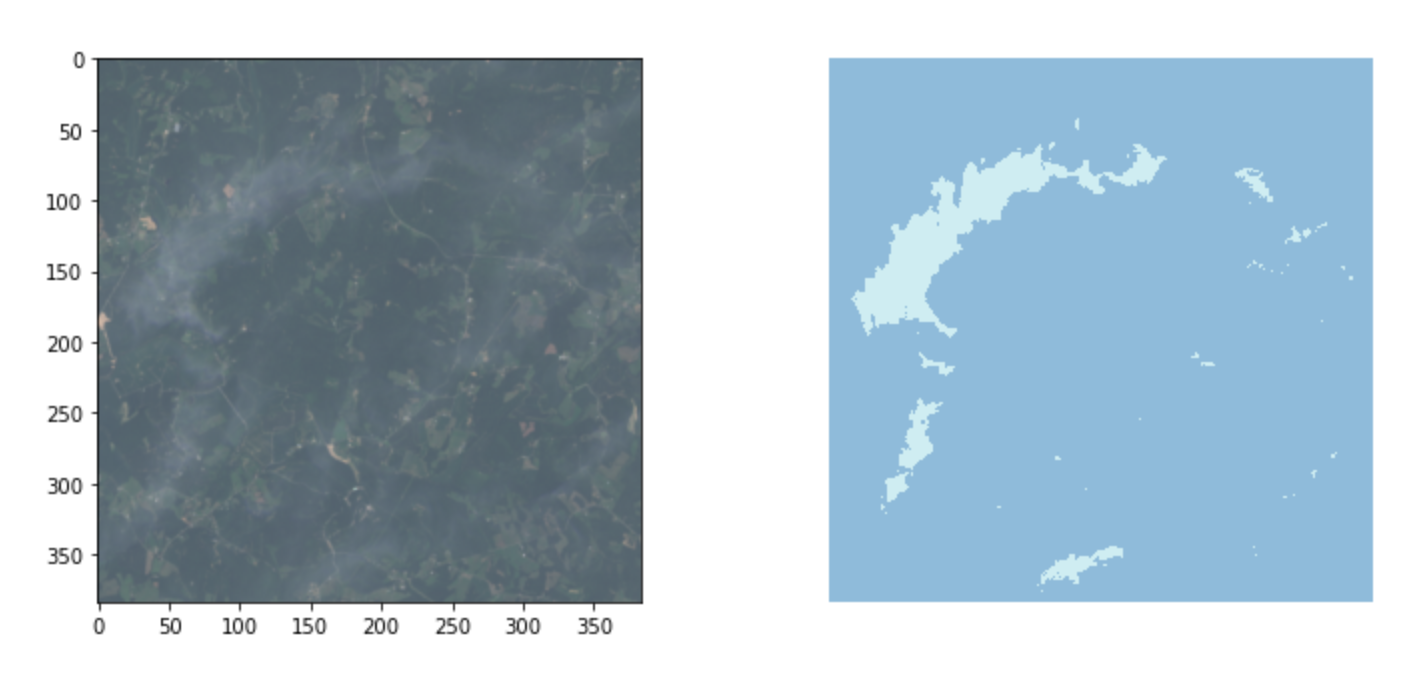
As we can see, our pipeline worked just fine. I used the .show() method of TensorMask with context ctx argument, just to show that in Fastai you can force the output to any context. Another interesting command is the partial, that returns reference to a function with a given set of parameters pre-filled.
如我们所见,我们的管道运行良好。 我将.show()方法与上下文ctx参数一起使用,只是为了表明在Fastai中可以将输出强制到任何上下文。 另一个有趣的命令是局部函数,它返回对具有预先填充的给定参数集的函数的引用。
3-创建数据集和数据加载器 (3- Creating a Dataset and a Dataloader)
Before going into the augmentations, we will first create a dataset and a dataloader, just to check if everything is working as desired. Note that we don’t need to specify the get_items function in the DataBlock, because our source is already a list of items. We will also define a function show_img() to display the multichannel tensor.
在进行扩充之前,我们将首先创建一个数据集和一个数据加载器,以检查一切是否按预期工作。 注意,我们不需要在DataBlock中指定get_items函数,因为我们的源代码已经是项目列表。 我们还将定义一个函数show_img()来显示多通道张量。
def show_img(tensor_img, ctx=None):
    ctx = plt.subplot() if ctx is None else ctx

    #normalize to fit between 0 and 1
    if tensor_img.max() > 0:
        tensor_img = tensor_img / tensor_img.max()

    ctx.imshow(tensor_img.permute(1, 2, 0)[..., :3])

# To create this DataBlock we don't need to specify the get_items function
# because we will pass the list of files as the source
db = DataBlock(blocks=(TransformBlock([get_filenames, open_ms_tif, lambda x: x/10000]),
                       TransformBlock([partial(map_filename, str1='red', str2='gt'),
                                       partial(open_tif, cls=TensorMask)])),
               splitter=RandomSplitter(valid_pct=0.2)
              )


# Now We could call db.summary() to see if everything goes well
# %time db.summary(source=items)
# Instead, we will create the dataloader and display a batch sample

ds = db.datasets(source=items)
dl = db.dataloaders(source=items, bs=4)
batch = dl.one_batch()
print(batch[0].shape, batch[1].shape)


# display the batch
_, ax = plt.subplots(batch[0].shape[0], 2, figsize=(10, batch[0].shape[0]*3))
for i in range(batch[0].shape[0]):

    show_img(batch[0][i], ctx=ax[i, 0])
    TensorMask(batch[1][i]).show(ax[i, 1])
torch.Size([4, 4, 384, 384]) torch.Size([4, 384, 384])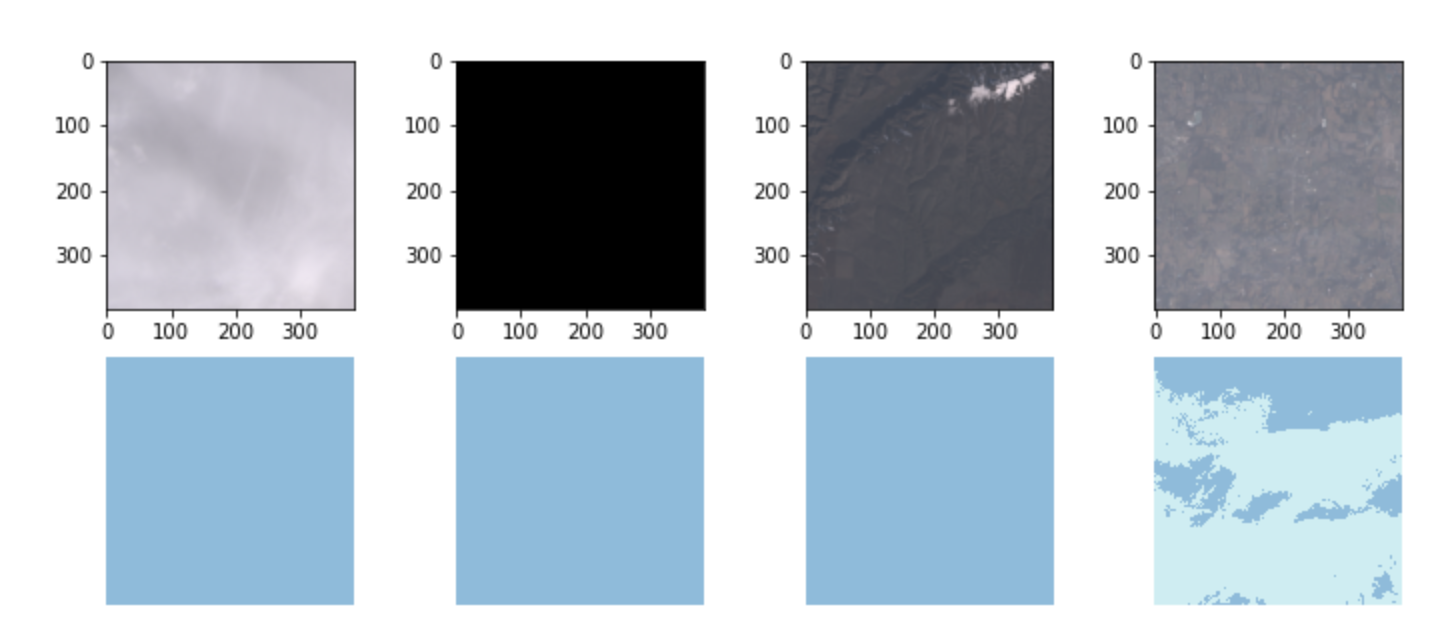
4-增强 (4- Augmentations)
For the augmentations we will be using the Albumentations [2] library. There is a huge list of possible augmentations, separated in different classes like Pixel level and spatial-level transformations. For this tutorial we will keep it simple and use just the basic shift, flip, scale, rotate, brightness and contrast. The full list can be accessed by their online documentation (here).
对于扩充,我们将使用Albumentations [2]库。 有大量可能的增强功能,分为像素级和空间级转换之类的不同类别。 对于本教程,我们将使其保持简单,仅使用基本的平移,翻转,缩放,旋转,亮度和对比度。 完整列表可通过其在线文档(此处)进行访问。
One important aspect of the Albumentations library is that it supports augmentation for segmentation and for object detection. That means it can apply the corresponding augmentation that was applied to the image to its target (mask or bounding box). That’s a crucial point, as we need to keep our cloud masks matching the augmented images.
Albumentations库的一个重要方面是它支持扩展以进行分段和对象检测。 这意味着它可以将应用于图像的相应增强应用于其目标(蒙版或边界框)。 这是至关重要的一点,因为我们需要保持云遮罩与增强图像匹配。
Fastai will apply the augmentation to a tuple (X, Y), where X is the image and Y is the mask. To make it work within the framework it is necessary to subclass the ItemTransform class and create the encodes() method. To make it generic, our subclass will receive the desired transformation at the time of instance creation, like so:
Fastai会将增强应用于元组(X,Y),其中X是图像,Y是蒙版。 要使其在框架内工作,必须对ItemTransform类进行子类化并创建encodes encodes()方法。 为了使其通用,我们的子类将在实例创建时收到所需的转换,如下所示:
class SegmentationAlbumentationsTransform(ItemTransform):
    split_idx = 0

    def __init__(self, aug): self.aug = aug
    def encodes(self, x):
        img,mask = x


        # for albumentations to work correctly, the channels must be at the last dimension
        aug = self.aug(image=np.array(img.permute(1,2,0)), mask=np.array(mask))
        return TensorImage(aug['image'].transpose(2,0,1)), TensorMask(aug['mask'])


# Now we will create a pipe of transformations
aug_pipe = A.Compose([A.ShiftScaleRotate(p=.9),
                      A.HorizontalFlip(),
                      A.RandomBrightnessContrast(contrast_limit=0.1, brightness_by_max=False)])


# Create our class with this aug_pipe
aug = SegmentationAlbumentationsTransform(aug_pipe)


# And check the results
idx = 423
aug_number = 4


# Display original and some augmented samples
_, ax = plt.subplots(aug_number+1, 2, figsize=(8,aug_number*4))


show_img(ds[idx][0], ctx=ax[0,0])
ds[idx][1].show(ctx=ax[0,1])


for i in range(1, aug_number+1):
    img, mask = aug.encodes(ds[idx])
    show_img(img, ctx=ax[i,0])
    mask.show(ctx=ax[i,1])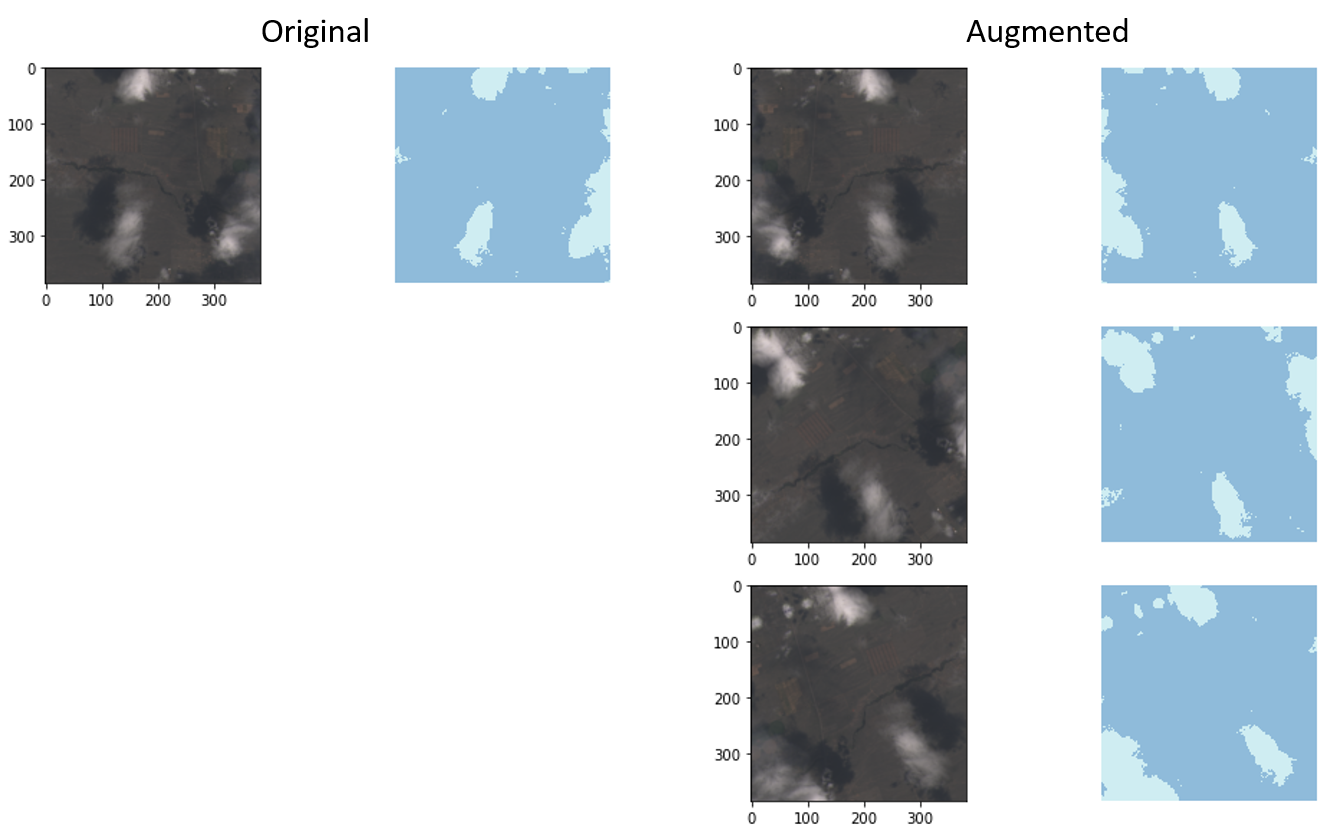
Note that there is a split_idx=0 defined within the class. That’s to tell Fastai to augment just the training dataset, and not the validation dataset. Now that we have set up our transformation class, let’s use it in the DataBlock. We will recreate the DataBlock, now with item_tfms parameter set to aug. We will then ask the dataloader to create one item multiple times to see how it goes.
请注意,在类中定义了split_idx=0 。 这是告诉Fastai仅增加训练数据集,而不是验证数据集。 现在我们已经设置了转换类,让我们在DataBlock中使用它。 我们将重新创建DataBlock,现在将item_tfms参数设置为aug 。 然后,我们将要求数据加载器多次创建一项,以查看其运行情况。
db = DataBlock(blocks=(TransformBlock([get_filenames, open_ms_tif, lambda x: x/10000]),
                       TransformBlock([partial(map_filename, str1='red', str2='gt'),
                                       partial(open_tif, cls=TensorMask)])),
               splitter=RandomSplitter(valid_pct=0.2),
               item_tfms=aug,
              )


dl = db.dataloaders(items, bs=4)


# check if it is being applied correctly
_, ax = plt.subplots(2, 4, figsize=(16, 8))


for i in range(0, 4):
    img, mask = dl.do_item(444)


    show_img(img, ctx=ax[0,i])
    mask.show(ctx=ax[1,i])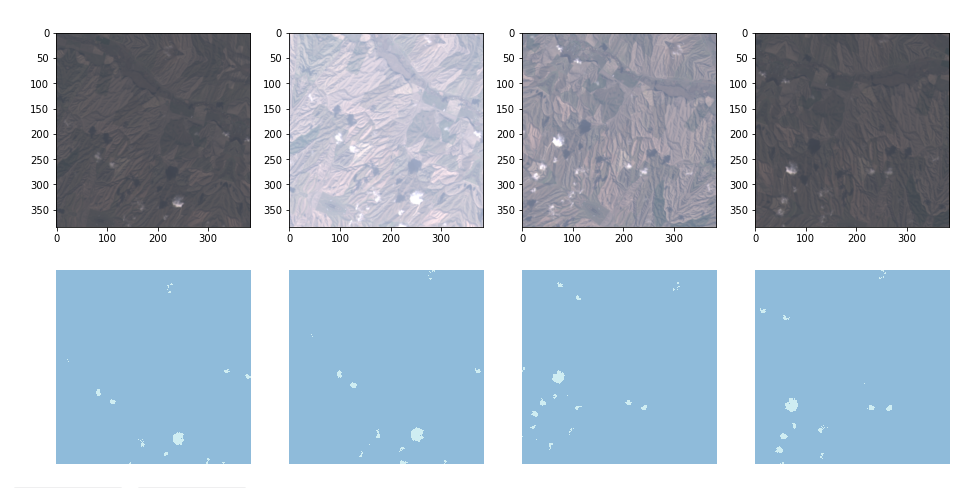
结论 (Conclusion)
As we saw in this story, implementing data augmentation for multispectral satellite images is just a matter of finding the right tools. In this regard, Albumentations is a great companion, as it can deal with many channels and augment the targets as well.
正如我们在本故事中看到的那样,为多光谱卫星图像实施数据增强只是找到合适工具的问题。 在这方面,专辑化是一个很好的伴侣,因为它可以处理许多渠道并扩大目标。
As mentioned before, the notebook with all the code can be found at Kaggle (here). There, it will be also possible to find a comparison of the learning accuracy with and without the augmentations.
如前所述,带有所有代码的笔记本可以在Kaggle(此处)找到。 在那里,有和没有增强的情况下,也可以找到学习准确性的比较。
Hope you enjoyed.
希望你喜欢。


 1228
1228

 被折叠的 条评论
为什么被折叠?
被折叠的 条评论
为什么被折叠?
 到【灌水乐园】发言


