


停电后文件变成二进制 修复
Welcome to my guide on dynamic binary instrumentation (DBI). In this article, we’re going to learn the evolution of general binary analysis methods and how to perform some common routines used by security researchers. DBI in itself is a powerful way to gain visibility, modify behavior, and fuzz closed source binaries without having to re-compile or run the original code itself. In fact, there are use cases where engineers have optimized code performance by using instrumentation. If you’ve ever heard of “hot patching” or “function hooking”; that’s exactly what DBI does.
欢迎使用我的动态二进制仪器(DBI)指南。 在本文中,我们将学习通用二进制分析方法的演变以及如何执行安全研究人员使用的一些常见例程。 DBI本身是一种获得可见性,修改行为和模糊关闭源代码二进制文件的强大方法,而无需重新编译或运行原始代码本身。 实际上,在某些情况下,工程师使用工具可以优化代码性能。 如果您曾经听说过“热补丁”或“功能挂钩”; 这正是DBI所做的。
After reading this article, you should be able to:
阅读本文之后,您应该能够:
- Understand the common methodologies for binary analysis and their differences 了解二元分析的通用方法及其差异
- How dynamic binary instrumentation (DBI) works 动态二进制工具(DBI)的工作方式
- Be able to examine static file properties 能够检查静态文件属性
Use debuggers for “cracking” or patching a portable executable (PE)
使用调试器“破解”或修补可移植可执行文件( PE )
- Use DBI frameworks for modifying an application’s behavior using injected hooks 使用DBI框架通过注入的挂钩修改应用程序的行为
分析方法 (Analysis Methods)
When you analyze malware, or binaries in general; you have to keep in mind that it is an iterative process and that there is no “template” that fits every sample or application you will be analyzing. However, as a general guideline many analysts and engineers start with methods that involve the least amount of complex interaction and work their way up. Sometimes they have to go backwards to reference new information to gain traction in their analysis. Generally, these techniques are:
分析恶意软件或二进制文件时; 您必须记住,这是一个反复的过程,没有适合您要分析的每个样本或应用程序的“模板”。 但是,作为一般指南,许多分析家和工程师从涉及最少复杂交互的方法开始,然后逐步发展。 有时,他们不得不倒退参考新信息,以在分析中获得关注。 通常,这些技术是:
- Examining Static File Properties 检查静态文件属性
- Static Code Analysis 静态代码分析
- Dynamic Analysis 动态分析
- Dynamic Binary Instrumentation (DBI) 动态二进制仪器(DBI)
- Runtime Emulation 运行时仿真
Note that if you’re examining malware; that a sandbox to detonate may utilize multiple analysis techniques but with limited test cases and control. This would include network behavior observations. Researchers still perform these methods manually because of the amount of control they have in how the code behaves. One concern is we wouldn’t want a sample to escape from your lab to the public Internet or potentially “call home” to let the attacker know you’re analyzing it.
请注意,如果您正在检查恶意软件; 引爆沙箱可能会使用多种分析技术,但测试用例和控制方式有限。 这将包括网络行为观察。 研究人员仍然可以手动执行这些方法,因为他们可以控制代码的行为方式。 一个令人担心的问题是,我们不希望样本从您的实验室逃逸到公共Internet或可能“打电话回家”,以使攻击者知道您正在分析它。
静态文件属性 (Static File Properties)
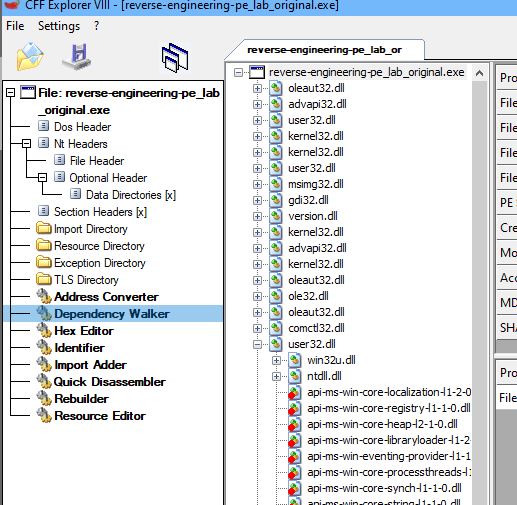
This is one of the most commonly used techniques which include analyzing strings, metadata, library imports, and other easily accessible information about the file such as entropy. This provides the least amount of visibility and information as to what the sample does. It is particularly the case when binaries are packed which usually includes encryption. This still worth while to investigate because you need to know things like architecture of the binary runtime, possible non-encrypted library imports, and our ability to turn off dynamic basing. Let’s go ahead and show case this in CFF explorer with our PE example:
这是最常用的技术之一,包括分析字符串 ,元数据,库导入以及有关文件的其他易于访问的信息,例如熵。 这提供了最少的可见性和有关样品功能的信息。 打包二进制文件(通常包括加密)时尤其如此。 这仍然值得研究,因为您需要了解二进制运行时的体系结构,可能的未加密库导入以及我们关闭动态基础的能力。 让我们继续通过PE 示例在CFF资源管理器中展示这种情况:
As you can see from the above, we have many static properties listed. We also have our imports and dependency walker sections which we will get to. Notably, we know we are working with a Windows 64-bit binary because it is a PE, not ELF. Navigate to the “Section Headers” and we can also see that nothing is encrypted which means we’re most likely not-packed. However, it the varies on names and what characters you see will depend on your binary. One example is UPX which is a common legitimate and not-so-legitimate packer and is most known for labeling its sections ‘UPX’. You also don’t need to use CFF Explorer; for malware you can also use PEStudio. In our example we’re not packed as you can see below with our file magic information left intact:
从上面可以看到,我们列出了许多静态属性。 我们还将介绍导入和依赖项遍历部分。 值得注意的是,我们知道我们正在使用Windows 64位二进制文件,因为它是PE,而不是ELF 。 导航到“节头”,我们也可以看到,没有被加密,这意味着我们很可能不是包装。 但是,它的名称有所不同,您看到的字符将取决于二进制文件。 一个示例是UPX ,它是一种常见的合法且不太合法的打包程序,并且最著名的是将其部分标记为“ UPX”。 您也不需要使用CFF Explorer。 对于恶意软件,您还可以使用PEStudio 。 在我们的示例中,我们没有打包,因为您可以在下面看到完整的文件魔术信息:

However, what’s more interesting for us when we’re getting prepared to perform DBI is that we need to know the imports of libraries. CFF Explorer has a dependency walker that will not only list the imports, but also show you some of the other stub libraries or functions that “could” be called. Remember, we don’t know which specific ones yet because we haven’t examined the actual code or run it.
但是,当我们准备执行DBI时,对我们而言更有趣的是,我们需要了解库的导入。 CFF Explorer有一个依赖项遍历器,它不仅会列出导入,而且还会向您显示“可以”调用的其他一些存根库或函数。 请记住,我们还不知道哪些特定代码,因为我们尚未检查或运行实际代码。
One important thing we should do is turn off re-basing support (ASLR) for our imports because we would like to reference our system’s memory address space to be the same for each runtime. We can concurrently use static, dynamic, and DBI analysis in cross references. To do so, go to the optional header section and selct the DLL Characteristics features. Uncheck “Dll can move”:
我们应该做的一件事是关闭导入的重新基准支持( ASLR ),因为我们希望引用系统的内存地址空间,使每个运行时都相同。 我们可以在交叉引用中同时使用静态,动态和DBI分析。 为此,请转到可选的标头部分,并选择“ DLL特性”功能。 取消选中“ Dll可以移动”:

静态代码分析 (Static Code Analysis)
After static properties we typically want to move into static code analysis. We’re still not executing the binary code but examining the disassembly information for functions and the general structure. While we do not have the time in this article to teach you assembly fundamentals; the Reverse Engineering 101 and 102 workshops provided on behalf of “@malwareunicorn” are extremely useful for newcomers. For now, we’re just going to take a quick look into loading it into Ghidra for ease of display:
在获得静态属性之后,我们通常希望进入静态代码分析。 我们仍然没有执行二进制代码,而是检查功能和常规结构的反汇编信息。 尽管我们在本文中没有时间教您组装基础知识; 代表“ @malwareunicorn ”提供的反向工程101和102 研讨会对新来者非常有用。 现在,我们将快速浏览一下将其加载到Ghidra中以便于显示:

Upon loading our example 64-bit PE into code browser we see our standard displays of trees and disassembly in the main viewer in a linear fashion. Scrolling down from we can see that the ‘LoadStringW’ Windows API is called which means we’re potentially taking in string data from perhaps user input. Ghidra has also identified the sub-routine of load string within a larger function that has yet to be identified as we see in the decompile view:
将示例64位PE加载到代码浏览器中后,我们在主查看器中以线性方式看到了标准的树显示和反汇编。 从中向下滚动,我们可以看到调用了“ LoadStringW” Windows API,这意味着我们可能会从用户输入中提取字符串数据。 Ghidra还在较大的函数中标识了装入字符串的子例程,该函数尚未确定,正如我们在反编译视图中看到的那样:

Now that we’ve identified at least one function scrolling down disassembly window in order of execution we turn on the “function graph” view and now we see the general structure of the PE. It’s a pretty simple set of branching which seems to run something in a conditional loop or exit. This is shown in the bottom right with nice color-coded blocks:
现在,我们已经确定了至少一个按执行顺序向下滚动拆卸窗口的功能,我们打开“功能图”视图,现在我们看到了PE的一般结构。 这是一组非常简单的分支,似乎在条件循环或退出中运行某些操作。 这显示在右下角,带有漂亮的颜色编码块:

At this point because we know our binary is fairly simple with a few conditional jumps and calls to functions that may take user input. In malware analysis and true reverse engineering; this is where you would start making your execution history notes and attempt to create the ‘C’ equivalent code for functions that cannot be identified by examining the assembly. You would also capture more strings where applicable.
在这一点上,因为我们知道我们的二进制文件相当简单,但有一些条件跳转和对可能需要用户输入的函数的调用。 进行恶意软件分析和真正的逆向工程; 在这里,您将开始制作执行历史记录,并尝试为无法通过检查程序集识别的功能创建“ C”等效代码。 如果适用,您还将捕获更多字符串。
动态代码分析 (Dynamic Code Analysis)
Let’s move on to dynamic analysis (not instrumentation yet) using the x64dbg tool that is a 64 bit compatible debugger for Windows. For Linux ELF files you might use GDB and other dynamic analysis tools. When you think of dynamic analysis, think of debuggers. This is where we actually execute the original code of the sample; cautions should be taken for malware researchers.
让我们继续使用x64dbg工具进行动态分析(暂不提供工具),该工具是Windows的64位兼容调试器。 对于Linux ELF文件,您可以使用GDB和其他动态分析工具。 当您想到动态分析时,请想到调试器。 这是我们实际执行示例原始代码的地方; 应谨慎对待恶意软件研究人员。
Let’s go ahead and load our example in x64dbg with the correct architecture instance. Hit up the “Options” menu and ensure your “Events” settings include the basic breakpoints including “Entry Breakpoint” which is abbreviated as EOP” in many applications. If you also notice, we are 64-bit because we see the CPU register “RIP” as opposed to “EIP” in the main disassembly section. We are at a “System” breakpoint stopped right at the windows NT loader before runtime:
让我们继续以正确的架构实例将示例加载到x64dbg中。 弹出“选项”菜单,并确保您的“事件”设置包括许多应用程序中的基本断点,包括“ Entry Breakpoint”(缩写为EOP)。 如果您还注意到,我们是64位的,因为在主反汇编部分中我们看到了CPU寄存器 “ RIP”而不是“ EIP”。 我们在运行时之前在Windows NT加载器处停止的“系统”断点处:

Let’s go ahead and run our application and see what it’s all about from our prior static analysis as clues:
让我们继续运行我们的应用程序,并从我们之前的静态分析中了解所有线索:


This makes sense from our prior analysis that we see a user input field from the function routines called and that we have a “check” button that would be our condition followed by our exit button which we also saw in the code block diagram from Ghidra. A few years ago, I found this binary somewhere on a “crackme” example challenge but forgot where I got it from. *If you’re the author, please contact me so I can properly reference your work.
从我们先前的分析中可以看出,我们从调用的函数例程中看到了一个用户输入字段,并且有一个“检查”按钮(这是我们的条件),然后是退出按钮,我们在Ghidra的代码框图中也看到了该按钮。 几年前,我在“ crackme”示例挑战中的某处发现了该二进制文件,但忘记了从何处获得它。 *如果您是作者,请与我联系,以便我正确引用您的作品。
Below we can see that guessing the password isn’t going to get us anywhere after we’ve hit the entry point (EOP) where our stack frame is being built:
在下面我们可以看到,在我们到达构建堆栈框架的入口点(EOP)之后,猜测密码不会带我们到任何地方:

There must be a smarter way to go about this. Since we know things are not encrypted; let’s do a string references search in all of our modules to see what we find. Right click anywhere within your disassembler and then do a “Search for”, “All Modules”, “String references” and let it run. Once completed let’s enter the filter for “password” near the bottom of the window:
必须有一个更聪明的方法来解决这个问题。 既然我们知道事情没有被加密; 让我们在我们所有的模块中进行字符串引用搜索,看看我们发现了什么。 右键单击反汇编器中的任何位置,然后执行“搜索”,“所有模块”,“字符串引用”,然后运行它。 完成后,让我们在窗口底部附近输入“密码”过滤器:
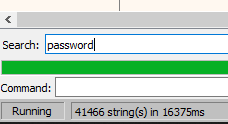

That “Valid Password” message looks like a good place to start. Double click on the string and you will jump to that area of memory. We see the conditional jumps “jne” which means jump not equal and what appears to be a loaded MD5 hash as our password. There’s plenty of ways to solve our problem; but let’s take the lazy way. We see short jumps and calls between addresses. Let’s just NOP over them so we automatically ignore the condition and hit our desired endpoint which is a “valid password” message:
该“有效密码”消息看起来像是一个很好的起点。 双击字符串,您将跳到该内存区域。 我们看到条件跳转为“ jne”,这意味着跳转不相等,并且似乎是加载的MD5哈希作为我们的密码。 有很多方法可以解决我们的问题。 但是让我们采取懒惰的方式。 我们看到地址之间有短暂的跳转和呼叫。 让我们对它们进行NOP处理,以便我们自动忽略条件并点击所需的端点,这是“有效密码”消息:

Double click on the JNE instruction to get the assembly editor:
双击JNE指令以获取程序集编辑器:

Delete everything and just put the word ‘NOP’ so we just let the CPU pass over the instruction and do nothing:
删除所有内容,并在单词上加上“ NOP ”,这样我们就让CPU跳过指令而不执行任何操作:

After pressing OK, you should see the standard 0x90 hex op codes for NOP disassembly code:
按下OK之后,您应该看到NOP拆卸代码的标准0x90十六进制操作码:

Let’s patch this change to the binary by going to “File” and “Patch File”:
让我们通过转到“文件”和“修补文件”将更改更改为二进制文件:

A new window will pop up asking you to confirm he corresponding address value changes. Go ahead and finish the patch and be sure to save the file:
将弹出一个新窗口,要求您确认相应的地址值更改。 继续并完成补丁,并确保保存文件:

Now you can run the sample PE using any password and it won’t matter. We never had to reverse our MD5 hash:
现在,您可以使用任何密码运行示例PE,这无关紧要。 我们从不需要撤销MD5哈希值:

A quick note on .NET binaries: Since .NET framework in itself is an abstracted intermediate language; any non-packed or encrypted binaries you find can be examined through a decompiler as “events”. One such tool is Dotpeek and you can perform the same type of patching without having to use a complete debugger. Other tools include the IL Decompiler. I won’t go through the full usage of the Visual Studio IL Decompiler and .NET patching, but I will show you some screenshots as the premise is the same.
关于.NET二进制文件的快速说明:由于.NET框架本身是一种抽象的中间语言; 您找到的任何未压缩或加密的二进制文件都可以通过反编译器作为“事件”进行检查。 Dotpeek就是这样一种工具,您可以执行相同类型的修补程序,而不必使用完整的调试器。 其他工具包括IL反编译器。 我不会完全使用Visual Studio IL Decompiler和.NET修补程序,但是由于前提相同,我将向您显示一些屏幕截图。
If you would like to try it out on your own, feel free to download the binaries from my repo. Note: I used to work for RSA’s Advanced Cyber Defense team and so I made these binaries on my own time to help train clients and friends on Windows binary patching. These are also licensed under GPL-2.0. You will see my existing metadata in the following screenshots. The sample source code snippet is shown below:
如果您想自己尝试一下,请随时从我的repo下载二进制文件。 注意 :我曾经在RSA的高级网络防御团队工作,所以我自己制作了这些二进制文件,以帮助培训客户和朋友进行Windows二进制修补程序。 这些也根据GPL-2.0进行了许可。 您将在以下屏幕截图中看到我现有的元数据。 示例源代码段如下所示:

You can examine it under DotPeek or an IL DASM utility:
您可以在DotPeek或IL DASM实用程序中检查它:

In IL DASM unfortunately, you can’t make direct edits; so you will need to use CFF Explorer and cross examine the relative virtual address (RVA) of the event function and make the changes in a Hex editor in the appropriate little endian format to null out the password requirement:
不幸的是,在IL DASM中,您无法直接进行编辑; 因此,您将需要使用CFF Explorer并交叉检查事件函数的相对虚拟地址(RVA),并在十六进制编辑器中以适当的小端序格式进行更改,以使密码要求无效:


If successful, you should not need to use the password “rsatraining”, but instead anything will do:
如果成功,则不需要使用密码“ rsatraining”,而是可以执行以下操作:

运行时仿真 (Runtime Emulation)
I’m going to briefly cover emulation; however, it’s worth mentioning that full emulation at runtime is an additional layer that achieves more “transparency” than DBI would because you are mocking an actual operation system including memory behavior, common driver and library loads, and the type of file structure. Think of emulation as DBI, only “beefed up”. This is most useful for anti-forensic based binaries such as malware. One such tool with ease of use is Carbon Black’s Binee. Unfortunately, it only handles Windows 32-bit libraries with no support for 64-bit imports.
我将简要介绍仿真。 但是,值得一提的是,在运行时进行完全仿真是一个比DBI更高的“透明性”层,因为您要模拟一个实际的操作系统,包括内存行为,公共驱动程序和库负载以及文件结构的类型。 可以将仿真视为DBI,只是“精打细算”。 这对于基于反取证的二进制文件(例如恶意软件)最有用。 一种易于使用的工具就是Carbon Black's Binee 。 不幸的是,它仅处理Windows 32位库,不支持64位导入。
Demonstrations and explanations of it was presented at Def Con 27. I’m a lazy analyst and so I decided to try it out in Remux v7 . Due to the requirements of using Windows 32-bit binaries; we’re not going into too much depth on Binee. Many modern OS’s are 64-bit only including the later editions of Windows 10. (Yes, I know Windows 10 32 bit was released once upon a time but it isn’t supported or updated anymore.)
Def Con 27上对此进行了演示和解释。 我是一个懒惰的分析师,所以我决定在Remux v7中尝试一下。 由于使用Windows 32位二进制文件的要求; 我们对Binee的讨论不会太深入。 许多现代操作系统仅是64位的,包括更高版本的Windows10。(是的,我知道Windows 10 32位曾经发行过一次,但现在不再受支持或更新。)
Emulation is considered an improvement over simple instrumentation because it has the ability to mimic a native environment to the binary image without having to run the original code with injections. A high-level architecture of how this happens is displayed below from this presentation:
仿真被认为是对简单仪器的改进,因为仿真具有模拟二进制图像的本机环境的能力,而无需通过注入来运行原始代码。 此演示文稿的下面显示了如何实现此操作的高级体系结构:

To see Binee in it’s most basic action, just run it with simple switch to show you the imports with their arguments and the address:
要查看Binee的最基本操作,只需使用简单的开关即可运行它,以向您显示导入及其参数和地址:

This doesn’t make full use of actually emulating anything; it does show some great functions called in their relative imports though. When running Binee in simulation mode; even with 2 GB worth of DLL’s from a vanilla Windows 10 32-bit VM, we still see that we’re missing some of the imports or API’s being called near the top of the image. Never the less the functions were traced even with an anti-debugger enabled sample:
这并没有充分利用实际模拟的东西。 它确实显示了一些在其相对导入中调用的强大功能。 在模拟模式下运行Binee时; 即使从普通的Windows 10 32位VM中获得了2 GB的DLL,我们仍然看到在映像顶部附近缺少一些导入或API。 即使使用启用了反调试器的示例,也要跟踪这些功能:

While this is great for general debugging and a more automated approach to malware analysis; this doesn’t directly help us with “cracking” or modifying a binary runtime behavior. That’s where instrumentation comes back in.
尽管这对于常规调试和一种更加自动化的恶意软件分析方法非常有用; 这并不能直接帮助我们“破解”或修改二进制运行时行为。 这就是仪表重新出现的地方。
动态二进制仪器 (Dynamic Binary Instrumentation)
DBI provides engineers and researchers tools to interact with applications without source code and the most common use case is to “hook” functions, modify memory or CPU registers, and other aspects of the binary’s runtime. There’s also fuzzing cases to examine where inputs may traverse between subroutines in trace and taint testing. There are many frameworks for DBI and here are some common ones for those just starting out:
DBI为工程师和研究人员提供了无需源代码即可与应用程序交互的工具,最常见的用例是“挂钩”函数,修改内存或CPU寄存器以及二进制文件运行时的其他方面。 还有一些令人费解的案例,以检查在跟踪和污点测试中子例程之间的输入可能在何处遍历。 DBI有许多框架,对于刚开始的人来说,这里有一些常见的框架:
How does DBI work? Let’s look at the illustrations provided from “@mxmssh” from his presentation about Fuzzing using DBI. Even though DynamoRIO is featured, essentially all DBI frameworks work in the same way in the following steps:
DBI如何工作? 让我们看一下从“提供的说明@mxmssh ”从他的演示如何使用DBI起毛。 尽管具有DynamoRIO功能,但基本上所有DBI框架都可以在以下步骤中以相同的方式工作:
- The framework will launch and suspend the original binary image and hook into the entry points 该框架将启动并挂起原始的二进制映像并挂接到入口点
A code cache copy is then created of the original code (if the framework is launched in just in time (JIT) mode as opposed to standard “jump trampolines” specific to functions only)
- The code cache is also injected and hooked at varying functions based on the pin tool’s runtime requirements so that the instrumentation is always kept in control of execution 根据引脚工具的运行时要求,还将代码高速缓存注入并挂钩到各种功能,以便始终将检测保持在执行控制中
- Controlled code cache is then executed providing the engineer the visibility and desired routines of the binary runtime based on specific instrumentation tooling compiled 然后执行受控代码缓存,根据编译的特定检测工具为工程师提供二进制运行时的可见性和所需例程。

If you’re confused, think about instrumentation as a surgeon operating on a patient. The surgeon uses instruments to perform specific actions within an operation routine while the patient is kept in a alive or running state; modifying his or her existing “runtime”.
如果您感到困惑,可以考虑将器械视为对患者进行手术的外科医生。 外科医生在患者处于存活或运行状态时使用仪器在手术程序中执行特定动作; 修改他或她现有的“运行时”。
For our hands on practice; I will focus on Frida in this article because of its ease of use and abstraction APIs. However, it is worth noting that when you hear dialogue regarding the use of “pin tools” know that engineers refer to this as generally any instrumentation tool. Intel Pin came out to the general public in 2004 and became popular because of its portability and “relative” ease of use.
为了我们动手实践; 由于本文的易用性和抽象API,我将在本文中重点介绍Frida。 但是,值得注意的是,当您听到有关使用“销钉工具”的对话时,工程师会知道这通常是任何仪器工具。 Intel Pin在2004年问世,并因其便携性和“相对”易用性而广受欢迎。
My experience has been different in both DynamoRIO and Intel Pin with limited success in compiling and running the utilities in Windows 10 x64 bit and Virtualized Kali 2020.2 x64 environments. The latest pin tools tend to crash (for me on a fully patched system with defender turned off) in different failures briefly illustrated below even when running 32-bit and 64-bit compiled tools and binaries as shown below:
在DynamoRIO和Intel Pin方面,我的经验有所不同,在Windows 10 x64位和虚拟化Kali 2020.2 x64环境中编译和运行实用程序的成功有限。 即使在运行如下所示的32位和64位编译工具和二进制文件时,最新的PIN工具也会在以下简要说明的不同故障中崩溃(对我来说,它是在已关闭防御程序的完整补丁系统上):


After many hours of trial and error testing; I’ve found that Frida tends to be more fruitful in my experiments. However, not even “Frida-discover” scripts tend work for my installation. That’s ok , we’ll get around this a bit using another script and set of parameters. I just wanted to highlight that no tool is perfect for every possible environment. Like any introduction of new applications into your environment; you should test in non-production. Here’s an example of Frida-Discover not properly tracing functions being called within 64-bit Notepad:
经过数小时的反复试验和测试; 我发现Frida在我的实验中往往会更有成果。 但是,即使“ Frida-discover”脚本也不适合我的安装。 没关系,我们将使用另一个脚本和一组参数来解决这个问题。 我只是想强调一点,没有一种工具适合每种可能的环境。 就像将新应用程序引入您的环境一样; 您应该在非生产状态下进行测试。 这是Frida-Discover无法正确跟踪在64位记事本中调用的函数的示例:

And the same issue in generic 64 bit binary that we patched with NOP’s earlier in the article:
以及与本文前面的NOP一起修补的通用64位二进制文件中的相同问题:

I will provide code samples and syntaxes you can copy and paste from. Do note that to install Frida, on Windows 10 x64; please use the latest edition of 3.8.x or higher 64-bit Python so it comes installed with “pip”. A simple “pip install Frida-tools” will capture their core system and their windows compiled binary tools in the default folder of your Python installation under “scripts.” Hopefully, you won’t have to worry about it if you’ve added Python to your environment path variable.
我将提供可复制和粘贴的代码示例和语法。 请注意,在Windows 10 x64上安装Frida。 请使用最新版本的3.8.x或更高版本的64位Python ,使其随“ pip”一起安装。 一个简单的“ pip install Frida-tools ”将在您的Python安装的默认文件夹中的“脚本”下捕获其核心系统和Windows编译的二进制工具。 希望,如果您已将Python添加到环境路径变量中,则不必担心。
Now back to us trying to source function calls for varying binaries. Well, we see that Frida-discover did not find anything. We can use Frida-trace but every example shows us that we must already “somewhat” know what we’re looking for from a function. One thing to get around this, but will be extremely noisy is to make a wildcard for every function to trace called from the import. Unfortunately, this all writes a ton of template javascript (JS) files to the running directory for you to sort through later as shown below:
现在回到我们那里,尝试为不同的二进制源函数调用。 好吧,我们看到Frida-discover没有找到任何东西。 我们可以使用Frida-trace,但是每个示例都向我们表明,我们必须已经“某种程度上”知道我们要从函数中寻找什么。 要解决此问题,但会带来很大的麻烦,那就是为要从导入调用的每个函数创建一个通配符。 不幸的是,这一切都会将大量的模板javascript(JS)文件写入运行目录,以便您稍后进行排序,如下所示:

There’s got to be a better way. Unfortunately; this is when you have to pull out an API monitoring or interceptor utility which means you have to run code without instrumentation control. I’m not thinking of Systinternal’s ProcMon either because it doesn’t show you all the call values nor resolve all the documented popular windows APIs; although you can perform a basic stack trace with it; similar to “strace” and “ltrace” in Linux. We’re going to need something heavier and that’s API Monitor v2.0 alpha.
必须有更好的方法。 不幸; 这是当您必须提取API监视或拦截器实用程序时,这意味着您必须在没有仪器控制的情况下运行代码。 我既不考虑Systinternal的ProcMon,也不是因为它不显示所有调用值,也不解析所有记录的流行Windows API。 尽管您可以使用它执行基本的堆栈跟踪; 类似于Linux中的“ strace”和“ ltrace”。 我们将需要一些更重的东西,那就是API Monitor v2.0 alpha 。
A lot of the resolution work has been done and takes a lot of guess work out of tracing functions we wish to inject and hook into. In a malware analysis scenario; this is something you would want to do as a last resort as you’re running the binary uncontrolled through a well-known API sniffer. We’re not planning on using malware in our upcoming exercises so this should be fine. Let’s think about a scenario where we can use instrumentation for good.
我们已经完成了很多解析工作,并从我们希望注入并加入的跟踪函数中抽出了很多猜测工作。 在恶意软件分析方案中; 当您通过众所周知的API嗅探器不受控制地运行二进制文件时,这是您最想做的事情。 我们不打算在接下来的练习中使用恶意软件,因此应该没问题。 让我们考虑一下可以永久使用工具的场景。
仪表的真实用例 (A Real Use Case for Instrumentation)
Several years ago, for a client, I had a developer place blame a recent firewall and IPS deployment when an application stopped working mysteriously with network connectivity. A packet capture (PCAP) disproved her assertion something on the network was causing her endpoint to not work. In turned out her ODBC connection wasn’t being established and she was affirmative that her hard coded IP and port combination was forever there even though the PCAP showed otherwise.
几年前,对于一个客户,当一个应用程序无法通过网络连接神秘地工作时,我将开发人员的位置归咎于最近的防火墙和IPS部署。 数据包捕获(PCAP)驳斥了她的断言,原因是网络上的某些事件导致其端点无法正常工作。 结果证明她的ODBC连接没有建立,并且她坚决认为即使PCAP另有说明,她的硬编码IP和端口组合也永远存在。
She didn’t have any of her original source code and everything was already 32-bit compiled back in the old Windows XP/2000 days. DBI could’ve helped out in this scenario (had I known about it at the time) where we would inject her windows binary making the connection calls and modifying its behavior in real time to properly inject the correct hard coded IP port pair. I truly suspect the application quit working due to a non-enforced IP conflict from the previous switch and router setup. But none the less, Frida would’ve come in handy. Let’s see how we would use it for an equivalent network program such as Windows “ping.exe” in a lab equivalent.
她没有任何原始源代码,并且在旧的Windows XP / 2000时代,所有内容都已经过32位编译。 在这种情况下,DBI可以提供帮助(当时我已经知道了),在这种情况下,我们将注入她的Windows二进制文件以进行连接调用并实时修改其行为,以正确注入正确的硬编码IP端口对。 我真的怀疑应用程序由于先前的交换机和路由器设置中的非强制IP冲突而退出工作。 但是无论如何,弗里达会派上用场的。 让我们看看如何将其用于等效的网络程序,例如实验室等效的Windows“ ping.exe”。
Our lab scenario is that we want to ensure that we have accessibility to the Cloudflare Public DNS primary server which is 1.1.1.1. However, we’ve recently switched our desired DNS monitoring to Google public DNS which is 8.8.8.8 and no longer have access to the scripts our source code that is hard coded calling <ping.exe 1.1.1.1> on our behalf. We “could” setup HOST files or perform some internal DNS forwarding redirect with fake static PTR and A records but that is obviously super bad practice. No, no — we will use dynamic instrumentation to the rescue with Frida.
我们的实验方案是,我们要确保对Cloudflare Public DNS主服务器1.1.1.1具有可访问性。 但是,我们最近已将所需的DNS监视切换为8.8.8.8的Google公共DNS ,并且不再可以访问代表我们硬调用<ping.exe 1.1.1.1>的源代码脚本。 我们“可以”设置HOST文件或使用伪造的静态PTR和A记录执行一些内部DNS转发重定向,但这显然是超级坏习惯。 不,不-我们将使用动态仪表对Frida进行营救。
First, we must overcome our lack of API call visibility with analyzing not just the imports for Ping.exe, but the actual Windows API specific calls to determine how we plan to change the address from 1.1.1.1 to 8.8.8.8 and just for fun, capture the ICMP echo request payload that Windows 10 x64 bit will be sending out without having to start a PCAP. Fire up API Monitor v2 and in the far left select the “Networking”, “Scripting Runtime Library”, and “Windows Application UI Development” categories under the filter widget for “All Modules” as shown below:
首先,我们不仅必须分析Ping.exe的导入,而且还要分析实际的Windows API特定调用,以确定我们计划如何将地址从1.1.1.1更改为8.8.8.8,并且仅仅是为了好玩,才能克服API调用可见性不足的问题。 ,无需启动PCAP,即可捕获Windows 10 x64位将要发送的ICMP回显请求有效负载。 启动API Monitor v2,并在最左侧选择“所有模块”的过滤器小部件下的“网络”,“脚本运行时库”和“ Windows应用程序UI开发”类别,如下所示:

Next near the middle of “Monitored Processes” add a new process and set the following process image to be: “c:\windows\system32\ping.exe” and its appropriate argument of 1.1.1.1 as shown below:
接下来,在“受监视的进程”的中间附近添加一个新进程,并将以下进程映像设置为:“ c:\ windows \ system32 \ ping.exe”及其适当的参数1.1.1.1,如下所示:

Once you press OK this will run the binary. For us, ping.exe by default exits after 3 attempts of echo requests to its destination saving us the hassle of pausing or stopping our runtime snooping. Your window should populate with many neat artifacts. One in particular that looks like something of interest “icmpSendEcho2Ex” and we see it running 3 different times which coincides with our expected default behavior.
按下OK后,将运行二进制文件。 对我们来说,默认情况下,ping.exe在尝试3次向其目的地发送回显请求后会退出,从而避免了暂停或停止运行时侦听的麻烦。 您的窗口应填充许多整洁的工件。 特别是一个看起来像有趣的东西“ icmpSendEcho2Ex ”,我们看到它运行3次不同的时间,这与我们预期的默认行为一致。
Notice that it does not resolve to a known import module in API Monitor. No, it does not come from ping.exe in a static linked DLL as we will see later. This is API Monitor failing to resolve it in the ‘Module’ column. Later on we will see that the correct DLL is indeed listed in the Parameters section for some odd reason.
请注意,它无法解析为API Monitor中的已知导入模块。 不,它不是来自静态链接的DLL中的ping.exe,我们将在后面看到。 这是API Monitor无法在“模块”列中解决它。 稍后,我们将由于某些奇怪的原因而在“参数”部分中确实列出了正确的DLL。

In our Windows MSDN documentation, we see the following C++ construct of the destination address as part of the arguments:
在Windows MSDN 文档中 ,我们将目标地址的以下C ++构造作为参数的一部分:
IPHLPAPI_DLL_LINKAGE DWORD IcmpSendEcho2Ex(
  HANDLE                 IcmpHandle,
  HANDLE                 Event,
  PIO_APC_ROUTINE        ApcRoutine,
  PVOID                  ApcContext,
  IPAddr                 SourceAddress,
  IPAddr                 DestinationAddress,
  LPVOID                 RequestData,
  WORD                   RequestSize,
  PIP_OPTION_INFORMATION RequestOptions,
  LPVOID                 ReplyBuffer,
  DWORD                  ReplySize,
  DWORD                  Timeout);
Reading further down into the page under the remarks section we see that in Windows Server 2008 or later this function is called and references the ICMPAPI.H header file and its associated DLL which is “Iphlpapi.dll” which is also cross referenced in the non-NT legacy IcmpSendEcho function.
深入阅读“备注”部分下的页面,我们看到在Windows Server 2008或更高版本中,此函数被调用并引用了ICMPAPI.H头文件及其关联的DLL,即“ Iphlpapi.dll”,该文件在非-NT旧版IcmpSendEcho函数。
A useful tip: Whenever you see the “EX” at the end of a Microsoft API function; it stands for “extended” and which means the new function supersedes the older “EX” edition but is incompatible with the original “EX” edition. It’s kind of interesting that in modern Windows 10 with all the latest updates that a 64-bit version of ping.exe would use the extended legacy function.
一个有用的提示:每当您在Microsoft API函数的末尾看到“ EX”时; 它代表“扩展”,这意味着新功能将取代旧的“ EX”版本,但与原始“ EX”版本不兼容。 有趣的是,在具有所有最新更新的现代Windows 10中,ping.exe的64位版本将使用扩展的旧版功能。
Since we want to change the IP address of our argument’s destination; we’re going to be examining the “DestinationAddress” argument with the “type” to be IN_ADDR structure format also used and seen in C libraries for Linux. This is described IPv4 values as two unsigned shorts or a single unsigned long format. This coincides with the API Monitor’s resolution of our function if you look at your Parameters area we see Argument 6 (5 in when we reference it because we start with the array of 0):
由于我们要更改参数目标的IP地址; 我们将使用“ type”检查“ DestinationAddress”参数是否为IN_ADDR结构格式,该格式也在Linux C库中使用和看到。 将IPv4值描述为两个无符号的短裤或单个无符号的长格式。 如果您查看参数区域,这与API Monitor对函数的解析是一致的,那么我们会看到参数6(引用时为5,因为我们从0数组开始):

Notice that the DestinationAddress in the pre-call value which is a filled buffer from our argument is “1.1.1.1” in hex and is not mutated at all in the post-call value. And for completeness, let’s check our Hex buffer and we see our payload of the alphabet which is standard for Windows ping requests:
请注意,调用前值中的DestinationAddress是我们参数中的填充缓冲区,十六进制为“ 1.1.1.1”,并且在调用后值中根本没有突变。 为了完整起见,让我们检查我们的十六进制缓冲区,我们看到我们的字母有效载荷,这对于Windows ping请求是标准的:

We should have all the information we need to properly “hot patch” our binary without modifying the original code itself changing our destination host to 8.8.8.8, examine that our payload that we saw in the above figure; and for fun — we’ll also create a post-action function injected instrumentation to create a file in a directory.
我们应该拥有在不修改原始代码本身的情况下正确“热补丁”二进制文件所需的所有信息,而无需将目标主机更改为8.8.8.8,检查上图中看到的有效负载; 而且很有趣-我们还将创建一个后动作函数注入工具来在目录中创建文件。
Let’s get started with a skeleton script for Frida by hooking the exact function and import that we need by creating a variable and then using Frida’s Interceptor API to attach to that function when the caller initiates the API request, we’re going to send a message to the console showing the successful JIT hook:
让我们从Frida的框架脚本开始,方法是钩住确切的函数并通过创建变量导入所需的东西,然后在调用者发起API请求时使用Frida的Interceptor API附加到该函数,我们将发送一条消息到显示成功的JIT挂钩的控制台:
//create object pointer to function to reference in the interceptor
var IcmpSendEcho2Ex = Module.findExportByName('Iphlpapi.dll', 'IcmpSendEcho2Ex')

//hook into the pointer of our target function
Interceptor.attach(IcmpSendEcho2Ex, {onEnter: function (args) {send("[+] IcmpSendEcho2Ex API hooked!");
In the same indented subroutine “onEnter” we’re going to also send a copy of our ICMP echo payload to the screen for argument “6”; remember it’s one less than our human count because computer arrays start at 0. We’re also going to set destination IP argument to a “pointer” value of 8.8.8.8. Note the use of pointer as part of the argument is part of Frida’s documentation and specific to dereferencing after a cast to the expected value of IN_ADDR structure type. We also send confirmation to our console screen.
在相同的缩进子例程“ onEnter”中,我们还将向屏幕发送参数“ 6”的ICMP回显有效负载的副本; 请记住,它比我们的人数少一个,因为计算机阵列从0开始。我们还将将目标IP参数设置为8.8.8.8的“指针”值。 请注意,将指针用作参数的一部分是Frida 文档的一部分,并且特定于在强制转换为IN_ADDR结构类型的期望值之后进行取消引用 。 我们还将确认发送到控制台屏幕。
//snoop on the payload
                                //this.RequestData = args[6];
                                send("Payload: " + args[6].readAnsiString());
                                //change ip address from 1.1.1.1 to google.com
                                args[5] = ptr("0x08080808");
                                send("New address: " + args[5]);},
This is an optional routine; but we can also inject a post-function hook when the function returns with the use of “onLeave”. Here for fun, we create an example file status lock on disk as opposed to a mutex or a semaphore flag because we’re “lazy” instrumentation analysts:
这是一个可选例程。 但是当函数使用“ onLeave”返回时,我们也可以注入一个函数后钩子。 为了好玩,我们在磁盘上创建一个示例文件状态锁,而不是互斥锁或信号灯标志,因为我们是“懒惰”的工具分析人员:
onLeave: function (args) {
                  //you dont need anything here unless you want post function routines
                  //create a file on the file system for fun
                  var file = new File("c:\\SFTP_Root\\foobar.txt", "w");
                  file.write("My name is Dennis and I'm learning instrumentation...");
                  file.close();
  }});
Putting it all together you can copy and paste that script into something like <ping_tamperhook.js>
放在一起,您可以将该脚本复制并粘贴到< ping_tamperhook.js >之类的文件中
//example Friday hook script by Dennis Chow dchow[AT]xtecsystems.com
//GPLv2.0 31-Jul-2020
//create object pointer to function to reference in the interceptor
var IcmpSendEcho2Ex = Module.findExportByName('Iphlpapi.dll', 'IcmpSendEcho2Ex')
//hook into the pointer of our target function
Interceptor.attach(IcmpSendEcho2Ex, {
    onEnter: function (args) {
        send("[+] IcmpSendEcho2Ex API hooked!");
        //snoop on the payload
		//this.RequestData = args[6];
		send("Payload: " + args[6].readAnsiString());
		//change ip address from 1.1.1.1 to google.com
		args[5] = ptr("0x08080808");
		send("New address: " + args[5]);
    },
  onLeave: function (args) {
	  //you dont need anything here unless you want post function routines
	  //create a file on the file system for fun
	  var file = new File("c:\\SFTP_Root\\foobar.txt", "w");
	  file.write("My name is Dennis and I'm learning instrumentation...");
	  file.close();
  }});
Are you ready to hot patch ping.exe? Let’s see how this works. Before we run Frida core, be sure to create a file with “1.1.1.1” in it as the argument to ping.exe. Frida does not support in-line arguments at the time of writing. Our final syntax will be “Frida -l tamperhook.js -f “c:\windows\system32\ping.exe” -O “pingoptions.txt”.
您准备好对ping.exe进行热补丁了吗? 让我们看看它是如何工作的。 在运行Frida core之前,请确保创建一个带有“ 1.1.1.1”的文件作为ping.exe的参数。 Frida在撰写本文时不支持嵌入式参数。 我们的最终语法为“ Frida -l tamperhook.js -f“ c:\ windows \ system32 \ ping.exe” -O“ pingoptions.txt”。
What this does is spawn Frida in the intercept mode with JIT patching after we type the “%resume” command to follow ping.exe to its main function that we’ve established a code-cache control over. We can see in the console window that we’ve hooked our payload and successfully swapped “1.1.1.1” for “8.8.8.8” and we can sniff our payload below.
这是在键入“%resume”命令后,在ping.exe之后执行ping.exe的主要功能(已建立代码缓存控制)后,在带有JIT补丁的拦截模式下生成Frida。 我们可以在控制台窗口中看到已经钩住了负载,并成功将“ 1.1.1.1”替换为“ 8.8.8.8”,并且可以在下面嗅探负载。
In fact, you can also see the standard output of ping in each attempt showing the response from “8.8.8.8” and near the end for statistics, ping.exe still referencing the original buffer string “1.1.1.1”. And of course, we should also see our simulated lock status file “foobar.txt”.
实际上,在每次尝试中ping的标准输出都显示了“ 8.8.8.8”的响应,并且接近统计末尾,ping.exe仍引用原始缓冲区字符串“ 1.1.1.1”。 当然,我们还应该看到模拟的锁定状态文件“ foobar.txt”。

闭幕 (Closing)
I hope you enjoyed our brief introduction to instrumentation and binary patching. There are so many useful applications to using these methods besides hooking and “short jump” workarounds. I encourage you to continue exploring the Frida framework for instrumentation as the API abstractions are very powerful. In fact, you can even write “pin tools” just like a debugger by replacing or changing values in the stack, heap, and CPU registers. As always, if you’re in need of cyber security services, feel free to drop me a line at www.scissecurity.com
希望您喜欢我们对工具和二进制修补程序的简短介绍。 除了钩子和“短跳转”变通方法外,还有许多有用的应用程序可以使用这些方法。 我鼓励您继续探索Frida框架进行检测,因为API抽象非常强大。 实际上,您甚至可以像调试器一样编写“引脚工具”,方法是替换或更改堆栈,堆和CPU寄存器中的值。 与往常一样,如果您需要网络安全服务,请随时致电www.scissecurity.com与我联系。
Dennis Chow, CISO of SCIS Security
SCIS Security的CISO Dennis Chow
翻译自: https://medium.com/swlh/instrument-and-patch-your-way-to-binary-enlightenment-6dfd04d094c5
停电后文件变成二进制 修复


 626
626

 被折叠的 条评论
为什么被折叠?
被折叠的 条评论
为什么被折叠?
 到【灌水乐园】发言


