


In part 1 of this series, we familiarized ourselves with Docker by understanding:
在本系列的第1部分中,我们通过了解以下内容使自己熟悉Docker:
✅ What Docker is and how it operates on the high level✅ What Docker images and containers are✅ How custom Docker images are created and run (as containers)
✅什么是Docker及其在更高级别上的操作✅什么样的Docker映像和容器是✅如何创建和运行自定义Docker映像(作为容器)
Sweet. Now let us move on to a more complex example, a “Dockerized” visit-counter NodeJs app. The application has a backend and a database. For simplicity, we will stick with and use Redis, an in-memory data store, as our database.
甜。 现在,让我们继续一个更复杂的示例,一个“ Dockerized”访问计数器NodeJs应用程序。 该应用程序具有后端和数据库。 为简单起见,我们将坚持使用内存数据存储Redis作为数据库。
从应用程序的代码开始... (Starting with the Application’s Code…)
Here is the code for our simple backend server. Simply create a project folder and put the following two files inside the root. If you are not familiar with Javascript or NodeJs for that matter, please follow the comments to know what each line is responsible for.
这是我们简单的后端服务器的代码。 只需创建一个项目文件夹,然后将以下两个文件放在根目录下即可。 如果您不熟悉Javascript或NodeJ,请按照注释了解每一行的职责。
We can go ahead and run this application on the local machine. Remember that for the application to operate, the Redis server must be up and running on our local machine. For that, we need to make sure that the Redis server is running on our local machine. You learned from the previous series how to quickly spin up the Redis server. All you need to do to make Redis available locally is to “map” the container port to a local port. Open a terminal and type the following:
我们可以继续在本地计算机上运行该应用程序。 请记住,要使应用程序运行,Redis服务器必须已启动并在我们的本地计算机上运行。 为此,我们需要确保Redis服务器正在本地计算机上运行。 您从上一系列中学到了如何快速启动Redis服务器。 要使Redis在本地可用,您要做的就是将容器端口“映射”到本地端口。 打开一个终端并输入以下内容:
docker run -d -p 6379:6379 redisUse the docker ps command to ensure that the Redis container is running OK. To run the app locally, you need to have NodeJs installed on your machine. You can skip this step if you do not have NodeJs and do not wish to install it.
使用docker ps 命令以确保Redis容器运行正常。 要在本地运行该应用程序,您需要在计算机上安装NodeJ。 如果您没有NodeJ并且不想安装它,则可以跳过此步骤。
Now simply go ahead and run the following command inside the project folder:
现在,只需继续在项目文件夹中运行以下命令:
npm run startNow navigate to localhost:8081 and check out the results:
现在导航到localhost:8081并检查结果:
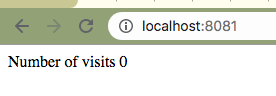
Before you move on to the next step, kill both the application and the Redis server. You can run Ctrl + c in the console to stop the app. To stop the Redis server, simply find the container ID by running docker ps then kill it using:
在继续下一步之前,请杀死应用程序和Redis服务器。 您可以在控制台中运行Ctrl + c来停止应用程序。 要停止Redis服务器,只需运行docker ps找到容器ID,然后使用以下命令将其杀死:
docker kill <first-few-characters-of-the-ID>So far so good. But we want to run the application using Docker, not directly on our local machine. For that, we need to build the image of our app first.
到现在为止还挺好。 但是我们想使用Docker运行应用程序,而不是直接在本地计算机上运行。 为此,我们需要首先构建应用程序的图像。
Dockerization步骤1:为应用构建映像 (Dockerization Step 1: Building an Image for the App)
It is time for us to build our very Docker image of the app. Remember Dockerfiles? Let’s take a deep dive into the Dockerfile. Create a new file in the project folder and name it Dockerfile (without any extension) Follow the comments are you are scanning the code:
现在是时候为应用构建我们的Docker映像了。 还记得Dockerfiles吗? 让我们深入研究Dockerfile。 在项目文件夹中创建一个新文件,并将其命名为Dockerfile (不带任何扩展名)。在扫描代码时,请遵循以下注释:
# filename: Dockerfile
# the base image with NodeJs already installed
FROM node:alpine


# creating a work directory at the root
WORKDIR '/app'


# copy package.json file and install the dependencies first
COPY package.json .
RUN npm install


# then, copy the rest of the files in the working directory
COPY . .


# execution command upon initializing the container
CMD ["npm","start"]
Note the following two things about the Dockerfile above:
请注意以下有关Dockerfile的以下两件事:
- Setting up a working directory inside the container (line #5) is a good practice that ensures no conflict with the existing file system. 在容器内(第5行)设置工作目录是一种很好的做法,可确保与现有文件系统不发生冲突。
Note how we separated package.json from the rest of the files in our project directory to avoid unnecessary cache busts. This way, when we make some changes to the application’s code (while the dependencies remain the same), Docker skips lines 1 to 11 and utilizes the cache because nothing changed there. In a real-world scenario, doing so can save a tremendous amount of time upon new builds.
请注意,我们如何将package.json与项目目录中的其余文件分开,以避免不必要的缓存破坏。 这样,当我们对应用程序的代码进行一些更改时(在依存关系保持不变的情况下),Docker会跳过第1至11行并利用缓存,因为那里没有任何更改。 在实际情况下,这样做可以节省大量的时间来构建新版本。
Dockerization的最后阶段:部署应用程序 (Final Stage of Dockerization: Deploying the App)
IMPORTANT NOTE: At this stage, I am going to make a few intentional errors instead of going straight to the correct solution, for the sake of a better learning experience.
重要说明:在这个阶段,为了获得更好的学习体验,我将犯一些故意的错误,而不是直接寻求正确的解决方案。
正在连接到Redis服务器… (Connecting to the Redis Server…)
Let us see what happens when we try to run the image that we configured in the previous step:
让我们看看尝试运行在上一步中配置的映像时会发生什么:
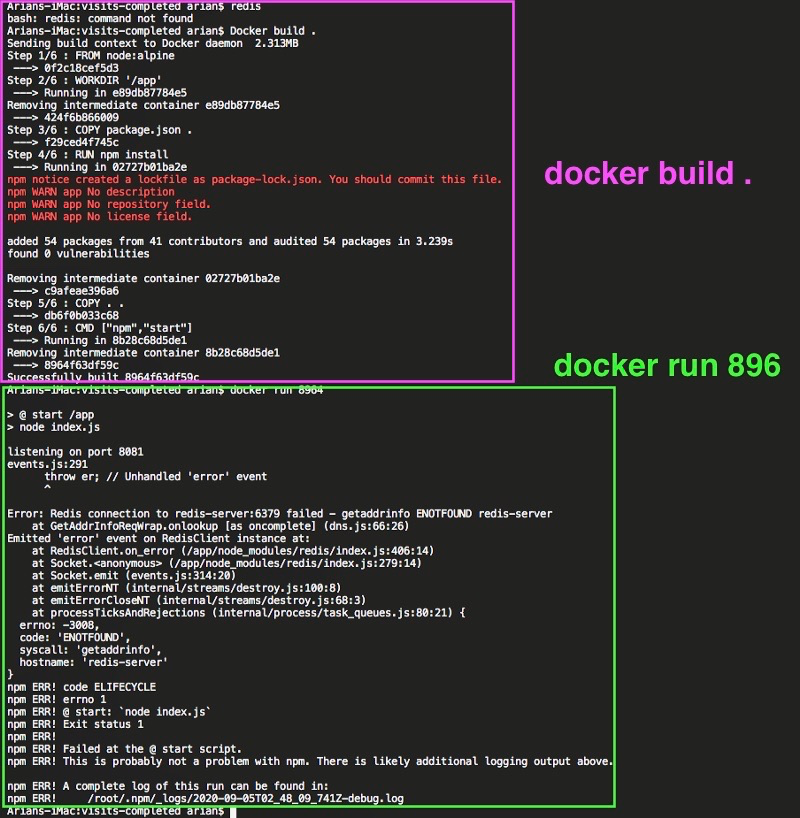
The Redis server does not seem to be accepting connections on port 6379. Of course…🤦♂️ We need to have a running Redis image in our Docker network in order for our app to connect to!
Redis服务器似乎未在端口6379上接受连接。当然…🤦♂️我们需要在Docker网络中拥有一个正在运行的Redis映像,以便我们的应用程序能够连接到!
We saw in the previous part of this series how we can run a Redis server and interact with it. Of course, we can use the Docker CLI to download and run the latest Redis image from Dockerhub. We use the -d option (known as the detached mode) so our local machine’s standard i/o is no longer attached to the containers, hence the container runs in the background.
在本系列的前一部分中,我们看到了如何运行Redis服务器并与之交互。 当然,我们可以使用Docker CLI从Dockerhub下载并运行最新的Redis映像。 我们使用-d选项(称为分离模式),因此本地计算机的标准I / O不再附加到容器,因此容器在后台运行。
docker run -d redisThe Redis container is up and running. You will see that our attempt to run the Node app will fail again, this time because our app container and Redis container are two separate entities and cannot bridge a connection without special configuration.
Redis容器已启动并正在运行。 您将看到我们尝试运行Node应用程序的尝试将再次失败,这是因为我们的应用程序容器和Redis容器是两个单独的实体,并且没有特殊配置就无法桥接连接。
现在是解决问题的关键... (And now the key to the problem…)
We somehow need to create a network of the two containers. Of course, we can do so using Docker CLI. Remember that Docker CLI is one of the possible ways to interact with the server. However, there is a much less cumbersome way to do so, namely via the Compose tool.
我们不知何故需要创建两个容器的网络。 当然,我们可以使用Docker CLI做到这一点。 请记住,Docker CLI是与服务器交互的可能方式之一。 但是,没有那么麻烦的方法,即通过Compose工具。

Compose has commands for managing the whole lifecycle of your application:
Compose具有用于管理应用程序整个生命周期的命令:
⚡️ Start, stop, and rebuild services⚡️ View the status of running services⚡️ Stream the log output of running services⚡️ Run a one-off command on a service
⚡️启动,停止和重建服务⚡️查看正在运行的服务的状态⚡️传输正在运行的服务的日志输出⚡️在服务上运行一次性命令
To use Compose, we take the following three-step process:
要使用Compose,我们采取以下三个步骤:
✅ Define your app’s environment with a Dockerfile so it can be reproduced anywhere.
✅用定义你的应用程序的环境Dockerfile所以它可以在任何地方复制。
✅ Define the services that make up your app in docker-compose.yml so they can be run together in an isolated environment. Below is the content of our Compose file. Since we are using the current directory as the build context, go ahead and put this file in the root folder of the project, where the app-server.js file resides.
✅定义,使您的应用程序在服务docker-compose.yml这样他们就可以一起在一个孤立的环境中运行。 以下是我们的Compose文件的内容。 由于我们使用当前目录作为构建上下文,因此请继续将该文件放在app-server.js文件所在的项目的根文件夹中。
# file: docker-compose.yml
version: "3"  # docker-compose tool version
services:  # set up default network: redis and our server
  redis-server:  # the name of our redis server
    image: "redis"
  node-app:  # the name of our app server
    restart: on-failure  # if the app exits with non 0 code, restart it
    build: .  # the build contenxt, the application code resides in the same folder as this file
    ports:  # maps the port 8081 of this container to port 4001 of the local machine
      - "4001:8081"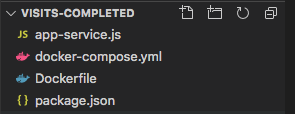
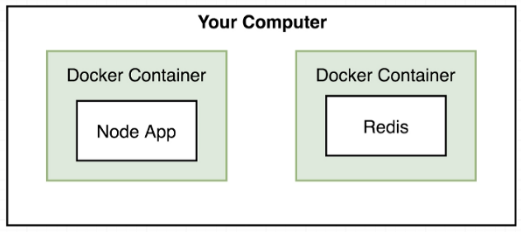
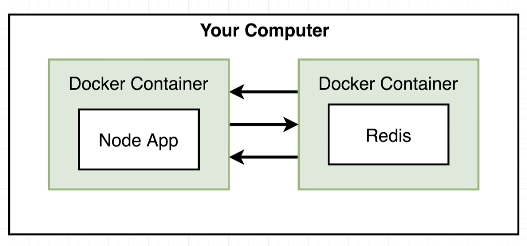
Follow the comments to see what each line means. Basically, all the services named under “services” will be placed in a default network where the containers can communicate. Therefore, we can say that the new configuration paints a picture more like so:
按照注释查看每一行的含义。 基本上,所有以“服务”命名的服务都将放置在容器可以通信的默认网络中。 因此,可以说新的配置更像是这样:
Also, pay attention to options passed under each service to further define the behavior of each container. For example, passing the restart option will cause the app to restart when it exits with a non zero status. This means that Docker is smart and watches the process that begins after running the exec command (at the last line of our Dockerfile) and can bring the application back to life in case of a failure. We will explore more of these options in the subsequent series.
另外,请注意在每个服务下传递的选项,以进一步定义每个容器的行为。 例如,传递重新启动选项将导致应用程序以非零状态退出时重新启动。 这意味着Docker很聪明,可以监视运行exec命令(在Dockerfile的最后一行)后开始的进程,并在出现故障时使应用程序恢复正常。 我们将在后续系列中探讨更多这些选项。
✅ Run docker-compose up and Compose starts and runs your entire app.
✅运行docker docker-compose up然后Compose启动并运行您的整个应用程序。
We run the following command to compose our containers:
我们运行以下命令来组成我们的容器:
docker-compose up --buildNote: If you omit the build option from the above command, Docker will simply use the latest images. This is an important option to pass in case you made some changes to the project in the meantime since the last build. Docker automatically builds the containers if no previous containers image exists.
注意:如果您从上述命令中省略了build选项,则Docker将只使用最新的映像。 这是一个重要选项,以防您自上次构建以来对项目进行了一些更改。 如果先前的容器映像不存在,Docker将自动构建容器。
And ….here is what we get:
……我们得到的是:
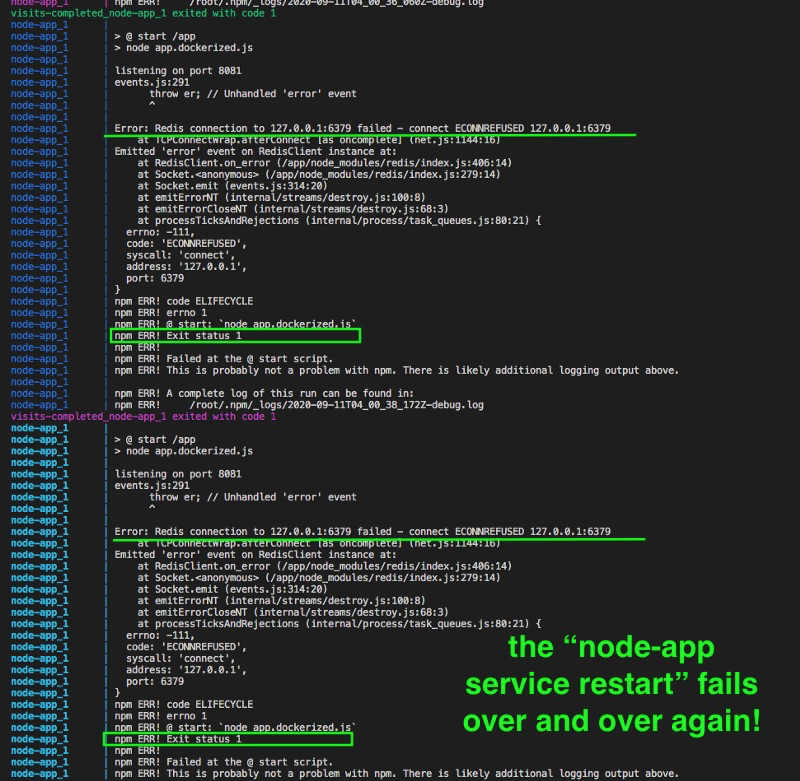
Use Ctrl + c to stop docker from restarting the app container indefinitely.
使用Ctrl + c阻止docker无限期重启应用容器。
So why did this fail again?! This is due to how Docker handles connection requests from our app. Let’s review part of our app-server.js code. Particularly, let us pay attention to how we are trying to connect to the Redis through the client object:
那为什么又失败了呢? 这是由于Docker如何处理来自我们应用程序的连接请求。 让我们回顾一下我们的app-server.js代码。 特别是,让我们注意我们如何尝试通过客户端对象连接到Redis:

At this point, inside the app container, the Redis client will try to connect to port 6379 local to the container itself. Remember that Docker containers are loosely connected. This means that in order to connect to the server run in another container in the network, you need to use the container’s name as the host. So let us modify the app-server.js, and pay particular attention to lines 8–10. Note how the hostname is exactly equal to how we named the Redis service under services inside the docker-compose.yml file. Docker is smart and understands that a connection request to that host URL implies that we want to connect to the Redis container inside the Docker network.
此时,在应用程序容器内部,Redis客户端将尝试连接到容器本身本地的端口6379 。 请记住,Docker容器是松散连接的。 这意味着,为了连接到在网络中另一个容器中运行的服务器,您需要使用容器的名称作为主机。 因此,让我们修改app-server.js,并特别注意第8-10行。 注意主机名是如何正好等于我们的命名方式下的泊坞窗,compose.yml文件中的服务Redis的服务。 Docker很聪明,并且了解到到该主机URL的连接请求意味着我们要连接到Docker网络内部的Redis容器。
const express = require('express'); // import server library
const redis = require('redis'); // import our in-memory database
const process = require('process'); // import library to access the running process


const app = express(); // initialize the server


// database connection cursor
const client = redis.createClient({
	host: 'redis-server',
	port: 6379, // default port for redis
});
client.set('visits', 0); // initialize the counts to 0


app.get('/', (req, res) => {
	// define a GET endpoint
	client.get('visits', (err, visits) => {
		// load the number of visits
		res.send('Number of visits ' + visits);
		client.set('visits', parseInt(visits) + 1); // increment and save the new number
	});
});


app.listen(8081, () => {
	// start the server on port 8081
	console.log('listening on port 8081');
});
With this change, let us try to compose again:
通过此更改,让我们尝试再次撰写:
docker-compose up --build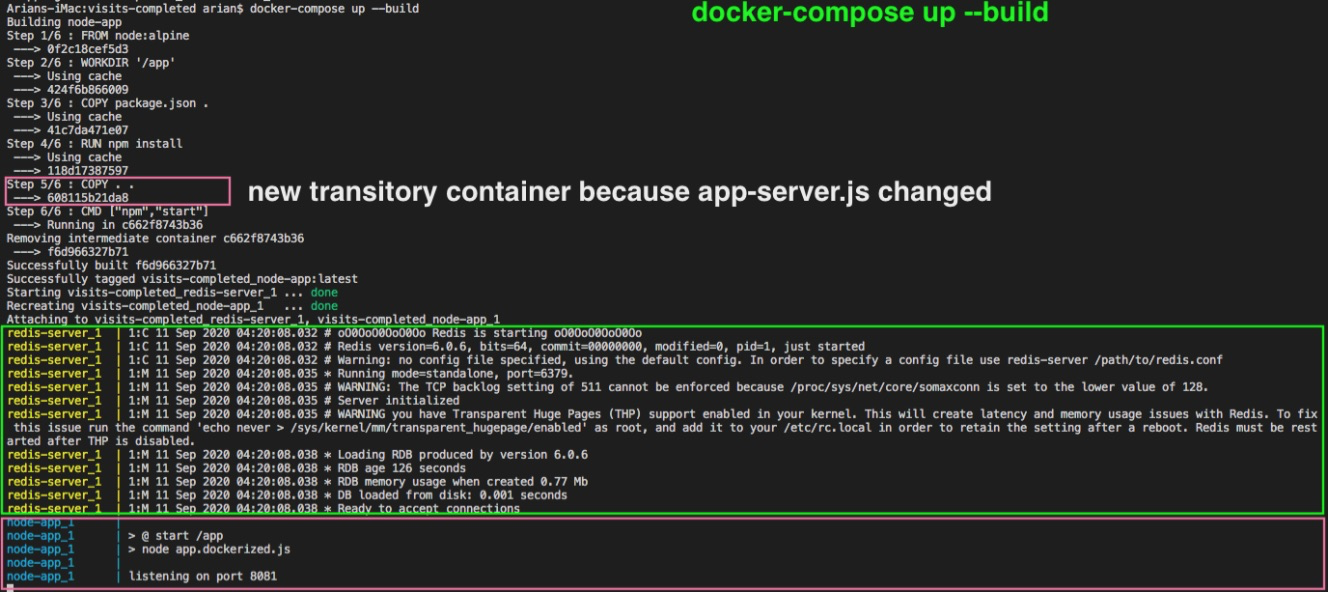
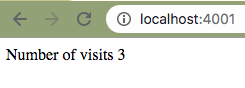
And indeed our app works now!
实际上我们的应用程序现在可以正常工作了!

Don’t leave the Docker containers running, so go ahead and bring down the network using once you are done using the app:
不要让Docker容器保持运行状态,因此,使用完该应用程序后,请继续使用来关闭网络:
docker-compose downVoila! We made it.
瞧! 我们做到了。
The Compose tool is extremely powerful in making container services work together seamlessly in Docker. We will explore this tool, along with more complicated examples to see how Docker is used to run multi-container applications. We will also see how to productionize applications in Docker and the best practices. In the upcoming articles in this series, I will also show you how to persist container data (via Docker Volumes) all before moving on to Kubernetes!
Compose工具在使容器服务在Docker中无缝协同工作方面非常强大。 我们将探索该工具,以及更复杂的示例,以了解如何使用Docker运行多容器应用程序。 我们还将看到如何在Docker中生产应用程序以及最佳实践。 在本系列的后续文章中,我还将向您展示如何在继续使用Kubernetes之前持久化容器数据(通过Docker Volumes)!
Keep up the good work and stay tuned for the next blog! 🤓
继续努力,继续关注下一个博客! 🤓


 1039
1039

 被折叠的 条评论
为什么被折叠?
被折叠的 条评论
为什么被折叠?
 到【灌水乐园】发言


