


This post describes best practices for organizing machine learning projects that I have found to be highly effective during my PhD in machine learning.
这篇文章描述了组织机器学习项目的最佳实践,我发现在我攻读机器学习博士学位期间非常有效。
Python (Python)
Python is a great language for machine learning. Python includes a bunch of libraries that are super useful for ML:
Python是一种很棒的机器学习语言。 Python包括一堆对ML超级有用的库:
numpy: n-dimensional arrays and numerical computing. Useful for data processing.
numpy :n维数组和数值计算。 对于数据处理很有用。
pandas: data analysis library. pandas dataframes are essentially numpy arrays with descriptive strings as row and column labels. They can be sorted, filtered, grouped, concatenated, etc. Useful for data processing.
pandas :数据分析库。 pandas数据框本质上是具有描述性字符串作为行和列标签的numpy数组。 可以对它们进行排序,过滤,分组,串联等。对数据处理很有用。
PyTorch: build neural networks. Includes many pretrained models and clean computer vision datasets. PyTorch is my favorite library for neural networks because it encourages using object-oriented programming (a model is a class, a dataset is a class, etc.), writing code in PyTorch is quick, and PyTorch supports eager execution by default so it can be used with the Python debugger.
PyTorch :构建神经网络。 包括许多预先训练的模型和干净的计算机视觉数据集。 PyTorch是我最喜欢的神经网络库,因为它鼓励使用面向对象的编程(模型是类,数据集是类,等等),在PyTorch中编写代码很快,并且PyTorch默认支持急切执行,因此它可以与Python调试器一起使用。
TensorFlow: an alternative to PyTorch which is more popular in industry. A couple years ago I used TensorFlow, but after switching to PyTorch I have never looked back. I find PyTorch much better for research. If you want to use TensorFlow and you want a higher-level interface for it, you can use Keras.
TensorFlow :PyTorch的替代品,在工业界更流行。 几年前,我使用了TensorFlow,但切换到PyTorch之后,我再也没有回头。 我发现PyTorch可以更好地进行研究。 如果您想使用TensorFlow并且想要一个更高级别的接口,则可以使用Keras 。
scikit-learn: this is a nice library for regression, SVMs, k nearest neighbors, random forests, calculating the area under the receiver operating characteristic, calculating confusion matrices, etc.
scikit-learn :这是一个不错的库,用于回归,支持向量机,k个最近邻居,随机森林,计算接收器工作特征下的面积,计算混淆矩阵等。
matplotlib and seaborn: make lovely visualizations! I cover these libraries in a later section.
matplotlib和seaborn :进行可爱的可视化! 我将在后面的部分中介绍这些库。
吉特 (Git)
Git version control is extremely useful for keeping machine learning projects organized.
Git版本控制对于使机器学习项目井井有条非常有用。
Git is a tool that can be used to keep track of all changes that you make to your code. A Git “repository” is a directory containing your code files. Git uses space-efficient techniques so that it does not store multiple copies of your code but instead stores relative changes between old files and new files. Git helps keep your directory of code files clean and organized because only the most recent versions are “obviously” present (although you can easily access any version of your code at any time). You choose when to mark that changes have occurred, using a “commit” which bundles together specific changes to your code along with a written description that you provide. Git repositories also make it easy to share code and collaborate. On the whole, Git is a way better solution to preserving old code functionality than saving a million different versions of your code under “myscript_v1.py”, “dataprocessing_v56.py”, “utils_73.py” and so on.
Git是一种可用于跟踪对代码所做的所有更改的工具。 Git“存储库”是包含您的代码文件的目录。 Git使用节省空间的技术,因此它不存储代码的多个副本,而是存储旧文件和新文件之间的相对更改。 Git有助于保持代码文件目录的井井有条,因为只有“很明显”的最新版本存在(尽管您可以随时轻松访问任何版本的代码)。 您可以使用“提交”来选择何时标记已发生更改,该“提交”将对代码的特定更改以及您提供的书面说明捆绑在一起。 Git存储库还使共享代码和协作变得容易。 总体而言,与在“ myscript_v1.py”,“ dataprocessing_v56.py”,“ utils_73.py”等下保存一百万个不同版本的代码相比,Git是一种更好的保留旧代码功能的解决方案。
Git version control is available through GitHub, GitLab, and Bitbucket to name a few. I use GitHub most frequently. Once you have GitHub set up and are used to using it, it takes about 2 minutes to set up a new repository.
可以通过GitHub,GitLab和Bitbucket获得Git版本控制。 我最常使用GitHub。 设置好GitHub并习惯使用它后,大约需要2分钟即可建立一个新的存储库。

Here are the steps to get GitHub set up on your machine:
以下是在您的计算机上设置GitHub的步骤:
Install Git: https://git-scm.com/downloads
安装Git: https : //git-scm.com/downloads
Make a GitHub account www.github.com
创建一个GitHub帐户www.github.com
Link your GitHub account with your machine via an SSH key. This step enables you to push code from your machine to GitHub’s cloud storage. See Generating a new SSH key, Adding a new SSH key to your GitHub account
通过SSH密钥将GitHub帐户与计算机链接。 此步骤使您可以将代码从计算机推送到GitHub的云存储。 请参阅生成新的SSH密钥,将新的SSH密钥添加到GitHub帐户
- Make a new repository on GitHub by clicking the green “New” button in the “Repositories” section of your profile.通过单击个人资料“存储库”部分中绿色的“新建”按钮,在GitHub上创建新的存储库。
- Enable your computer to push to that repository (note that GitHub will provide you with these instructions with the right URL for your repository immediately after you create the repository; the following commands are just an example): 使您的计算机能够推送到该存储库(请注意,在创建存储库后,GitHub会立即为您提供这些说明以及正确的存储库URL;以下命令只是一个示例):
echo "# pytorch-computer-vision" >> README.md
git init
git add README.md
git commit -m "first commit"
git branch -M master
git remote add origin https://github.com/rachellea/pytorch-computer-vision.git
git push -u origin master
Let’s say you have now changed some code in myeditedscript.py. To “commit” to the repository (i.e. log in that change):
假设您现在已经在myeditedscript.py中更改了一些代码。 要“提交”到存储库(即登录该更改):
git add myeditedscript.py
git commit -m 'added super useful functionality'
git push origin master
水蟒 (Anaconda)
Anaconda is a package manager. It enables creation of different computing environments which may contain different Python versions and/or different packages and/or different package versions. Anaconda is especially useful when you are working on multiple projects that have conflicting dependencies.
Anaconda是程序包经理。 它允许创建不同的计算环境,其中可能包含不同的Python版本和/或不同的程序包和/或不同的程序包版本。 当您处理具有冲突依赖关系的多个项目时,Anaconda尤其有用。
Anaconda is easy to use. Steps:
Anaconda易于使用。 脚步:
First, install Anaconda: https://docs.anaconda.com/anaconda/install/
首先,安装Anaconda: https : //docs.anaconda.com/anaconda/install/
Next, create an environment. I find it useful to name the environment after the project that it’s for. For example, if the project is about chest x-ray classification using a neural network, the environment could be called chestxraynn:
接下来,创建一个环境。 我发现以要使用的项目命名环境很有用。 例如,如果该项目是关于使用神经网络对胸部X光进行分类的,则该环境可以称为Chestxraynn:
conda create --name chestxraynn python=3.5Note that you do NOT want to put quotes around the environment name, otherwise the quote characters themselves will be part of the environment name. Also, you can choose any version of Python that you want. It does not have to be Python 3.5.
请注意,您不想在环境名称周围加上引号,否则引号字符本身将成为环境名称的一部分。 另外,您可以选择所需的任何Python版本。 它不一定是Python 3.5。
Once the environment is created it is time to activate the environment. “Activation” merely means that you will be “put inside the environment” so that you can use all of the software that’s installed inside of it.
创建环境后,就可以激活环境了。 “激活”仅意味着您将“放入环境中”,以便可以使用其中安装的所有软件。
To activate the environment on Windows, run this command:
要在Windows上激活环境,请运行以下命令:
activate chestxraynnOn Linux or macOS,
在Linux或macOS上,
source activate chestxraynnYou can install packages inside the environment using the “conda install” command.
您可以使用“ conda install”命令在环境中安装软件包。
For example, the conda command to install matplotlib is:
例如,安装matplotlib的conda命令为:
conda install -c conda-forge matplotlibYou can just Google “conda install packagename” to locate the page that tells you what conda command to run to install that package. Technically within a conda environment you can also install packages using pip, but this can cause issues and so should be avoided if possible.
您可以只用Google“ conda install packagename”来找到告诉您运行哪个conda命令来安装该软件包的页面。 从技术上讲,在conda环境中,您还可以使用pip安装软件包,但这可能会引起问题,因此应尽可能避免。
Anaconda will take care of making sure that the versions of everything inside the environment are compatible. For more commands see the Conda Cheat Sheet.
Anaconda将确保环境中所有版本的兼容性。 有关更多命令,请参见Conda备忘单。
It’s also possible to create a conda environment from a file that someone else has put together. In the GitHub repository https://github.com/rachellea/pytorch-computer-vision, there is a file called tutorial_environment.yml. This file specifies the dependencies needed to run the tutorial code. To create a conda environment based on this file, all you need to do is run the following command in the Anaconda prompt:
也可以从其他人放在一起的文件中创建conda环境。 在GitHub存储库https://github.com/rachellea/pytorch-computer-vision中,有一个名为tutorial_environment.yml的文件。 该文件指定运行教程代码所需的依赖项。 要基于此文件创建conda环境,您需要做的就是在Anaconda提示符下运行以下命令:
conda env create -f tutorial_environment.yml组织代码:类和函数 (Organize Your Code: Classes and Functions)
Code organization is very important. At various points in the past I have encountered research code that is thousands of lines crammed in one module, with no documentation, repeated chunks of code copied and pasted everywhere, some blocks of code commented out with no explanation, and weird variable names. The code doesn’t run, and even if it did run, it is probably not correct.
代码组织非常重要。 在过去的不同时候,我遇到了一个研究代码,该代码成千上万的行挤在一个模块中,没有文档,重复的代码块被复制并粘贴到各处,有些代码块被注释掉而没有任何解释,并且变量名称很奇怪。 该代码无法运行,即使可以运行,也可能不正确。
I have also encountered a lot of nice code — for example, all the code I have looked at in the PyTorch implementation is organized and well-documented.
我还遇到了很多不错的代码-例如,我在PyTorch实现中查看的所有代码都是有组织的,并且文档齐全。
It will save you a lot of time in the long run if you write good quality code for your own projects. One aspect of good quality code is its organization within a module.
如果您为自己的项目编写高质量的代码,从长远来看将为您节省大量时间。 高质量代码的一个方面是其在模块内的组织。
Recommendations:
建议:
- Use object-oriented programming. I highly recommend PyTorch as a machine learning framework because it facilitates using object-oriented programming for everything. A model is a class. A dataset is a class. Etc. 使用面向对象的编程。 我强烈推荐PyTorch作为机器学习框架,因为它有助于对所有内容使用面向对象的编程。 模型是一类。 数据集是一个类。 等等。
- Use functions. If you’re writing something that wouldn’t work well as a class, then organize that code into functions. Functions are re-usable. Globs of code in the global namespace are not reusable. 使用功能。 如果您编写的东西不能作为类很好地工作,则可以将该代码组织成函数。 功能是可重用的。 全局名称空间中的全部代码不可重用。
整理代码:目录 (Organize Your Code: Directories)
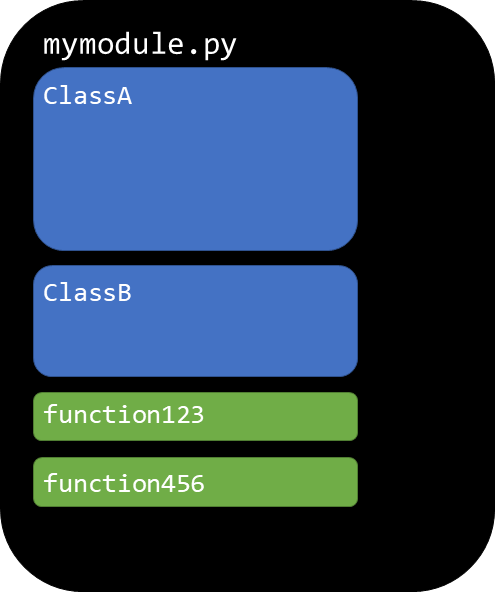
Use multiple modules to organize your code, and organize these modules into directories.
使用多个模块来组织代码,并将这些模块组织到目录中。
A simple example organization that I like is demonstrated in the GitHub repository that I put together for this post and other related posts: https://github.com/rachellea/pytorch-computer-vision
我喜欢的一个简单示例组织在本文和其他相关文章放在一起的GitHub存储库中得到了演示: https : //github.com/rachellea/pytorch-computer-vision
The overall organization is as follows:
总体组织如下:
- One module for the train/eval/test loop (src/run_experiment.py) 训练/评估/测试循环的一个模块(src / run_experiment.py)
- One module for calculating performance metrics (src/evaluate.py) 一个用于计算性能指标的模块(src / evaluate.py)
- One module (or more) for data processing: (load_dataset/custom_pascal.py and load_dataset/custom_tiny.py) 一个或多个模块进行数据处理:(load_dataset / custom_pascal.py和load_dataset / custom_tiny.py)
- One module (or more) for models: models/custom_models_base.py 一个或多个模型模块:models / custom_models_base.py
Here is the overall organization of the repository:
这是存储库的整体组织:
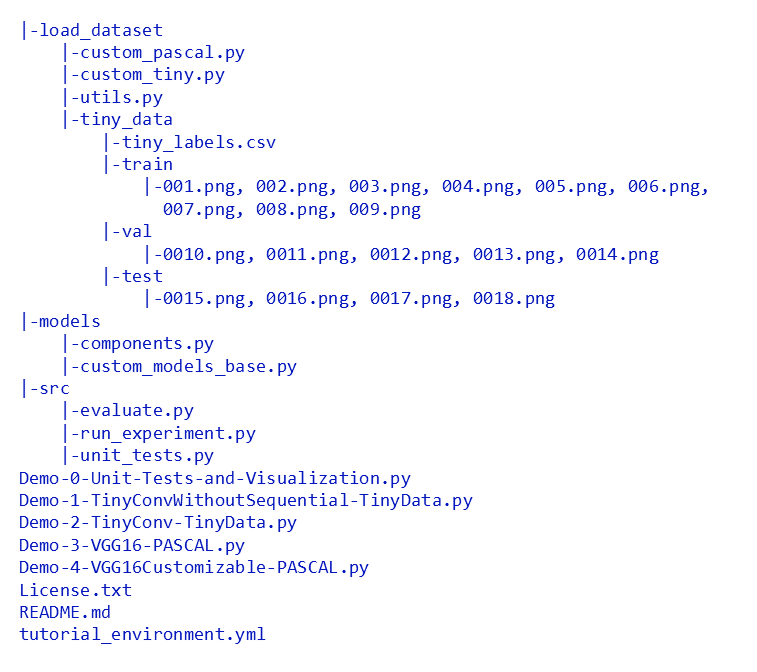
Note that while there is a data set stored in this repository (those PNGs in the directories “train”, “val”, and “test”) it is generally speaking not a good idea to put your data set into your repository. The only reason there is a data set in this repository is because it is a tiny fake dataset that was created for example purposes. Unless your data is very small, it should not go in the repository.
请注意,尽管此存储库中存储了一个数据集(目录“ train”,“ val”和“ test”中的那些PNG),但通常来讲,将数据集放入存储库不是一个好主意。 此存储库中存在数据集的唯一原因是因为它是为示例目的而创建的微小假数据集。 除非您的数据很小,否则不应将其放入存储库中。
输入 (Importing)
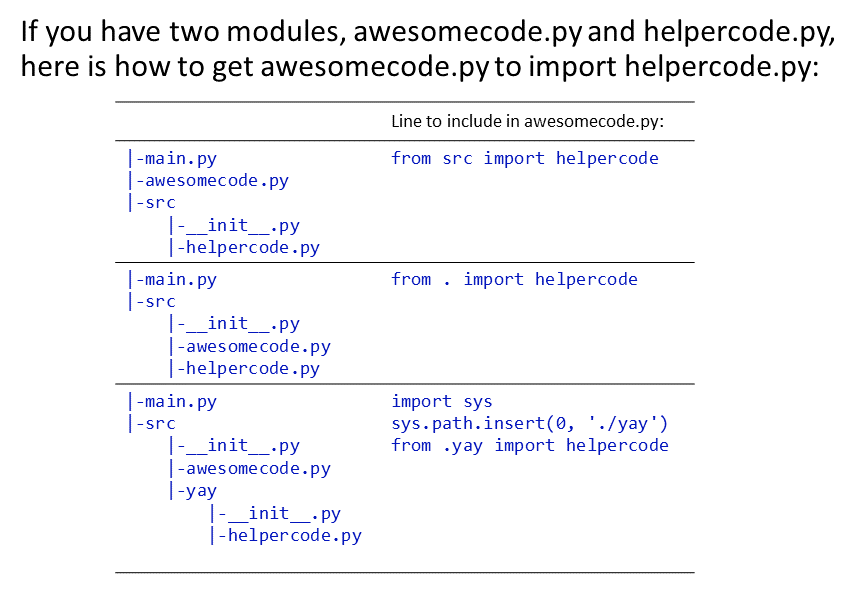
Note that you need an empty file called __init__.py in each of the subdirectories so that modules can import files from these directories.
请注意,每个子目录中都需要一个名为__init__.py的空文件,以便模块可以从这些目录中导入文件。
Here is how to get a module called awesomecode.py to import a module called helpercode.py based on what directories they are located in relative to each other:
这是如何获取名为awesomecode.py的模块,以基于它们相对于彼此位于的目录来导入名为helpercode.py的模块:
文献资料(Documentation)
It is good to write a lot of documentation. Comment everything. Document all your functions and methods and classes with docstrings. Sometimes it is helpful to document a function before you write it. It is also OK if the documentation is longer than the code sometimes. It’s better to be “overly clear” than not clear enough.
编写很多文档是很好的。 评论一切。 用文档字符串记录所有函数,方法和类。 有时在编写函数之前记录一下函数会有所帮助。 如果文档有时比代码长,也可以。 最好是“过于清晰”,而不是不够清晰。
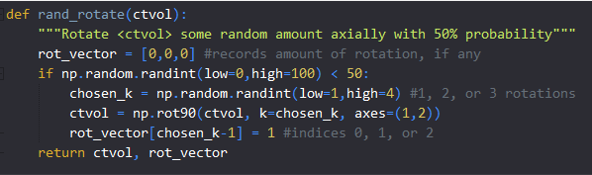
The image above is a simple function rand_rotate() that randomly rotates a 3D numpy array representing a CT volume. The docstring could be improved by specifying that <ctvol> is a 3D numpy array. The comments are helpful because they explain why the vector indicating what rotation was performed uses (k-1) — it’s because the chosen_k is 1, 2, or 3 but Python is zero-indexed. Simple comments like this can prevent confusion later.
上图是一个简单的函数rand_rotate(),它随机旋转表示CT体积的3D numpy数组。 通过指定<ctvol>是3D numpy数组,可以改进文档字符串。 这些注释很有用,因为它们解释了为什么指示执行旋转的向量使用(k-1)的原因-这是因为selected_k是1、2或3,但是Python的索引为零。 像这样的简单注释可以防止以后出现混淆。
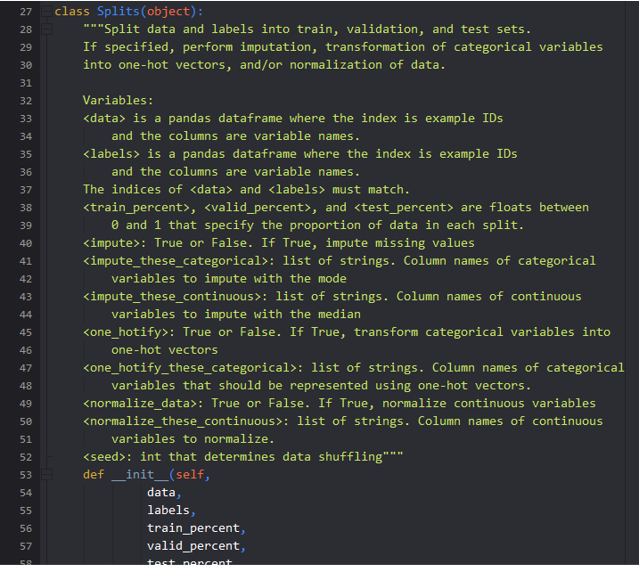
The image above shows documentation from some of my data processing tutorial code.
Documentation will ensure that when you look back on old code, you can quickly remember what it does. Documentation will prevent you from accidentally breaking your own code when you see something that looks weird and have the gut instinct to change it — if there’s a comment next to it explaining why the weird thing is necessary, you’ll leave it alone. Documentation will also enable other people to use your code.
文档将确保当您回顾旧代码时,您可以快速记住它的作用。 文档将防止您在看到怪异的东西并有直觉来改变它时意外地破坏自己的代码-如果在其旁边有注释解释为什么怪异的东西是必要的,您将不理会它。 文档还将使其他人可以使用您的代码。
命名变量 (Naming Variables)
Always use descriptive variable names. “volumetric_attn_gr_truth” is a better variable name than “truth” (what truth?), and way better than “gt” or heaven forbid “g”. It is OK if your variables have long names. They should never ever have single-letter names.
始终使用描述性变量名。 “ volumetric_attn_gr_truth”是一个比“ truth”更好的变量名(真是什么?),并且比“ gt”或天堂禁止“ g”更好。 如果您的变量具有长名称,也可以。 他们永远都不应使用单字母名称。
Even if you are iterating over rows and columns, use “row” and “col” as your variable names instead of “i” and “j”. I once spent an entire day looking for a very weird bug that turned out to be caused by iterating over a 2D array incorrectly because I’d switched “i” and “j” in one line of code out of hundreds. That was the last time I use a single-letter variable name.
即使您要遍历行和列,也请使用“行”和“列”作为变量名,而不是“ i”和“ j”。 我曾经花了一整天的时间来寻找一个非常奇怪的错误,该错误原来是由于不正确地迭代2D数组而导致的,因为我在数百行代码中的一行中将“ i”和“ j”切换了。 那是我最后一次使用单字母变量名称。
单元测试 (Unit Tests)
A lot of people claim that they don’t have time to write tests for their code because “it’s just for research.” I would argue that it’s even more important to test research code, because the whole point of research is that you don’t know what the “right answer” is — and how can you know if you’ve reached the right answer if you don’t know whether your code producing the answers is correct?
许多人声称他们没有时间为他们的代码编写测试,因为“这只是为了研究”。 我认为测试测试代码甚至更重要,因为整个研究的重点是您不知道“正确答案”是什么,以及如果您不知道正确答案,您将如何知道不知道您产生答案的代码是否正确?
Every time I have spent a day writing unit tests for my code, I have found mistakes — some of them tiny, and some of them more significant. If you write unit tests you will catch mistakes in your code. If you write unit tests for other people’s code, you will find mistakes in their code as well.
每当我花一天时间为代码编写单元测试时,我都会发现错误-有些错误很小,有些更严重。 如果编写单元测试,则会在代码中发现错误。 如果您为其他人的代码编写单元测试,您也会在他们的代码中发现错误。
In addition to facilitating code correctness, unit testing also helps enforce good code organization, by discouraging you from writing “god functions” that do too many things at once. God functions are usually a nightmare to test, and should be broken down into smaller, more manageable functions.
除了促进代码的正确性之外,单元测试还通过阻止您编写同时执行过多任务的“上帝函数”来帮助加强良好的代码组织。 上帝的职能通常是测试的噩梦,应分解为更小,更易于管理的职能。
At the very least, it’s a good idea to unit test the most critical parts of your code, e.g. complicated data processing or strange tensor rearrangements within a model. It is never a waste of time to make sure that your code is right.
至少,最好对代码的最关键部分进行单元测试,例如,复杂的数据处理或模型中奇怪的张量重排。 确保您的代码正确是永远不会浪费时间的。
You can see a very simple example of unit tests here. These unit tests include testing of some built-in PyTorch functions for demonstration purposes.
您可以在此处看到一个非常简单的单元测试示例。 这些单元测试包括对一些内置PyTorch功能的测试,以进行演示。
通过可视化检查代码 (Checking Code with Visualizations)
Especially in computer vision, it is useful to perform sanity checks using visualizations.
特别是在计算机视觉中,使用可视化执行完整性检查非常有用。
matplotlib is great for viewing images, segmentation maps, images with bounding boxes, etc. Here is an example of a visualization produced by applying matplotlib’s imshow() function to an input image:
matplotlib非常适合查看图像,分割图,带有边界框的图像等。这是通过将matplotlib的imshow()函数应用于输入图像而产生的可视化示例:
seaborn is designed for statistical data visualization. It is great for making heatmaps and for producing sophisticated visualizations of performance metrics. Here are some examples of plots that can be made with approximately one line of code in seaborn:
seaborn专为统计数据可视化而设计。 这对于制作热图和生成性能指标的复杂可视化效果非常好。 以下是一些示例的示例,这些示例可以用seaborn的大约一行代码来完成:
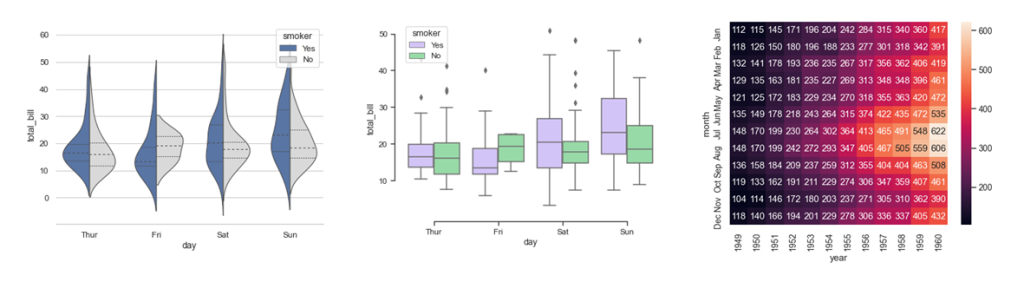
Both matplotlib and seaborn can be used to create visualizations that display in an instant whether the input data looks reasonable, whether the ground truth looks reasonable, whether the data processing has proceeded without messing anything up accidentally, whether a model’s output makes sense, etc.
matplotlib和seaborn均可用于创建可视化效果,以即时显示输入数据是否看起来合理,基本事实看起来是否合理,数据处理是否已经进行而不会意外弄乱任何东西,模型的输出是否有意义等。
演示0:单元测试和可视化 (Demo 0: Unit Tests and Visualizations)
In the tutorial repository, Demo-0-Unit-Tests-and-Visualization.py will run the unit tests in src/unit_tests.py and will then run visualizations of the PASCAL VOC 2012 dataset images and segmentation ground truth.
在教程资料库中, Demo-0-Unit-Tests-and-Visualization.py将在src / unit_tests.py中运行单元测试,然后对PASCAL VOC 2012数据集图像和分段基本情况进行可视化。
In order to run the visualization part of the demo, change the path in the Demo-0-Unit-Tests-and-Visualization.py to a path on your machine in which you can store the PASCAL VOC 2012 dataset and uncomment the line under the path to download the dataset. Once the dataset is downloaded you can run the visualizations. The code that makes the visualizations is in load_dataset/custom_pascal.py. At the moment, the total number of images_to_visualize is set to 3 in the demo file; if you want to visualize more images, you can increase that number further, e.g. to 100.
为了运行演示的可视化部分,请将“ Demo-0-Unit-Tests-and-Visualization.py”中的路径更改为机器上的路径,您可以在其中存储PASCAL VOC 2012数据集,并取消注释下的行下载数据集的路径。 下载数据集后,您可以运行可视化文件。 进行可视化的代码在load_dataset / custom_pascal.py中。 目前,演示文件中images_to_visualize的总数设置为3; 如果您想可视化更多图像,则可以将该数字进一步增加,例如增加到100。
Here is what the visualizations look like:
可视化效果如下所示:
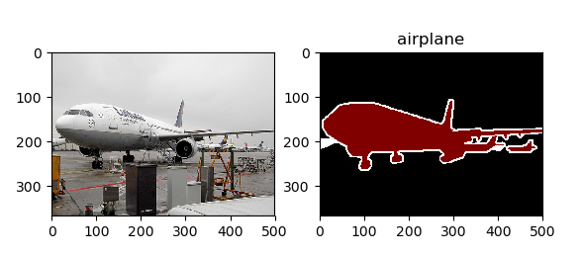
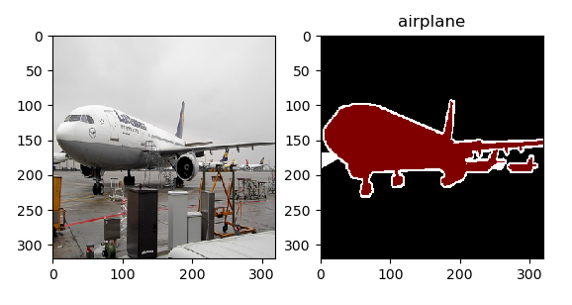
From the visualizations we can infer several useful things:
从可视化中,我们可以推断出一些有用的东西:
- The mapping between the input images and the ground truth segmentations is correct. 输入图像和地面真实分割之间的映射是正确的。
- The mapping between the integers used to define the pixel-wise segmentation ground truth and the label descriptive strings is correct. e.g. 1 maps correctly to “airplane.” 用于定义逐像素分割基本情况的整数与标签描述字符串之间的映射是正确的。 例如1正确映射到“飞机”。
- The resampling step did not “destroy” either the input image or the segmentation ground truth, or cause them to be severely misaligned. 重采样步骤不会“破坏”输入图像或分割地面真实情况,也不会导致它们严重失准。
终端中的可视化 (Visualizations in Terminals)
If you are in a “non-interactive environment” (i.e. a terminal with no graphical user interface) then you will need to turn off interactive plotting and save your figures so you can open them elsewhere:
如果您处于“非交互式环境”(即没有图形用户界面的终端)中,则需要关闭交互式绘图并保存图形,以便可以在其他地方打开它们:
import seaborn
import matplotlib
matplotlib.use('agg')
import matplotlib.pyplot as plt
plt.ioff() #seaborn figure:
heatmap = seaborn.heatmap(some_dataframe, cmap = 'Blues', square=True, center=0)
heatmap.get_figure().savefig('Descriptive_Figure_Name.png',bbox_inches='tight')
plt.close() #matplotlib figure:
plt.imshow(chest_x_ray,cmap='gray')
plt.savefig('Other_Descriptive_Figure_Name.png')
plt.close()
Python调试器 (The Python Debugger)
The Python debugger is an extremely useful tool, because it allows you to inspect everything in the state at the place where your program crashed, and run snippets of code at the place where your program crashed so you can try out possible solutions. Using the Python debugger is way more efficient than debugging with print statements, and it will save you hours and hours of time. The Python debugger can also be used with PyTorch; you can inspect tensors, gradients, logging dataframes, etc.
Python调试器是一个非常有用的工具,因为它允许您在程序崩溃的位置检查状态下的所有内容,并在程序崩溃的位置运行代码段,以便尝试可能的解决方案。 使用Python调试器比使用打印语句进行调试更有效,并且可以节省您数小时的时间。 Python调试器也可以与PyTorch一起使用。 您可以检查张量,渐变,记录数据帧等。
To run a script interactively in a terminal using the Python debugger, use the following command:
要使用Python调试器在终端中交互运行脚本,请使用以下命令:
python -m pdb myscript.pyYou will see a (Pdb) prompt show up. Type ‘c’ to continue. (That is just a lone lowercase letter c, for continue).
您将看到一个(Pdb)提示。 输入“ c”继续。 (这只是一个单独的小写字母c,继续)。
To get out of the Python debugger, use ‘q’ (that is a lone lowercase letter q, for quit). You may have to use q twice to fully quit.
要退出Python调试器,请使用'q'(退出时使用的是单独的小写字母q)。 您可能需要两次使用q才能完全退出。
If you want to stop at a specific point in your program, then within the relevant module you can import pdb and then put “pdb.set_trace()” at the specific point where you want to stop. Or, if you don’t want to bother importing pdb, you can just write “assert False” at the place you want to stop and that will guarantee the program dies where you want it to (although that is not the official way to use the Python debugger).
如果要在程序的特定位置停止,则可以在相关模块中导入pdb,然后将“ pdb.set_trace()”放在要停止的特定位置。 或者,如果您不想麻烦地导入pdb,则可以在要停止的位置写“ assert False”,这样可以保证程序在您想要的位置消失(尽管这不是正式的使用方式) Python调试器)。
不要使用Jupyter笔记本 (Don’t Use Jupyter Notebooks)
Given all of the previous sections, I must now recommend never using jupyter notebooks for machine learning projects, or really for any coding project that’s going to take you longer than a couple days.
鉴于前面的所有部分,我现在必须建议不要将jupyter笔记本用于机器学习项目,或者真正用于将花费您多于几天时间的任何编码项目。
Why?
为什么?
Notebooks encourage you to keep everything in the global namespace, which produces one gigantic monster module that does everything, and has no functions, no classes, and no structure whatsoever.
笔记本鼓励您将所有内容保留在全局名称空间中,该名称空间产生一个巨大的Monster模块,该模块可以执行所有功能,并且不具有任何功能,没有类且没有任何结构。
- Notebooks make it more difficult to re-use your code. Functions are re-usable; “code in cells 5, 10, and 13” is not re-usable. 笔记本使重用代码变得更加困难。 功能是可重用的; “单元5、10和13中的代码”不可重复使用。
- Notebooks make it difficult to unit test. Functions and methods can be unit tested. “Code in cells 5, 10, and 13” cannot be unit tested. 笔记本电脑很难进行单元测试。 功能和方法可以进行单元测试。 “单元5、10和13中的代码”不能进行单元测试。
- The more organized your code is (i.e. the more subdivided into classes and functions), the less interactive the notebook becomes — and the interactivity is the main reason people like notebooks. The appealing interactive property of notebooks is inherently in opposition to highly structured, well-organized code. 您的代码越有条理(即,将其细分为更多的类和函数),则笔记本的交互性就越差—交互性是人们喜欢笔记本的主要原因。 笔记本的吸引人的交互特性固有地与高度结构化,组织良好的代码相反。
- Notebooks make it difficult to properly use Git version control. Notebooks are just massive JSON files so properly merging them or doing pull requests with them is essentially impossible. 笔记本电脑很难正确使用Git版本控制。 笔记本只是大量的JSON文件,因此正确地合并它们或对它们执行拉取请求基本上是不可能的。
- Notebooks make it difficult to collaborate with others. You have to “take turns” working on the notebook (rather than pushing/pulling from the same repo as you could with “regular code”). 笔记本很难与他人合作。 您必须“轮流”在笔记本上工作(而不是像使用“常规代码”那样从同一存储库中推入/拉出)。
- Notebooks have a non-linear workflow, which is completely in opposition to reproducible research. You should not have to “run the cells in a particular order” to reproduce someone else’s work. 笔记本电脑具有非线性工作流程,这完全与可重复的研究相反。 您不必“以特定顺序运行单元”来复制他人的作品。
What are notebooks good for? Some possibly acceptable use cases are initial data visualization, homework assignments, “presentation-style” software, and interactive demonstrations. (However, I argue that all of those can also be accomplished without using jupyter notebooks.)
笔记本有什么用? 一些可能可接受的用例是初始数据可视化,作业分配,“演示样式”软件和交互式演示。 (但是,我认为所有这些都可以在不使用jupyter笔记本的情况下完成。)
I am not the only person in existence who believes that it is better to avoid jupyter notebooks for machine learning projects. For further reading/reference, see Why I don’t use Jupyter notebooks and you shouldn’t either by Daoud Clarke; 5 reasons why jupyter notebooks suck by Alexander Mueller; and The Notebook Anti-Pattern by Kristina Young.
我并不是唯一一个相信为机器学习项目避免使用jupyter笔记本更好的人。 有关进一步的阅读/参考,请参阅为什么我不使用Jupyter笔记本,而Daoud Clarke也不应该这样做。 Jupyter笔记本吸引Alexander Mueller的5个原因; 和Kristina Young的《笔记本反模式》 。
目标 (Goals)
Two useful goals are:
两个有用的目标是:
- To write code that is correct and understandable. If your code is correct, it’s more likely that your model will produce good results, that your research conclusions will be correct, and that you will create something practically useful. 编写正确且易于理解的代码。 如果您的代码是正确的,则您的模型更有可能产生良好的结果,您的研究结论将是正确的,并且您会创建一些实际有用的东西。
- To ensure that anyone can replicate everything you did — e.g. your model, its results, the figures — by running one command in a terminal (e.g. “python main.py”). This will help others to build on your work and will also help “future you” to build on your own work. 为确保任何人都可以通过在终端中运行一个命令(例如“ python main.py”)来复制您所做的一切(例如,模型,结果,图形)。 这将帮助其他人建立在您的工作之上,也将帮助“未来的您”建立在您自己的工作之上。
概要 (Summary)
- Python is an excellent language for machine learningPython是机器学习的绝佳语言
- Git version control helps keep track of different versions of code. It is available through GitHub. Git版本控制有助于跟踪不同版本的代码。 可通过GitHub获得。
- Anaconda is a package manager that enables creation of different environments which may contain different Python versions and/or packages. It is useful when working on multiple projects that have conflicting dependencies. Anaconda是一个软件包管理器,可以创建不同的环境,其中可能包含不同的Python版本和/或软件包。 当处理具有冲突依赖关系的多个项目时,此功能很有用。
- Organize your code into classes and functions within a module. Organize modules in a hierarchical directory structure within a Git repository. 将代码组织到模块中的类和函数中。 在Git存储库中以分层目录结构组织模块。
- Document your code with comments and docstrings 用注释和文档字符串记录代码
- Use descriptive variable names. Never use single-letter variable names. 使用描述性的变量名。 切勿使用单字母变量名称。
- Write unit tests, especially for the most complicated or critical parts of the data processing and model. 编写单元测试,尤其是针对数据处理和模型中最复杂或最关键的部分。
- Visualize your data set, model output, and model performance using matplotlib and seaborn visualizations 使用matplotlib和Seaborn可视化工具可视化数据集,模型输出和模型性能
- Use the Python debugger for fast, efficient debugging使用Python调试器进行快速,高效的调试
- Do not use jupyter notebooks for machine learning projects不要将jupyter笔记本用于机器学习项目
Happy machine learning-ing!
机器学习愉快!

Originally published at http://glassboxmedicine.com on September 22, 2020.
最初于2020年9月22日发布在http://glassboxmedicine.com上。
翻译自: https://towardsdatascience.com/how-to-organize-machine-learning-projects-babd04f7a679


 5112
5112

 被折叠的 条评论
为什么被折叠?
被折叠的 条评论
为什么被折叠?
 到【灌水乐园】发言


