


aws fargate
Have you ever thought about how to write your back-end applications using Swift without having to worry about scaling, patching, and other cumbersome infrastructure tasks? If you answered yes, this article is for you.
您是否曾经考虑过如何使用Swift编写后端应用程序而不必担心扩展,修补和其他繁琐的基础架构任务? 如果您回答“是”,则本文适合您。
1.创建蒸气服务器应用程序 (1. Creating Your Vapor Server App)
Vapor is a web framework written in Swift that allows you to develop expressive and Swifty server-side applications.
Vapor是一个用Swift编写的Web框架,可让您开发富有表现力的Swifty服务器端应用程序。
After installing Vapor, open a terminal window, select a folder where your new project will live, and run the following command:
安装 Vapor后,打开一个终端窗口,选择一个文件夹,新项目将在该文件夹中运行,并运行以下命令:
$ vapor new CDKSwift -nThis will create a new folder called CDKSwift with a Vapor “hello world” template and all the required components to run your server. Now let's open the project by entering the CDKSwift folder and running:
这将创建一个名为CDKSwift的新文件夹,其中包含Vapor“ hello world”模板以及运行服务器所需的所有必需组件。 现在,通过输入CDKSwift文件夹并运行以下CDKSwift打开项目:
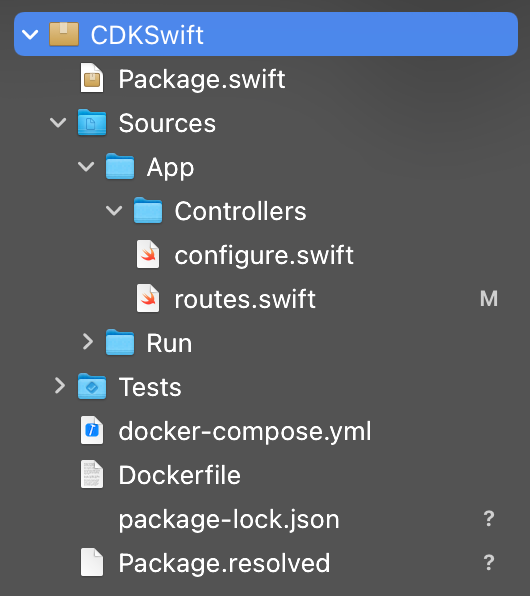
$ vapor xcodeIt will open Xcode. At that point, you should have a folder structure that looks like this:
它将打开Xcode。 那时,您应该具有一个类似于以下内容的文件夹结构:
Open the routes.swift source file and change its contents to the following:
打开 routes.swift源文件并将其内容更改为以下内容:
import Vapor


func routes(_ app: Application) throws {
    app.get { req in // 1
        return "I'm the root path"
    }

    app.get("hello") { req in // 2
        return "Hello, AWS!!!"
    }
}
This code:
这段代码:
Configures an endpoint that will respond to HTTP GET requests on
<hostname>/and return anI'm the root pathmessage.配置一个端点,该端点将响应
<hostname>/上的HTTP GET请求并返回“I'm the root path消息。Configures another endpoint that will respond to HTTP GET requests on
<hostname>/helloand returnHello, AWS. We haven’t gotten to AWS yet, but we will shortly.配置另一个端点,该端点将响应
<hostname>/hello上的HTTP GET请求并返回Hello, AWS。 我们还没有使用过AWS,但是我们很快会。
Let's test if everything is working as expected. In Xcode, hit the play button or CMD + R. After the build succeeds, you should see the following message in your Xcode console:
让我们测试一切是否按预期进行。 在Xcode中,单击“播放”按钮或CMD +R。构建成功后,您应该在Xcode控制台中看到以下消息:
[ NOTICE ] Server starting on http://127.0.0.1:8080Go back to your terminal window and run:
返回终端窗口并运行:
$ curl localhost:8080You should see I'm the root path in your terminal. Now run:
您应该看到I'm the root path您终端中I'm the root path 。 现在运行:
$ curl localhost:8080/helloAnd you should be able to see Hello, AWS!!!.
并且您应该能够看到Hello, AWS!!! 。
Pretty neat, eh? This shows that your Vapor server is up and running. Now we can jump into the next challenge.
很整洁吧? 这表明您的Vapor服务器已启动并正在运行。 现在我们可以跳入下一个挑战。
2.无处不在的容器 (2. Containers Everywhere)
To run our Vapor server on the cloud, we'll be using Docker containers. The official Docker documentation describes a container as:
为了在云上运行我们的Vapor服务器,我们将使用Docker容器。 Docker官方文档将容器描述为:
“A standard unit of software that packages up code and all its dependencies so the application runs quickly and reliably from one computing environment to another. A Docker container image is a lightweight, standalone, executable package of software that includes everything needed to run an application: code, runtime, system tools, system libraries and settings.”
“一个标准的软件单元,用于打包代码及其所有依赖项,因此该应用程序可以从一个计算环境到另一个计算环境快速,可靠地运行。 Docker容器映像是一个轻量级的,独立的,可执行的软件软件包,其中包含运行应用程序所需的一切:代码,运行时,系统工具,系统库和设置。”
Some benefits of using containers are:
使用容器的一些好处是:
- More efficient use of system resources 更有效地利用系统资源
- Faster delivery cycles (as you'll notice by the end of this article) 更快的交付周期(如您在本文结尾所注意到的)
- Application portability 应用程序可移植性
So install Docker and look for the Dockerfile that lives in the root of your project folder. This file is a "recipe" for Docker to build your container with all the resources required to run your Vapor server.
因此, 安装Docker并查找位于项目文件夹根目录中的Dockerfile。 该文件是Docker使用运行Vapor服务器所需的所有资源来构建容器的“配方”。
Feel free to read the file contents to see what the "recipe" for building your application looks like. I'm going to skip the details for this tutorial, but in summary, the recipe will copy all your project contents to an image containing a Swift 5.2 toolchain and build it. Then it will use the generated executable and define an entry point that will run your server in production mode at the address 0.0.0.0 and port 8080.
随意阅读文件内容,以查看构建应用程序的“配方”。 我将跳过本教程的详细信息,但总而言之,该食谱会将所有项目内容复制到包含Swift 5.2工具链的图像中并进行构建。 然后它将使用生成的可执行文件并定义一个入口点,该入口点将以生产模式在地址为0.0.0.0的服务器上运行 和8080端口。
Before building and running your Docker image, kill the Xcode process that you spun up later. Go to your terminal and run:
在构建和运行Docker映像之前,请终止稍后启动的Xcode进程。 转到终端并运行:
$ lsof -i tcp:8080This will list processes running on TCP port 8080, and if you see any running, grab the number in the PID column and run the following command to kill it:
这将列出在TCP端口8080上运行的进程,如果您看到正在运行的进程,请在PID列中获取数字并运行以下命令将其杀死:
$ sudo kill -9 <PID>Now you can build your Docker image. To do so, go to your project root folder and run:
现在您可以构建Docker映像了。 为此,请转到项目的根文件夹并运行:
$ docker build -t vapor-image .After the build succeeds, run your container and check if everything is working as expected by running:
构建成功后,运行容器并通过运行以下命令检查一切是否按预期工作:
$ docker run --rm -p 8080:8080 -it vapor-imageThis command will run your container and bind the port 8080 from your container to your localhost:8080 address. After running it, you should see the following terminal output:
该命令将运行您的容器并将端口8080从您的容器绑定到您的localhost:8080地址。 运行它之后,您应该看到以下终端输出:
[ NOTICE ] Server starting on http://0.0.0.0:8080Run the same curl commands you ran before to check if your server is running as expected. If so, let's build the infrastructure that will back our server.
运行之前运行的相同curl命令,以检查服务器是否按预期运行。 如果是这样,让我们构建支持服务器的基础架构。
3. AWS Fargate和AWS CDK (3. AWS Fargate and AWS CDK)
Now it's time to start thinking about the cloud infrastructure where our app will be deployed. Wouldn't be nice if we could invest our main focus on developing the app itself and not the infrastructure aspects like scaling, security, and provisioning? Fear not: AWS Fargate is here to help.
现在是时候开始考虑将在其中部署我们的应用程序的云基础架构了。 如果我们可以将主要精力放在开发应用程序本身而不是可伸缩性,安全性和供应等基础架构方面,那会不会很好? 不用担心:AWS Fargate可以为您提供帮助。
In AWS Fargate docs’ own words:
用AWS Fargate docs自己的话来说:
“AWS Fargate is a serverless compute engine for containers that works with both Amazon Elastic Container Service (ECS) and Amazon Elastic Kubernetes Service (EKS). Fargate makes it easy for you to focus on building your applications. Fargate removes the need to provision and manage servers, lets you specify and pay for resources per application, and improves security through application isolation by design.
“ AWS Fargate是用于容器的无服务器计算引擎,可与Amazon Elastic Container Service(ECS)和Amazon Elastic Kubernetes Service(EKS)一起使用 。 Fargate使您轻松专注于构建应用程序。 Fargate消除了供应和管理服务器的需要,使您可以为每个应用程序指定和支付资源,并通过设计隔离应用程序来提高安全性。
Fargate allocates the right amount of compute, eliminating the need to choose instances and scale cluster capacity. You only pay for the resources required to run your containers, so there is no over-provisioning and paying for additional servers.”
Fargate分配了适当的计算量,从而无需选择实例和扩展集群容量。 您只需为运行容器所需的资源付费,因此不会超额配置并为其他服务器付费。”
This sounds like a very good candidate for our app compute platform. So let's start writing our infrastructure code and deploy it.
这听起来像是我们的应用程序计算平台的很好的候选人。 因此,让我们开始编写我们的基础结构代码并进行部署。
Yes, you read that right. I said, “Let's write the infrastructure code.”
是的,你看的没错。 我说:“让我们编写基础结构代码 。”
In July 2019, AWS launched its Cloud Development Kit (CDK), a toolkit that enables you to define your infrastructure in a code-first approach. This way, you can easily define your infrastructure resources using many programming languages, leverage code versioning, and avoid copying and pasting a lot of ARNs in AWS console.
在2019年7月,AWS启动了其云开发套件(CDK) ,该工具套件使您能够以代码优先的方式定义基础架构。 这样,您可以使用多种编程语言轻松定义基础架构资源,利用代码版本控制,并避免在AWS控制台中复制和粘贴大量ARN。
To proceed to the next steps, you should have an AWS account configured. Then you need to install AWS CDK. Near the bottom of the linked page, you will find how to install CDK and its prerequisites. Make sure to use TypeScript as the programming language since we'll be using it in this tutorial.
要继续下一步,您应该配置一个AWS账户 。 然后,您需要安装AWS CDK 。 在链接页面底部附近,您将找到如何安装CDK及其先决条件。 确保使用TypeScript作为编程语言,因为我们将在本教程中使用它。
Jump back to your terminal window and navigate to your project root directory. Then run:
跳回到终端窗口并导航到项目根目录。 然后运行:
#1 $ mkdir cdk
#2 $ cd cdk
#3 $ cdk init app --language typescript
Create a new directory called
cdkinside your project root folder.在项目根文件夹中创建一个名为
cdk的新目录。Enter the created
cdkfolder.输入创建的
cdk文件夹。Create a new
cdkapp template prepared for the TypeScript language.创建为TypeScript语言准备的新
cdk应用程序模板。
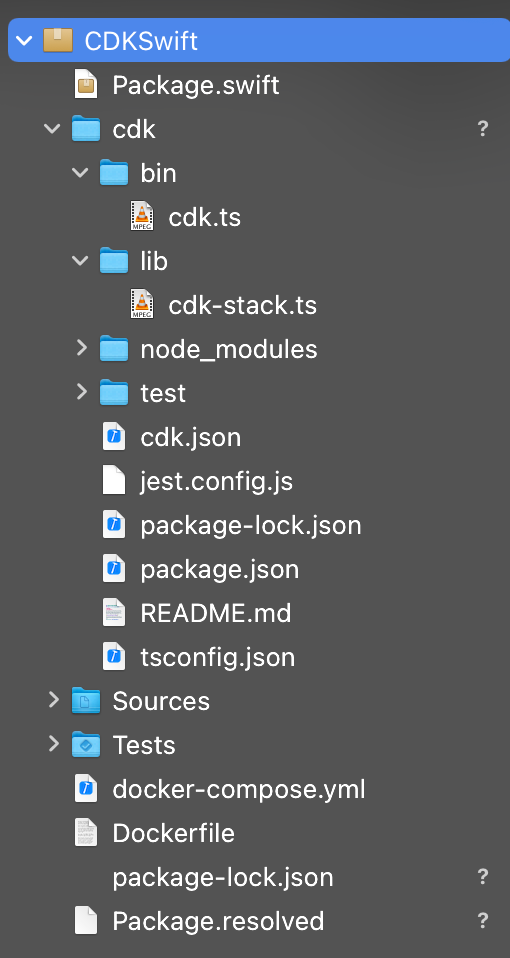
This last command will install a lot of Node.js dependencies. After that is done, you should have a project structure that looks like this:
最后一个命令将安装许多Node.js依赖项。 完成之后,您应该具有一个如下所示的项目结构:
Open the bin/cdk.ts file (I suggest using VSCode or a text editor other than Xcode) and you should see the following code:
打开bin/cdk.ts文件(我建议使用VSCode或Xcode以外的文本编辑器),您应该看到以下代码:
import 'source-map-support/register';
import * as cdk from '@aws-cdk/core';
import { CdkStack } from '../lib/cdk-stack';


const app = new cdk.App();
new CdkStack(app, 'CdkStack');
Change Line 6 to new CdkStack(app, 'VaporSwiftStack'); to change the stack name to VaporSwiftStack. CDK uses a concept from AWS called stack that encloses and encapsulates a set of related resources in your cloud infrastructure.
将第6行更改为new CdkStack(app, 'VaporSwiftStack'); 将堆栈名称更改为VaporSwiftStack 。 CDK使用来自AWS的称为堆栈的概念,该概念在您的云基础架构中封装并封装了一组相关资源。
Now jump into lib/cdk-stack.ts and you should see something like this:
现在进入lib/cdk-stack.ts ,您应该看到类似以下内容:
import * as cdk from '@aws-cdk/core';


export class CdkStack extends cdk.Stack {
  constructor(scope: cdk.Construct, id: string, props?: cdk.StackProps) {
    super(scope, id, props);


    // The code that defines your stack goes here
  }
}
This file defines a CdkStack class, and we will define all the other resources required to create our infrastructure inside the class constructor.
该文件定义了一个CdkStack类,我们将定义在类构造函数中创建基础结构所需的所有其他资源。
Now jump back to the terminal and run:
现在跳回到终端并运行:
$ npm install @aws-cdk/aws-ecr-assetsThis will install a CDK module capable of uploading our Docker image to the AWS Elastic Container Registry. In order to do that, modify your class to the following:
这将安装一个CDK模块,该模块能够将Docker映像上传到AWS Elastic Container Registry。 为此,请将您的类修改为以下内容:
import * as cdk from '@aws-cdk/core';
import { DockerImageAsset } from '@aws-cdk/aws-ecr-assets'; // 1
import * as path from 'path'; // 2


export class CdkStack extends cdk.Stack {
  constructor(scope: cdk.Construct, id: string, props?: cdk.StackProps) {
    super(scope, id, props);


    const asset = new DockerImageAsset(this, "VaporSwiftDockerAsset", { // 3
      directory: path.resolve(__dirname, "../.."), // 4
      exclude: ["cdk", "cdk.out"], // 5,
      repositoryName: "vapor-swift-image-repo" // 6
    });
  }
}
Import the
DockerImageAssetclass from our recently installed module.从我们最近安装的模块中导入
DockerImageAsset类。- Import the path module so we can manipulate file paths. 导入路径模块,以便我们可以操纵文件路径。
Create a new instance of
DockerImageAssetthat will be responsible for uploading our image to ECR.创建一个新的
DockerImageAsset实例,该实例将负责将映像上传到ECR。The
directoryproperty is the local directory that has our Dockerfile that will be built.directory属性是包含我们的Dockerfile的本地目录 那将被建立。The
excludeproperty will exclude the specified folders or files from our image build.exclude属性将从我们的映像构建中排除指定的文件夹或文件。Set our repository name to
vapor-swift-image-repo.将我们的存储库名称设置为
vapor-swift-image-repo。
Since we will need to upload assets like our Docker image, we first need to bootstrap our CDK application with our AWS account. To do so, run the following in your terminal:
由于我们需要上传像Docker映像这样的资产,因此我们首先需要使用我们的AWS账户引导CDK应用程序。 为此,请在终端中运行以下命令:
$ cdk bootstrapYou will see a lot of resources being created and finally something like this as the output:
您将看到创建了很多资源,最后将输出如下所示:
 ⏳  Bootstrapping environment aws://<acount-id>/us-east-1...
CDKToolkit: creating CloudFormation changeset...
[██████████████████████████████████████████████████████████] (3/3)✅  Environment aws://<account-id>/us-east-1 bootstrapped.
So far, so good. Let's continue with our CdkStack class. Before that, let's install two more required CDK modules in our project. Reach your terminal window and run:
到目前为止,一切都很好。 让我们继续我们的CdkStack类。 在此之前,让我们在项目中安装另外两个必需的CDK模块。 到达终端窗口并运行:
$ npm install @aws-cdk/aws-ecs @aws-cdk/aws-ecs-patternsNow jump back to the lib/cdk-stack.ts source file and change it to the following:
现在,跳回到lib/cdk-stack.ts源文件并将其更改为以下内容:
import * as cdk from '@aws-cdk/core';
import { DockerImageAsset } from '@aws-cdk/aws-ecr-assets';
import * as path from 'path';
import * as ecs from '@aws-cdk/aws-ecs'; // 1
import * as ecsPatterns from '@aws-cdk/aws-ecs-patterns'; // 2


export class CdkStack extends cdk.Stack {
  constructor(scope: cdk.Construct, id: string, props?: cdk.StackProps) {
    super(scope, id, props);


    const asset = new DockerImageAsset(this, "VaporSwiftDockerAsset", {
      directory: path.resolve(__dirname, "../.."),
      exclude: ["cdk", "cdk.out"],
      repositoryName: "vapor-swift-image-repo",
    });


    const cluster = new ecs.Cluster(this, "Cluster", { // 3
      clusterName: "VaporSwiftCluster",
    });


    new ecsPatterns.ApplicationLoadBalancedFargateService( // 4
      this,
      "VaporSwiftFargate",
      {
        cluster, // 5
        memoryLimitMiB: 512, // 6
        desiredCount: 1, // 7
        serviceName: "vapor-swift-app", // 8
        taskImageOptions: {
          image: ecs.ContainerImage.fromDockerImageAsset(asset), // 9
          containerPort: 8080, // 10
        },
        publicLoadBalancer: true, // 11
      }
    );
  }
}- Import the AWS ECS module. 导入AWS ECS模块。
- Import the ECS patterns module that has the pattern we will use to deploy and run our Docker image. 导入具有用于部署和运行Docker映像的模式的ECS模式模块。
- Create a cluster that will contain a task running our Docker image and therefore our Vapor app. 创建一个集群,其中将包含一个运行我们的Docker映像并因此运行我们的Vapor应用程序的任务。
Create an
ApplicationLoadBalancedFargateService(more on that later).创建一个
ApplicationLoadBalancedFargateService(稍后会详细介绍)。- Set the cluster we just defined in our Fargate definition. 设置我们刚刚在Fargate定义中定义的集群。
- Set the maximum memory to 512 Mb. 将最大内存设置为512 Mb。
- Define that we will only have one task running with our service. 定义我们的服务将只运行一项任务。
- Define our service name. 定义我们的服务名称。
- Set the image to be run as our previously created ECR asset. 将图像设置为作为我们先前创建的ECR资产运行。
- Set our container port to 8080 (more on that later). 将我们的容器端口设置为8080(稍后再介绍)。
- Set the load balancer that will run in front of our Fargate service to be visible outside our VPC. 将将在Fargate服务之前运行的负载平衡器设置为在VPC外部可见。
An ApplicationLoadBalancedFargateService is a deployment pattern that will create an ECS task (our service running in our Docker container) managed by Fargate and put it behind an Application Load Balancer. This way, any traffic sent to the load balancer DNS will be redirected to the containerPort defined in point No. 10.
一个ApplicationLoadBalancedFargateService 是一种部署模式,它将创建由Fargate管理的ECS任务(我们的服务在Docker容器中运行),并将其置于Application Load Balancer之后。 这样,发送到负载平衡器DNS的所有流量都将重定向到第10点containerPort定义的containerPort 。
As you may have noticed, you can configure Fargate service properties like CPU, memory, the number of tasks, and a lot more. Please visit this AWS CDK page to learn more about all the options you can define.
您可能已经注意到,您可以配置Fargate服务属性,例如CPU,内存,任务数等等。 请访问此AWS CDK页面,以了解有关您可以定义的所有选项的更多信息。
Now let's build our infrastructure code. Go back to your terminal and run:
现在,让我们构建我们的基础结构代码。 返回您的终端并运行:
$ npm run buildIf everything was installed and imported correctly, the TypeScript compiler should emit no errors. Now let’s deploy our infrastructure by running:
如果所有内容均已正确安装和导入,则TypeScript编译器应不会发出任何错误。 现在,通过运行以下内容来部署基础结构:
$ cdk deploy --require-approval neverThis will generate a cloud formation template change set and deploy our code without asking if it can create or update IAM roles and policies.
这将生成一个云形成模板更改集并部署我们的代码,而无需询问它是否可以创建或更新IAM角色和策略。
It will take a while and you will start seeing the same output that the docker build command generated in Section 2. After the image is built, you will see an output like the following:
这将需要一段时间,您将开始看到与第2节中生成的docker build命令相同的输出。在docker build映像之后,您将看到类似以下的输出:
CdkStack: creating CloudFormation changeset...
[██████████████████████▎···································] (15/39)9:59:18 PM | UPDATE_IN_PROGRESS   | AWS::CloudFormation::Stack                | CdkStack
10:00:15 PM | CREATE_IN_PROGRESS   | AWS::EC2::VPCGatewayAttachment            | Cluster/Vpc/VPCGW
10:00:15 PM | CREATE_IN_PROGRESS   | AWS::EC2::Subnet                          | Cluster/Vpc/PublicS
ubnet2/Subnet
10:00:15 PM | CREATE_IN_PROGRESS   | AWS::IAM::Policy                          | VaporSwiftFargate/.
..Role/DefaultPolicy
10:00:15 PM | CREATE_IN_PROGRESS   | AWS::EC2::Subnet                          | Cluster/Vpc/Private
Subnet1/Subnet
10:00:16 PM | CREATE_IN_PROGRESS   | AWS::EC2::Subnet                          | Cluster/Vpc/PublicS
ubnet1/Subnet
10:00:19 PM | CREATE_IN_PROGRESS   | AWS::EC2::SecurityGroup                   | VaporSwiftFargate/L
B/SecurityGroup
10:00:20 PM | CREATE_IN_PROGRESS   | AWS::EC2::SecurityGroup                   | VaporSwiftFargate/S
ervice/SecurityGroup
This shows all the resources being created in your AWS account.
这显示了在您的AWS账户中创建的所有资源。
When the resource creation finishes deploying, you will see the following output:
资源创建完成部署后,您将看到以下输出:
✅  CdkStackOutputs:
CdkStack.VaporSwiftFargateLoadBalancerDNS91F0D848 = CdkSt-Vapor-WFNZA891WCKL-597636731.us-east-1.elb.amazonaws.com
CdkStack.VaporSwiftFargateServiceURL2080FDCA = http://CdkSt-Vapor-WFNZA891WCKL-597636731.us-east-1.elb.amazonaws.com
Finally, grab the HTTP URL in the output list (this is your load balancer address — and your address will be different from this one) and check if the service is up by running the following in your terminal:
最后,获取输出列表中的HTTP URL(这是您的负载均衡器地址-您的地址将与此地址不同),并通过在终端中运行以下命令来检查服务是否启动:
$ curl http://CdkSt-Vapor-WFNZA891WCKL-597636731.us-east-1.elb.amazonaws.comAnd you should see:
而且您应该看到:
$ I'm the root pathThen append /hello to the URL path and run curl again:
然后附加/hello 到URL路径,然后再次运行curl :
$ curl http://CdkSt-Vapor-WFNZA891WCKL-597636731.us-east-1.elb.amazonaws.com/helloYou should receive:
您应该收到:
$ Hello, AWS!!!Awesome! You have a Vapor server running in AWS. Pretty easy, pretty fast, minimal effort, and you didn’t have to reach the AWS console.
太棒了! 您具有在AWS中运行的Vapor服务器。 非常容易,非常快速,最小的工作量,并且您无需访问AWS控制台。
Now I recommend playing around with your Vapor server and then redeploying it. Add other routes for other HTTP methods like POST and PUT, and check what else you can do.
现在,我建议您使用Vapor服务器,然后重新部署它。 为其他HTTP方法(例如POST和PUT添加其他路由,然后检查您还能做什么。
Before wrapping up, I must remind you to clean up your AWS-created resources. Otherwise, you'll be billed for their usage. To delete your stack, reach your terminal and run:
总结之前,我必须提醒您清理AWS创建的资源。 否则,将向您收取使用费用。 要删除堆栈,请到达终端并运行:
$ cdk destroy结语 (Wrapping Up)
In this tutorial, you:
在本教程中,您:
1. Created a fully functional Vapor server capable of responding in multiple routes.
1.创建了一个功能齐全的Vapor服务器,该服务器能够在多个路由中进行响应。
2. Built and ran a Docker container to back your Vapor server.
2.构建并运行一个Docker容器来支持您的Vapor服务器。
3. Deployed the container to AWS Fargate using AWS CDK.
3.使用AWS CDK将容器部署到AWS Fargate。
下一步 (Next Steps)
In the next tutorial, we will update our Vapor app to use AWS DynamoDB as the database and create CRUD operations.
在下一个教程中,我们将更新Vapor应用程序以将AWS DynamoDB用作数据库并创建CRUD操作。
Thanks for reading this article! If you have any suggestions or comments, please let me know.
感谢您阅读本文! 如果您有任何建议或意见,请告诉我。
aws fargate


 1028
1028


 被折叠的 条评论
为什么被折叠?
被折叠的 条评论
为什么被折叠?
 到【灌水乐园】发言


