


容器化ci/cd
In this article, we’ll be setting up an environment for automated building, testing, and deployment, using containers and services hosted in the cloud.
在本文中,我们将使用云中托管的容器和服务为自动构建,测试和部署建立环境。
I’ll be assuming that you already have some knowledge of what CI/CD is, and you’re looking to implement its ideas on your project. Furthermore you must have some previous knowledge of Docker, some of basics AWS services, and software engineering in general.
我假设您已经了解什么是CI / CD,并且您正在寻求在项目中实现其思想。 此外,您必须具有Docker的某些先验知识,AWS服务的一些基本知识以及一般的软件工程知识。
Given we’re working with Docker, the technology you’re using is not so important. But for this tutorial, we’ll be using Flask for its simplicity.
鉴于我们正在使用Docker,您使用的技术并不是那么重要。 但是对于本教程,我们将使用Flask来简化操作。
First things first, let me present to you our tools. For our code repository, we’ll be using Github. We need a CI tool to build, run the tests, and deploy our application (if everything goes well). And for that, we’re taking Travis-CI. For last, we need somewhere to host our application and, since we’re talking Docker, let’s use AWS Elastic Container Service (ECS).
首先,让我向您介绍我们的工具。 对于我们的代码存储库,我们将使用Github 。 我们需要一个CI工具来构建,运行测试和部署我们的应用程序(如果一切顺利的话)。 为此,我们采用Travis-CI 。 最后,我们需要在某个地方托管我们的应用程序,并且由于我们在谈论Docker,因此让我们使用AWS Elastic Container Service(ECS) 。
Now let’s see how the workflow works:
现在让我们看看工作流程如何工作:

Every time a commit or a merge is done to a branch, Travis will be triggered and run a list of instructions to build and run our tests. If the build is done successfully and every test passes, Travis will push our Docker image to Docker Hub and trigger an update event on ECS, telling to our cluster that has a new image version to be downloaded.
每次对分支进行提交或合并时,都会触发Travis并运行一系列指令以构建和运行我们的测试。 如果构建成功完成并且每次测试都通过,Travis将把我们的Docker映像推送到Docker Hub并在ECS上触发更新事件,告知我们的集群有要下载的新映像版本。
I’ve made a code template to get things easier to set up. Feel free to use it:
我制作了一个代码模板,以使设置更容易。 随意使用它:
So let’s get our hand dirty and do some work. This is how our source tree looks like:
因此,让我们动手做些工作。 这就是我们的源代码树的样子:
app
|__main.py
|__test.py
ci
|__travis-deploy.sh
|__.travis.yml
|__docker-compose.yml
|__Dockerfile
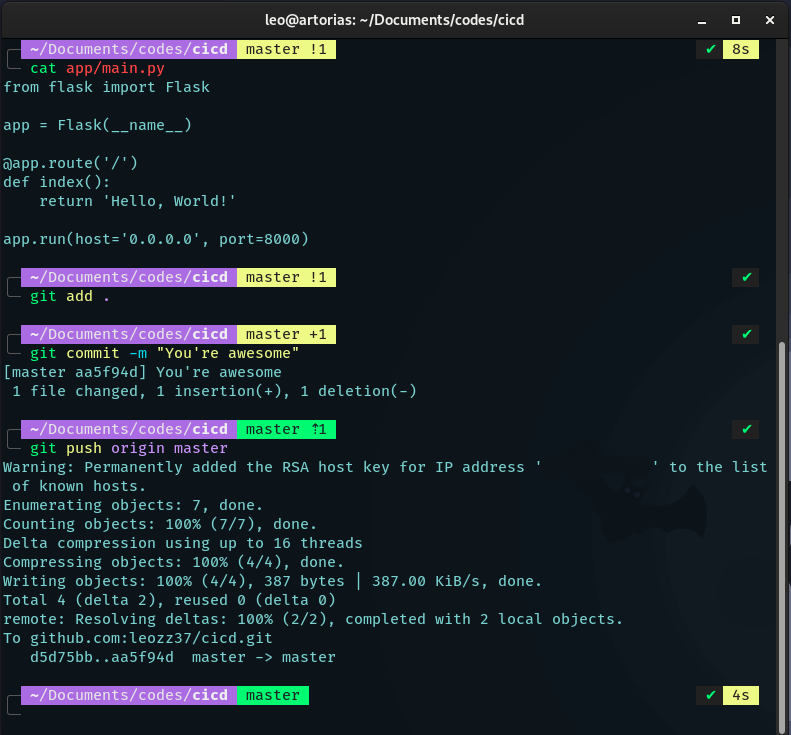
|__requirements.txtTo make things easier, our Python application consists of two files. main.py contains the Flask code and test.py has the unit test. Since its simplicity, the unit test verifies what a function that returns a sum of two numbers (it has no useful purpose).
为了简化操作,我们的Python应用程序包含两个文件。 main.py包含Flask代码,而test.py具有单元测试。 由于简单,单元测试验证返回两个数字之和的函数(没有任何用处)。
Our Python needs a txt file telling what dependencies it needs and its versions, so our requirements.txt will look like this:
我们的Python需要一个txt文件,告诉它需要什么依赖关系及其版本,因此我们的requirements.txt将如下所示:
To get things started with Docker, first, you need an account on Docker Hub, go ahead and create if you don’t have one yet: https://hub.docker.com/. If you not familiar with it, its a Docker image repository and it’s where ECS will be getting the latest version of our application. (ps: make sure to remember your username).
要开始使用Docker,首先,您需要在Docker Hub上拥有一个帐户,如果没有,请继续创建: https : //hub.docker.com/ 。 如果您不熟悉它,它是一个Docker映像存储库,ECS将在该存储库中获取我们应用程序的最新版本。 (ps:请确保记住您的用户名)。
Now let’s build a Dockerfile and a docker-compose for our Python code and upload it to Docker Hub.
现在,让我们为Python代码构建一个Dockerfile和一个docker-compose,并将其上传到Docker Hub。
In docker-compose.yml make sure to replace “YOUR_USER” for your Docker Hub username on line 8. After the slash, you can choose the name of your application.
在docker-compose.yml确保在第8行 上将“ YOUR_USER”替换为您的Docker Hub用户名。 在斜杠后,您可以选择应用程序的名称。
To upload the image, let’s build and push it to Docker Hub with these terminal commands:
要上传图像,让我们使用以下终端命令构建并将其推送到Docker Hub:
$ docker-compose build --pull$ docker-compose pushGo to your homepage, you will see your Docker image there.
转到您的主页 ,您将在其中看到您的Docker映像。

For our CI tool, log in Travis website with your Github account and sync your repositories. Every time you commit your code to Github, it will trigger a new build (it shouldn’t work by now, since we don’t have an ECS cluster).
对于我们的CI工具,请使用您的Github帐户登录Travis网站并同步您的存储库。 每次将代码提交给Github时,它都会触发一个新的构建(由于我们没有ECS集群,因此它现在不应该起作用)。

Let’s create a .travis.ymlfile, telling all instructions it must follow to build, test, and deploy our application. The instructions work by jobs, first, you have to specify its settings (such a distro, language compiler, if sudo is needed), if not specified, it will use the default ones. Then you can execute shell commands on which job.
让我们创建一个.travis.yml文件,告诉它构建,测试和部署应用程序必须遵循的所有说明。 该说明按作业进行工作,首先,您必须指定其设置(如果需要sudo,则为发行版语言编译器),如果未指定,它将使用默认设置。 然后,您可以在哪个作业上执行Shell命令。
Travis has the following list of jobs, that will be executed in this exact order (you don’t have to use all of them):
Travis具有以下作业列表,这些作业将按照完全相同的顺序执行(您不必全部使用它们):
install:
before_install:
script:
after_success:
after_failure:
after_script:
before_deploy:
deploy:
after_deploy:
This is our .travis.yml and travis-deploy.sh scripts:
这是我们的.travis.yml和travis-deploy.sh脚本:
Now that we have all our files set up, let’s create an ECS cluster. AWS is a very complex host service, so I highly recommend you READ THE DOCS (at least ECS ones) since AWS offers a bunch of services and they can charge you for using their services. But for this example, the free tier covers us.
现在我们已经设置了所有文件,让我们创建一个ECS集群。 AWS是一项非常复杂的主机服务,因此我强烈建议您阅读DOCS (至少是ECS的DOCS ),因为AWS提供了很多服务,他们可以向您收取使用服务的费用。 但是在这个例子中,免费套餐涵盖了我们。
ECS cluster resources depend on your application needs. I’ll show you how to set up an environment good enough for our Flask application. But keep in mind you should do a custom configuration for your project.
ECS群集资源取决于您的应用程序需求。 我将向您展示如何为Flask应用程序设置足够好的环境。 但是请记住,您应该为项目进行自定义配置。
Go to AWS website and log to your AWS Management Console
转到AWS网站并登录到您的AWS管理控制台

Search for “ECS”
搜索“ ECS ”

Click on “get started”.
点击“ 开始使用 ”。

Select the custom Container definition and hit “configure”.
选择自定义容器定义,然后单击“ configure ”。

Choose a name for your Container. On Image use this format: “Docker Hub user / your image name : latest”, or just get it from your image repository on Docker Hub. Mine for example is: leozz37/cicd-example:latest.Map your ports (for Flask we’re using 8000). Then click Update.
为您的容器选择一个名称。 在Image上使用以下格式:“ Docker Hub用户/您的映像名称:最新”,或仅从Docker Hub上的映像存储库中获取它。 例如,我的是: leozz37/cicd-example:latest. 映射您的端口(对于Flask,我们使用8000)。 然后点击更新 。

Select “Application Load Balancer” and click Next.
选择“ 应用程序负载平衡器 ”,然后单击下一步 。

Chose a Cluster Name and click Next.
选择一个群集名称 ,然后单击下一步 。
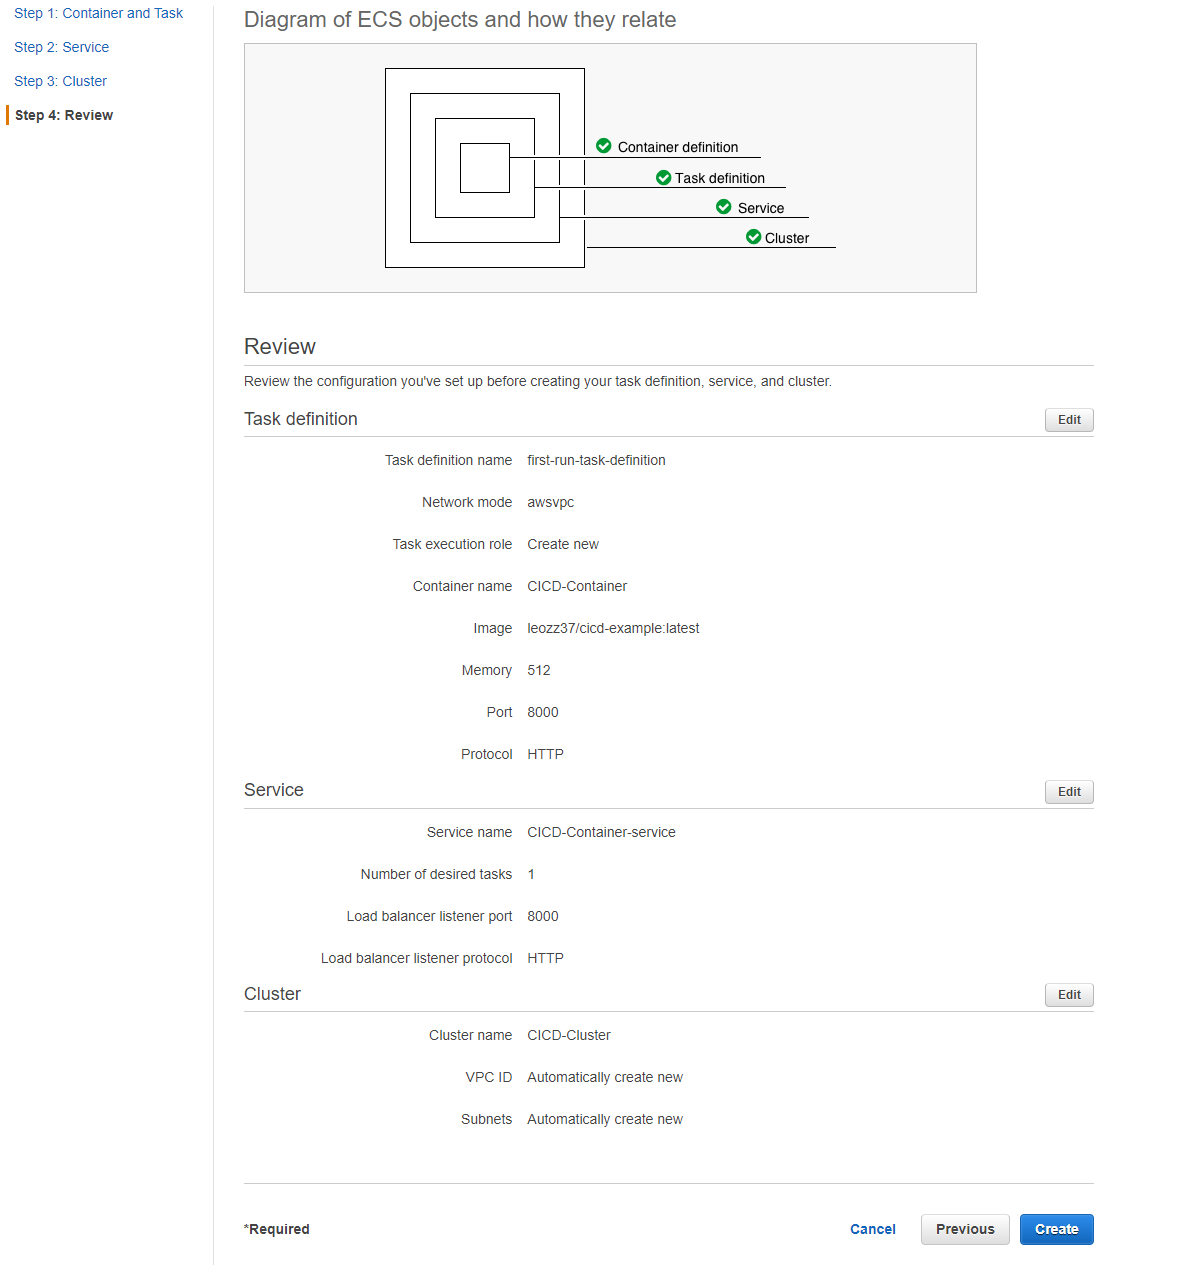
Review all your configurations and click Create.
查看所有配置,然后单击“ 创建” 。

Wait for your Cluster to get done. If you don’t remember your Service and Cluster name, you can check them here later.
等待您的集群完成。 如果您不记得自己的服务和群集名称,可以稍后在此处进行检查。
Now we have to set up our Travis environment variables. Go to your project on Travis and go to settings. On Environment Variables, you need to set up yours this way:
现在,我们必须设置Travis环境变量。 转到Travis上的项目并转到设置。 在环境变量上,您需要通过以下方式进行设置:
Make sure to have every variable set up to their equivalent values (the names are self-explanatory).
确保将每个变量设置为其等效值(名称不言自明)。
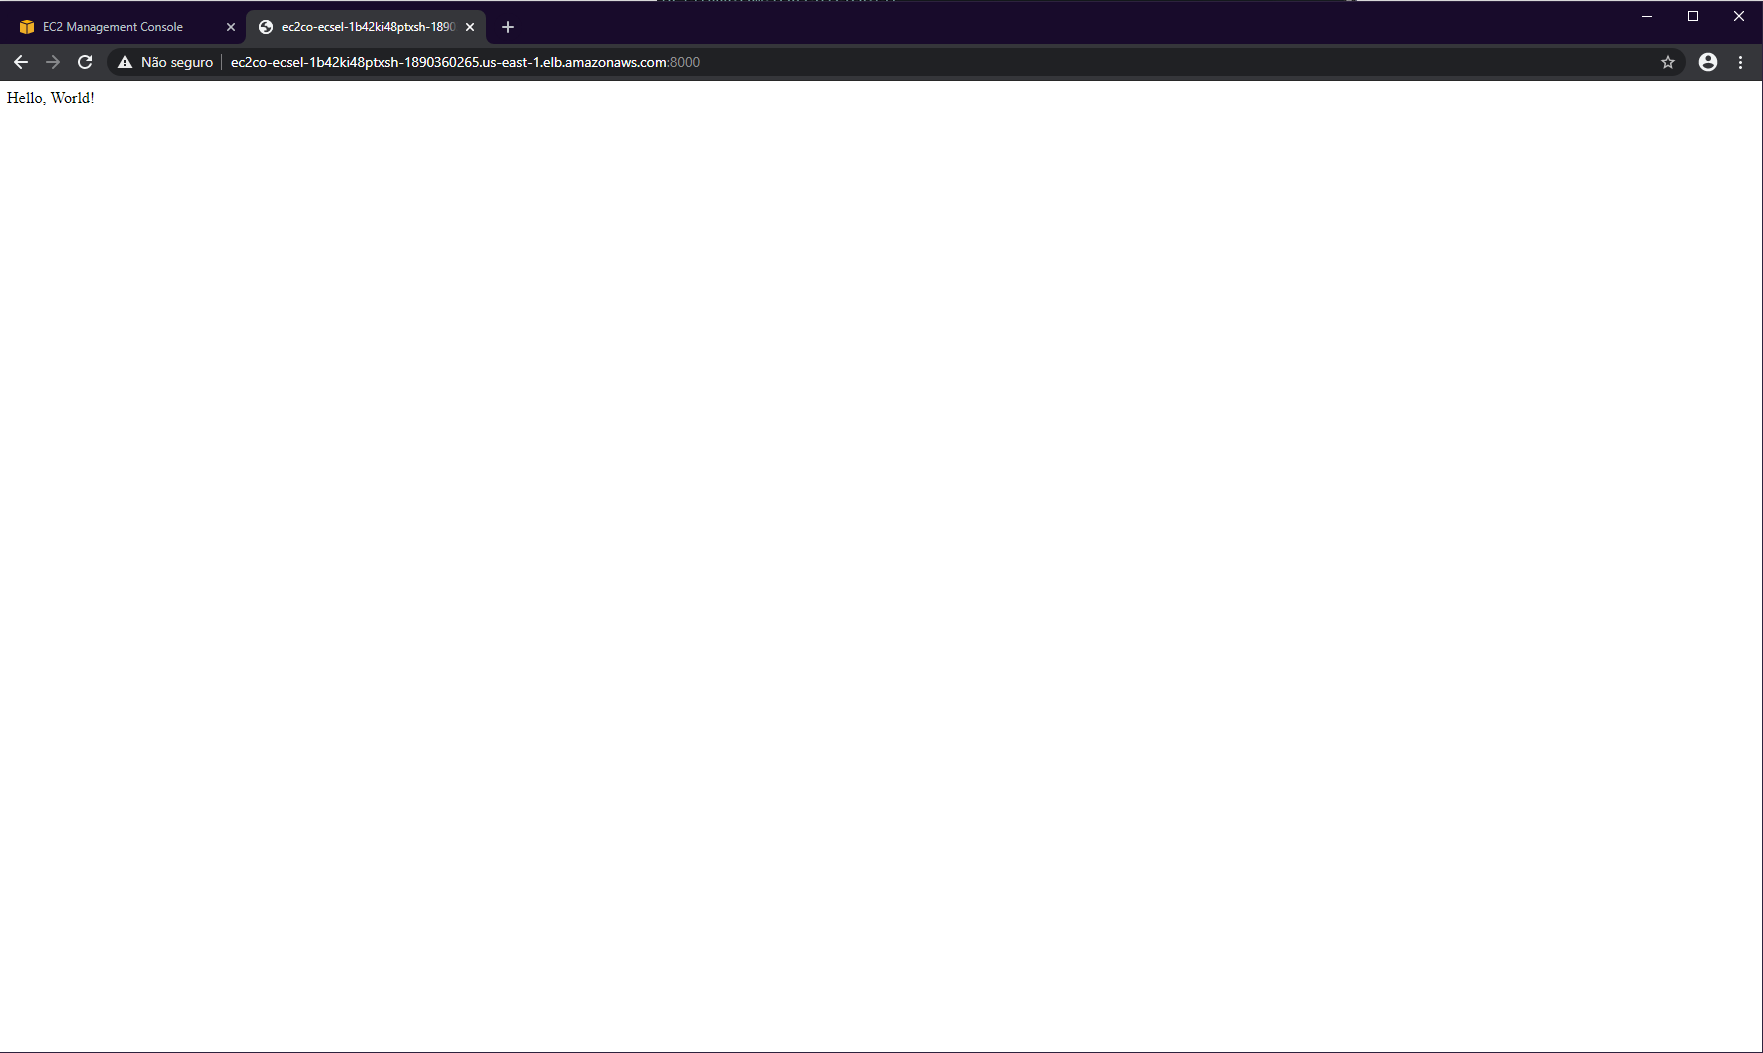
Now everything is set up, on AWS go to load balancer, and on Basic Configuration, copy your DNS Name and search for it on your browser with the port 8000 (or to the port you set up).
现在已完成所有设置,在AWS上转到负载均衡器,在“基本配置”上,复制DNS名称并在浏览器中使用端口8000(或设置的端口)进行搜索。

Our code is running!
我们的代码正在运行!
Now let’s change something on our code and commit it to witness the magic.
现在,让我们更改代码中的某些内容并提交以见证魔术。
Go to Travis and watch it doing all the hard work.
前往Travis并观看它所做的所有辛苦工作。
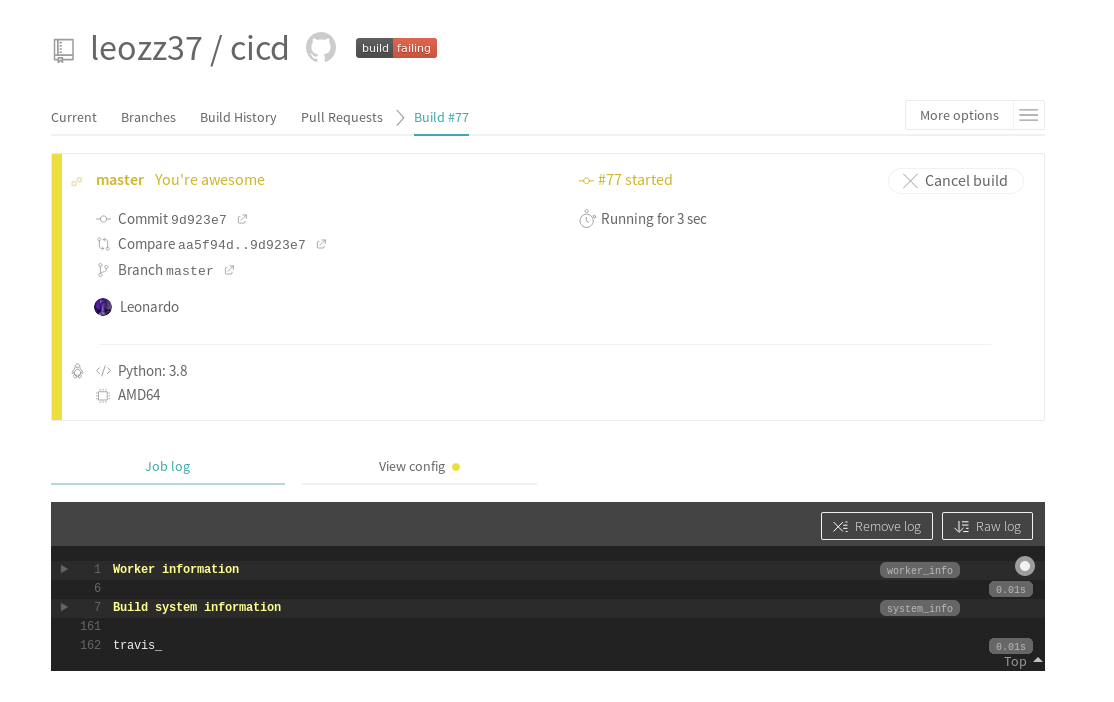
After building and testing, if everything goes well, Travis will deploy our image to Docker Hub and tell ECS that there’s a new version of it.
在构建和测试之后,如果一切顺利,Travis会将我们的映像部署到Docker Hub,并告诉ECS它有一个新版本。

If you refresh your browser, you should see your update.
如果刷新浏览器,应该会看到更新。
And that’s it! You just created a CI/CD environment using (kinda) free tools and everything hosted on the cloud!
就是这样! 您刚刚使用(kinda)免费工具以及云上托管的所有内容创建了CI / CD环境!
容器化ci/cd


 688
688

 被折叠的 条评论
为什么被折叠?
被折叠的 条评论
为什么被折叠?
 到【灌水乐园】发言


