


aws上部署hadoop
Gitlab is a web tool that provides Git repository hosting service along with a lot of services related to DevOps such as continuos integration/continuous deployment pipeline features. This gives developers the possibility of automating the entire DevOps life cycle from build to deployment in the same environment where source code is hosted.
Gitlab是一个Web工具,可提供Git存储库托管服务以及与DevOps相关的许多服务,例如持续集成/持续部署管道功能。 这为开发人员提供了在托管源代码的相同环境中自动完成从构建到部署的整个DevOps生命周期的可能性。
In this article we are focusing on the creation of a file called “.gitlab-ci.yml”, which is responsible for implementing both Continuous Integration and Continuous Deployment functionalities for our project. It creates a pipeline that consists of one or more stages that run sequentially and each stage can contain one or more jobs/scripts that can run in parallel.
在本文中,我们着重于创建名为“ .gitlab-ci.yml”的文件,该文件负责为我们的项目实现持续集成和持续部署功能。 它创建了一个由一个或多个顺序运行的阶段组成的管道,每个阶段可以包含一个或多个可以并行运行的作业/脚本。
In order to run “.gitlab-ci.yml”, it must be placed at the repository’s root and a Gitlab Runner must be installed to execute it. For Gitlab Runner installation, see http://docs.gitlab.com/ee/ci.
为了运行“ .gitlab-ci.yml”,必须将其放置在存储库的根目录下,并且必须安装Gitlab Runner才能执行它。 对于Gitlab Runner安装,请参见http://docs.gitlab.com/ee/ci 。
So, before start scripting the file, first it is important to plan what stages and jobs are needed to achieve desired results to make it as resource efficient as possible.
因此,在开始编写文件脚本之前,首先重要的是要计划需要什么阶段和工作才能获得所需的结果,以使其尽可能地节省资源。
定义阶段 (Defining stages)
Our source code is a front-end React.js based application. This means that:1) lt generates static files for deployment.2) It can be deployed to any hosting that supports static file hosting. In our case we, chose Amazon S3, because it is the easiest option for a front-end deployment under AWS ecosystem.
我们的源代码是一个基于React.js的前端应用程序。 这意味着:1)生成用于部署的静态文件。2)可以将其部署到任何支持静态文件托管的托管。 在我们的案例中,我们选择Amazon S3,因为它是AWS生态系统下前端部署的最简单选择。
Besides, we want to have two environments being one for testing purposes and other for clients.
此外,我们希望有两种环境,一种环境用于测试目的,另一种环境用于客户。
In the face of these conditions, we can divide our “.gitlab-ci.yml” in two stages: build and deploy.
面对这些情况,我们可以将“ .gitlab-ci.yml”分为两个阶段: 构建和部署 。
建立阶段 (Build stage)
In this stage, we generate our application static files. If there are no build commands defined inside “package.json” file under “scripts” property, simply use “npm run build”, “yarn build” or a command according to your package manager of preference.
在此阶段,我们生成应用程序静态文件。 如果在“ scripts”属性下的“ package.json”文件内未定义任何构建命令,只需根据您的软件包管理器的偏好使用“ npm run build”,“ yarn build”或命令。
The build command will generate a “/build” folder containing all of our required static files. We need this folder to be available in the “deploy” stage since its files will be put in S3 bucket.
build命令将生成一个“ / build”文件夹,其中包含我们所有必需的静态文件。 我们需要此文件夹在“部署”阶段可用,因为其文件将放入S3存储桶中。
Here follows the code for the “build” stage:
以下是“ build”阶段的代码:
.yarn_build:
  image: node:10
  script: |
    yarn # Install all dependencies
    yarn build:${APP_ENV} # Build command
  artifacts:
    paths:
      - ./build      yarn_dev:
  extends: .yarn_build
  stage: build
  before_script:
    - export APP_ENV="dev"
  only:
    refs:
      - develop

yarn_prod:
  extends: .yarn_build
  stage: build
  before_script:
    - export APP_ENV="prod"
  only:
    refs:
      - master
In the code above, we define 2 jobs “yarn_dev” and “yarn_prod” that represents our environments for the application. Both extend from “yarn_build” since they define the variable that sets the environment for the build command. We are capable of using yarn for our build command by using “node:10” image (from Docker Hub), which comes with yarn pre-installed. For more information about available node images: https://hub.docker.com/_/node/.
在上面的代码中,我们定义了两个作业“ yarn_dev”和“ yarn_prod”,它们代表应用程序的环境。 两者都从“ yarn_build”扩展,因为它们定义了设置构建命令环境的变量。 通过使用预安装了yarn的“ node:10”映像(来自Docker Hub),我们可以将yarn用于我们的构建命令。 有关可用节点映像的更多信息: https : //hub.docker.com/_/node/ 。
Each job will run depending on the branch the commit was made. A commit in “develop” will trigger “yarn_dev” job and a commit in “master” will trigger “yarn_prod” job. Other branches won’t trigger a pipeline since we want to save resources as much as possible. The “only-refs” configuration gives possibility of multiple branches triggering a pipeline for an environment in case it becomes necessary.
每个作业将根据提交的分支运行。 在“ develop”中的提交将触发“ yarn_dev”作业,在“ master”中的提交将触发“ yarn_prod”作业。 其他分支不会触发管道,因为我们要尽可能节省资源。 “ only-refs”配置提供了在需要时多个分支触发环境管道的可能性。
At the end, we set “/build” folder as an artifact of our build stage for it to be available and accessible in the next stage.
最后,我们将“ / build”文件夹设置为构建阶段的工件,以使其在下一阶段可用和可访问。
部署阶段 (Deploy stage)
In this stage, we send all built static files into our S3 bucket of choice. Given that we have two environments for our application, we created one bucket for each environment. The bucket names are set as environment variables inside our repository settings. To define those variables, just go to “Settings” => CI/CD => Variables section.
在此阶段,我们将所有构建的静态文件发送到我们选择的S3存储桶中。 鉴于我们的应用程序有两个环境,我们为每个环境创建了一个存储桶。 存储桶名称在我们的存储库设置中设置为环境变量。 要定义这些变量,只需转到“设置” => CI / CD =>变量部分。
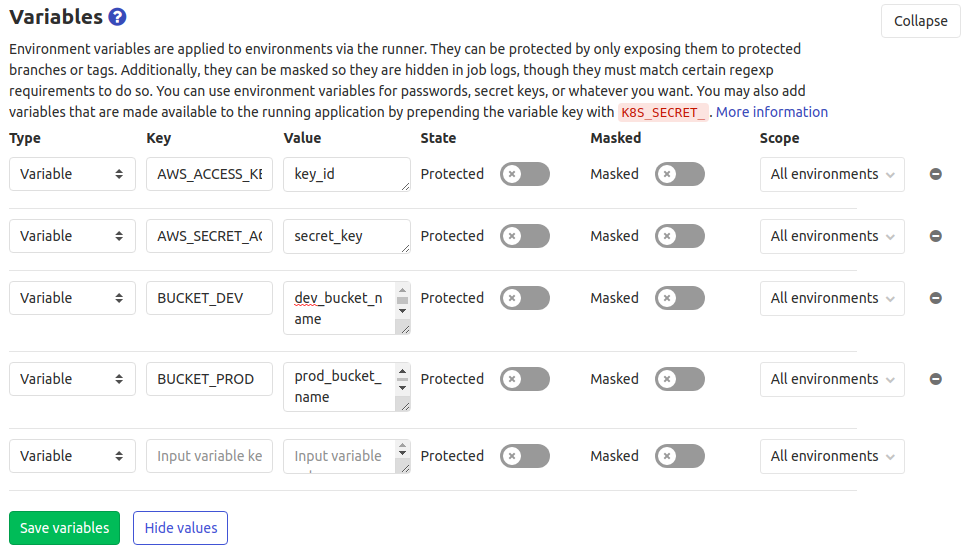
By defining variables here, they are accessible from “.gitlab-ci.yml” without the need of updating the file itself in case of a required update of values.
通过在此处定义变量,可以从“ .gitlab-ci.yml”访问它们,而在需要更新值的情况下,无需更新文件本身。
We defined both bucket names and required AWS credentials in order to run “s3 sync” as shown bellow:
我们定义了存储桶名称和必需的AWS凭证,以运行“ s3 sync” ,如下所示:
.deploy_aws:
  image: python:latest
  when: manual
  script: |
    pip install awscli #Install awscli tools
    aws s3 sync ./build/ s3://${S3_BUCKET}deploy_dev:
  extends: .deploy_aws
  stage: run
  dependencies:
    - yarn_dev
  before_script:
    - export S3_BUCKET=${S3_BUCKET_DEV}
  only:
    refs:
      - develop deploy_prod:
  extends: .deploy_aws
  stage: run
  dependencies:
    - yarn_prod
  before_script:
    - export S3_BUCKET=${S3_BUCKET_PROD}
  only:
    refs:
      - master
We use a python image since it has the most robust awscli implementation. The awscli is installed inside the image using python’s “pip” package manager and, afterwards, a “s3 sync” command can be run to put our static files in the respective bucket. For this command to be successful, this bucket must be already created. For more details on Gitlab deployment, see https://about.gitlab.com/blog/2016/08/26/ci-deployment-and-environments/.
我们使用python图片,因为它具有最可靠的awscli实现。 使用python的“ pip”包管理器将awscli安装在映像中,然后,可以运行“ s3 sync”命令将我们的静态文件放入相应的存储桶中。 为了使该命令成功执行,必须已创建此存储桶。 有关Gitlab部署的更多详细信息,请参阅https://about.gitlab.com/blog/2016/08/26/ci-deployment-and-environments/ 。
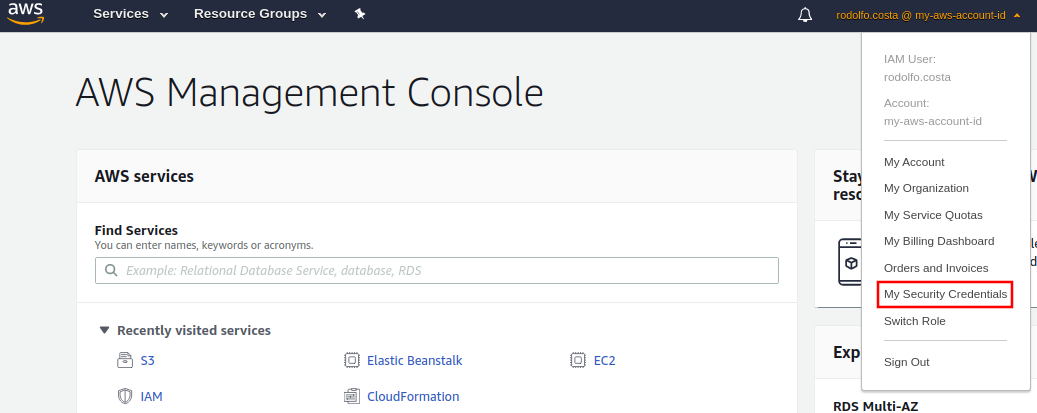
In addition, to run “s3 sync” command, we need both AWS_ACCESS_KEY and AWS_SECRET_ACCESS_KEY to be defined. They can be obtained when you’re logged in your AWS account by going to: “Security Credentials” => “Create access key”.
另外,要运行“ s3 sync”命令,我们需要同时定义AWS_ACCESS_KEY和AWS_SECRET_ACCESS_KEY 。 当您登录AWS账户时,可以通过以下方式获取它们:“ Security Credentials” =>“ Create access key”。
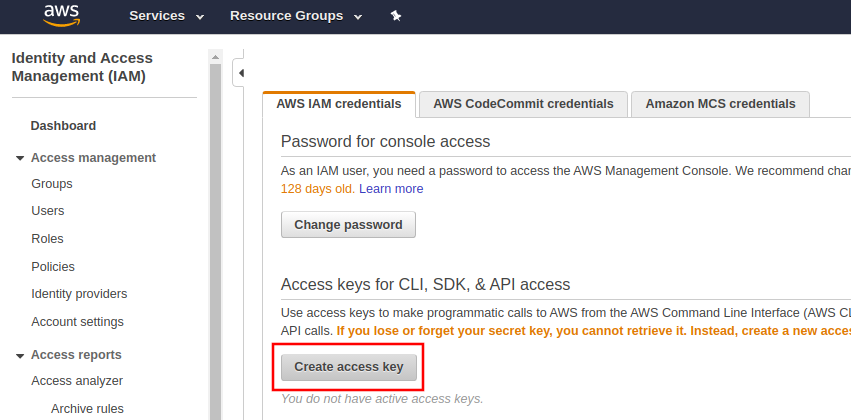
After clicking the button, a dialog with both values will appear. Once the dialog is closed, you won’t have access to them again if you didn’t choose to download credentials as a .csv file.
单击按钮后,将出现一个包含两个值的对话框。 对话框关闭后,如果您未选择将凭据下载为.csv文件,则将无法再访问它们。
AWS Web托管 (AWS Web Hosting)
After running “.gitlab-ci.yml” successfully, all static files should be inside the bucket. But that doesn’t mean they are already being served. To get that capability, first open your bucket. It opens with “Overview” tab selected, select “Properties” tab and some cards will appear. Choose “Static website hosting” as shown bellow.
成功运行“ .gitlab-ci.yml”后 ,所有静态文件都应位于存储桶中。 但这并不意味着他们已经被送达。 要获得该功能,请先打开您的存储桶。 它会打开,并选择“概述”选项卡,选择“属性”选项卡,然后会出现一些存储卡。 选择“静态网站托管” ,如下所示。
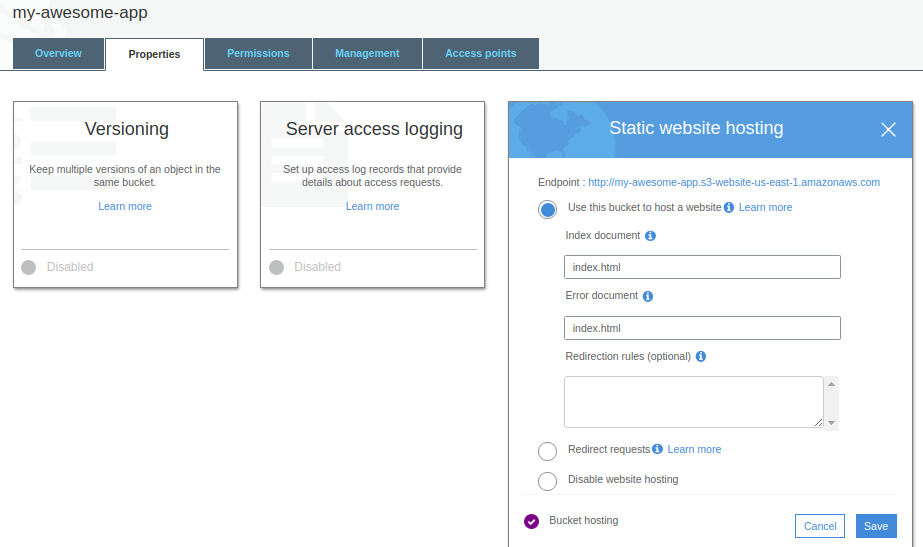
With the card open, select “Use this bucket to host a website”, fill both “Index document” and “Error document” with index.html and save. After that, an endpoint will be created, but won’t be accessible yet.
打开卡片后,选择“使用此存储桶托管网站”,并用index.html填充“索引文档”和“错误文档”并保存。 此后,将创建一个端点,但尚无法访问。
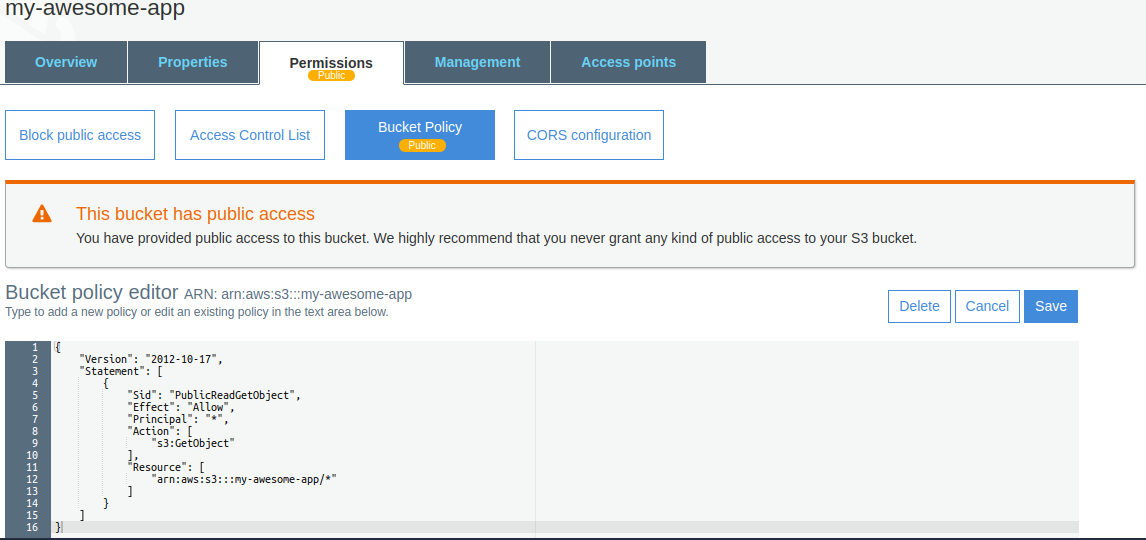
To enable public access to your endpoint, go to “Permissions” tab and add the following bucket policy:
要启用对端点的公共访问,请转到“权限”选项卡并添加以下存储桶策略:
{
    "Version": "2012-10-17",
    "Statement": [
        {
            "Sid": "PublicReadGetObject",
            "Effect": "Allow",
            "Principal": "*",
            "Action": [
                "s3:GetObject"
            ],
            "Resource": [
                "arn:aws:s3:::my-awesome-app/*"
            ]
        }
    ]
}
Inside “Resource” object, insert your bucket name and click on “Save” button. From now on, the “Permissions” tab will show a Public badge.
在“资源”对象内,插入您的存储桶名称,然后单击“保存”按钮。 从现在开始,“权限”标签将显示一个公共徽章。
That’s awesome! Now we have our React app hosted and accessible from anywhere!
棒极了! 现在,我们可以托管React应用,并且可以从任何地方访问!
结论 (Conclusion)
With all stages and variables defined, we can create a simple yet powerful script that automates the whole process of deployment of our application. From now on, we don’t need to worry about how to proceed with deployment everytime we want to do it.
在定义了所有阶段和变量之后,我们可以创建一个简单而功能强大的脚本,该脚本可以自动化应用程序部署的整个过程。 从现在开始,我们不必担心每次想要进行部署时都该如何做。
The script itself is easy to read and understand and is flexible enough to scale according to application demands and/or team strategies.
该脚本本身易于阅读和理解,并且足够灵活,可以根据应用程序需求和/或团队策略进行扩展。
Here’s the whole “.gitlab-ci.yml” file:
这是整个“ .gitlab-ci.yml”文件:
翻译自: https://medium.com/@rodolfombc/deploying-a-react-app-on-aws-with-gitlab-ci-1a9c3222f786
aws上部署hadoop


 2357
2357


 被折叠的 条评论
为什么被折叠?
被折叠的 条评论
为什么被折叠?
 到【灌水乐园】发言


